Basic Seamanship: Rope splice. Back Slice and Crown Knot
Hello friends!
Today I will show how to make some rope splices with real examples from the ship that I work in.
But first I will explain little bit about the knots used.
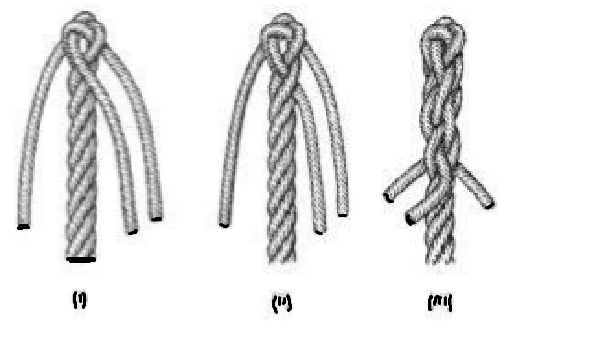
The Back splice is used to stop the end of a rope unraveling but because it creates a greater thickness at the end of the rope it can make tying subsequent knots and lashing with the rope slightly more difficult.
How to make a back splice:

Unlay more than sufficient to make the splice and spread the strands evenly.
Make a crown knot by bending each end over its neighbor in turn, going the same way around as the lay of the rope.
How to make a crown Knot:

- spread out the strands;
- Choose one strand and, continuing around in the direction of the rope's twist lay it across its neighbor.
- Repeat with that strand.
- Repeat with the remaining strand tucking it under the first.
- Tighten it to form the first part of a Back Splice.
- Tuck each end in turn over the adjoining main strand and under the next.
- Draw tight close to the crown knot.
- Continue in this fashion until you’ve made at least three tucks. Draw the ends tight after each round of tucks
Ok now that we know the way we start to do it for real!
These photos were made on board Celebrity Summit in a day that we had to splice some ropes.
So we start by unraveling the strands:

Then we join the strands


Now this next part may be hard …or let’s say difficult to understand but what you have to do is just put one strand in another strand.
I for example I like to count to three:
- One down
- Two up
- Three down


After that we have some lose strands these we tie with rope and a band (the black band) and then we cut and burn them.


Well I hope you enjoyed my small guide I am Cynetyc and I will see you next time!


cynetic dude thanks for the steps and you have me as your follower now! I love thatI discovered your blog!
Thank you very much for reading, appreciating and following as well! I do my best to show in my small blog about my life, my opinions, guides and places that I visited .
Wahh. it seems like to hard to have these kind of knots. actually we do not evolve this kind of activity, so thank you very much for sharing these valuable contents with us, appreciate your skills my friend
Thank you very much @futuresmart for reading and appreciating my article.
you are welcome my friend
That's one steady knot ^^
Yep it is super strong!
Oo wow interesting to see this. Tnx for sharing
Thanks very much @zoef I am glad you liked my small guide!
I'm trying this one tonight!
Thanks for sharing
Awesome @haberg, I am glad you liked it ! In my post we had many strands for the rope because it need to be super strong, but if you want to learn the best way is to start with 3 strands and then count as you make the knots.
That seems kind of hard
but will try it some time ,Nice work Buddy you do Up there
You are right @rehan12 these knots require special attention and a lot of patience because they will keep our vessel moored.
Keep up the good work buddy
Knoting expert you are :) hehe :D
Thank you @hassanabid!
nice to see you again :D
wow that was really nicely done i would love to try this too thanks for the step by step post :D
Thank you very much for reading and appreciating my post @blazing!
thanks for sharing
great post...I'm trying this one tonight...........upvoted and re-steem