Viewing Steem Blockchain Data in a Web Browser. Part 6: Using the Steem API CDN and the getAccounts() function, and examining the account data model
This is part 6 of a series of posts that describe how to use the Steem Javascript API to display data from the Steem blockchain on a webpage. The first five posts discussed setting up basic HTML and using simple javascript to modify it.
- Part 1: Text editors and minimal HTML
- Part 2: Metadata, Unicode, and inline CSS
- Part 3: Metadata, nav and footer bars, divs, and HTML entities
- Part 4: Forms, scripts, and the developer console
- Part 5: Using HTML id attributes to modify HTML elements using Javascript
Here, the Steem Javascript API will finally be used to retrieve some user data from the Steem blockchain and display it in our web page. The coding in most of this post alters the final HTML document in Part 5 of this series. Some of this might be confusing if you haven't looked at that HTML document.
Adding the CDN
First we will add the CDN for the API to the “head” section of the HTML document from Part 5. CDN stands for “content delivery network”. CDNs are often used to deliver javascript and CSS libraries to a client web browser. When an HTML document is loaded in your browser, it is usually loaded from a remote server. The remote server sends the HTML document, its styling files, and its javascript files and all of the supporting markup and programs are loaded into your browser when the web page is loaded. These things get to you faster when the web server is physically closer to you since this usually means that the information has to travel a shorter path through fewer “relay stations”.
CDNs are “networks” of servers that contain software libraries so that, for example, the javascript code from a library can be sent to your browser from a closer location than that of the server that sends the HTML document itself. The page is then likely to load faster and work more robustly for you. The alternative to using a networked source for libraries is to have the library locally installed on the web server and sent with the HTML document to a client.
The location of the CDN and how to use it in a script tag is noted in the Steem Javascript API documentation under the CDN heading. We put the script tag in the head part of our HTML document like so:
<head>
    <meta charset="utf-8">
    <meta name="viewport" content="width=device-width,initial-scale=1">
    <meta name="description" content="Hello Steemit User">
    <script src="https://cdn.steemjs.com/lib/latest/steem.min.js"></script>
    <title>Hello Steemit User</title>
</head>
(In practice, if there is trouble with loading libraries from a particular CDN that may hang up often, the web server can have a locally-installed version of the javascript library that can be served more reliably.)
steem.api.getAccounts()
Now that we have the CDN in the head section of the HTML document, the Steem Javascript api will be loaded when we load the HTML document and we can use its functions in our javascript. The first function we will use is in the examples section of the documentation. It is called steem.api.getAccounts().
The documentation for the function getAccounts says:
 steem.api.getAccounts(['ned', 'dan'], function(err, result) {
    console.log(err, result);
});
The function "getAccounts" belongs to an "api" object which belongs to a "steem" object. The function takes two arguments. This first is an array and the second is a function. A javascript programmer recognizes an array by the presence of square brackets ‘[]’. In javascript, an array is a collection of “things” in the form of a list indexed by their location in the list. The “things” can be numerical values, strings, Booleans, other arrays, objects, or even functions. Here, the getAccounts function expects to be passed an array of strings. getAccounts uses those strings to extract account information of each user on the steem blockchain. After that information is extracted, getAccounts passes the account information or an error to a function, which is the second argument of getAccounts, that is supposed to do something with the account information or error message. This function is called a “callback”. If getAccounts can’t return a proper "result", it returns an error. If it can return the result, then "err" is "null".
Javascript anonymous and named functions
The documentation shows the use of an “anonymous” function. The function has no name. Anonymous functions are often used in javascript when a block of code is used only once or to assign the function to a variable or put it in an array or object.
Javascript provides both anonymous and named functions. To declare a function named "writeToConsole" that writes the contents of two things to the console, write:
function writeToConsole(err,result){
  console.log(err,result);
}
Instead of using "function" and then the name of the function, you can also declare and name the function by writing an anonymous function and putting it into a variable like so:
var writeToConsole = function(err,result){
  console.log(err,result);
}
Another way of writing an anonymous function uses “=>” instead of "function" like so:
var writeToConsole = (err,result) =>{
  console.log(err,result);
}
Regardless of the declaration structure, you can put a named callback function into getAccounts like this:
steem.api.getAccounts([‘ned’,’dan’],writeToConsole);
Also, because an anonymous function can be declared using “=>”, you could replace function(err,result) in the documentation and write:
steem.api,getAccounts([‘ned’, ’dan’], (err,result)=>{
  console.log(err,result);
});
The combination of curly brackets, parentheses, and semicolons at the end of the function call results from inserting an anonymous function as an argument in a function call. Javascript functions are a special type of object so you can put them in variables, arrays, and other objects.
Using steem.api.getAccounts to log user's data to the console
Let’s put the function from the documentation into a function called “showUserData” in the javascript in our HTML document. We erased the "helloUser" function from previous posts because we aren’t using it any more but retain the lines of code that give us a reference to the form element and extract the input text value (the user's name) from the form. The new script element looks like this (remember that you must put the CDN for the steem-js API into the head section of the document to be able to call the "getAccounts" function):
<script>
      function showUserData() {
        var inputForm = document.getElementById("nameForm");
        var uName = inputForm.elements["sUser"].value;
        steem.api.getAccounts(['ned', 'dan', uName], function(err,result){
          console.log(err,result);
        });
      }
</script>
The opening markup tag for the form in the HTML document from Part 5 must be changed to run the showUserData function when the form is submitted like so:
<form action="#" onsubmit="showUserData();return false;" id="nameForm">
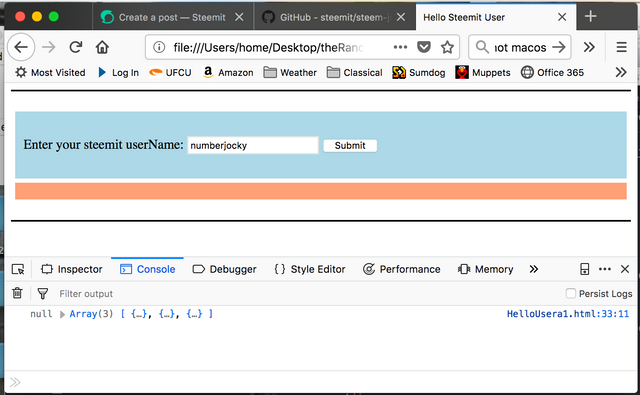
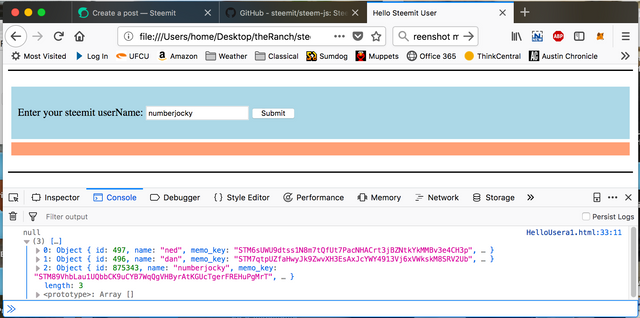
When we alter the HTML document from Part 5 in a text editor, save the file with an .html suffix, and load the file into our web browser and then enter a user name in the form and press the submit button, the data for that user account along with the data for ned and dan is logged in the console and the browser looks like this:
Examining the data model
In the console are the word "null" corresponding to what is in "err" and "Array (3) [ {...}, {...}, {...} ]" corresponding to what is in "result". Array (3) indicates an array with 3 things in it and the three sets of curly brackets "{}" inside of the square brackets "[]" indicate that those things in the array are "Objects".
Each “Object” in the array returned by "getUserAccounts" contains data for a particular user. To figure out which user the “Object” belongs to, the value of the “name” property of the “Object” must be retrieved. To see a few of the properties or "keys" of the Objects, click on the right-pointing grey arrow next to the word "Array" to expand the array. After expanding the array, the web browser looks like this:
The first few keys that you can see are "id", "name", and "memo_key". The values of the "id" keys are numbers and the values of the "name" and "memo_key" keys are character strings. The value of the "name" key tells us the name of the account that the Object belongs to.
Javascript "Objects"
“Objects” are special kinds of things in javascript. An Object in javascript is usually called a dictionary, a struct, or a hash table in other languages. It is a somewhat confusing name because things are often called “objects” in javascript programming without being formal “Objects”. An Object in javascript is a set of key, value pairs in which values are accessed using their keys. The keys of an Object are unique character strings. The values in an Object can be numbers, strings, Booleans, arrays, maps, functions, or any other type of object (types of objects can be defined by the programmer using object “constructors”).
Let’s look at the data model of the data returned for only one user by getAccounts. To do this, we will modify our function to only print the first object in the array to the console. The new showUserData function looks like this:
<script>
      function showUserData() {
        var inputForm = document.getElementById("nameForm");
        var uName = inputForm.elements["sUser"].value;
        steem.api.getAccounts([uName], function(err,result){
          console.log(err,result[0]);
        });
      }
</script>
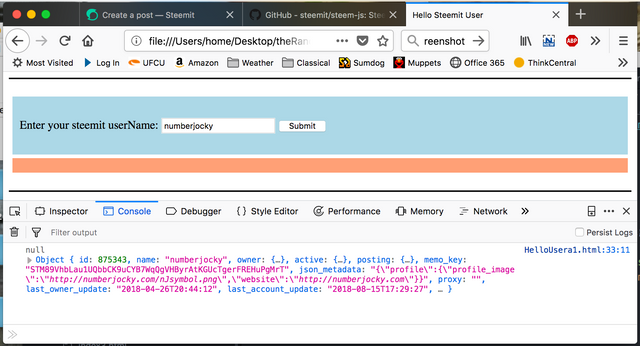
After the developer console is opened and the "submit" button is pushed, there is an Object in the console.
The object has key value pairs separated by commas and corresponding keys and values separated by colons. Curly brackets indicate that the data is in an Object (as opposed to an array or a character string). Examining the Object in the console by clicking on the right-pointing grey arrow next to the word "Object" allows you to examine the possible keys of the Object. After you expand the Object, it looks something like this:
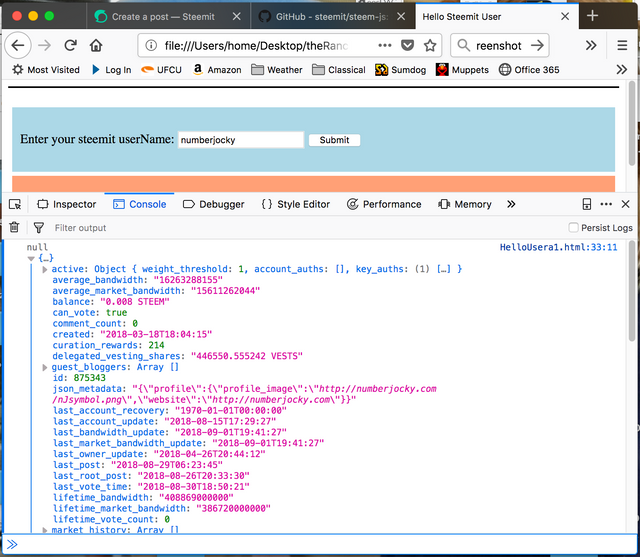
If you scroll down through the Object, you will notice that the data model Object contains other Objects, strings, Booleans, numbers, and arrays as values of its keys.
Retrieving values from the data Object and displaying them
Let’s retrieve a value from the data Object and print it in the console. The way to retrieve a value from the Object is to write ObjectName.key or ObjectName['key']. So, for example, if we wanted to see the values of the "name" and “sbd_balance” keys, we would print result[0].name and result[0].sbd_balance to the console like so:
<script>
      function showUserData() {
        var inputForm = document.getElementById("nameForm");
        var uName = inputForm.elements["sUser"].value;
        steem.api.getAccounts([uName], function(err,result){
          console.log(result[0].name);
          console.log(result[0].sbd_balance);
          console.log(err,result[0]);
        });
      }
</script>
Printing the name and sbd_balance values in the console looks like this:
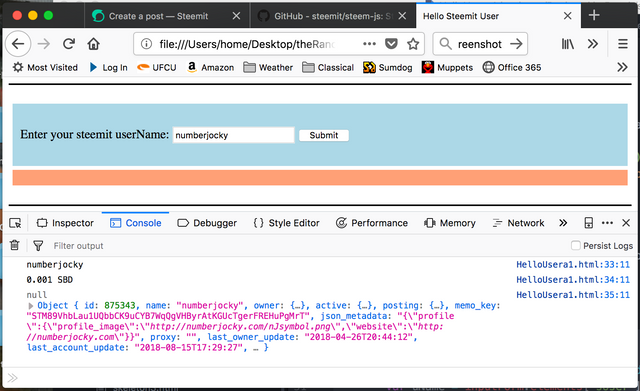
The value of "name" is a character string and the value of "sbd_balance" is a character string with two words.
Now, let’s retrieve the name and sbd_balance from the data Object and display them in our web page. We will put them in the div placeholder element from Part 5 in this series. Here is the new "showUserData" function:
<script>
   function showUserData() {
        var inputForm = document.getElementById("nameForm");
        var uName = inputForm.elements["sUser"].value;
        var dataViewEl = document.getElementById("dataView");
        steem.api.getAccounts([uName], function(err,result){
          var userData = result[0];
          var theText = '<p>';
          theText = theText+'User Name: '+userData.name+'<br>';
          theText = theText+'SBD Balance: '+userData.sbd_balance;
          theText = theText+'</p>'
          dataViewEl.innerHTML = theText;
        });
   }
</script>
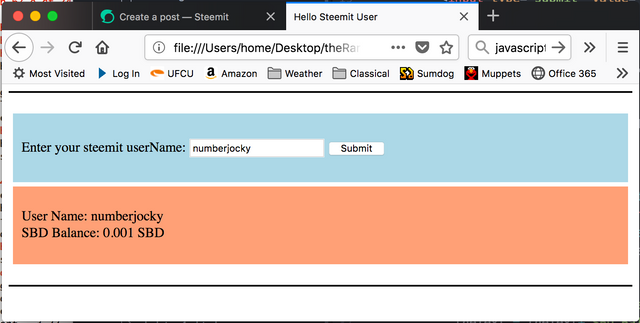
InPart 5 of this post series we discussed "document", "getElementById", "elements", and "var" so we will not discuss those here. A new variable named "userData" is set to the result[0] Object, then the HTML that will be put into the div placeholder element as a character string starting and ending with paragraph tags(<p></p>) is put into the "theText" variable. There is a line break (<br>) after the first line to separate it from the second line when it is displayed. Also notice that we are able to access dataViewEl from inside the callback function. This ability is made possible by the scope of the dataViewEl variable. The variable is declared outside the callback function so it can be accessed and modified inside the callback function. However, variables declared inside the callback function are not accessible outside the callback function.
After entering a user's name and clicking on the submit button, the web browser display looks like this:
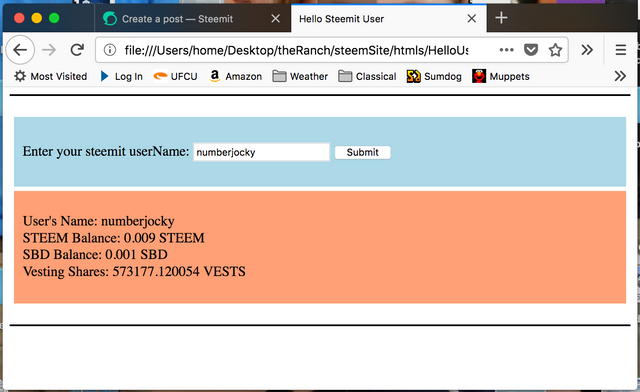
Now we will display the user's name, their STEEM Balance, their SBD Balance, and their Vesting Shares in the placeholder div. The final HTML file with CDN in the head section and the showUserData function is:
<!DOCTYPE html>
<html>
  <head>
    <meta charset="utf-8">
    <meta name="viewport" content="width=device-width,initial-scale=1">
    <meta name="description" content="Hello Steemit User">
    <script src="https://cdn.steemjs.com/lib/latest/steem.min.js"></script>
    <title>Hello Steemit User</title>
  </head>
  <body>
    <nav style="border: 1px solid black">
    </nav>
    <br>
    <div style="background-color: lightblue; padding: 10px; margin: 5px">
      <br>
      <form action="#" onsubmit="showUserData();return false;" id="nameForm">
        Enter your steemit userName: <input type="text" name="sUser" id="userNid">
        <input type="submit" value="Submit">
      </form>
      <br>
    </div>
    <div id="dataView" style = "background-color: lightsalmon; padding: 10px; margin: 5px">
    </div>
    <br>
    <footer style = "border: 1px solid black">
    </footer>
    <script>
      function showUserData() {
        var inputForm = document.getElementById("nameForm");
        var uName = inputForm.elements["sUser"].value;
        var dataViewEl = document.getElementById("dataView");
        steem.api.getAccounts([uName], function(err,result){
          var userData = result[0];
          var theText = '<p>';
          theText = theText+'User\'s Name: '+userData.name+'<br>';
          theText = theText+'STEEM Balance: '+userData.balance+'<br>';
          theText = theText+'SBD Balance: '+userData.sbd_balance+'<br>';
          theText = theText+'Vesting Shares: '+userData.vesting_shares;
          theText = theText+'</p>';
          dataViewEl.innerHTML = theText;
        });
      }
    </script>
  </body>
</html>
Putting this HTML into a text file and loading into your browser and putting in a user's name and pressing the submit button results in something that looks like this:
Hello! Your post has been resteemed and upvoted by @ilovecoding because we love coding! Keep up good work! Consider upvoting this comment to support the @ilovecoding and increase your future rewards! ^_^ Steem On!

Reply !stop to disable the comment. Thanks!
Thank you!