JavaFX - Tools of the Trade - Eclipse
Moving on to Eclipse, from the previous post featuring the NetBeans IDE.
I used Eclipse 2020-12 for this article.

Pretty, isn't it?
I will assume you have the JavaFX SDK downloaded and unpacked or (alternatively) know or are willing to setup a maven JavaFX project; also you need SceneBuilder installed.
Setting up SceneBuilder
Go to Window > Preferences; in that window there's a treeview. Go to General > Editors > File Associations. In the main panel there's a "File types" list; search for "*.fxml" and if not found add it. Then in the lower part of that panel there's the "Associated editors" list where you can see / add / remove / set as default the editors for the file type selected in the list above. Clicking on the "Add" button next to the lower list will display the "Editor Selection" dialog where you can choose from one of the internal editors or select / browse for external programs. In our case we'll browse for the local SceneBuilder installation.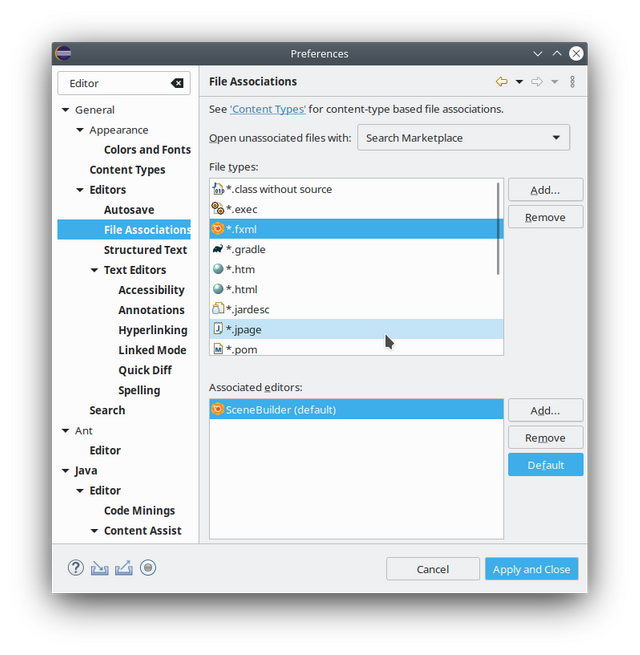
Setting up the JavaFX library
Window > Preferences. In the tree view, select Java > Build Path > User Libraries.
Click on "New", type in the library's name (such as "JavaFX 13") and hit "OK". The library has been added into the listview; now click on the "Add External JARs..." button; a file selection dialog appears where you can browse to your JavaFX library location and select all the jars in there. When done it should look like this:
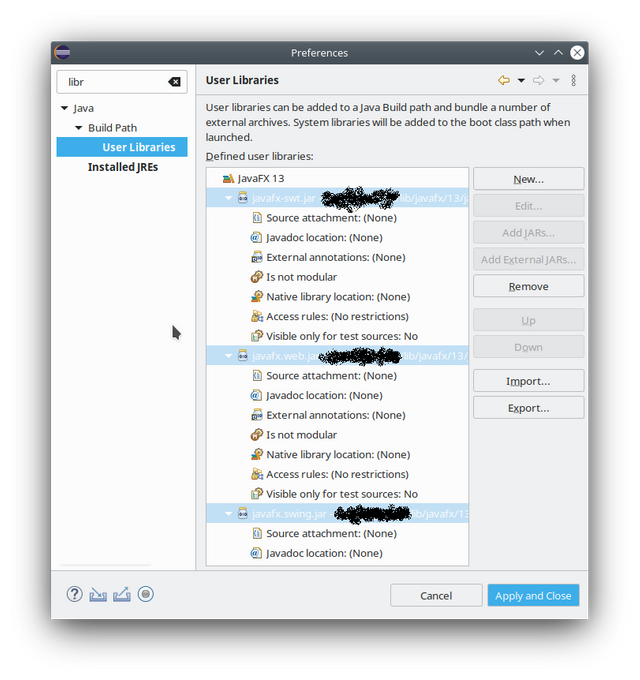
Notice that you can go ahead and set the location for sources and javadoc, for each jar file.
A simple JavaFX project
Go to File > New > Java Project
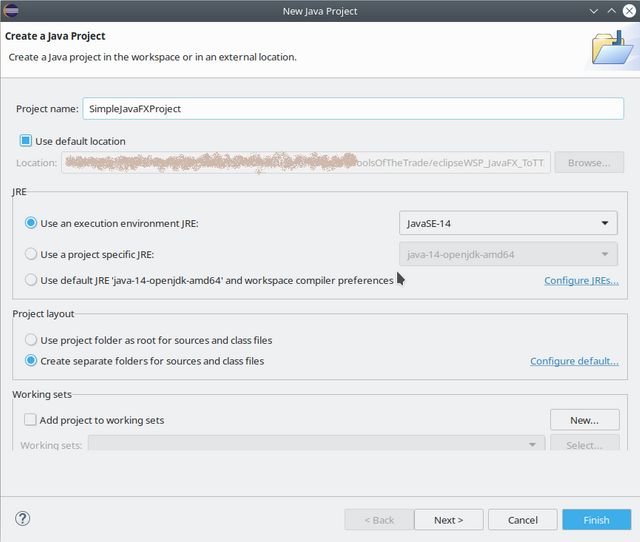
Click "Next" and you're presented with the "Java Settings" step of the wizard. Here in the "Source" tab you should have the "Create module-info.java file" checkbox checked.
Select the "Libraries" tab, select "Modulepath", click on "Add Library..." then in the dialog that opens up select "User Library", hit "Next" select the previously defined "JavaFX 13" library and click "Finish".

Eclipse will ask you to enter a module name, enter one and click "Create".
In the left-hand Package Explorer right click on the "src" folder, select "New" > "Package"; the "New Java Package" dialog show up, enter a package name such as "simplejavafxproj" and hit "Finish".
In the Package Explorer the new package shows up under "src"; right click and select "New" > "Class"; enter a class name such as "SimpleJavaFXApp", write "Application" in the superclass textbox, hit "Browse" and double click on the Application class from the javafx.application package. Check the "public static void main" checkbox and hit "Finish".
The generated source code file will have an import statement underlined in red; the Application superclass after the extends keyword will also be underlined.
Move the caret & Ctrl+1 on the import statement and the IDE offers to "Add 'requires javafx.graphics' to module-info.java".
Now the "SimpleJavaFXApp" should be underlined; Ctrl+1 on it and the IDE gives us the "Add unimplemented methods" option; select that and the public void start method appears, which should look like so:
    @Override
    public void start(Stage stage) throws Exception {
        FXMLLoader fxmlLoader = new FXMLLoader(NewMain.class.getResource("newFXML.fxml"));
        var scene = new Scene(fxmlLoader.load(), 640, 480);
        stage.setScene(scene);
        stage.show();
    }
Now, in Package Explorer right-click on the package, select "New" > "File"; in "File name:" enter "newFXML.fxml" and hit "Finish". Right click on the newly created file and select "Open with" > "SceneBuilder".
Once SceneBuilder is up and running follow the same steps as in the previous article. Don't hate me for the URL fragment not working; hate the rules of the game - steemit drops the IDs from html elements; just search for "Now let's add a new FXML file". Design the fxml file in SceneBuilder as described in that article, save it and then select "View" > "Show Sample Controller Skeleton". A dialog appears with the Java source code for a controller for that fxml file; you can experiment with the "Comments" and "Full" checkboxes.
Copy the controller code and paste it into a new Java class that you'll create in Eclipse; now back in SceneBuilder you can write that newly-created controller class' fully qualified name into the "Controller class" textbox (in the "Controller" section in the lower-left corner - the "Document" pane).
The controller should look like so:
public class NewFXMLController {
    @FXML
    void sayHello(ActionEvent event) {
        System.out.println("Hello!");
    }
}
Right click on the project > "Run As" > "Java Application" and you should see this error in the IDE's console:
Exception in Application constructor
Exception in thread "main" java.lang.reflect.InvocationTargetException
...yada yada yada...
Caused by: java.lang.IllegalAccessException: class com.sun.javafx.application.LauncherImpl (in module javafx.graphics) cannot access class simplejavafxproj.SimpleJavaFXApp (in module simpleJavaFXProject) because module simpleJavaFXProject does not export simplejavafxproj to module javafx.graphics
...yada yada <BigStackTrace> yada...
Now, the last inner exception (the line starting with "Caused by") tells us that it's "because module simpleJavaFXProject does not export simplejavafxproj to module javafx.graphics". We solve that by adding the following lines into
module-info.java:
exports simplejavafxproj;
opens simplejavafxproj to javafx.graphics, javafx.fxml;
Another exception ultimately caused by
Caused by: java.lang.ClassNotFoundException: javafx.scene.control.Button
requires javafx.controls;
module-info.java.Finally when running it should look like so:  )
)
A Maven JavaFX project
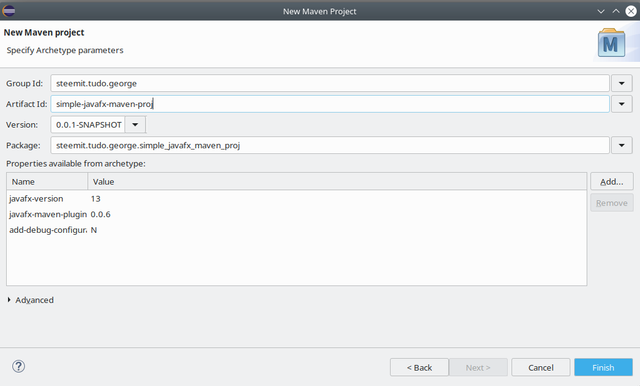
In the Eclipse main menu, select "File" > "New" > "Project..."; select "Maven" > "Maven Project"; hit "Next" and type "openjfx" in the Filter textbox (it should be visible in the "Maven Central" catalog). Select the "javafx-archetype-fxml" artifact id and hit "Next". Enter the required group ID, artifact ID and package name and hit "Finish".
In Project Explorer right click on the project, select "Run As" > "Java Application" and... stuff should get displayed. You can open the various java source files and fxml files that were automatically created by the new project wizard & maven archetype.