Pick-up replacement to an electric guitar mod. Stratocaster / Sostituzione pick-up ad una chitarra elettrica mod. Stratocaster
Pick-up replacement to an electric guitar mod. Stratocaster (single coil pick-ups)
Welcome back friends, today we see how to replace pickups on our guitar and how to make a shield against the parasitic frequencies we talked about last time. Even if you don't want to replace the pick-ups, I strongly suggest you make the shielding on your guitar, it's worth it!
Follow me in this adventure. Sorry for the quality of the photos but I made them with the computer's webcam. We proceed!
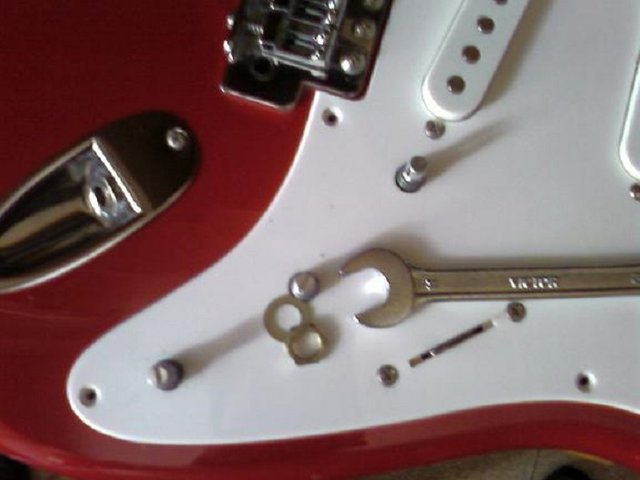
- First, remove the tone and volume knobs, levering under them with a small screwdriver, without straining too much. They are applied by pressure.
To remove the selector cap simply pull it firmly. Do not use pliers to avoid damaging it unless you want to replace it.
Now that we have removed the knobs, with an 11 wrench we can unscrew the three nuts that fix the potentiometers to the mask.
After removing them, let's not forget to remove the two screws that hold the selector.
Obviously remember to unscrew all the screws that hold the mask attached to the guitar body.
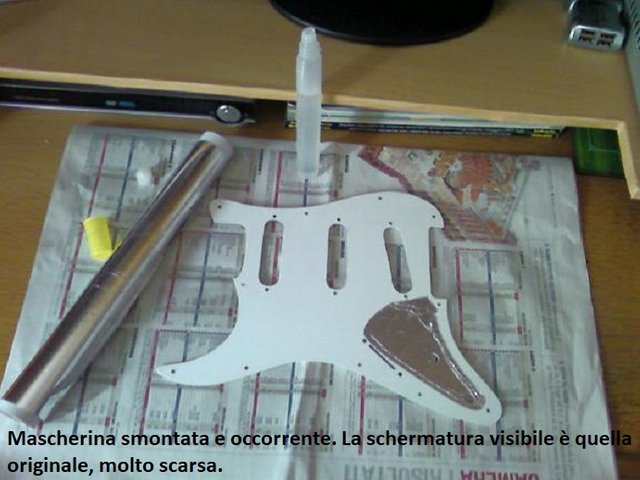
Before proceeding to the actual work, I thought of creating a shield to reduce the parasitic frequencies picked up by the pick-ups.
The work is quite simple and we can use material already present in the house. We need glue and aluminum foil.
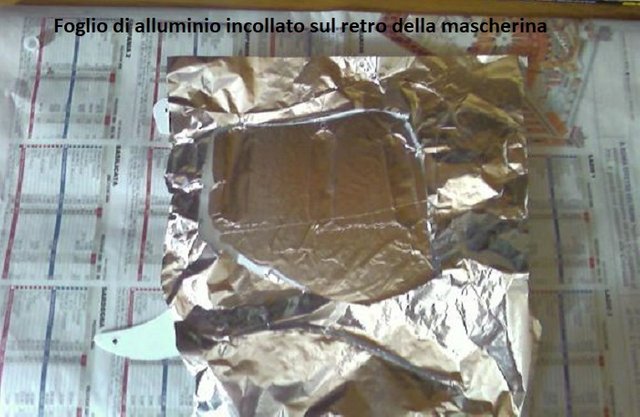
- Spread the back of the mask over with glue, trying to get close to the edges of the pick-up holes.
- Subsequently we take a sheet of aluminum (type Domopack) and let it adhere well to the back surface of the mask avoiding to create air bubbles.
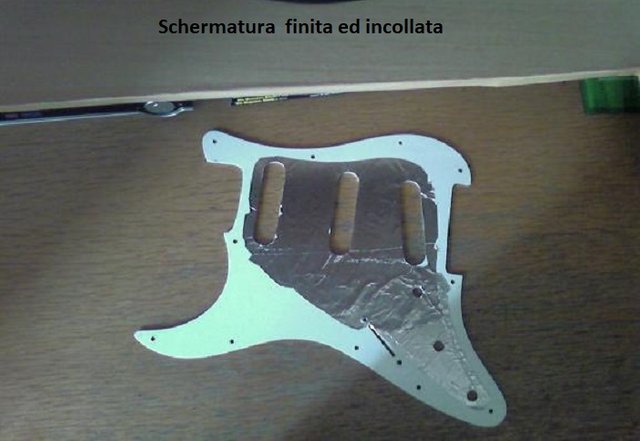
- Once the excess aluminum foil has been removed, the mask must appear as in the photo below:
- Now that we have removed the potentiometer nuts, we can easily remove them from their seat and then proceed to disassemble the pick ups.
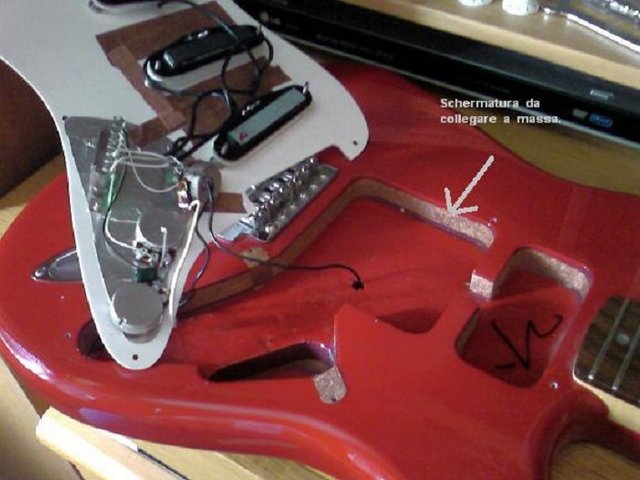
In this phase I made a further shielding (gray arrow) with coppery adhesive tape that runs along the edge of the recess and which will then obviously be connected to ground. It is not obligatory to do so, only the shielding of the mask is fine, but adding this other creates a sort of Faraday cage that improves protection against background noise picked up by magnets.
- Now we can remove the pick-ups from the mask, paying close attention to the adjustment springs that can "jump" once the sealing screws have been completely unscrewed.
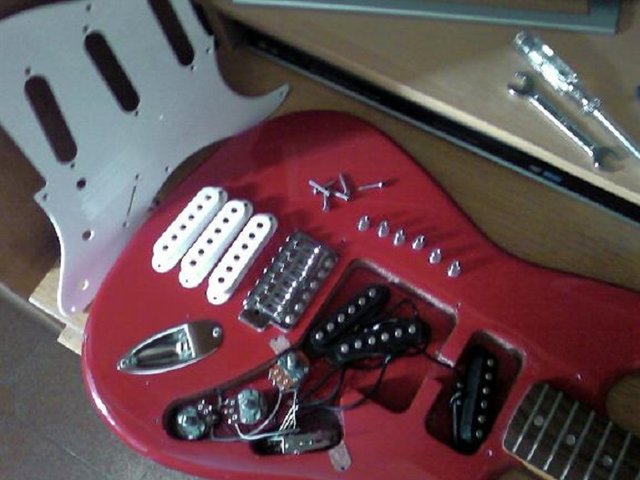
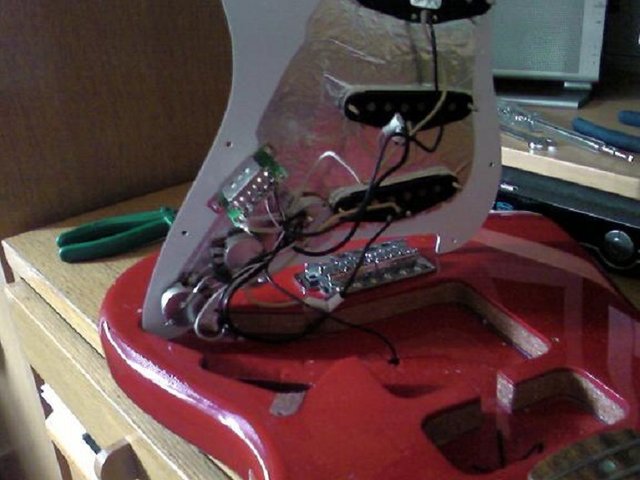
The disassembled guitar of its elements presents itself this way. Note the three white pickup caps, the six screws and the six springs that hold the pick ups to the mask.
- Now remove the old pick-ups by unsoldering or cutting the connection cables from the selector pins and from the ground on the volume potentiometer.
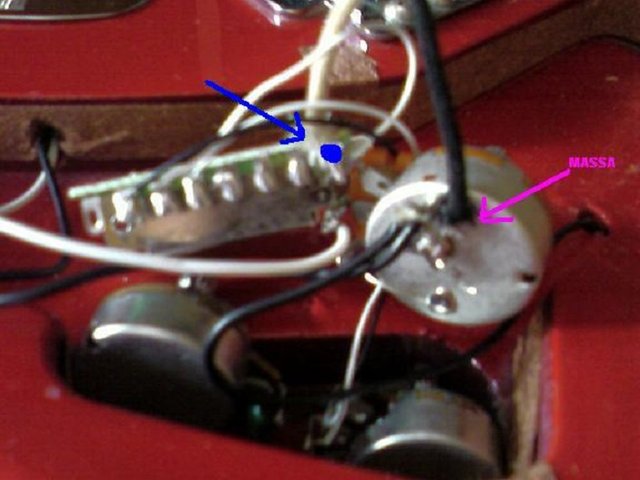
Now we can begin to assemble the new pick-ups, paying attention, we weld the white pick-up cable to the handle to the first pin to the right of the selector (blue dot) and the black cable to the mass, located as already mentioned above, on the potentiometer of the volume.
- In this phase we connect the white cable of the central pick-up to the second pin starting from the right of the selector (yellow dot) and the black cable always grounded, always placed on the case of the volume potentiometer.
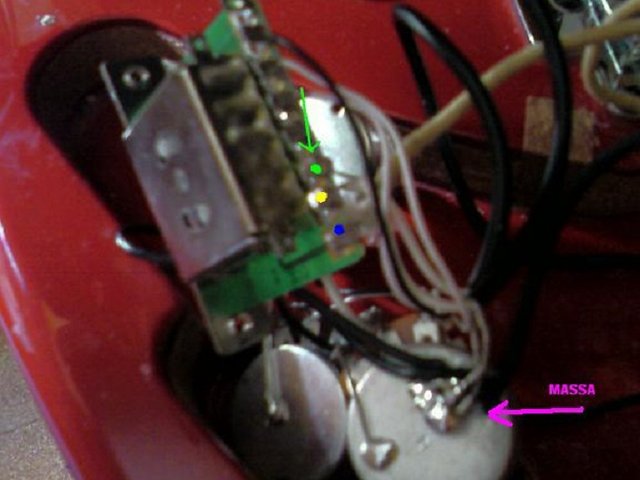
- Connect the last white cable of the pick up to the bridge on the third foot (green dot) starting from the right of the selector.
Connect the black pick-up cable (purple arrow) to the volume potentiometer together with the others.
Now we will have this kind of connections: - Green dot = bridge pick up cable
- Yellow point = central pick up cable
- Blue point = pick up cable to the handle
- Purple arrow = ground connections (all black pick up cables)

- Now that we have connected the pick-up cables to the selector, we are ready to mount them on the grille, putting the white hoods removed from the old pick-ups first, then inserting the screws in the grille and being very careful, positioning the springs keeping the threaded part inside them and the widest part resting on the mask. Repeat for all pick ups.
- We close the mask again, taking care to position the connection cables well inside the recess.
Once in place we can tighten the support screws and reassemble the knobs of the potentiometers simply by pressing them with a finger.
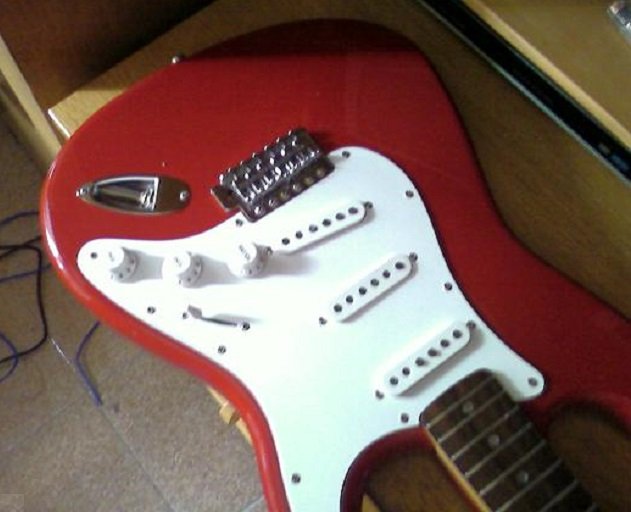
Our guitar returns as before (indeed, better!) And now we need only a set of new strings to resume playing!
With this we are done, at least for today! Stay tuned for more news! Ciaoooooooooooo!
Sostituzione pick-up ad una chitarra elettrica mod. Stratocaster (single coil)
Ben ritrovati amici Steemians, oggi vediamo come sostituire i pick-up alla nostra chitarra e come realizzare una schermatura contro le frequenze parassite di cui abbiamo parlato la volta scorsa. Anche se non volete sostituire i pick-up, vi consiglio caldamente di realizzare la schermatura sulla vostra chitarra, ne vale la resa!
Seguitemi in questa avventura. Scusate la qualità delle foto ma le ho realizzate con la webcam del computer. Procediamo!
- Per prima cosa rimuovere le manopole del tono e del volume, facendo leva sotto di esse con un piccolo cacciavite, senza sforzare troppo. Sono applicati a pressione.
Per togliere il cappuccio del selettore è sufficiente tirarlo con forza. Non usate pinze per non danneggiarlo a meno che non volete sostituirlo.
Ora che abbiamo tolto le manopole, con una chiave da 11 possiamo svitare i tre dadi che fissano i potenziometri alla mascherina.
Dopo averli rimossi, non dimentichiamoci di togliere le due viti che fissano il selettore.
Ovviamente ricordate di svitare tutte le viti che tengono fissata la mascherina al body della chitarra.
Prima di procedere al lavoro vero e proprio, ho pensato di realizzare una schermatura per diminuire le frequenze parassite captate dai pick-up.
Il lavoro è piuttosto semplice e possiamo servirci di materiale già presente in casa. Ci serve della colla e un foglio di alluminio.
- Cospargiamo di colla il retro della mascherina cercando di arrivare per bene vicino ai bordi dei fori per i pick-up.
- Successivamente prendiamo un foglio di alluminio (tipo Domopack) e facciamolo aderire per bene alla superficie posteriore della mascherina evitando di creare bolle d'aria.
- Una volta rimosso il foglio di alluminio in eccesso, la mascherina si deve presentare come nella foto qui sotto:
- Ora che abbiamo rimosso i dadi dei potenziometri possiamo levarli dalla loro sede con facilità per poi passare allo smontaggio dei pick up.
In questa fase ho realizzato una ulteriore schermatura (freccia grigia) con nastro adesivo ramato che scorre lungo il bordo dell'incavo e che poi andrà ovviamente collegata a massa. Non è obbligatorio farlo, va bene anche la sola schermatura della mascherina, ma aggiungendo quest'altra si crea una sorta di gabbia di Faraday che migliora la protezione contro i rumori di fondo captati dai magneti.
- Ora possiamo smontare i pick-up dalla mascherina, prestando molta attenzione alle molle di regolazione che possono "saltare" una volta svitate completamente le viti di tenuta.
La chitarra smontata dei suoi elementi si presenta un questo modo. Si notano i tre cappucci bianchi dei pick up, le sei viti e le sei molle che tengono fissati i pick up alla mascherina.
- Rimuoviamo ora i vecchi pick-up dissaldando o tagliando i cavetti di collegamento dai piedini del selettore e dalla massa sul potenziometro del volume.
Ora possiamo incominciare a montare i nuovi pick-up, prestando attenzione, saldiamo il cavetto bianco del pick-up al manico al primo piedino a destra del selettore (punto blu) ed il cavetto nero alla massa, sita come già detto precedentemente, sul potenziometro del volume.
- In questa fase colleghiamo il cavo bianco del pick-up centrale al secondo piedino a partire da destra del selettore (punto giallo) e il cavo nero sempre a massa, posta sempre sulla cassa del potenziometro del volume.
- Colleghiamo l'ultimo cavetto bianco del pick up al ponte sul terzo piedino (puntino verde) a partire da destra del selettore.
Collegare a massa sul potenziometro del volume assieme agli altri, il cavetto nero del pick-up (freccia viola).
Ora avremo questo tipo di collegamenti: - Punto verde = cavo pick up al ponte
- Punto giallo = cavo pick up centrale
- Punto blu = cavo pick up al manico
- Freccia viola = collegamenti a massa (tutti i cavetti neri dei pick up)
- Adesso che abbiamo collegato i cavi dei pick-up al selettore, siamo pronti a montarli sulla mascherina, mettendo per primi i cappucci bianchi rimossi dai vecchi pick-up, successivamente si inseriscono le viti nella mascherina e facendo molta attenzione, si posizionano le mollettine tenendo la parte filettata all'interno di esse e la parte più larga in appoggio alla mascherina. Ripetere l'operazione per tutti i pick up.
- Richiudiamo la mascherina facendo attenzione a posizionare per bene all'interno dell'incavo i cavetti di collegamento.
Una volta in sede possiamo riavvitare le viti di sostegno e rimontare le manopole dei potenziometri semplicemente pressandole con un dito.
La nostra chitarra ritorna come prima (anzi,meglio!) ed ora ci occorre solo una muta di corde nuove per riprendere a suonare!
Con questo abbiamo finito, almeno per oggi! Rimanete sintonizzati per altre novità! Ciaoooooooooooo!
This post was selected, voted and shared by the discovery-it curation team in collaboration with the C-Squared Curation Collective. You can use the #Discovery-it tag to make your posts easy to find in the eyes of the curator. We also encourage you to vote @c-squared as a witness to support this project.
Thanks!
Hello,
Your post has been manually curated by a @stem.curate curator.
We are dedicated to supporting great content, like yours on the STEMGeeks tribe.
Please join us on discord.
Congratulations @hjmarseille! You have completed the following achievement on the Steem blockchain and have been rewarded with new badge(s) :
You can view your badges on your Steem Board and compare to others on the Steem Ranking
If you no longer want to receive notifications, reply to this comment with the word
STOP