Vector illustration (part 2): Inking process | Illustrazione vettoriale (parte 2): il processo di inchiostrazione (ENG - ITA)

©@airmatti
ENG - I've to say that there are several ways to process vector illustrations. These are the steps with which I personally found myself rally ok. I also use Adobe Illustrator CS 5.1, but the tools, even if with different names, are essentially present in almost all vector graphics programs.
ITA - Preciso che esistono diversi modi per elaborare illustrazioni vettoriali. Questi sono i passaggi con cui personalmente mi sono trovato meglio. Inoltre utilizzo Adobe Illustrator CS 5.1, ma gli strumenti, anche se con nomi diversi, sono essenzialmente presenti in quasi tutti i programmi di grafica vettoriale.
From the paper | Dalla carta
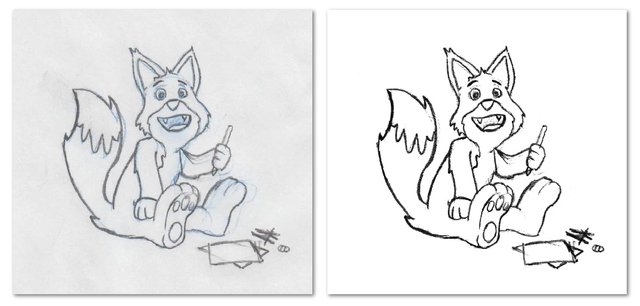
ENG - Personally I always start from the paper. It allows me to process and set up better what I want to achieve as a final result. Once you have arrived at a satisfactory solution it is important to define the line to be followed for inking in a precise way. This will facilitate us a lot later. You must then import the image into your computer and you can use a scanner or a camera. The important thing is to keep a high resolution, at least 300dpi. In this way, if it's necessary, we can zoom in on the original without losing too much quality. Another important step is the regulation of contrast and brightness. Everything must be designed to make as clear as possible the lines to be inked.
ITA - Personalmente parto praticamente sempre dalla carta. Mi permette di elaborare e impostare meglio quello che voglio ottenere come risultato finale. Una volta arrivati a una soluzione soddisfacente è importante definire in maniera più o meno precisa la linea da seguire per l'inchiostrazione. Questo ci faciliterà molto successivamente. Bisogna poi importare l'immagine nel computer e si può utilizzare uno scanner o una macchina fotografica. L'importante è tenere una risoluzione alta, almeno di 300dpi. In questo modo se fosse necessario possiamo zoommare sull'originale senza che perda troppa qualità. Altro passaggio importante è la regolazione del contrasto e della luminosità. Il tutto deve essere atto a rendere il più possibile chiaro quali sono le linee da inchiostrare.

Before and after brughtness and contrast regulation
Prima e dopo regolazione dei luminosità e contrasto
©@airmatti
Our "friend" pen tool |Il nostro "amico" pennino
ENG - Now it's time to ink. With the improvement of the tablets and software, I see more and more people inking using just the tablet lately. You can do it if you have excellent quality tools. Otherwise, as in my case, it is better to use the mouse and the pen tool or "bezier curve". At the beginning the use of this tool is a little difficult. But once you've been accostumed to it, you're pretty quick. The first thing to do is, in the new document, create a layer where we will import our sketch and a layer above it where we will go to inking. Personally I use to give a very fine yellow colored trace (0.1-0.5 mm approx) in order to clearly see the tracing. Once the whole part to be inked has been traced, I enlarge the thick of the track and, from the advanced options of the track window, I set the "outline track 1" profile, which gives a much more realistic look, brush style. Once you are used to it you can also try the use of brushes.
For this whole step, I found it easier to create a video that you can watch on DTube!
ITA - Ora è il momento di inchiostrare. Con il miglioramento delle tavolette e dei software, vedo ultimamente sempre più persone che inchiostrano usando appunto la tavoletta grafica. Si può fare se avete degli strumenti di ottima qualità. Altrimenti, come nel mio caso, è meglio usare il mouse e lo strumento pennino o "curve bezier". All'inizio l'utilizzo di questo strumento risulta un po' ostico. Ma una volta presa la mano si va abbastanza spediti. La prima da cosa da fare è, nel nuovo documento, creare un livello dove importeremo il nostro schizzo e un livello sopra di esso dove andremo a inchiostrare. Personalmente uso dare una traccia colorata di giallo molto fine (0.1-0.5 mm ca) in modo da vedere chiaramente il tracciamento. Una volta tracciata tutta la parte da inchiostrare ingrandisco lo spesso della traccia e, dalle opzioni avanzate della finestra traccia, imposto il "profilo traccia 1", che da' un look molto più realistico, stile pennello. Quando ci prendete la mano potete anche sbizzarrirvi con l'uso dei pennelli.
Per tutto questo passaggio, ho trovato più semplice creare un video che potete guardare su DTube!
▶️ DTube
▶️ IPFS
On the third and last part, we'll see how to add colors to our vector drawing!
Nella terza ed ultima parte vedremo come aggiungere il colore al nostro disegno!
You can also see my work at the following sites:
 ..…
..…  ..…
..…  ..…
..…  ..…
..…
llustrator, graphic designer
Outdoor adventurer
Folk and Blues enthusiast
Team sports lover!

Such a wondeful and interesting topic by @airmatti mam...
Actualy I'm new comer in to this platform...I'm always try learn something with every posts...
Followed now U sir....I'm become ur fan now...I'm always try check ur blog everyday...
Thanks mam..
Thanks
Realmente muy interesante, realmente haces el boceto en fisico con papel y lápiz y luego con scaner lo pasas a digital. Después Cuando vayas a pintar este pequeño dibujo, quedará fantastico. Esperemos los resultados, Saludos.
En el próximo post habrá color ... ¡muchas gracias y hasta pronto!
That was very interesting to watch.
Tankss!
Esto me motiva a volver al dibujo... Mi otra pasión! 😊
Hermosa! ¡Espero ver algo pronto tuyo!
Molto utile questa guida! Mi tornerà sicuramente utile per dei lavori futuri che ho in mente, grazie :).
Ottimo non vedo l'ora di vedere qualche tua opera!
Ci sai fare con i tutorial👍💪 ora sembra molto semplice, peccato non ho tempo per provare 🙈
Il tempo è tiranno! :) Grazie!
muy buen tema @airmatti me gusta ya que quiero aprender a dibujar bien, ademas enseñando eestas practicas con estos dibujos se qque aprendere mas gracias a ti.
@calitoo
Bueno @calitoo muchas gracias :D
I use CorelDraw and have usually used the Trace tool but I think I will try your way and see what kind of results I get.
Good tutorial.
It depends on how you need the result, and sometimes on which image you have to convert. In this way you often have a more precise and qualitative result. Thanks!
mi cimenterò in qualche prova....
Ottimo!
Gran bel post, avere un po' di tempo da dedicare, potrebbe anche essere interessante approfondire l'argomento, ma ci vorrebbe un avatar a disposizione!!
Encomiabile lavoro frutto di una conoscenza superba dell'argomento, eccellente post
Grazie! Sarebbe bello se fai qualche prova, al massimo fammi sapere! Saluti!