Dual of the Fates - Booting Windows and Linux with Partitions on a Single Drive
So I might have mentioned that I am somewhat of a tech geek.
Just like the Pope is somewhat of a Catholic.
Unlike many techs, who have a certain loyalty to a particular OS, I try to find the value in Windows, Mac OS X, and various Linux distros. I like the idea of being able to cross over between each OS, and I have a "universal" software set that I use on all of my systems: Chrome and apps, VLC media player, LibreOffice, HandBrake, Audacity. These apps are cross-platform, and that comes in very handy when flipping between OSes. I also learned about this terrific app system called "Ninite," which allows for installation and updating of non-Microsoft apps, and installs them without any of the unwanted "extras" that are sometimes bundled with some of these useful apps.
Which brings me to today's subject. See, when it comes to booting up my computer, I have to use Jayne Cobb's sentiment regarding grenades and firearms:


(from the movie "Serenity")
Along the way in my journey as a tech, I have developed what I call my "digital signature." There are certain features of a system that allow me to identify if I have worked on a computer before, and when that was. Going back about 12 years, I was finding myself constantly being called by a former acquaintance and his family, since they would get their systems infested with malware, spyware, and what are now call PUPs - Potentially Unwanted Programs. This was in the end days of Windows XP, and while I loved XP, it was also getting to the point where installing it from scratch and then updating it to the latest Service Pack, and then installing more updates and patches was an hours-long process. Now toss in installing programs...
Back in those days, I had a handy little tool in Norton Systemworks, specifically their "Ghost" program. So what I would do is partition the hard drive and have a quick recovery system with Norton Ghost. Procedurally:
- Partition the hard drive
- Install the OS, run updates, and install programs
- Backup the "C:" partition using Ghost to the "D:" partition
The restore process would take about 40-60 minutes, and would be:
- Boot from Ghost
- Restore the "C:" partition from the clean image stored on the "D:" partition
- Update the restored "C:" partition OS and programs
- Backup the "C:" partition using Ghost to the "D:" partition
It was really a leapfrog type of process to keep my reinstallation times to a minimum. Eventually, this came to be somewhat problematic, since invariably files would have to be backed up as well. So I started making "D:" partition bigger, and then I would source the User files over there. Since I did this systemically from the beginning of a reinstallation, I never had to worry about it with each restoration. There was the inherent danger of a virus hiding out on "D:" but that could be overcome with some drive scanning and an external drive dock. So the new installation procedure became:
- Partition the hard drive
- Install the OS, run updates, and install programs
- Relocate the User files to the "D:" partition
- Backup the "C:" partition using Ghost to the "D:" partition
And restoration became:
- Remove the drive and dock it to another system to clean it.
- Replace the drive and boot from Ghost
- Restore the "C:" partition from the clean image stored on the "D:" partition
- Update the restored "C:" partition OS and programs
- Backup the "C:" partition using Ghost to the "D:" partition
And life got easier.
I wanted to carry the same idea in to my dual-booting for Windows and Linux. I typically use a Debian build, mostly Ubuntu and sometimes LinuxMint, although that is only when I'm in the mood for a mojito...
Ubuntu tends to be able to read and write to Windows partitions, which is oh-so-convenient. But lately, I have been doing some teching for some classmates, and not all of them are tech-savvy to the degree that others are. However, they have expressed interest in the dual-booting idea, and I wanted to find an easy way for them to access their files without having to dig their way through Windows folder hierarchy to find their files while running Linux. That prompted me to revisit the "D:" partition, which I labeled "Storage."
Things to consider:
- Linux tends to require a small partition called "Swap" space.
- Windows tends to create a small partition, only 100 MB or so.
- Dual-booting involves a particular sequencing: all Windows OS installations first, all Linux OS installations second.
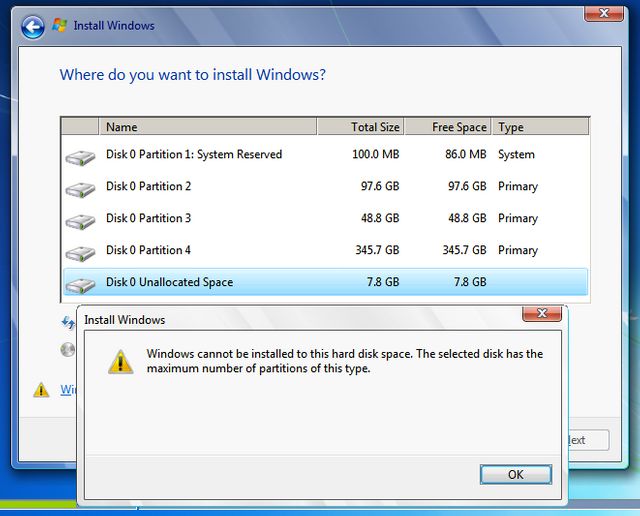
- There is a logistical limitation of the physical hard drives which only allows for 4 partitions.
A standard dual-boot would read:
Disk 0 Partition 1: Windows System Reserved
Disk 0 Partition 2: Windows
Disk 0 Partition 3: Linux "/"
Disk 0 Partition 4: Swap
And that would leave no ability to create the "Storage" partition. Oops...
Ideally, I'd like something like this:
Disk 0 Partition 1: Windows
Disk 0 Partition 2: Storage
Disk 0 Partition 3: Linux "/"
Disk 0 Partition 4: Swap
I particularly wanted to make certain that there as absolutely no wasted space, even 100 MB - mostly due to my sense of boundaries and division. Plus, what is the point of the "Windows System Reserved" partition, anyway, amirite?

(Lily Aldrin from the show "How I Met Your Mother")
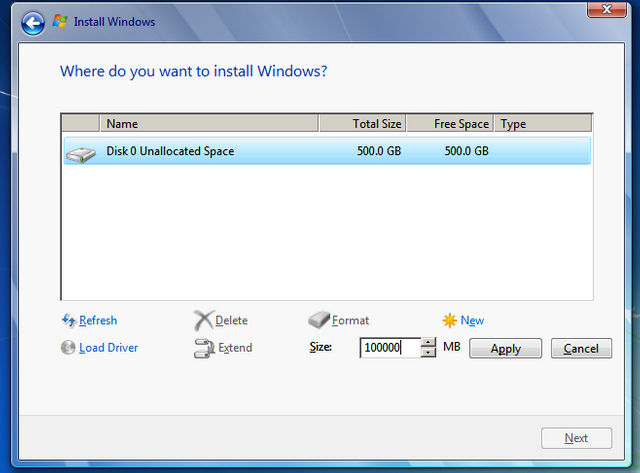
I ran some tests and pulled all of my screenshots using Oracle's VirtualBox, another one of the cross-platform apps that I love using. Also, for the purposes of this exercise, I set the hard drive space to 500 GB so that the breakdown would be as follows:
Disk 0 Partition 1: Windows - 100 GB
Disk 0 Partition 2: Linux - 50 GB
Disk 0 Partition 3: Storage - 342 GB
Disk 0 Partition 4: Swap - 8 GB
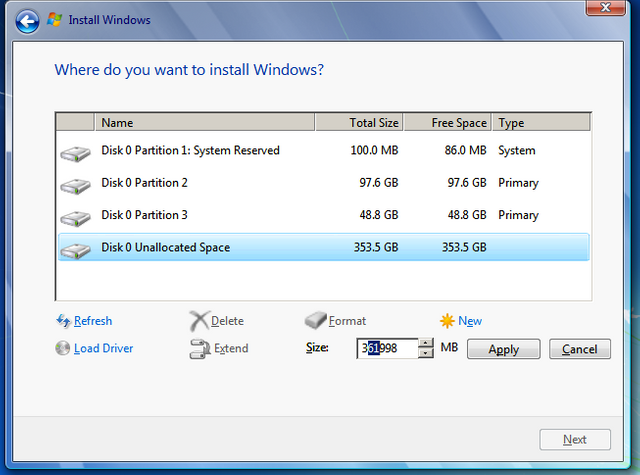
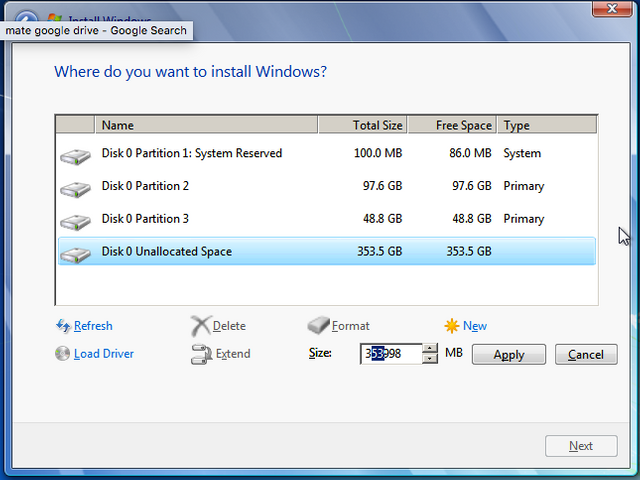
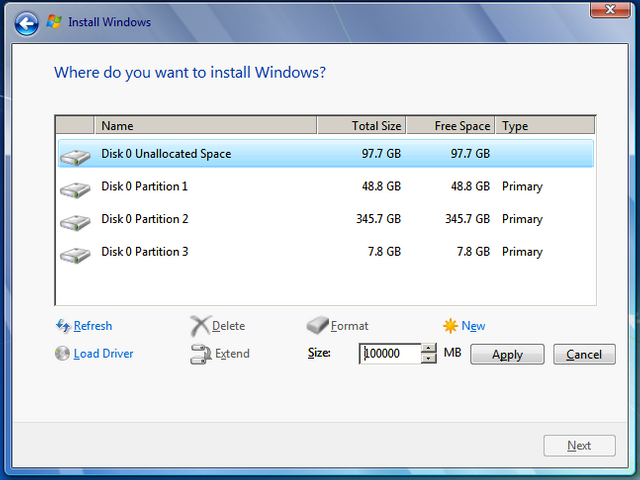
My efforts to get a "clean" division using the Windows Installer meant that I had to create and delete several partitions.
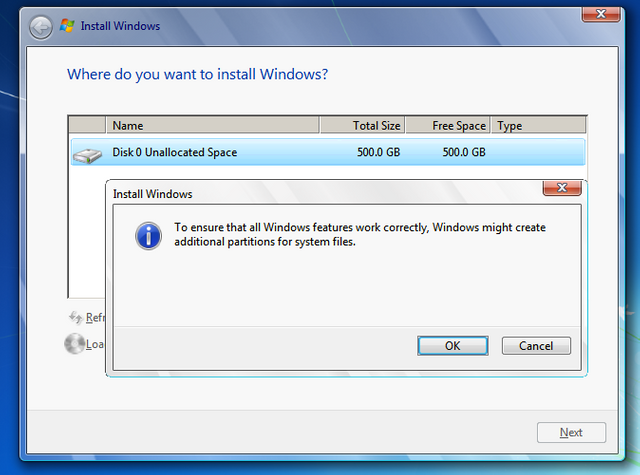
- Create a Windows partition, 100 GB
- This will automatically create the "windows System Reserved" partition in front of the main partition
- Create the Linux partition, 50 GB
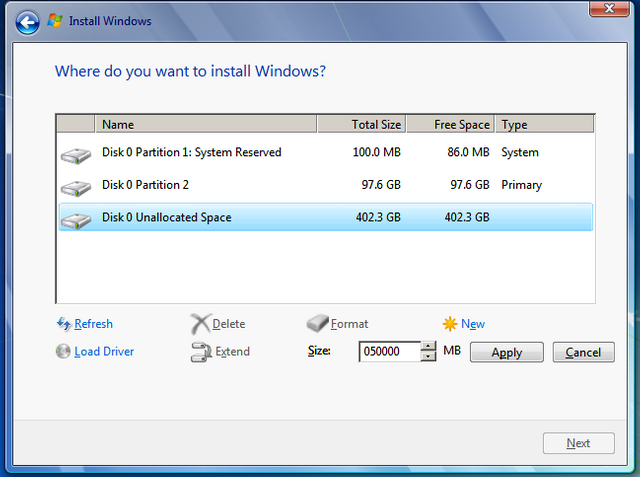
- Now we want to make the "Storage" partition, but we need to cut off 8 GB for the "Swap" space as well
- Delete the "Disk 0 Partition 1: System Reserved" partition
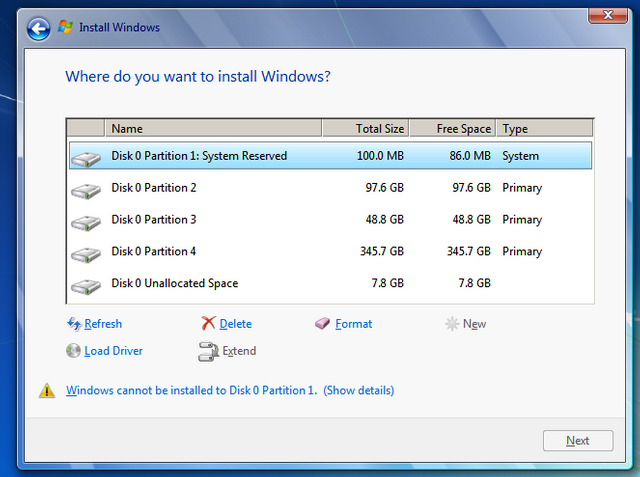
- Now you can create the "Swap" partition
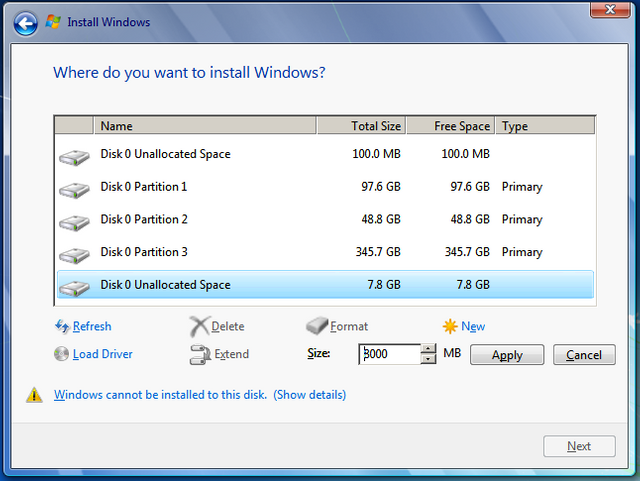
- Again, delete "Disk 0 Partition 1", which is the "Windows" partition

- Now re-create the "Windows" partition and continue with the installation like normal.
I'm running Windows 7 for the initial installation, and then I ran the free upgrade to Windows 10. There is also the matter of setting the "Storage" partition as "D:" and formatting it for NTFS. No matter the version of Windows, you'll need to relocate the User folders from "C:\Users{username}" to the "Storage" partition, "D:{username}". Also, make sure that you label the "C:" partition as "Windows" and the "D:" partition as "Storage". You can do all of the manipulation to the drives by using the "Computer Management" app to regulate everything. Enter this by holding the Windows key and tapping R, and then entering this command into the dialogue box: compmgmt.msc and click "OK".
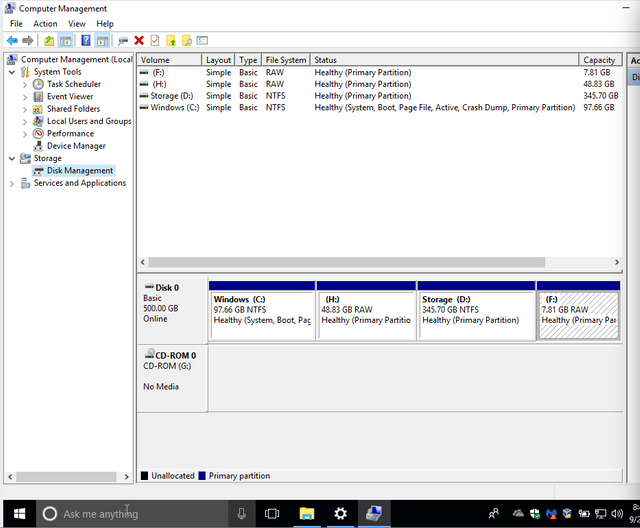
A series of right-clicks on each partition will allow you to do things like change the drive letters and format each partition.
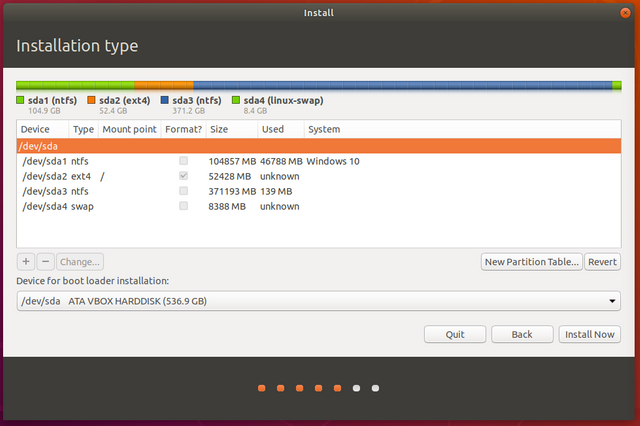
Now it is time for Linux! I am using the latest distro of Ubuntu, 18.04.1 LTS. Boot from the alternate media and begin the installation like normal until you get to the "Installation type" screen:
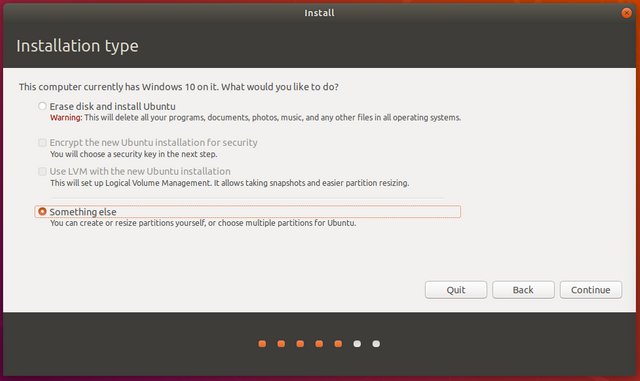
and click on "Something else" to get to this screen:
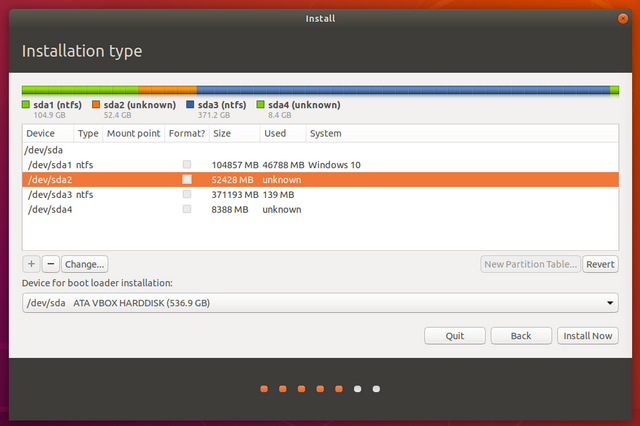
Now make certain that you set the 50 GB partition as follows:

Do the same thing for the "Swap" partition, and it should look like this when you're done:
You can complete the rest of the installation process as normal, and in almost not time, you should have a working and viable dual-boot system, with a boot menu that is very easy to use:
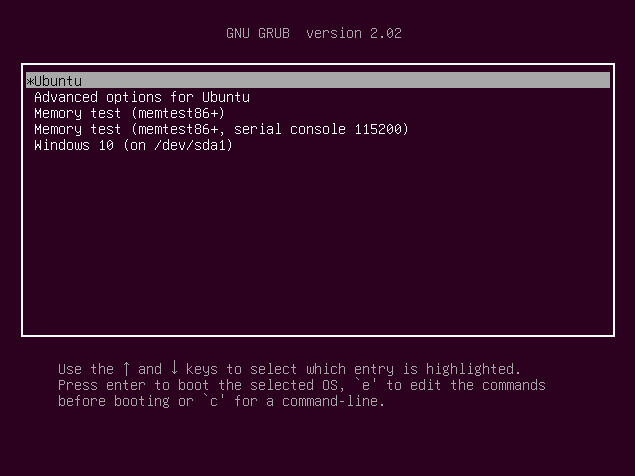
Your system will default to Linux, but a simple application of the arrow keys will allow you to boot into Windows.
Now for the folders...
- Boot into Linux.
- In the list of Applications, find one called "Disks" and open it.
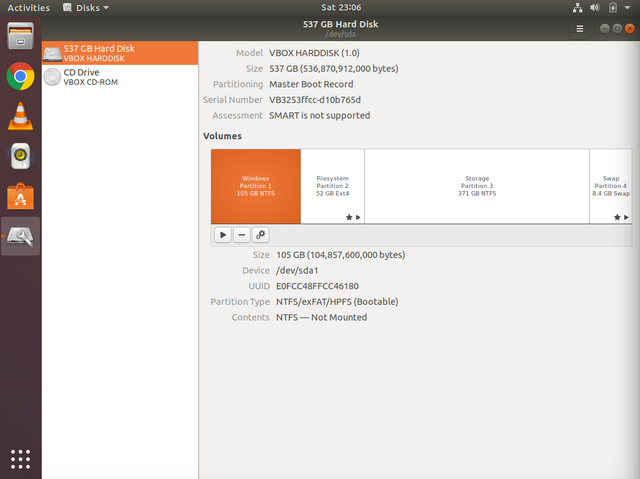
- Click on the gears icon beneath the spread of partitions labeled "Volumes".
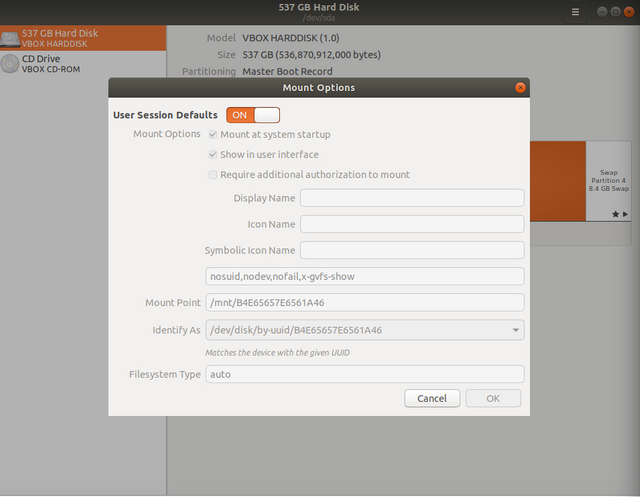
- Slide the switch to "OFF" and then check the boxes for "Mount at system startup" and "Show in user interface". You'll be prompted for your user password, and then you can click "OK".
- Close out of the app and reboot the system, making sure you get back into Linux. After triggering the reboot, you can go grab a cup of coffee, since it will default into Linux anyway!
Now for the ease-of-use/cosmetic part... Wouldn't it be great to have the shortcuts on the sidebar of the windows?
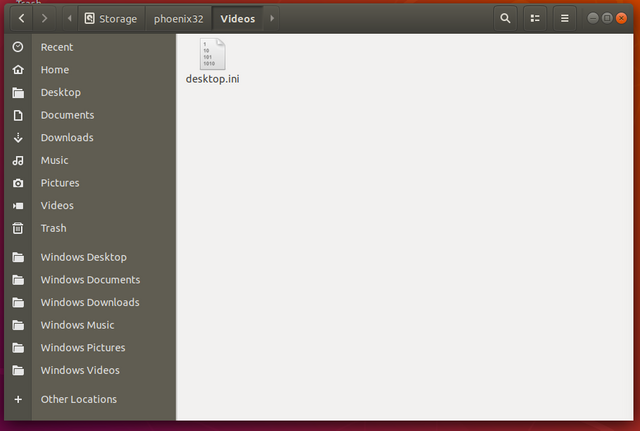
That just means dragging from the "Storage/{username}/" folder onto the sidebar, one folder at a time, and then right-clicking each one to rename them from "Desktop" to "Windows Desktop", et cetera.
And there it is! The hardest part is that it can be a time-consuming process - you are, after all, installing two different OSes, all of the requisite apps and updates for each, as well as cross-linking your files, all while creating a separate partition to protect said files, in the event that you need to wipe either of the OSes an reinstall them.
Links for the aforementioned apps:
Chrome: https://www.google.com/chrome/
VLC media player: https://www.videolan.org/vlc/index.html
LibreOffice: https://www.libreoffice.org/
HandBrake: https://handbrake.fr/
Audacity: https://www.audacityteam.org/
VirtualBox: https://www.virtualbox.org/
Ninite: https://ninite.com/
And for Ubuntu Linux: https://www.ubuntu.com/
or LinuxMint: https://linuxmint.com/