Truly a pleasure to meet you all
Hello everyone I'm new to Steemit and wanted to introduce myself properly .
I have lost some of myself living here but have gained so much more. I consider myself a multifaceted person with many varied interests , though most often I find myself doing self improvement and home improvement projects. I like to keep my hands busy with projects and hope to share some of them with you, hopefully in the process generating some extra income to help me see some of my many ideas through to completion.

seeing as I'm new here I'm going to take my time and learn my way around, but starting off id like to share one of my projects from last year.
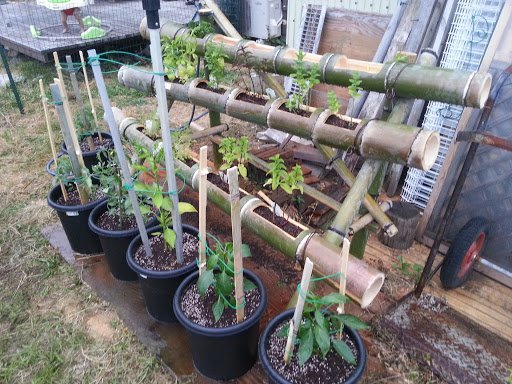
Bamboo Herb garden afternoon project
I didn't get photos of cutting the bamboo or binding it together as i wish i had, but for reference i used stainless deck screws and #9 wire.
There are better options but i was in a rush and didn't take as much time as i should have.


So it was a rush job partly cause I was bored and had extra energy and the lovely wife had been bugging me for an herb garden for a while.
(1.) Starting off choose the poles you want to use and cut them to even lengths and keep in mind where the cell ends are as you don't want to have a long bit of cell on an end of the pole or you're wasting space and material.
(side note: I made drinking cups and vases from the cutoff ends and gave them away as gifts.)
(2.) Once I got the bamboo cut and arranged in a way that suited me, i used the smaller tops from the same poles as legs and bracing for the frame, using 120mm deck screws to hold them together I then used the wire, pliers and a screwdriver to strengthen the joints
(bamboo splits easy and screws can cause a split that offers little strength, pre-drilling a hole helps reduce the chance of splitting but its better to bind the bamboo from without and use pegs or screws to give it a fulcrum point to stop shifting or rolling while you're binding the poles together.)
(3.) Next get out your hand saw and start making your cuts to create the pots for your herbs of choice.


(4.) Using a hammer and chisel I remove the cell wall. use caution or gloves at this point bamboo splinters are fine and can cut like a razorblade.
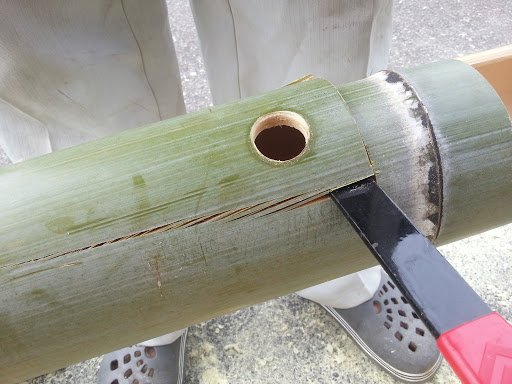


(5.) Using a hacksaw, a rigid cutting knife and wood chisel we clean up the edges and give ourselves a less prickly work surface.


much better.
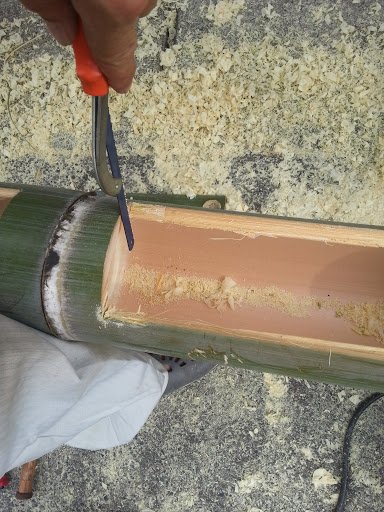
(6.) Next using a conical wood rasp bit for my power drill i round out the edges and smooth them further making a splinter free edge on the "pots".


It's coming along nicely. Repeat the previous steps until all the cells have been opened up and you're ready to move on to the next step.


(7.) using the wood chisel again we knock out drainage holes between the cells and ends.
(Alternatively you can drill a hole in the bottom of each pot and use a bit of plastic or fiberglass screen to keep your soil from washing out over time.) I didn't use screens or drill holes in the bottom and the soil i used became too sodden and drown out some of my plants. hindsight is 20/20 so its best to put a thumb sized hole in the bottom of each cell with screen and/or use light arable potting soil .


thats about it. things turned out passable though i wasn't happy with the alignment of the lowest pole and i could have done a few things differently. but there's lots of bamboo and lots of time ahead so, i may do another one in the future and spend a little more time working on the details. here are the end results before and after planting.


If you've reached this point of my post then i must thank you whole heartedly for taking the time to read my first Steemit contribution.
If you have any questions about my work or suggestions of how i can do things differently or any ideas you'd like to see me include in some of my future projects please let me know in the comments and follow if you enjoy what i do.
"I think that at the heart of every person there is a creator and many of us hold ourselves back from our full potential by limiting our own knowledge to what is comfortable, convenient or socially expected; to what we have or have not been taught.
It is my opinion that it's usually best to go your own way, with the advice of trusted friends and family to guide you and to keep in mind the only thing stopping us from doing something beautiful is often ourselves. Have confidence, believe in your dreams keep yourself motivated and do what makes you feel happy and fulfilled."
Joy and Peace be with you all and thank you again for reading.
@thediyguy.
Welcome to Steemit! A very good first Post 👍
hi @thediyguy welcome to steemit! Enjoyed reading the post and looking at the bamboo herb garden. Great work your doing in Japan and the self improvement projects. @cleverbot this is a nice introduction post.
Aww, thanks Cleverbot!
welcome to Steemit! very nice to meet you :) the device you've made is really something!
Welcome :-) following your blog. I love diy
thank you @digitalplayer i have much more to come when i get a bit more organized at home.
Welcome on Steemit!
I hope that you will participe in our community with pleasure, I was preparing to you some usefull links and tutorials for beginners.
Steemnow - this is website where you can check your Upvote power
Steemnow
SteemFollowers – great website for beginners, you can get Upvote for Upvote
Steemfollowers
Write, read and have fun! :D
Thank you for the support i really appreciate it. I'm really happy to have such a positive community outlet for sharing my ideas and projects. I hope to bring alot of useful and entertaining ideas to my fellow steemians.
Welcome to Steemit :)
thank you! I'm loving it so far never imagined so much positive support in such a short time.
Welcome to steemit sir! I came here via @kafkanarchy84 who mentioned you in one of his posts. I hope you have a blast here on Steemit and meet a lot of new friends.
That's an awesome project you did! It always fascinates me how creative some people can be. Looking forward to more cool DIY projects from you! :)
Thank you very much it feels amazing to be getting such a response from so many kind people.
You welcome @thediyguy to steemit.just a little advice, to succeed here you need a lot of diligence and patience. Enjoy the journey even as the funds flow in. I upvoted you. You can follow me so we can connect. Goodluck
thank you man i really appreciate it.
Awesome dude! First post kickin’ ass! Resteemed!
Thanks @kafkanarchy84 i couldn't have one it without you and @kaliju