How To Create .EHI File For Globe, TM, Smart, TNT and Sun

EHI is the config file used by HTTP Injector for android which is required for the app to work. There's a list of free EHI files distributed by others which are ready to import. But some of these EHI files has expiration and the speed may be slow due to many users connected. So the advantage of creating your OWN .EHI files will guarantee you a fast speed connection and the exact date of the expiration, if your ssh account has an expiration.
If you are a PC or Laptop user, refer to my other post: http://pinoytechsaga.blogspot.com/2017/07/how-to-create-hpi-file.html
How To Create Your Own .EHI File for Globe, TM, Smart, TNT and Sun using HTTP Injector for Android
Requirements:
- Android phone or device with sim slot (3G/4G/LTE capable)
- In creating SSH account, internet connection is required. (If you don't have internet access like WiFi, Register to Network Promos)
- Globe, TM, Smart, TNT or Sun Sim
- HTTP Injector by evozi - download HTTP Injector in Google Play Store or HTTP Injector APK
- APN Settings for each mobile network
Globe / TM - APN : http.globe.com.ph / www.globe.com.ph / internet.abs-cbn.com.ph
Smart / TNT - APN : internet
Sun - APN : wap
Procedure:
- Open any android internet browser. Create your own SSH Account first, choose one of the following Free Tunnel websites:
www.tcpvpn.com
www.fastssh.com
www.sshdropbear.com
www.mytunneling.com
create.sshgoogle.com
www.skyssh.com
bestvpnssh.com
For example, tcpvpn.com SG Server 7 Days was used in creating SSH account:
Recommended servers : Singapore, Japan and Germany. Singapore is the best choice if you want to create a low ping ehi which is good for online games.

This is the sample of created SSH account with tcpvpn SG Server.
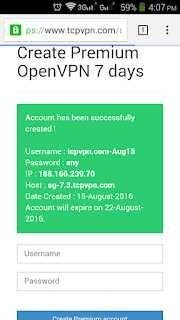
Remember the details like IP(because IP grasp better than host), username and password (we will use this later in HTTP Injector settings). I recommend you to save the page or to take a screenshot by pressing 'power button + volume down button'.
Or if we will write it down,
Username : tcpvpn.com-Aug15
Password : any
IP : 188.166.239.70
Open HTTP Injector.
Tap the 'three-dotted icon' in the upper right part, then select 'Clear Setting/Data'.


- Tap the 'gear icon' to go to Settings, then select 'Secure Shell (SSH)'.
Input your recorded details earlier including IP, username and password.

SSH Settings
SSH Host : 188.166.239.70 (we used IP rather than host because it grasp easily but you can also use sg-7.3.tcpvpn.com if you want)
SSH Port : 22 (other available SSH Ports are 443 and 80)
Username : tcpvpn.com-Aug15
Password/Passphrase : any
Additional Settings
Scroll down and go to 'Feature Settings'. Check Data Compression.
If done, go to home menu of HTTP Injector by pressing 'left arrow icon' or back button twice.
- Tap the 'three-dashed icon' in the left upper part, and select 'Payload Generator'.
Use the following settings for Payload Generator.
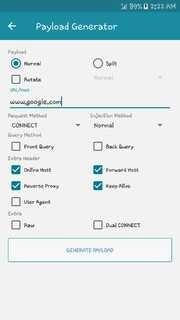

Payload : tick Normal
URL/Host : ssl.gstatic.com or fonts.gstatic.com or www.google.com (for a full list of free sites/host, view my other post : Full List of Free Sites, Host for Payload Generator)
Request Method : Connect
Injection Method : Normal
Query Method : Leave it unchecked
Extra Header : Check - Online Host - Forward Host - Reverse Proxy - Keep Alive
Tap 'Generate Payload'.
- You'll be redirected to home. Don't tap 'START' button yet.

Edit Remote Proxy or HTTP Proxy.
For beginners, just use the IP we recorded earlier, 188.166.239.70, and use Port 80 (other ports available are 8080 and 81):

Tap 'Save'.
For advance users, you can put different proxy. The best thing in using your own proxy for Globe/TM, Smart/TNT or Sun is that they are uncrowded proxy which means there are only few users, resulting to more stable and fast internet connection.
To get your own proxy, check these proxy sites :
http://www.ip-adress.com/proxy_list/
http://spys.ru/en/
http://gatherproxy.com/
And to check if these proxies are working, here's a Remote Proxy Checker.
After inputting your own Remote Proxy, check Google DNS.
Tap 'Save'.
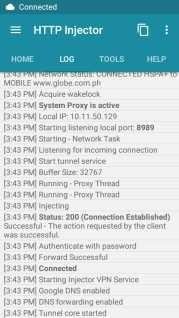
- Turn on your mobile data before tapping 'START'. And you're DONE!
Here's a sample image of HTTP Injector Log when you 'START' it. You will see a Status : 200 (Connection Established), it means you've successfully connected.

Optional : It's up to you if you will 'Export' or save the config, you can also 'lock' it to prevent it from editing.
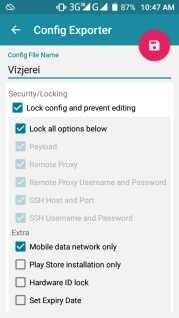
Config File Name : Your Desired Name
Security/Locking:
Check - Lock config and prevent editing
Check - Lock all options below
Extra:
Check - Mobile Data network only
You can also check - Set Expiry Date - and customize the expiry date
Note
Free SSH account has expiration of 5 to 7 days, so you need to create a new account after it expires. Just follow the same procedure above when you create another .ehi file configuration.
If you have any concern regarding this step by step tutorial on how to create EHI file, you can leave a comment below.
✅ @codes105, I gave you an upvote on your post! Please give me a follow and I will give you a follow in return and possible future votes!
Thank you in advance!