ICO 101: how to participate in an ICO made with Ethereum

The article was originally posted on https://medium.com/the-mission/ico-101-how-to-participate-in-an-ico-made-with-ethereum-cf57516183f6
There’s a lot of hype around cryptocurrencies and ICOs as it continues to grow exponentially every day, even experts couldn’t predict where it is today. Quite a few of them seem attractive, but imagine I didn’t know anything about cryptocurrency, wallets, and ethereum. I mean, nothing at all.
I will participate in the ICO of a mobile MMORPG called Lordmancer II (their site is lordmancer2.io. My goal was to get familiar with the whole idea of an ICO, go through all the steps, and have some fun in the process. For the purpose of this article the exact ICO doesn’t matter, the process will be the same for any. Let’s take this article as a general tutorial.
Let me remind you what an ICO is. The acronym stands for Initial Coin Offering, a mock-up of “Initial Public Offering”. Nowadays, any startup can issue its own currency, usually called tokens or coins, using blockchain technology. These tokens may be bought, sold, or exchanged for another cryptocurrency, such as Bitcoin, Ether, or for fiat (read: normal) currencies. The main goals for the issuer of the tokens or coins is to fund their project development, marketing, and help increase demand, which will then increase the value of the tokens. The final goal of the individuals who purchase tokens is to use them to exchange/buy/sell individual goods and items, or do what most people do and wait until their price has skyrocketed and then sell them for a HUGE PROFIT….Hopefully.
There are various business models designed to make the tokens more valuable with time. As for Lordmancer II, the price for their tokens will continue to grow because there will be always be an increase in demand for tokens from their players, and there’s a limited amount of tokens. Besides that, they also promise to burn a fraction of tokens with each trade, making for artificial deflation.
Okay, enough about theory. Let me finally tell you what you need to do if you want some tokens now for your money.
Step 1. Create your Ethereum Wallet
Most of the ICOs are based on Ethereum; a blockchain technology and a cryptocurrency by the same name. So, first of all you will need to set up your Ethereum wallet. There are many tools and apps for that out there. But not all of them support new ERC-20 tokens, and you will need those.
I recommend using one of the following:
● Ethereum Mist Wallet,
● Ethereum’s online wallet
● MyEtherWallet
Although you can use any of these three, in this article I will use MyEtherWallet as an example.
MyEtherWallet
Visit www.myetherwallet.com. The first thing you see is Create New Wallet.
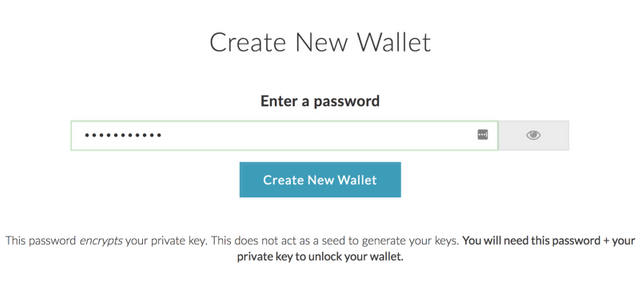
Come up with a strong password, fill in the form, make sure to remember it by heart, and then press ‘Create New Wallet’.

Now, save your Keystore File. Click ‘Download Keystore File’ and save the file somewhere on your computer or on a thumb drive for extra security. After you have saved the file (triple-check this!), go ahead and click the Continue button.
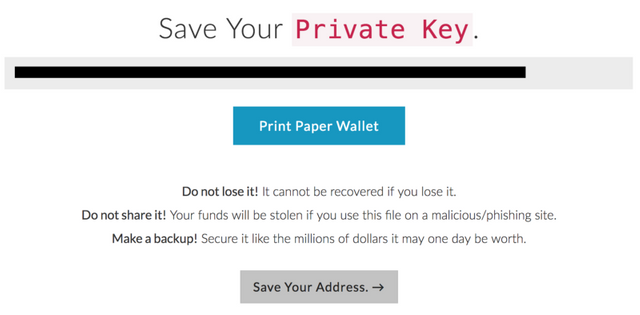
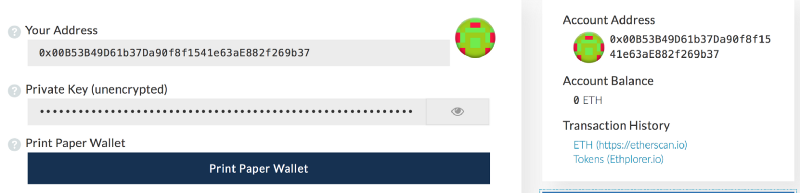
On the next screen you will see your Private Key, it’s a string of symbols. Make sure you write down or print your Private Key in order to create a Paper Wallet. Remember, there’s no way to remind you of your password or Private Key, the technology simply doesn’t allow that! If it’s lost, it’s lost forever! So, please take all of the warnings you will see on those pages seriously.
Proceed to next screen.
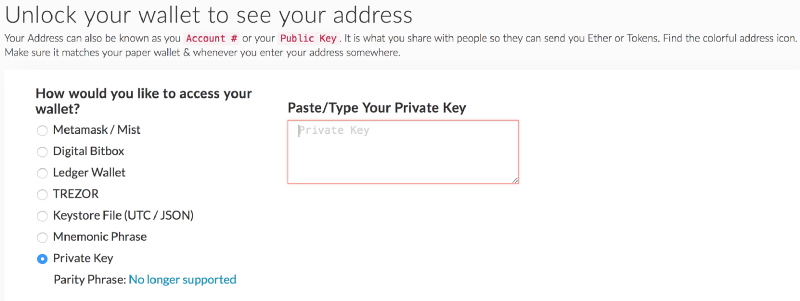
As you can see, there are many ways of accessing your wallet, but for clarity’s sake we’ll stick with the Private Key option. Simply paste or type in your private key, then click ‘Unlock’.
Another option is to use the keystore file you saved on your computer earlier, then enter your password and then you’ll be able to click ‘Unlock’.
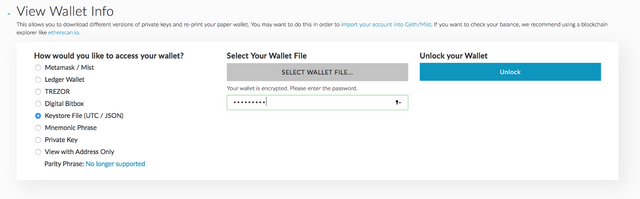
Now you have full access to your Ethereum Wallet and that’s it! It was simple, right? If you want to access your wallet again, go to www.myetherwallet.com and click on ‘View Wallet Info’ in the top right corner.
Step 2: Purchase your first Ether
Now you can actually start using your wallet. In order to fill your wallet with the Ether (ETH) needed to purchase someone’s tokens offered on an ICO, you will need a cryptocurrency exchange.
There are many exchanges out there, such as Coinbase, Kraken, Bitfinex, Bittrex, and many many more.
Some of these allow you to trade fiat currency (dollars or euro) for Ethereum directly, while others only allow exchanging Bitcoin (BTC) or another cryptocurrency to ETH. Also note that exchanges offer different exchange rates. Some might be more favorable to you than others, and the spread may be quite big. Visit a few of exchanges before each transaction, compare their rates and choose wisely!
I will not go into more detail about which exchange could be the best fit for you. Instead, I’ll show you the easiest way to purchase ETH and receive it on the wallet you have just created. Note again that this is the easiest way to do it, but may not be the best for you.
The easiest way to purchase ETH is to visit MyEtherWallet again and click on the Coinbase widget you see when you log in.
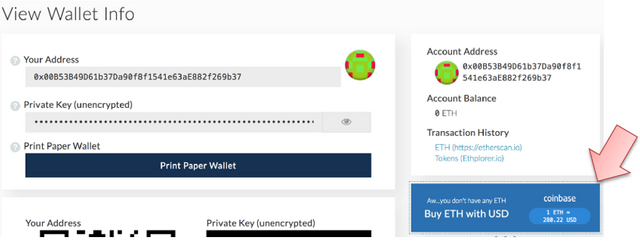
Coinbase is one of the biggest cryptocurrency exchanges, and this widget allows you to easily purchase ETH and immediately send it to your wallet. The process is pretty straightforward and we won’t get into detail here. Just click on the widget and follow their instructions. You’ll be asked to fill in your name, the amount of ETH you’d like to purchase, your email address, and your phone number.
Alternatively, you may opt to purchase Ether on any cryptocurrency exchange that supports Ethereum. Luckily, most of them do. Simply send the currency of your choice to the exchange you like best and exchange it for ETH. If you do not know how to do this, ask Google like this: “How to buy ETH on Kraken”, where you can substitute ‘Kraken’ for the exchange you prefer. In this latter case of “not Coinbase”, don’t forget to order the exchange to send ETH to your MyEtherWallet.
Step 3: Send ETH to the ICO
Whether you already had a wallet full of cryptocurrency, or have just recently created one using the first two steps from this article, you are now ready to participate in the ICO.
The next thing you need to do is visit the ICO website. Me, I’m going to lordmancer2.io. Usually there is a lot of project-related information, whitepaper, team, mentors and most often there’s a block dedicated to the ICO progression.
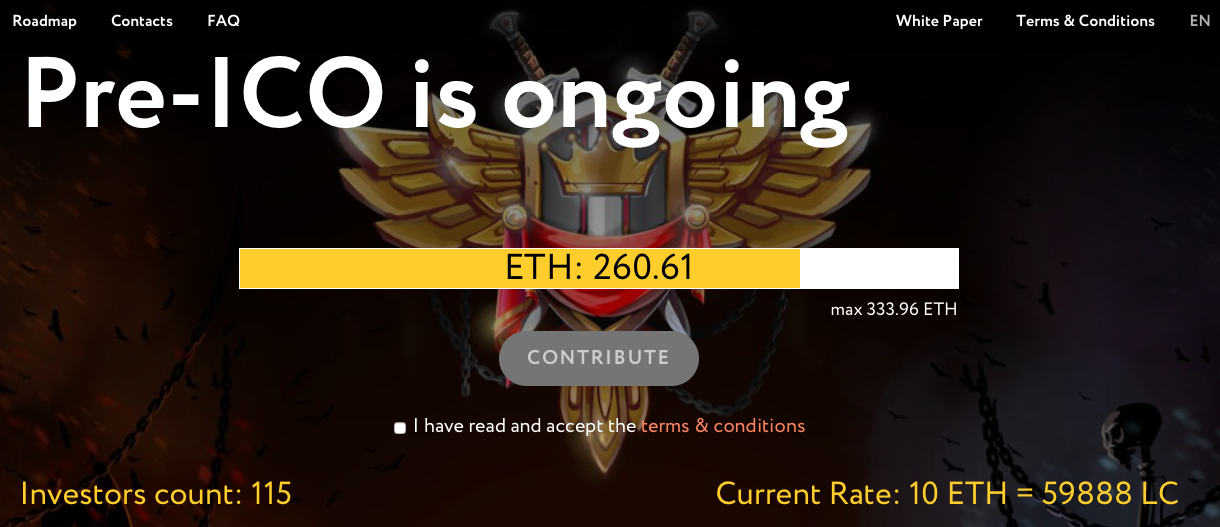
Here you can see total amount of Ether raised by the project, in this case 260.61, number of investors (115) and the current exchange rate.
In order to participate, I first need to read and accept the terms & conditions. After that I can click on ‘CONTRIBUTE’.
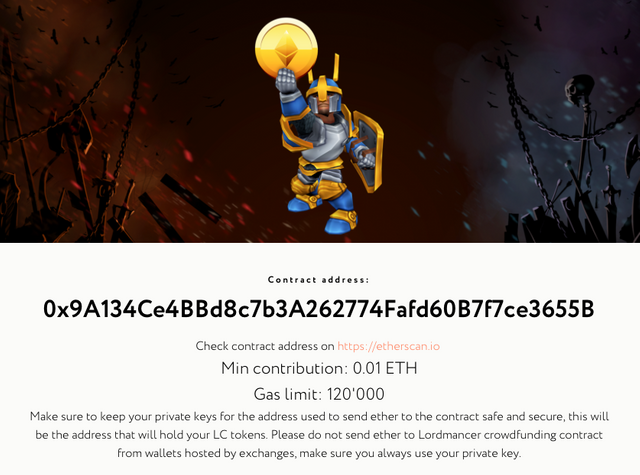
Here, one is presented with all the necessary information to buy tokens of this project: address to contribute, minimal amount of contribution, and recommended Gas limit (I’ll explain this later).
The most important thing here is the target address. It’s just another wallet like yours. Select the whole string of characters and copy it to clipboard (ctrl-c/cmd-c).
Now open MyEtherWallet and click ‘Send Ether & Tokens‘.
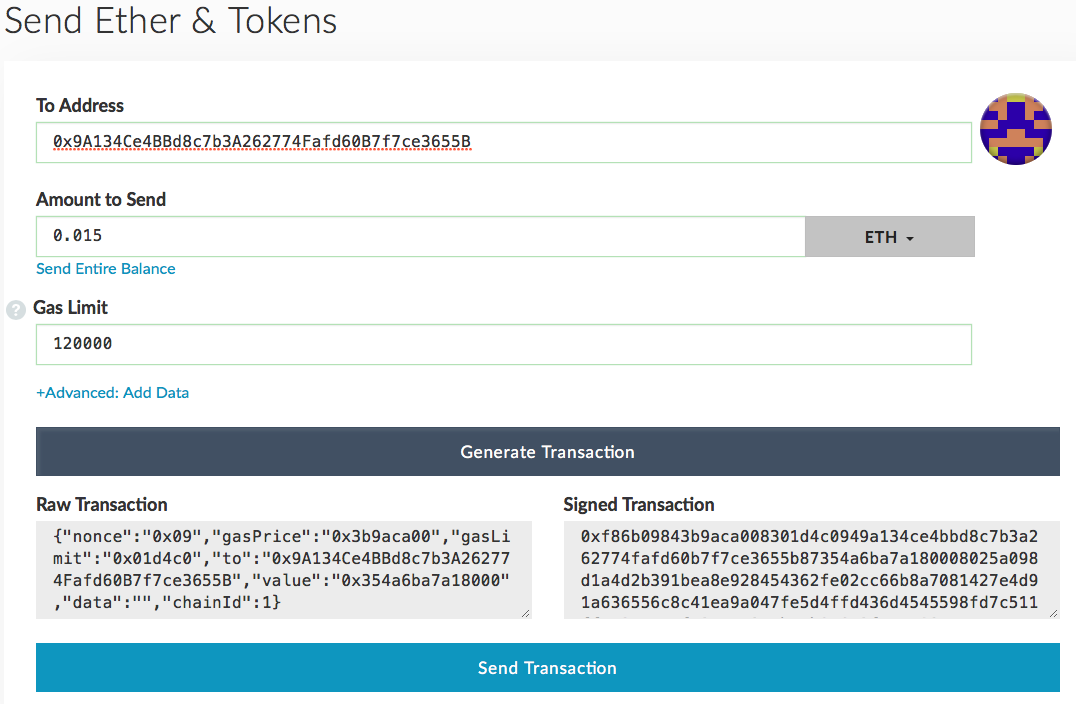
Paste the target address into ‘To Address’ field (ctr-v/cmd-v), type in the amount of Ether you want to invest and volume of Gas you’re expecting to spend.
What is Gas and Gas limit? Every transaction in Ethereum network requires a resource called Gas to be executed. Amount of Gas corresponds to the complexity of a transaction. If you set Gas limit too low, your transaction will fail. Think of it just like having gas in your vehicle (ETH in your wallet), and the destination is the ICO address. If you don’t put enough gas in your vehicle to get to the destination you’re going to, you won’t make it. Lower Gas setting will take longer such as driving a fuel efficient vehicle at slower speed. In MyEtherWallet you can set desired Gas price in the top right block.
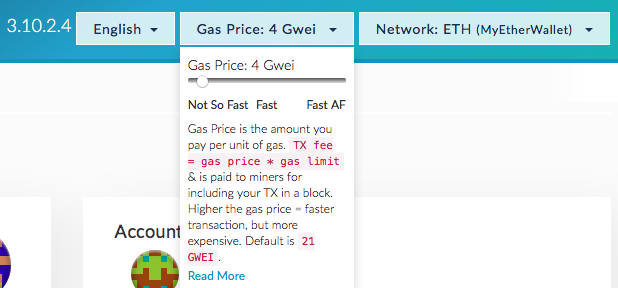
I recommend setting this value in a range from 4 to 10 Gwei. This is pretty cheap but the priority of your transaction will still be decent.
The last thing you have to do is to click ‘Generate Transaction’ and then ‘Send Transaction’.
That’s it! Now you’re a happy owner of those much desired tokens. Let’s put them into your MyEtherWallet.
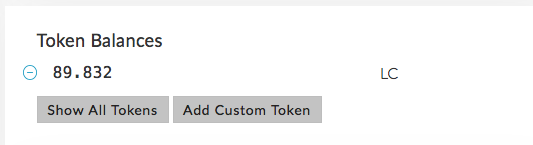
Click on ‘View Wallet Info’ menu and open your wallet as you did before. To the right you’ll see a block called ‘Token Balances’.
Click ‘Add Custom Token’
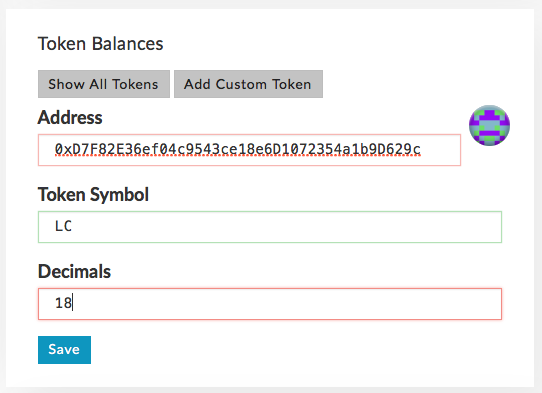
You should receive all of the required info from the ICO team. Usually, it’s clearly shown on their website. In a few seconds after you clicked ‘Save’, you’ll see the balance of your tokens.
That’s pretty much it! You’ve purchased the tokens you wanted, you’ve supported a great team, and you believe in them and their groundbreaking and revolutionary ideas! See you again on the next promising ICO!