How to Build a Hydroponic Wall Garden - Urban Farming in South Africa

Hello, thanks for checking out my complete step by step guide to build your very own fully custom clip-on hydroponic wall garden. This project is very easy to build, requires very little tools and uses minimal hardware & materials. Making it a perfect project for everyone who loves gardening!
Step 1: Pick a appropriate spot for your wall garden:
Make sure that you pick the right location.
1 - Check that you have a sufficient amount of space available for the wall garden.
2 - Make sure there is enough space on the back of the wall for the clip-on design to be save and fully effective.
3 – Ensure the wall receives the right amount of sunlight for your plants.
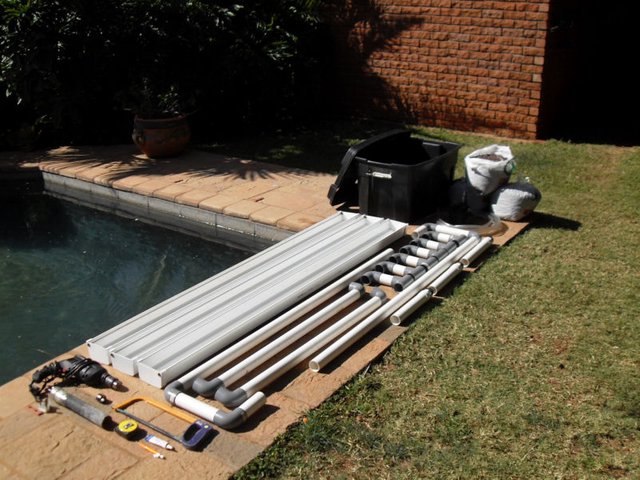
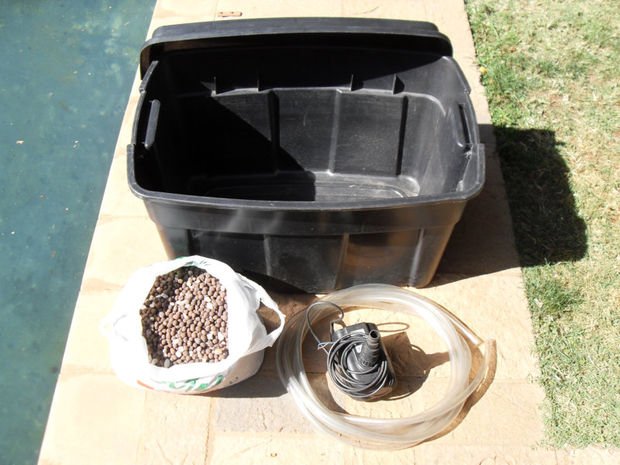
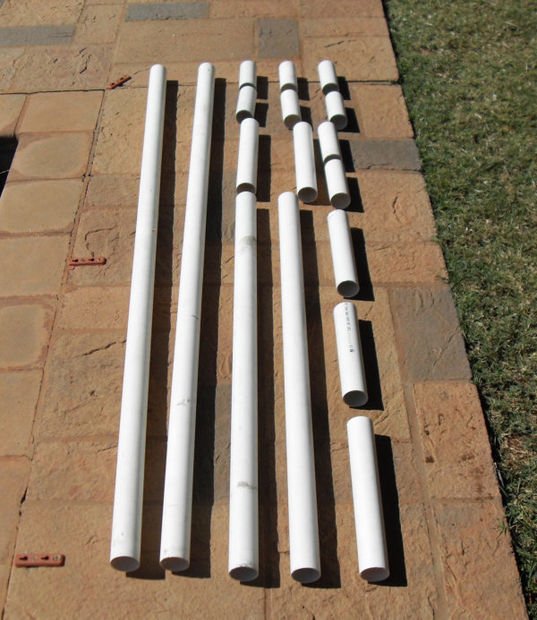
Step 2: Materials required:
Below are the materials required to successfully build a clip-on hydroponic garden at home.
Materials required for the Frame and Adjustable Tray Brackets
50mm PVC Piping, preferably white
14 X 50mm PVC Bends
6 X 50MM PVC T-Connections
Roll of Sanding Paper (50-150 grain)
Tube of PVC Glue
-Duct Tape
Materials for the Grow Trays
- Square PVC Gutters
-50mm PVC Pipe
6 X Gutter End Caps
3 X 36 - 50mm PVC threaded Adaptor
-3 X 50mm PVC threaded Adaptor
- 3 X 50mm Straight PVC Adaptors
-Stainless Steel Mesh
- Hydroponic Grow Medium ( LECA or Perlite)
Materials for Irrigation System
-50L-100L Water Reservoir
-Flexible tubing
-Water Pump ( Flow Rate 1400L/h, Head 2m )
-Cable Ties
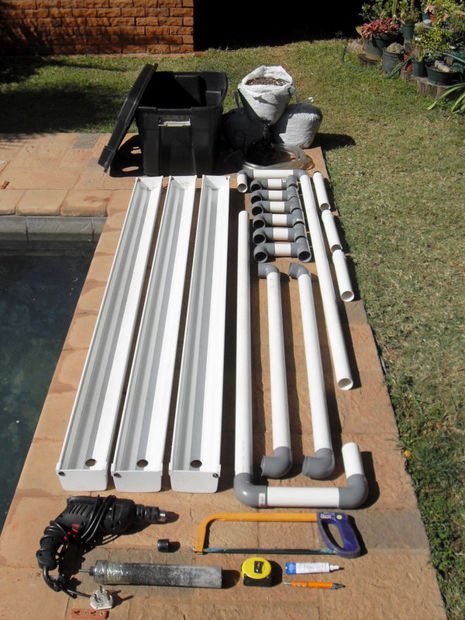
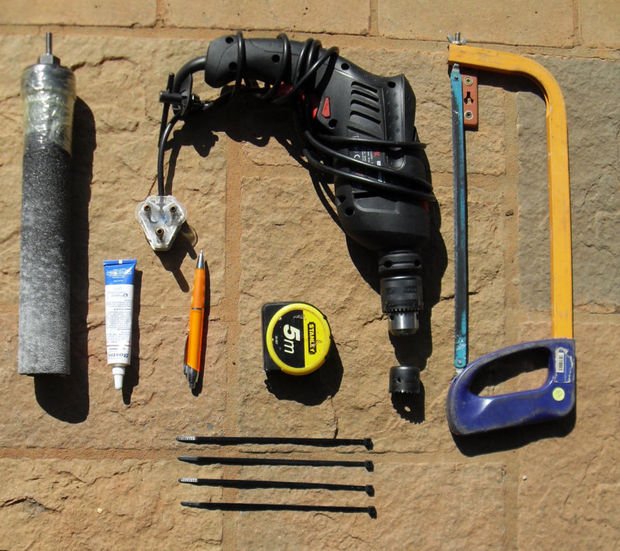
Step 3: Tools required:
Tools required to compete the project:
-Hand Saw
-Electronic Drill
-Tape Measure
-Pen
-50mm Hole saw
-36mm Hole saw
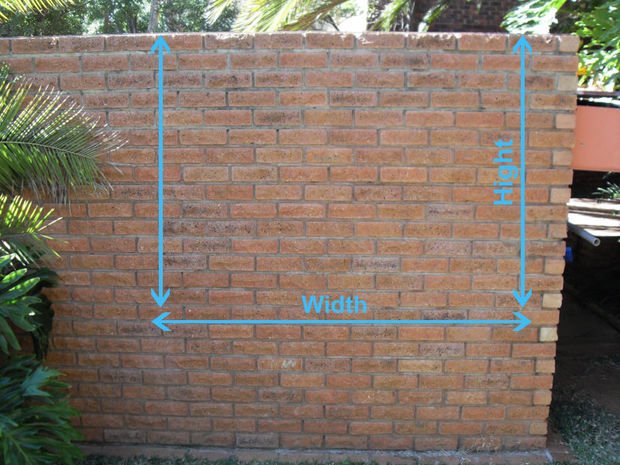
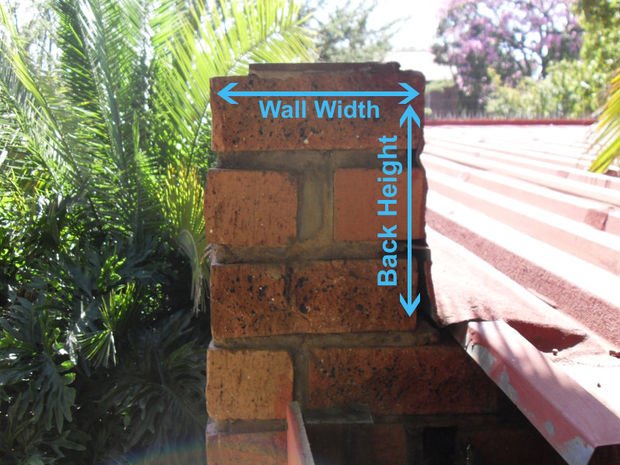
Step 4: Measuring your wall:
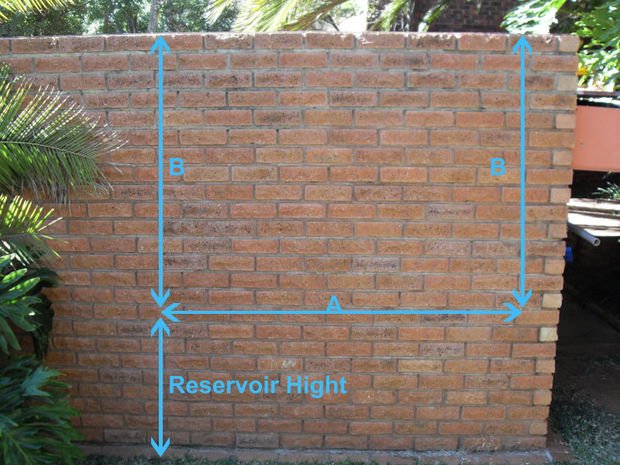
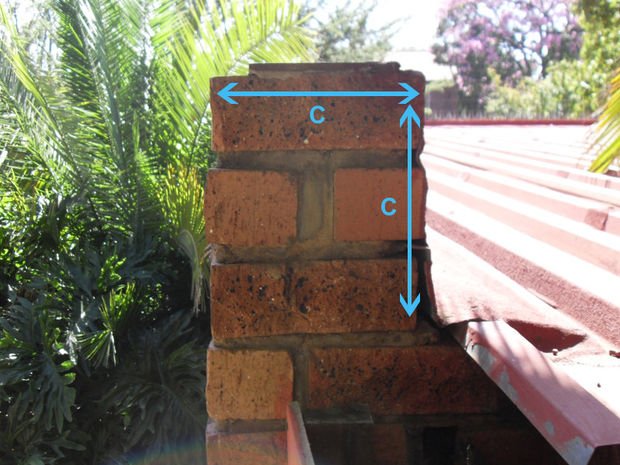
Write down the measurements in the instructions below on a piece of paper where instructed as it will be required in later on in the project
Step 5: Time to cut the PVC pipes and gutters:

In the previous step you did all the measurements for the grow trays and pieces of PVC piping you will need in this step.
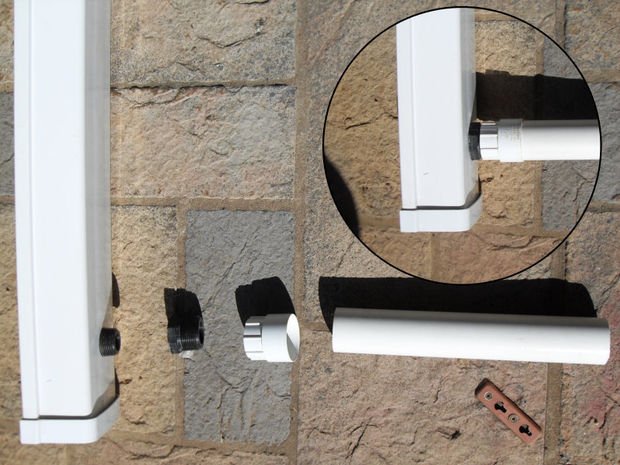
Step 6: Build the sliding grow tray arms:
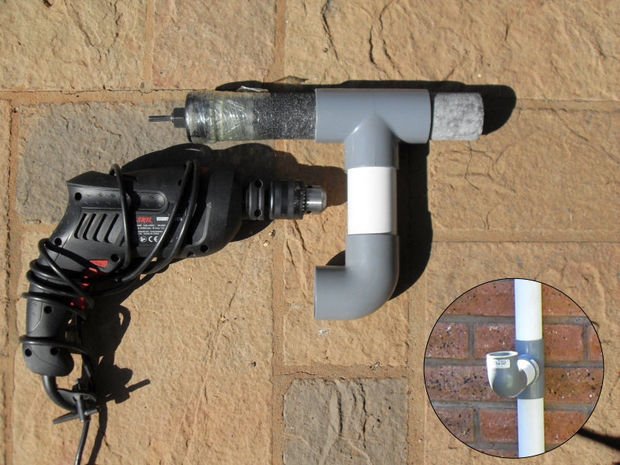
This can be achieved in a 2 ways:
With an electronic drill, a role of sanding paper, 50mm whole saw and some duct tape. As illustrated in the picture above. Be careful of over or irregular sanding when using this method. I found it works best to twist and turn the T junction around regularly.
Manually with some good old fashion elbow grease. Take the role of sanding paper and roll it up as close to 50mm as possible. Sand out the inside until it fits over the 50mm piping.
For this part you will need some PVC Weld/Glue
Now that you have correctly sanded out the T junctions it is time to assemble them. Take one length D piping and assemble them with each of the T junctions you just made as illustrated in the picture above.
Be sure they are aligned straight and the bits and pieces are glued together properly.
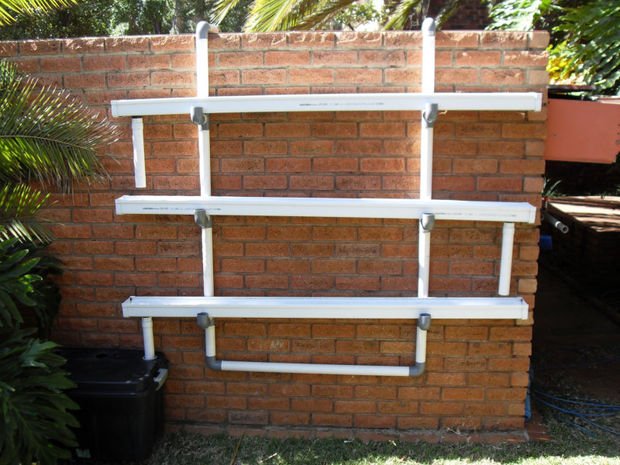
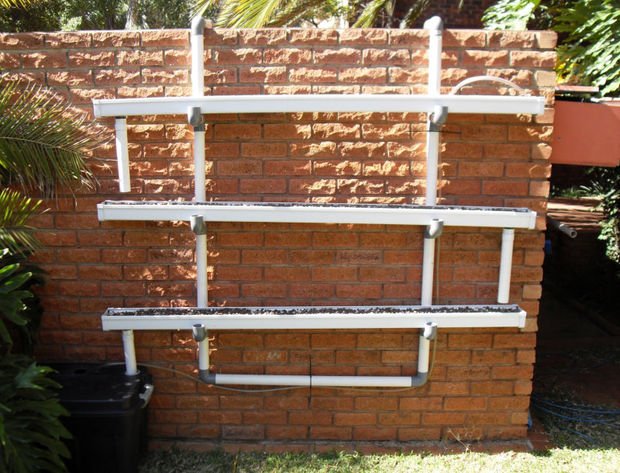
Step 7: Building the frame:
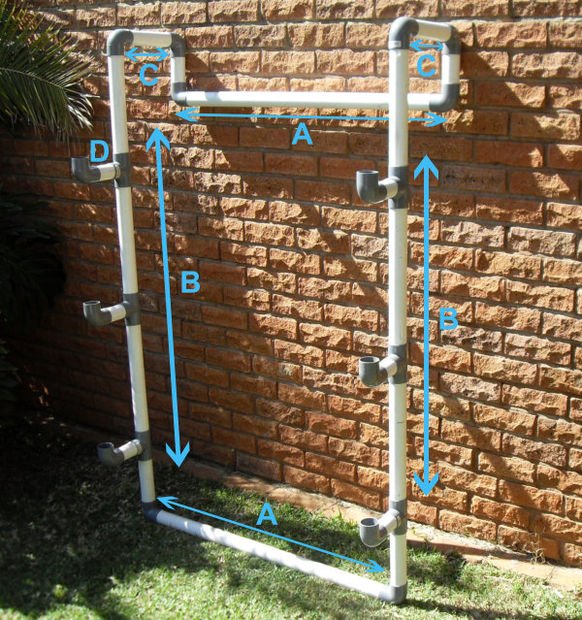
For this step you will need some PVC Weld/Glue.
Slide on 3 of the adjustable tray arms you just made to each one of the B pieces.
With the PVC Weld, assemble your clip-on frame as shown in the picture above
-Make sure that you use enough glue on the joints. Leave each joint to harden for about 5-15min (depending on the glue used) before continuing with the build.
- Also make sure your frame as is as straight as possible. Skew connections at the top of the frame can have a negative affect later on. Building each side first on a level platform before assembling the frame works well to keep things level.
Step 8: Adjusting grow tray levels:
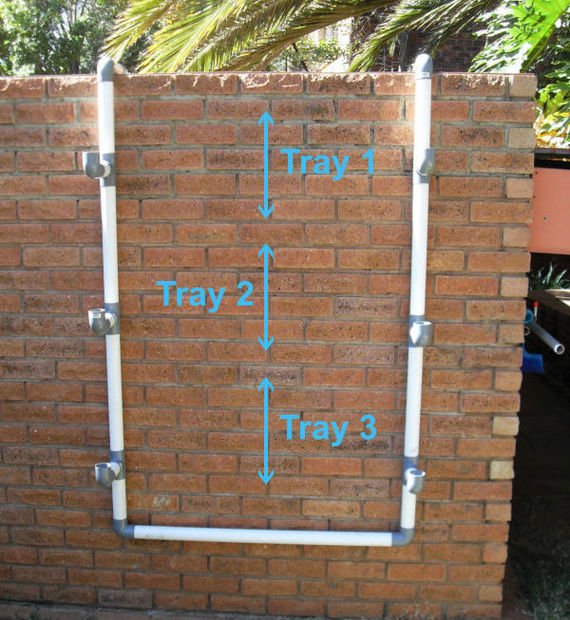
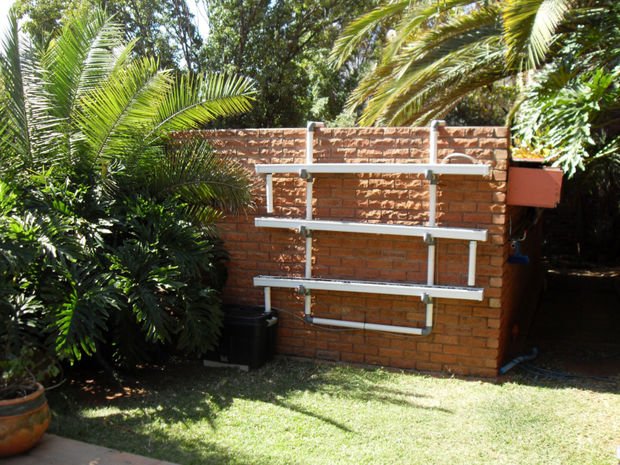
It is time to hang your frame on the wall. Check that everything fits well and that the frame is stable before continuing with the build.
With a measuring tape determine how high each of your levels should be. Swing the tray arms up to the correct level for each, ensuring that all of them are level to its opposite partner.
In order for the systems drainage to function properly each of the trays must lean a little bit lower to the one side. To achieve this simply slide the one side of each trays slide arms down 1cm, starting with the top left corner so that the water flows toward the left. Do the exact same with the middle and lower tray slide arms so that the water flow ends up at your reservoir.
Step 9: Building the grow trays:
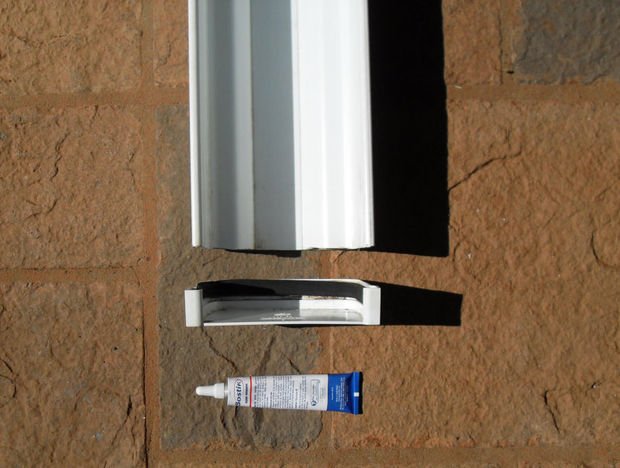
Insert an end cap on all of the gutter sides. Make sure they are correctly inserted and is flash to the end of each grow tray.
Line the inside of each end on of the gutter with glue for extra protection against sneaky leaks
Step 10: Install drainage ports into grow trays:
Drill a 36mm whole at the end of each grow tray.
Screw in the 36mm PVC threaded adapter into the whole. Then at the bottom of the tray screw in the 50mm threaded adapter along with the straight PVC adapter as shown on the picture.
Cut a round piece of steel mesh and insert it into the threaded adapter in the grow tray
Step 11: Install grow trays:
Step 12: Install reservoir:
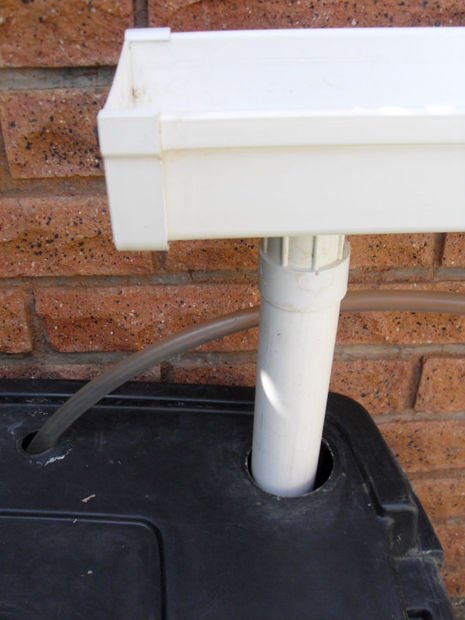
Place your water reservoir under your wall garden on a level surface and mark the spot where your drainage pipe and irrigation lines are going to enter your reservoir. Take the drill and drill a 50mm whole on the spot for your drainage and 36mm hole for your irrigation line.
Now take the tape measure and roughly measure the distance your last drainage pipe needs to be from the lowest tray to your water reservoir. It can be as long as you want as long as it doesn’t stick out of the reservoir.
Place your reservoir on its spot and insert the last drainage pipe so it enters the reservoir.
Step 13: Install irrigation line:

Insert the one end of your irrigation line through the whole in the lid of your reservoir and connect it to the water pump. Lead your irrigation line to the top right corner of your wall garden. When running, your water will flow in a zigzag pattern, irrigating on the one end and draining at the opposite end.
Step 14: Finishing steps:
Fill the Trays With Grow Medium.
I find a mix of perlite and LECA works well but any soilless grow medium can be used.
Fill Hydroponic Reservoir with nutrient solution.
Step 15: Final checks:
Before you switch on your hydroponic wall garden do the following checks first.
-Check that everything is stable
- Check that your power source is away from any moisture.
Now switch on your system and check that the water flows evenly through all the trays without any restrictions. Also check for possible leakage points.
Should everything check out you are now ready to start using your brand new clip on hydroponic wall garden!
System in Flight
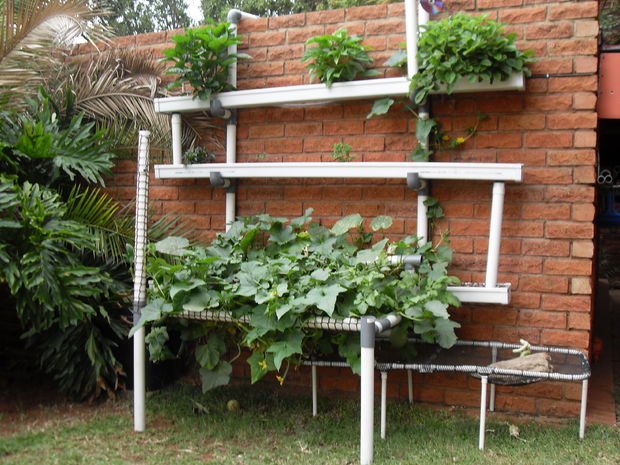
Here's a pic of the system in the early stages.You can see the cucumber, melon and watermelon plants at the bottom have enjoyed the system and are flourishing. We had to build an additional frame for the plants to give the vines some space to grab and grow. At the top, the pine berries and chilies were also starting to pick up speed. In the middle tray the parsley and devils chili just started to grow as they were planted at a later stage.
Unfortunately (sad) we don't have pics available of the plants and system after 5 months. The whole system was full...we managed to grow parsley, lots of rocket, salad lettuce, lots of pine berries, harvested 42 cucumbers, over 300 chilies and 1 super juicy watermelon and melon. Great success if you ask me...can wait for the next growing season to start:)
Upvoted
Upvoted
Nice @mono
Shot you an Upvote :)
:D
Great piece of information
Hey thanks a lot!!
With spring around the corner we should be up and running again soon..new plant species to be tested! Might I add that this was also added to instructables...thought it's nice to share it with both communities : )
Awesome guide @mono !!
Glad you found it useful : )
nice work, kind of a modified NFT system with rooting medium, well done and great info.
Thank you jed78...the nft setup was the only way to go for a wall garden...worked like a charm : )