HOW TO CONSTRUCT A HOUSE OF YOUR DESIRED STRUCTURE FROM START TO FINISH.


This design is done strictly with AUTODESK MAYA, below are the processes/steps involved in constructing a house of your desired structure from start to finish. Before we start with outlining the steps involved, let’s quickly understand the preliminaries of AUTODESK MAYA, basic tool used, their applications and other designs that can be done with AUTODESK MAYA.
WHAT IS AUTODESK MAYA AND HOW DOES IT WORK?
AUTODESK MAYA is a system software used in making 3- Dimensional designs and animation. 3-Dimensional designs in the sense that designs made via AUTODESK MAYA can be viewed in terms of length breadth and height inclusive. AUTODESK MAYA produce images of objects in 3 coordinates i.e. the X, Y and Z coordinates.
Another software that can work In place of AUTODESK MAYA is CINEMA 4D software which has application in various fields. AUTODESK MAYA is vast in various capacities in the sense that it brings whatsoever we can imagine or think of into reality via a due process. AUTODESK MAYA can create both static and dynamic design. Static meaning immovable and dynamic meaning moveable which can be regarded as ANIMATION.
All these are made from majorly POLYGONS.
A Polygon is a tool in AUTODESK MAYA having the characteristics of faces, vertices and edges.
Animation is the ability of an object to move from its initial/ pre-planned position to another, within a frame. (Pictures in AUTODESK MAYA are represented in frames per second (fps)). A frame has to do with the motion flow, transition, speed, and how smooth the video plays.
BASIC TOOLS USED IN AUTODESK MAYA
The work page in AUTODESK MAYA is called A SCENE. The left side of the scene encompasses of some tools which can basically be used to modify the scene. Modify in the sense that they can be used to create an object to a desired shape, location, size or a defined angle of inclination. These tools are:
1.) SELECT TOOL: the shortcut for the select tool is Q, the select tool is used to pick an object on the scene.
2.) MOVE TOOL: the move tool is used to move an object or polygon on the scene to a predetermined location of choice. The shortcut for the move tool is W.
3.) ROTATE TOOL: the rotate tool is used to revolve a particular image or polygon on the scene to a defined angle of inclination. The shortcut for the rotate tool is E
4.) SCALE TOOL: the scale tool is used to increase or decrease the size of a polygon or an object under modification in the scene. The shortcut for scale tool is R.
Some of the tools used in the POLYGON MENU include box, sphere, pipe, cylinder, grid etc., these are used respectively to build or create materials of choice, they can be used to transform every of our imaginations into reality.
Some important tools in the MENU BAR that are of vast use include THE EXTRUDE TOOL, BEVEL TOOL, THE INSERT EDGE LOOP TOOL etc. we shall quickly and briefly explain these tools and their uses before we get started.
EXTRUDE TOOL: The EXTRUDE TOOL is used to duplicate or drag out a new shape or face from an already existing one. The extruded part can be re-modified that is it can be re-scaled, moved in or out etc.
BEVEL TOOL: This tool is used to chamfer the edges of a polygon. It is used to smoothen just the edges of the polygon or whatever object you are working with so far it is characterized with edges.
INSERT EDGE LOOP TOOL: The INSERT EDGE LOOP TOOL is located under the MESH TOOL at the Menu Bar, it is used to create more edges on a polygon for further adjustments.
Another important tool we have to discuss about is ATTRIBUTE EDITOR which is located at the right edge of the screen, it shows the properties of a selected polygon on the scene.
FINALLY LET’S GET STARTED WITH CONSTRUCTING OUR HOUSE.
MAKING THE STRUCTURE OF THE BUILDING
STEP1: select a box from the polygon menu by clicking, then scale the box to your desired size using the SCALE TOOL from the tool bar depending on how large you want your building to be. Since it’s a storey building we then make the box high. PICTURE
N.B: Asides using box for the building we can also select the GRID POLYGON TOOL, this displays like a flat surface with several squares on the scene, it is mostly used to show compartments in a building plan, showing the number of rooms, and their location. This tool is used for internal parts of a building. Since we are concerned with just the outside of this building without showing the rooms, hence we go with the box method, we shall use the grid polygon tool method probably in subsequent projects. PICTURE

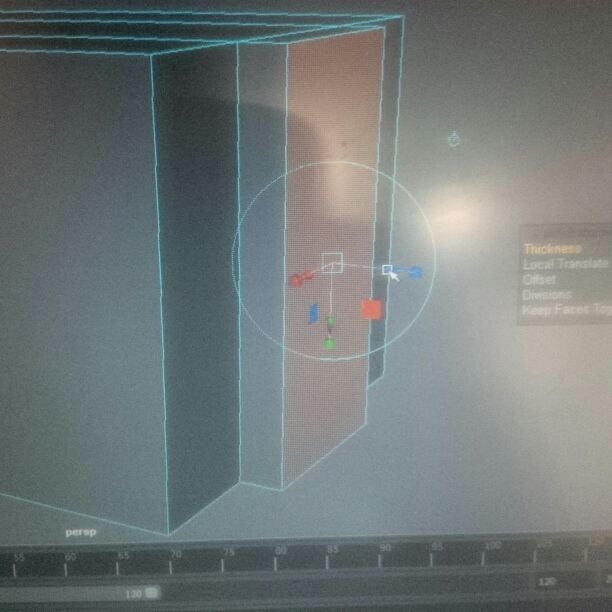
STEP2: After scaling the box to the desired size, we then make use of the EDGE LOOP TOOL which is gotten by clicking on the MESH TOOL in the menu bar. Use the EDGE LOOP TOOL to divide the faces of the box by clicking on it, then go to the area where you wish to divide, click on the edge, divide the first face vertically into three equal part, and do the same to the opposite face.
Then right click and hold your right click down, a drop down menu appears, click on face from the menu, then click on the select tool at the tool bar, after this come to your building and then click on the middle face, when the face is selected move your mouse up and click on the EXTRUDE tool, immediately you click some arrows appear with different colors carrying small boxes on top of them, make sure at the Centre a square is showing, the square is used to move the selected part in or out while the colored box when you click on it appears in the Centre and is used to re-scale the selected part. If a square is showing at the Centre of the arrows just at enclosed in a circle then use your mouse to drag the arrow out, by doing this you discover that the selected part is gradually protruding just as it is in our building plan. After doing this, right click again and then click on object mode to exit the face mode. PICTURE

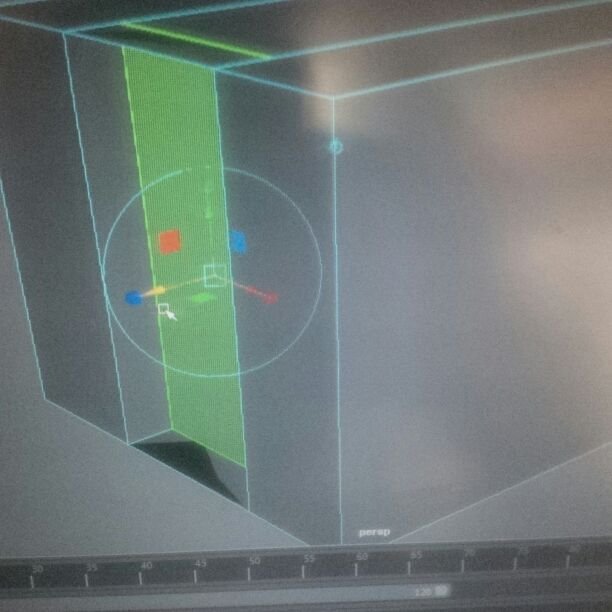
STEP3: Repeat this same step on the middle face of the opposite side, but this time instead of dragging out the arrow, you drag the arrow inside thereby moving that middle part inside as it is on the plan. PICTURE
STEP4: Having accomplished step three, we now use the same INSERT EDGE LOOP TOOL to create more edges for the windows and door. Make as many edges as possible to fit in the number of windows needed and their location. PICTURE

STEP5: After completing step four, select the faces for the windows and the door by selecting one first then hold down shift to select others then delete. PICTURE
N.B always remember to click on the select tool after making use of the INSERT EDGELOOP TOOL before performing another operation.
APPLYING COLOR TO THE BUILDING
STEP 6: Lets apply color to our building, to the part we extruded i.e. the middle part we are going to apply yellow color, while to the remaining part we apply pink color. To do this select all the faces in the middle part first, by holding down your right click then click on face, hold down your shift button and click on other faces to select more, after doing this then right click again, this time scroll down to ASSIGN EXISTING MATERIAL then click a drop down menu appears showing BLINN, LAMBERT etc, click on LAMBERT. You will discover that the ATTRIBUTE EDITOR at the right hand corner of the screen opens, if this does not happen go to the right hand side of the screen and click on ATTRIBUTE EDITOR, at the top of the attribute editor make sure that LAMBERT is clicked, if this is done, a colour palette appears which helps you to select the colour you want, then pick yellow. Select the other faces you wish to apply pink to then follow the same procedure but this time you pick pink. You can also rename your lambert to white in case if it is needed some other time.

CONSTRUCTING THE WINDOW
STEP 7: WE are done with the building structure, now let’s construct the windows. All we have to do is just make one then duplicate. To make the window, select a box when it appears on the scene you can use the MOVE TOOL to move the box away from the building, then adjust the thickness of the newly selected box as in the size of a window, the adjust the length and breadth of the box to take the form of a window.

STEP 8: Having gotten the shape and size of the window now we want to make it appear in glass form with white aluminum frames. To do this we make use of the INSERT EDGE LOOP TOOL to create more edges for the white frames.

APPLYING COLOR TO THE WINDOW
STEP 9: Here we want to apply colour to the window, first to the white aluminum frame, to apply colour select the face(s) you want to apply colour to, do this by holding down your right click button as usual and select the face, then hold down the shift button to select more faces. To apply colors after selecting the faces, hold down your right click button again and then scroll down to ASSIGN FAVOURITE MATERIAL then click, follow the usual procedure as in STEP 6 above, choose white since you want the aluminum frame to be white. You can also adjust the intensity, transparency and incandescence of the colour you have chosen. After you have chosen white the selected part of the : window turns white.

STEP 10: We have to apply colour to the other faces of the window in glass form, this is very easy just follow step 9. Select the faces you want to transform into glass form, hold down right click, go to assign favorite material. After clicking on lambert go to the color palette and pick any color of your choice depending on what you want the color of your glass to be. After doing this increase the transparency of the colour, by doing this the face gradually changes into glass.

STEP 11: if you succeeded in accomplishing step 10 above then adjust your window size to fit in the space provided for window in the building. Having done this, since you have so many window spaces you don’t need to create a widow for all of them, all you need to do is use the control + D by holding them down together to duplicate your window. After duplicating use the MOVE TOOL to move it to the required position, repeat this duplication and move process till you have covered every window area.

CONSTRUCTING THE ROOF
STEP 12: If you have succeeded in finishing the window, let’s make the roof, this is very easy to construct, pick a box from the polygon menu, after picking the box drag it to the top of the building, use the scale tool to enlarge the box until it covers the full top of the building just like a roof.

STEP 13: The roof still appears like a box, now we adjust it to take the form of the roof, by doing this, select the face of the roof, use the scale tool to reduce the size of the face, right click again and click on object mode. Click in scale tool again and make the roof a bit flattened. Select the face again, go to the menu bar on top and click on EXTRUDE, extrude the face you have selected by dragging it out after dragging it out then rescale the face again, continue this process of extrude face and rescale until you have the perfect style of your roof top. After this we are done with constructing the roof. To add color to the roof, follow the procedures of applying color then apply black color to the roof.
CONSTRUCTING THE FENCE
STEP 14: Here we are going to make the fence, this is very easy also, go to the polygon menu, select the grid polygon, use the move tool to drag it directly under the building, then take your mouse to the square at the extreme end of the grid, select every square at the extreme end round the grid leaving only the area where the gate should be unselected, after selecting all go to EXTRUDE, click and then drag it up, as you are dragging up the walls come up as in a fence and the building remains inside. Drag the walls to become high as in a fence level.


STEP 15: After doing this, we need to make the top of the fence a bit wider, to do this, click on every face on top of the fence then extrude it by dragging it out, then scale it to become wider than the wall beneath. After doing this, our fence is ready. You can then apply pink color to the fence also just by following the necessary procedure in step 10 above.
MAKING A PROTECTIVE BARB WIRE ON THE FENCE
STEP 16: Now we need to make the protective barb wire. To do this, pick the cylinder tool from the polygon menu, reduce the scale to make it very tiny make it a bit longer, then duplicate it into about 7 or 8 places with equidistance between them. After doing this pick one of the cylinder, rotate it using the ROTATE TOOL at the tool bar to be perfectly horizontal while others remain vertical at 90 degrees, after making the horizontal one fit it at very close to the top of the vertical ones then duplicate it and fix the other close to the bottom of the vertical one, after doing this, select all of them and hold down your control + G to group them, you can also do this by going to mesh on the menu bar, click then go to combine, this will help combine all the selected polygon and refer to them as one entity. Then you can apply black color to it following the necessary procedure.

STEP 17: When you are done combining, drag it to the top of the fence, duplicate it continuously and use your MOVE TOOL to move it to its proper position. Do this repeatedly until the top of the fence id fully covered with your barb wire.
MAKING THE GATE
STEP 18: To make the gate, simply pick a box again, rescale the box to fit in the size of the gate, then make the gate thinner just as it should be, continue to rescale until it fits perfectly into the provided space. A gate also carries two bars at each edge, to do this, simply click on a box again bring it out to the position it should be at the side of the gate, enlarge it and make it long, duplicate it then use the move tool to drag it to the other edge.

STEP 19: To apply color to the gate, use the INSERT EDGE LOOP TOOL, to create more edges on the gate, just vertical edges alone. After doing this click on the select tool then select the faces by holding down the right click to select faces as usual. Pick the first face, leave the second, pick the third, leave the fourth, and continue this until you have picked all. Then hold down your right click again and go to ASSIGN EXISTING MATERIAL, go to lambert then apply black color to it. Select the other faces then follow the same procedure to apply color to it, but this time we apply gold. After doing this our gate is ready.

.jpg)
STEP 20: At the gate there is a with circle, to do this, pick a sphere, and use the scale tool to make it very flat, then follow the usual procedure to apply white color to it. After doing this attach it to the gate, then you can combine or simply group them.

CONSTRUCTING A CAR
Yes we can also construct a car using the box polygon, it’s very easy, all you need is a box, and a pipe, so let’s get started
STEP 21: the first thing to do is to pick a box enlarge the box to take the size of the car you want to construct.
STEP 22: Then select the upper face of the box following the usual procedure of holding down your right click button then selecting the face, after doing this use the extrude tool to drag out the selected face so as to represent the upper part of the car. Make sure the extruded part is extruded considerably to fit in the size of the car you are constructing.

STEP 23: after doing this, now we one to make use of a new tool, this tool is used to smoothen edges, the tool is known as the BEVEL TOOL. Select the car then take your mouse to the menu bar where you have extrude tool, the bevel tool is just beside it. Click on it to smoothen the edges of the car, immediately you click on it a menu appears showing things like fraction, segments, keep face together etc. the fraction is used to increase or decrease the curviness of the object while the segment is used to increase or decrease the smoothness of the curved area. Adjust the fraction and the segment till it suits you.

STEP 24: if you have successfully accomplished step 24 then you have gotten the shape of your desired car. All we need to do now is to make provision for the glass at the four sides, front, back, left, and right. To do this, simply use the INSERT EDGE LOOP TOOL, to create partitions for the windows just as we did in the building.
STEP 25: having done this, we then apply the glass texture to it, as it was done in step 10, you can adjust the incandescence and the intensity of the color to make it brighter. Do this for all four faces, but make sure that the front face and the back face are well beveled.

STEP 26: Now let’s apply color to the body of the car, follow the procedures as in step 6, and then apply blue color to the faces required by selecting them.
STEP 27: You can also use the INSERT EDGE LOOP TOOL to create more edged in front of the car for the brake light and the full light. After creating the edges you then apply the necessary colors that befits them.
STEP 28: our car is not having tyres yet, to attach a tire, click on the pipe tool use the move tool to drag it to the position it should be, the, rotate it to make it erect as a tyre should be, you can then apply black color to it following the usual procedure. Use the move tool to locate it properly then use the control + D to duplicate and then move to other positions. When all four tyres are complete then our car is ready.

STEP 29: You can then use the move tool to move the car into the compound.


wow, this is amazing @vikebun, i am a 3D animator and i must confess breaking a model of such into simple steps could take days to achieve, i must appluad you for this hardwork mate, weldone!
Thanks a lot @vikebun this is the thing which I love about steemit you always learn something new and that too in such detail..... Thanks for sharing!!
Hi. I am @greetbot - a bot that uses AI to look for newbies who write good content!

Your post was approved by me. As reward it will be resteemed by a resteeming service.
Thanks @greetbot. I put a lot of effort into that project, it took me weeks to finish. Hoping that I would be curated but I wasn't. Am not gonna give up though. Thanks for commenting me
Thats a great tutorial, i like your hard work
Very intriguing. Nice write-up
Tnx