How To Connect ANY RC Transmitter To a Simulator
So, recently I got hooked on FPV drone racing / freestyle flying. I have some past experience from flying RC planes, but I've never flown a quadcopter before. I've decided to build my own, but before crashing it I wanted to get at least somewhat comfortable flying around in a simulator, but as I soon found out my Turnigy 9x transmitter didn't like my computer, so I had to figure out my own way of connecting it to a simulator. Here's how I went about it.

I wanted the solution to be compatible with pretty much every simulator out there and possibly even with every transmitter. So what do all simulators have in common? They require your transmitter to be represented as a HID (Human Interface Device) or a game controller to be more exact. So somehow I had to read the output from the transmitter and then emulate a game controller. Luckily I had an Arduino Leonardo clone laying around which is built around the ATMEGA 32U4 microcontroller which can emulate HID devices. This is the first part solved, but I still had to solve the second problem; reading the stick input from the transmitter.
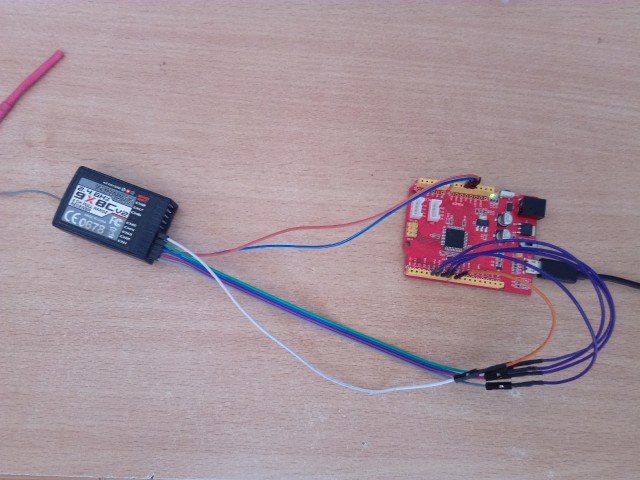
As it turns out, the easiest way to do this is by reading the outputs directly from the receiver. The receiver puts out a PWM signal which is relatively easy to read with a microcontroller. So I went ahead and connected the correct pins from the receiver to the Arduino. I've connected the channels for throttle, rudder (yaw), ailerons (roll), elevator (pitch) and an auxiliary channel which I'll later use as a makeshift ARM switch.
Ok, now all that was left to do was to write the software that will run on the Arduino. First I had to figure out how to emulate a game controller and with a quick Google search I found this library (https://github.com/MHeironimus/ArduinoJoystickLibrary).
Adding it to my Arduino IDE only took a couple seconds and I was ready to start coding. This is what I came up with (some of the values in the map functions were obtained through experimentation; feel free to change them to suit your controller).
NOTE: I realize the code isn't very well written and could be improved upon, but it gets the job done.
#include "Joystick.h"
bool armed = false;
void setup() { Joystick.begin(false);
pinMode(4, INPUT); pinMode(5, INPUT); pinMode(6, INPUT); pinMode(7, INPUT); pinMode(8, INPUT);
/* USE INTERNAL PULLUPS */ digitalWrite(4, HIGH); digitalWrite(5, HIGH); digitalWrite(6, HIGH); digitalWrite(7, HIGH); digitalWrite(8, HIGH);}
void loop() { long aile = pulseIn(4, HIGH);
if(aile > 0){ /* * Map the value twice to decrease resolution / sensitivity. * Filters out some of the interferecnce. * Not an ideal solution, but it works. */ aile = map(aile, 1040, 1889, 0, 100); aile = map(aile, 0, 100, 0, 255); Joystick.setXAxisRotation(aile); }
long elev = pulseIn(5, HIGH);
if(elev > 0){ /* * Map the value twice to decrease resolution / sensitivity. * Filters out some of the interferecnce. * Not an ideal solution, but it works. */ elev = map(elev, 1040, 1889, 0, 100); elev = map(elev, 0, 100, 0, 255); Joystick.setYAxisRotation(elev); }
long thru = pulseIn(7, HIGH);
if(thru > 0 && armed){ /* * Map the value twice to decrease resolution / sensitivity. * Filters out some of the interferecnce. * Not an ideal solution, but it works. */ thru = map(thru, 1040, 1889, 0, 100); thru = map(thru, 0, 100, 110, -127); Joystick.setYAxis(thru); }
long arm_sw = pulseIn(8, HIGH);
if(arm_sw > 0){ arm_sw = map(arm_sw, 1040, 1889, 0, 100); if(arm_sw < 50){ armed = false; Joystick.setYAxis(127); }else{ armed = true; } }
long rudd = pulseIn(6, HIGH);
if(rudd > 0){ /* * Map the value twice to decrease resolution / sensitivity. * Filters out some of the interferecnce. * Not an ideal solution, but it works. */ rudd = map(rudd, 1040, 1889, 0, 100); rudd = map(rudd, 0, 100, -127, 127); Joystick.setXAxis(rudd); }
Joystick.sendState();}After uploading the sketch to the board Windows detected it as a game controller and opening up the properties confirmed it was working (Windows for some reason didn't display X and Y axis movement correctly, but the simulator picks it up just fine).

NOTE: There is quite some visible interference, but luckily it's not noticeable while flying.
At this point everything was setup and I was ready to calibrate it in the simulator. During the calibration process I had to do quite a bit of trimming, but after I finished the setup I was ready to fly.
What are the pros and cons of this kind of setup?
Firstly the pros:
- Using this kind of setup allows you to use virtually any transmitter / simulator combo
- It's fairly easy to setup with some coding knowledge
And the cons:
- The response times aren't exactly great. After a couple of days of using this setup I've started to notice a small delay of a couple of milliseconds (ms) which might not be that big a problem for a beginner pilot like myself, but could present a problem for more experienced pilots.
- Setting this up requires some coding knowledge which isn't a problem for me as a programmer, but might present a problem to someone with little to no coding experience.
- There is quite a lot of noise in the data which could be eliminated using software, but that would even further decrease the resolution and increase the response time which wouldn't be ideal. Luckily though this interference isn't really noticeable while flying.
Overall this is a good setup for someone who has problems connecting their transmitter to the simulator using conventional methods (for example with an AUX cable).
Thanks for the information .. i am happy to see this news .. help devoted me
that is amazing. i wish i was as productive in my spare time.
I've got the TH9X. Ill have to try that out and see if I get similar results.
Thanks for this... very interesting.
Awesome! :) Let me know how it works and feel free to contact me if you need any help. :)
Congratulations @tadejgasparovic! You have completed some achievement on Steemit and have been rewarded with new badge(s) :
Click on any badge to view your own Board of Honor on SteemitBoard.
For more information about SteemitBoard, click here
If you no longer want to receive notifications, reply to this comment with the word
STOPCongratulations @tadejgasparovic! You have completed some achievement on Steemit and have been rewarded with new badge(s) :
Click on any badge to view your own Board of Honor on SteemitBoard.
For more information about SteemitBoard, click here
If you no longer want to receive notifications, reply to this comment with the word
STOPVery cool and novel use of an arduino!
Thanks for this amazing post. It relay helpful to understand the interfacing.