Pressuse Cooking Meat To Preserve It Without Using Electricity
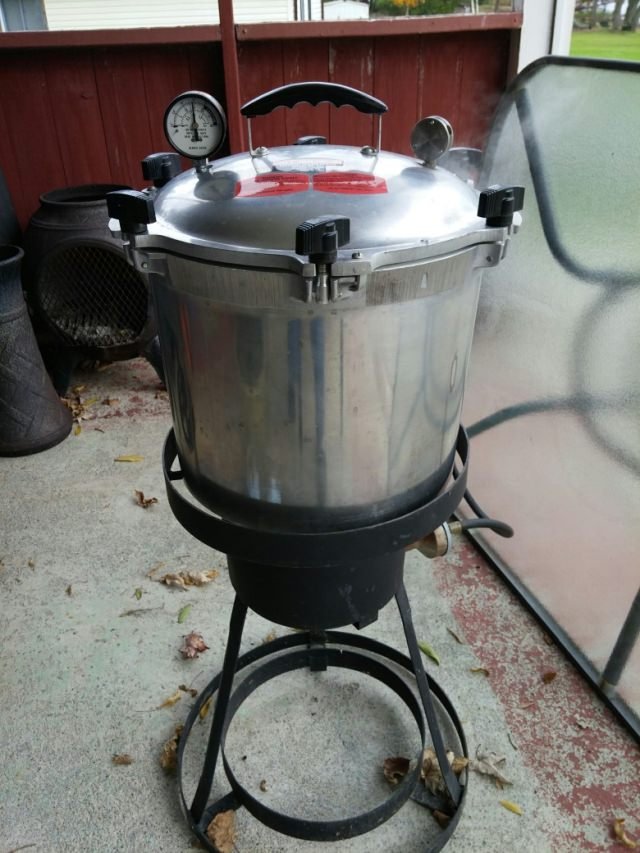
A few months ago, I started the process of learning how to use an All American pressure canner (model 921). I bought it gently used from an older couple and after inspecting it to make sure that the pressure relief valve was still intact and it had all its parts, I stored it for about 6 months before I worked up the nerve to give it a whirl.
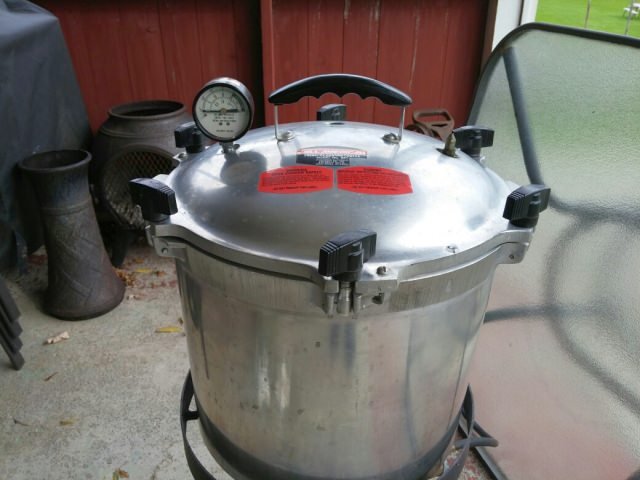
A pressure canner is a large kitchen appliance that resembles a typical household pressure cooker with the differences being that they are generally larger in size, offer multiple rocker weight options, have a pressure gauge and require an independent heat source.
Protip: In most cases, pressure canners are too big and too heavy to be safely used on a standard household stove-top. Glass top/flat ranges have been known to shatter under the weight of a "full to capacity" pressure canner.
In the big scheme of things, a pressure canner is more versatile than a standard pressure cooker because it can maintain an internal temperature inside the pot, for the optimal length of time required to effectively preserve food. This, a specific temperature maintained for a set amount of time, is what safely preserves each type of food.
Protip: To preserve meat (for example) the required temperature is 250 degrees F and this temperature needs to be maintained for 90 minutes.
Think OF A Pressure Canner As A More Precise Pressure Cooker
It lets you safely preserve fruits, vegetables, fish and meat in glass sealer jars. After you successfully complete the pressure canning process (meaning that you have properly filled your glass sealer jars and cooked the contents of those jars at the correct temperature for the correct amount of time) the food within the jars can be safely stored.
At Room Temperature! Indefinitely Without The Risk Of Contracting Botulism And Making Yourself Or Your Family Really Sick
Even meat. It can be safely preserved this way and stored on a shelf at room temperature as long as the seal (which is the tin lid) on the jar doesn't break.
Protip: If the seal does break, the contents of the jar will become exposed to oxygen and start to decay which makes it non-usable and the contents will discolour and smell putrid. If you ever open a jar, only to be assaulted by a disgusting smell, throw the contents of that jar away immediately because it is no longer safe to eat.
Directions:
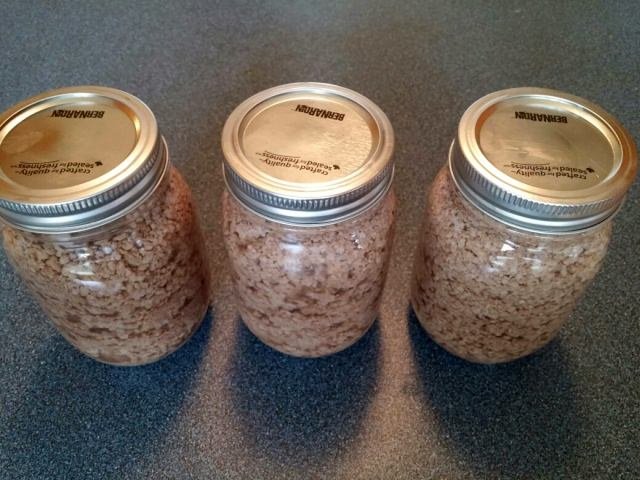
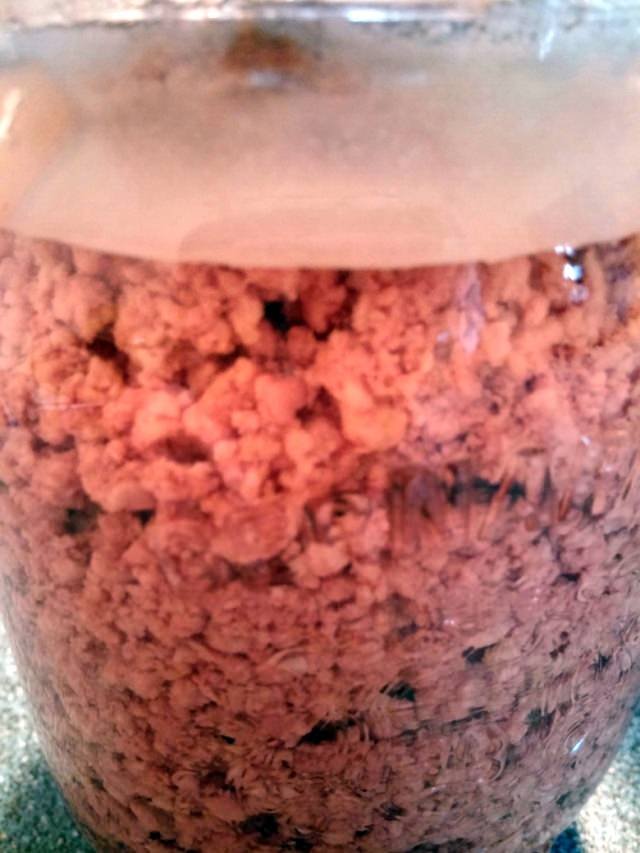
- Cook the ground beef in a frying pan, exactly the same way you would normally cook ground beef that you are planing to eat right away.
Protip: Frying the beef in advance will allow you to put the meat in the glass jars without the meat clumping together. Making this extra effort (to cook the meat in advance of sealing it in a glass jar) will ensure that the meat will easily come out of the jar when you want to use it.
- Prepare your jars by washing them with hot soapy water. Rinse and dry them well.
- Fill the jars with the cooked ground beef and add water to cover the top of it, while still leaving a 1 inch air gap at the top.
- Place the sealer lid in position and hand tighten the rings in place.
Protip: A wide mouth funnel with a large bottom opening will let you fill the glass jars more easily and quicker. In the photo below you can see what one of these special wide mouth funnels looks like.


I preserved 13 pounds (or 6 kg) of cooked ground beef in 26 pint (or 500 ml) glass sealer jars.
Most pressure canners come with metal risers. The risers are used to keep the glass jars off of the bottom of the canner and they are also used to support another layer of jars when you run it at full capacity. My canner will hold 18 pint (or 500 ml) glass jars. (Nine jars on the bottom and nine jars on top.)
Here's what it looks like with the bottom layer in place:
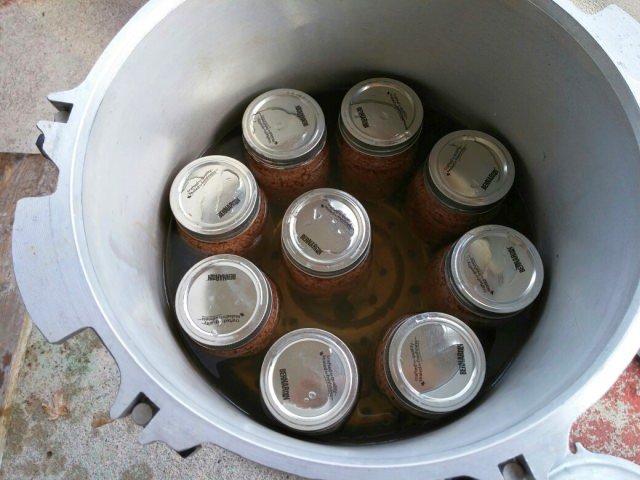
(Notice that the jars are sitting on the metal riser.)
- Fill the pressure canner with 1 gallon (4 litres) of water and the jars.
- Secure the lid, but do not put the rocker weight on the nipple, yet.
- Turn the propane on high to get it up to temperature quicker. (Do Not Walk Away)
- As the water inside the canner starts to boil, steam will start to sporadically escape from the nipple. Let this boiling progress for about 3 minutes.
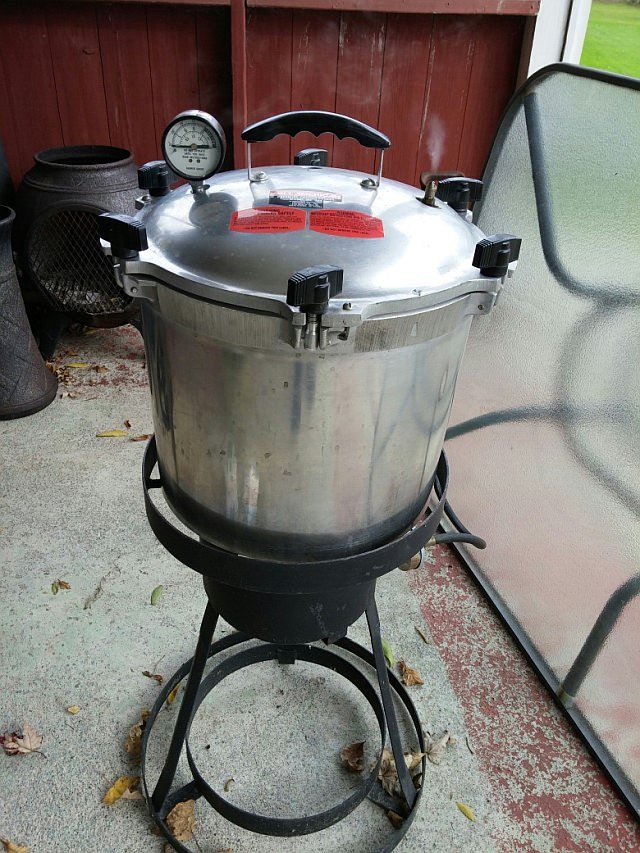
- Using a pair of tongs, carefully put the 15 pound rocker weight on the nipple. (Care must be taken to avoid getting burned by hot steam.)
(Notice the rocker weight in its place, opposite the pressure gauge.)
- Drop the propane flame back down to let the jars acclimatize to the higher temperature more gently.
- As the pressure from the steam inside the canner builds, so does the temperature.
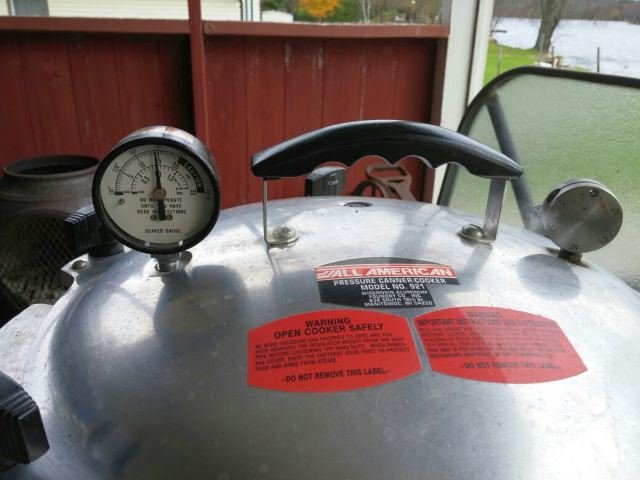
- Start a timer for 90 minutes when the pressure gauge reaches 15 pounds pressure (which is also 250 degrees F). The movement on the rocker weight follows a "rock. stop. rock." pattern when 15 pounds of pressure has been achieved.
I found that at approximately 30 minutes into my 90 minute preserving cycle at 15 pounds of pressure, I had to start adjusting for temperature increases. As the jars and water are at a constant temperature, the pressure and temperature (inside the canner) keeps building. This means that you have to reduce the propane to a lower flame to maintain exactly 15 pounds of pressure.
Protip: Do not walk away from the pressure canner while it's acclimatizing. If you don't adjust the flame level of your propane burner, the pressure and temperature will keep rising and you may blow the pressure relief valve right out of the lid. This puts you at considerable risk because you could easily get severely burned by superheated pressurized steam.
Eventually the pressure will remain constant, but I still made a point of checking the pressure gauge every 10 minutes, just to be certain that there were no fluctuations.
- At the end of 90 minutes, turn the propane burner off. As the temperature of the steam inside the canner drops and turns back to water, the pressure starts to drop too. When the pressure gauge has almost returned to its lowest setting, you can remove the rocker weight (very carefully) by using an oven-mitt to protect your hand and a pair of tongs. If steam comes out of that nipple, put the rocker weight back down immediately and wait until the pressure drops more before you try to remove the rocker weight again. If you take the weight off while there is still a lot of steam in the canner the pressure will drop too quickly and all the jars could shatter.
- Once, no steam comes out of the nipple when the rocker weight has been removed, it is safe to open the canner and remove the jars with oven mitts. The jars will need to cool for a few hours before handling and storing away.

I let them sit outside for approximately 2 hours before I brought them in and let them continue to cool on a counter for another 12 hours.
This is what the jars looked like after they had completely cooled to room temperature:
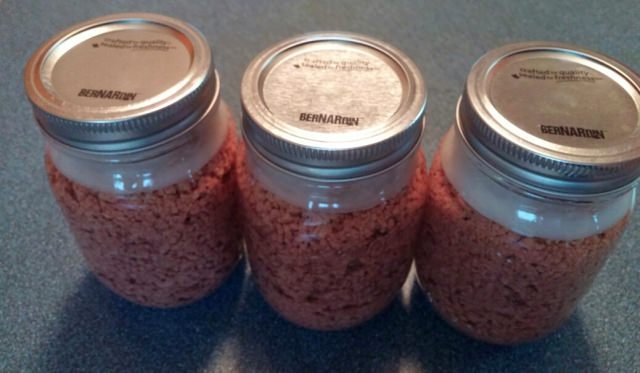
(Notice the fat has now solidified at the top of each jar. This should be easy to remove as each jar is opened and the meat used.)
I then relocated the jars of canned ground beef to shelves in my cold room. One of my motivations for investing in a pressure canner was so that I could preserve food and store it long term without having to use electricity to do it.
So far so good
I plan to start opening these jars in a month and I'll provide an update, then.
I welcome your comments and I invite you to follow me on my journey...there might be the odd botulism experiment along the way. ;)

~ Rebecca Ryan
@rebeccaryan
Great subject. I grew up around a pressure cooker much like the one you show in your photo.
My mother used it to can vegetables and meat. Plus, because of the large family size. She used it to cook meals for us as well. It had a 21 quart capacity. It would hold 7 quart jars to can each time.
I don't remember any rack though.
It never did blow up. It always worked well.
Thank you for reminding me of my childhood eating.
There was always enough for all of us when the lid was lifted. Ha
Francis
This is a beautiful memory. Thanks for sharing it with us all Francis. :)
I think preserving food is a valuable skill to have, so I continue to work at learning how to safely do it.
Thanks for the fantastic comment.
Rebecca ;)
@rebeccaryan,
That would be awesome! I have a question, when we give the pressure to it while bottles of meat inside, that heat can tolerate by the bottles? You always comes up with something new, something great, something memorized! Great article about your experience again!
Cheers~
Yes @theguruasia. The glass can tolerate 250 degrees F under pressure but that is the reason why it is so important to continually monitor the pressure/temperature so that they don't get too high, blow the pressure relief valve and break the glass in the process. To do it safely, you need to really pay attention to it. :)
@rebeccaryan,
Got it! That's what I was fear to do! Thanks for sharing such useful tips friend!
Cheers~
My mom and grandma use those all the time! My family does a lot of canning. Currently feasting on homemade grape jelly and apple butter :)
Cool! Nothing beats cracking open a jar of summer love. ;)
wow nice post, well i know about pressure cooker but honestly don't know about pressure canner, i think they are the more precise version of regular pressure cooker and there size is also bigger, well i really like your way to preserve the ground beef and i am sure in this way we can preserve out meat for month's, can we also apply this process to preserve any meat or it is just for beef, thank you very much for sharing your experience and knowledge with us, it's really helpful, Stay blessed
This is exactly the thing @adnanrabbani. Meats, fish and some vegetables (depending on whether they are low acid or not) require precise temperatures to kill the bacteria contained with in them properly. Any meat can be preserved if it is prepared properly and canned at the correct temperature for the correct amount of time. The benefit is that this food can be stored for years...although it is better if the contents are consumed within a year.
Thats a glorious and power saving technology method you sharing @rebeccaryan. The Pressure canner technique lets safely preserve all of foods what we need to cook like as fruits, vegetables etc... That would be easy process when you wrote this article. I almost know you contribute more important things to steemians. You nicely describe safely preserved this way and stored on at room temperature in this. Absolutely great.
Resteemed your post.
Thank you @madushanka! This was actually the hardest article I have written to date and it took me about 3 days to get it just right. I wanted to explain everything so that people could use this as a reference and be safe when they try it. Being able to preserve food is a very valuable skill to have and if you can do it by only using propane to cook it, once you've used that fossil fuel, no other power is required. In Canada, most people buy big freezers to freeze food for long term storage. If this is done, there is the cost of the freezer, the monthly cost to run the freezer and then if power is lost, you have to take action because all the food starts to thaw at once. Some people keep 1/2 a cow this way and it is certain disaster if the power goes out for a few days.
This compressor is very cool so I use it here in Saudi fast food very well
In addition to ease of use
We also notice that it is very dangerous if it is used incorrectly
Greetings my friend @walidsalah
It can be dangerous and you need to understand how the equipment works because the only safety feature is the pressure relief valve.
Everyone I have ever talked to who has used both a pressure cooker and a pressure canner has a story where they or someone they knew, blew out a pressure relief valve by accident, because they didn't follow the operating procedure correctly.
Yes my dear friend
It is necessary to know how good to use it, otherwise the explosion of misuse may lead to disaster
I wish you safety and all
Looks to me as not an easy process but màybe giving it a try is what I need to do.
I was fearful of the equipment...but once I used it a few times, I have become more comfortable with the process. It does take time to do. There is a lot of food prep and canning time but after that, you can have a beautiful home cooked meal on your table in less than 15 minutes...the time it takes to heat the contents of a couple of jars in a pot, plate it and take it to your table. ;)
its all about good house hold technique to preserve meat and other food for preserve long time without instrument, thanks for sharing.
Yes! Thanks for reading and commenting @sheikh27!
That's nice to know and would be looking forward for future updates on this :)
Yes @blazing. I am hopefully that I have done this correctly and when I go to use this meat in a month or so, it will not be rotten. Fingers crossed. LOL! I will do a follow-up one way or the other. :)
Very useful and useful thing, I think it should be in every house, it is possible to make any canned food. Thank you for the memorable article.
Yes, it is possible to can/jar any food...if you know how and have the proper equipment to do so.