From 0 to 8.5; a Practical Guide to Brewing Beer for Beginners
If you enjoy cooking or making things and also appreciate craft beer, then you really ought to try brewing. The home brew world has steadily grown over the last few decades with the result being an immediate supply of high quality ingredients and tools. As a result, as long as you follow directions, it is very likely you will succeed at brewing something tasty on your first try. Like anything else worth doing, there is a learning curve, or curves, but nothing too daunting. If you know your way around a kitchen and understand some basic concepts of sanitation then you will be kicking back with a satisfying pint of your own fermented liquid joy in no time.
I make no claims of being an expert brewer, but I have been a teacher all my adult life, and maybe even before that when I think about it. I truly believe the best teachers are often only a half step ahead of their students. This is definitely the case here as I have only been brewing for three years. However, Since I can still clearly remember the beginning, I think I can provide some great advice on how to get started and succeed on your first try. Also, I have made a few novice mistakes, and I will do my best to convey them here in ways that help you avoid them.
So this post is intended to be a complete overview of the most simplified approach to brewing your first batches of beer and will include the following:
- A complete list of the minimum supply set up you need to succeed the first time, and a reasonable upgrade, including links for learning to make them or purchase them.
- A step-by-step guide to the process, including the preparation, organization, boil, transfer, fermentation, and bottling.
- Tips on choosing beginner recipes.
- Resources for going to the next level.
Before I get into details, some preliminary thoughts.
- Brewing beer isn’t hard and isn’t very complicated.
- Brewing beer is mainly a form of cooking that you do on your kitchen stove. If you have followed recipes for things like stew or tomato sauce, you’re probably more than prepared.
- The keys to brewing good beer at home are sanitation, sanitation and sanitation. If you have ever had a friend’s home brew and suffered through the whole bottle while trying to be polite, it was most likely due to one of many possible bacteria that entered the system.
- The other key to good beer is trusting chemistry, and the fact that any proven recipe you find is based on exact quantities of ingredients added at more or less exact times in the process. If you understand that baking is chemistry and quantities then brewing will not be all that new to you.
Minimal Equipment List
Plastic Fermenting Bucket A large food-grade bucket with a matching lid and volume markers is what you want. They are one of the least expensive pieces of equipment you can buy, so don’t turn the old drywall mud bucket into a fermenter! However, old 5-gallon buckets are very helpful for sanitizing equipment, soaking and draining bottles, etc.
Plastic Fermenting Bucket
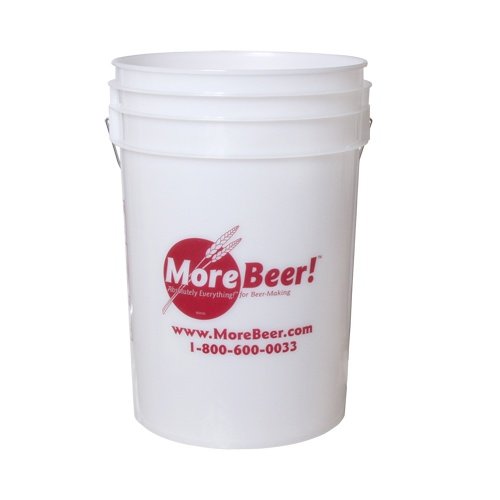
6-gallon plastic fermenting bucket
$12.99 at MoreBeer
Large (6 gallon) Glass or Plastic Carboy You can get away with just the bucket, but it is convenient to have a second vessel as I will explain later.
Glass Carboy
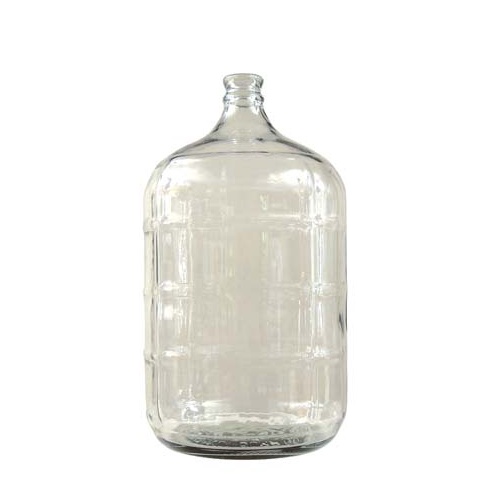
6-gallon glass carboy
$39.99 at MoreBeer
Large (6-8 gallon) Kettle You can definitely use a smaller kettle but it will require you to add unsanitized water to your wort when you are done cooking it. For my first couple of batches I used a 4-gallon pot. My 8-gallon pot has a built in removable strainer, a temperature gauge and a spigot. This is ideal, but something you can upgrade to later.
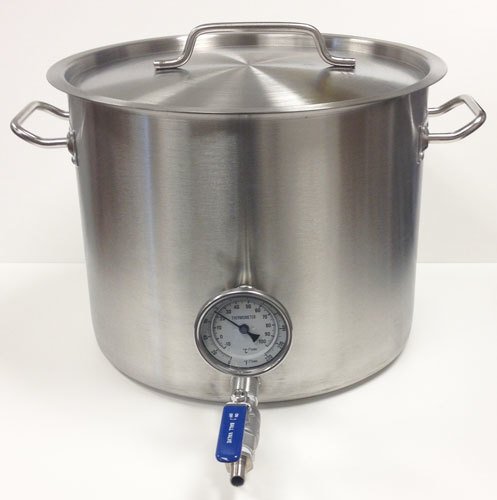
8 gallon boil pot
8-gallon stainless steel kettle
$80.00 at Brew International
Triple Scale Hydrometer This is necessary to take the original gravity (OG) and final gravity (FG) to determine potential alcohol content of your brew.
$6.99 at More Beer
Hydrometer Jar $3.99 at More Beer
Large Stainless Steel Spoon
Fine/Mesh Kitchen Strainer
Large Funnel
Bottling Wand $3.99 at More Beer
3/8" food grade plastic tubing, 6 feet or so $2.49/foot at More Beer
1" plastic tubing, 6 feet or so $2.39/foot at More Beer
Siphon Clamp $.99 at More Beer
Bottle Capper
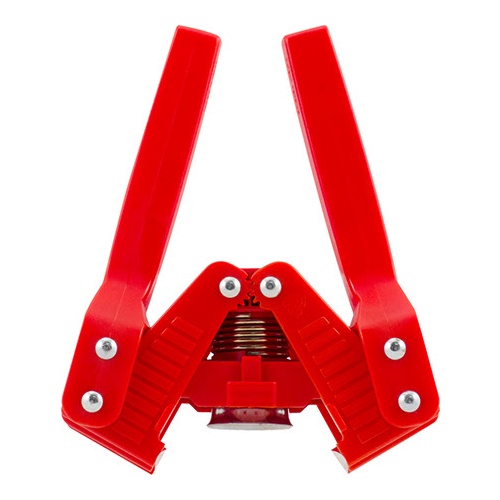
Bottle Capper
$16.99 at More Beer
3 Cases of Empty Bottles (72) $12.99 per case at More Beer
StarSan Sanitizer $5.99 to $24.99 at More Beer
Modest Upgrade Items
Wort Chiller $69.99 at More Beer
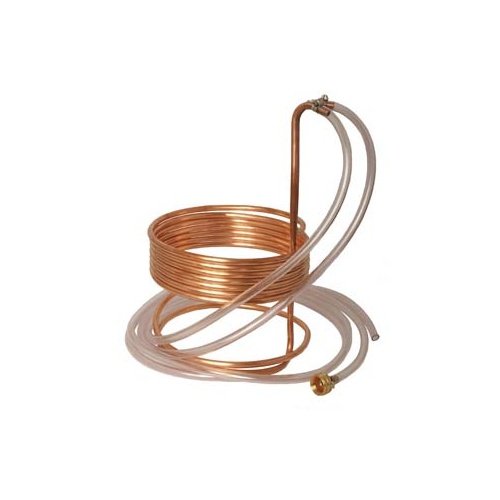
Wort ChillerA wort chiller allows you to cool your hot wort as quickly as possible, assuring as little time as possible in the "danger zone" when bacteria is more likely to infect. You can make your own by purchasing 50' of copper tubing, washing machine hoses and hose clamps. Here's a link to some instructions:
https://www.homebrewsupply.com/learn/making-a-diy-wort-chiller.html
Temperature Control $89.99 at More Beer
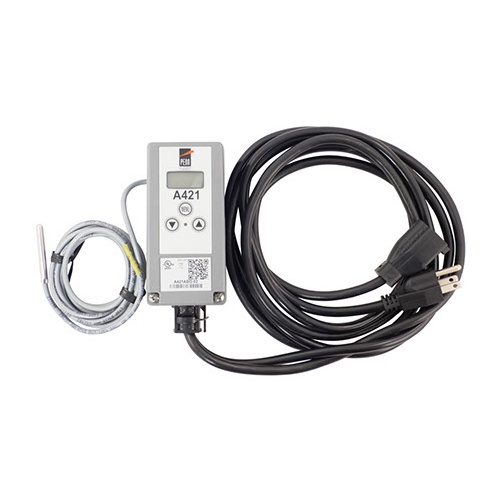
Temperature control
A temperature control can be used with heating wraps ($30) or for a more sophisticated set-up, with a refrigerator, to keep your fermenting wort at an exact temperature. This is the single most important upgrade I have made from the basic set up and one to consider if you go from "I think I will try this" to making it a regular hobby.
Heating Wrap $30 at More Beer
First Recipe(s)
There is definitely something to be said about starting out simply, but I think it’s more important to begin with your favorite style, or at least something close to it. A common practice is to begin with a stout, as it is considered the easiest, but brewing a double ipa isn’t exactly hard. I enjoy a stout now and then, but the few weeks of fermentation are going to make you feel like you’re back in the last month before summer vacation in 6th grade, so when you do eventually pop that first bottle, you will want it to be something you enjoy.
That said, I recommend you stick to ales, which still provide a decent array of styles. All beers have an ideal temperature for fermentation, but ales can handle variation, which makes them more suitable for a beginner who isn’t set up with a bunch of temperature control equipment. A Pilsner, which is a lager, requires very precise temperature drops at measured intervals. I brewed one once just using my ambient basement temperature and ice, and it somehow worked but took a lot of fuss.
The best source I know of for high quality ingredients is [Brew More] (www.brewmore.com). They have some great kits to choose from. For your first few batches I definitely recommend using kits. Then, when you get a deeper feel for what is going on in the process, you can look up recipes and piece them together by buying the individual ingredients. When you buy a kit, it comes with everything you need for a batch of beer except the yeast, but most companies will tell which is recommended and you just add it to your order. In a future post I will provide a detailed recipe for my all time favorite home brew that I based in Brooklyn Brewery’s Sirachi Ace.
Brew Day Prep
Don’t worry about your bottles on brew day. You won’t need them for at least 2-3 weeks and will want to sanitize them the same day you fill them.
Put an ounce of StarSan in your plastic brew bucket and fill it will 5 gallons of fresh water. Place your 1-inch plastic tube, carboy cap, strainer, hydrometer jar, and stainless steel spoon in the bucket. Take a cup or two of the solution and use it to rinse your boil pot. Sanitize the hydrometer separately as it is very fragile.
Fill your boil pot with fresh water. Unless there are serious issues with your tap water (unpleasant taste or known contaminants) it is fine to use for brewing. In fact, it is one ingredient that makes your brew your own, as different water sources have different elements and will have subtle effects on taste. If you are using an 8-gallon pot use the recommended amount of water in your recipe (usually 5, but sometimes 6 gallons). I always add about a half gallon to account for evaporation, but there is some debate about this.
The Boil
Get the boil going to your steeping temperature. This is where a pot with a thermometer is helpful, but also dangling a digital thermometer with an alarm works well.
While waiting for your water to get to steeping temperature, lay out your ingredients on a table. Read through the directions and organize the ingredients so you just grab the next item when it is time. Get your steeping grains ready by placing them loosely in the mesh bag provided in the kit.
When your water is at steeping temperature, place the grain bag in the pot. I like to tie or clip the bag onto my large spoon to suspend it in the water, but you can also just let bob around. When steeping is complete, hold the bag above the water and let it drain but do not squeeze out the liquid. Compost the grain (and usually the bag depending on the material) or feed it to your chickens when it cools. You can also make great energy bars from spent grains.
Bring the temperature up to boil. This is the most critical moment for any new brewer. Be careful not to let the water boil over, as it tends to do so quite suddenly. Once boiling, continue following the directions in your recipe. You are basically going to add liquid and/or dry malt extract, and hops. For liquid malt extract (LME) it helps to let the bag or can soak in very hot water to make it easier to pour out. I also will take some liquid from the boil and add it to the nearly empty bag or can to make sure I get all of the extract out and into the boil. Depending on the recipe you will add hops all at once or at varying intervals. You don’t need to bag the hops. I kind of like seeing them swirl around freely in the boil. Bagging the hops will make it less necessary to strain the wort after boiling.
If you are using a wort chiller to cool your wort when the boil is complete, place the wort chiller in the boiling wort when there are 10 minutes left. This will sanitize the chiller.
I just made the switch from water to wort. Wort is the technical term for what the water in your boil becomes when you add the ingredients.
When the boil is complete and all the ingredients have been added, except for any hops left over for dry hopping, you will want to get the wort chilled to 68-70 degree as fast as possible. This step probably has the biggest impact on the flavor of your beer. If the wort remains in the danger zone too long it will more susceptible to bacteria. You’re two choices for chilling the wort are an ice bath and a wort chiller.
Ice Bath
Have a sink, the larger the better, filled with cold water and ice before the boil is finished. As soon as the boil is finished, place the pot into the ice water. Be careful not to let the ice water flow into the pot. Keep draining the water and adding more ice until the temperature is below 70 degrees.
Wort Chiller
If you invested in the Wort Chiller already, place the pot of hot wort in the sink, connect the chiller and run cold tap water through it until the temperature gets under 70. Most set tub sinks are plumbed with hose nozel spigots that the wort chiller can be attached to. If you are using a kitchen spigot you may need to improvise, but you want to be able to run the cold water at full pressure. Be careful not to let the exhaust water from the chiller to enter the pot. You will see that the temperature will drop quickly, and then plateau. Swirl the chiller around a little to keep the temperature dropping as quickly as possible. When the wort is completely chilled, take a sample with the sterilized hydrometer jar. Gently put the hydrometer in the sample and record the original gravity (OG). You will take another reading after fermentation is complete and the two readings will be used to determine the potential alcohol by volume (ABV) of your beer. If you forget to take the OG you will never know the ABV.
Transfer to Bucket and Pitch Yeast
Once the wort is cooler I pour it through the fine strainer into the fermentation bucket. My bucket is still full of the StarSan solution at this point so I pour that onto a utility bucket for future use*. My strainer is large enough that it rests on the top of the bucket. By pouring the wort through the strainer it aerates the wort. This is another debated topic. Some people think that straining it introduces too much unfiltered air and therefore possibly bacteria. I have not had any problems doing this though, so I believe it’s a minor risk. Aeration is very important as the yeast will need the oxygen to thrive.
With the wort in the bucket it’s time to pitch the yeast. I use liquid yeast and just cut it open and squeeze it onto the wort. Then use the large spoon to stir the wort for a solid minute.
The last step is to place the large funnel in the glass or plastic carboy and pour the wort into it. Then store the carboy in a dark location (at least out of direct sunlight) that stays relatively cool. 68 degrees is ideal. If your location is too warm then you can place the carboy in keg bucket with some water in the bottom. Then you can add ice occasionally and cover the whole thing with a tarp or blanket. If the area is too cold there a couple of options from inexpensive to fairly expensive. The inexpensive option is keeping the carboy in a small closet with a safe heater that has a thermostat. The more expensive option is a heat wrap connected to a temperature controller (see above).
Once you have the carboy in the right location, place one end of the 1” tube in the neck and place the other end in a bucket of water. This is called a blowoff tube. The bucket of water will keep air from entering the tube and wort, but will allow a large amount of kraussen (froth created by the yeast) to escape the carboy without making a big mess.
This is the point where new brewers inevitably start to fret. You just did all this work and now you just have to wait for something to happen. But the yeast have to wake up and begin reproducing and that can take up to three days. It usually happens by the end of the second day, but you should wait at least three full days before panicking.
You will definitely know when fermentation begins. The wort will begin swirling almost like its simmering on the stove. Kraussen will form on the surface and most likely expand out of the carboy on through the blow off tube. After a couple of days the intensity dies down and you can change the tube for a bubbler, but it really doesn’t make a difference.
After starting your first batch you are going to be dying to taste your beer, and the tendency is to make bad decisions in the name of speeding up the process. If this happens to you then this is a big experience for you! Chill out. Take up a new hobby. Anything other than messing with your brew before it is fully fermented.
I recommend not even looking at it for two full weeks. After that you can draw small samples to test the gravity once a day until there is no decrease in the final gravity reading. If 24 hours pass and the readings remain the same then fermentation is finished.
When I determine that fermentation is complete, I transfer the brew from my glass carboy to another one. This is called the secondary fermentation, and it is debatable whether it is necessary. If you are using the minimum setup, just leave the brew in the plastic bucket for another week.
Dry Hopping
If your recipe calls for adding hops after fermentation begins follow the directions for timing. You can also just add the hops after racking to the secondary.
Bottling Day
The day you’ve been waiting for! Sort of. You still have to wait a week or two to finish the beer and carbonate it, but at least bottling is an activity and something to break the monotony of waiting.
The first thing you should do on bottling day is transfer the beer from the carboy or fermenting bucket to bottling bucket. This is where it is helpful to have a couple of buckets or a carboy and a bucket, but if you only have the one bucket it will also work. Transferring it just gets more beer into the bottling bucket, with less trub left to clog up your bottling wand.
Refer back to your recipe to determine the amount of priming sugar to add to the beer. Start boiling 2 cups of water in a small sauce pan and add the sugar as it warms up. Stir the sugar until it is dissolved to keep it from burning on the bottom of the pan. Boil for 10 minutes, and then let the solution cool or chill it in ice water, being careful not to introduce any additional, un-sterilized water. When the solution has cooled to near room temperature, pour it into the beer and stir gently without making bubbles for a minute. At this point you don’t want to introduce more oxygen.
The beer now should settle for a little while, as there is still some trub and you don’t want it going into the bottles. While the beer is settling, go to work on the bottles.
I save the bucket of StarSan that I used to prepare for the boil at least until bottling day. Place all of your bottles into the StarSan solution, then dump them back out into the bucket and suspend them upside down for a few minutes. I use two 5-gallon buckets to drain the bottles.
When all the bottles have been dunked and dumped, place them in six pack holders, or loose in a bottle case.
Soak the bottling wand in the bucket of StarSan for a few minutes along with the 3/8” tube.
The safest way to begin siphoning your beer is to attach the bottle wand to the tube and then fill the tube with StarSan. Then place the open end (non wand end) in the beer being careful not to release the StarSan into the beer. (Tiny amounts of StarSan are safe, but you don’t want to dump a bunch into your beer.) Then lower the other end of the tube into a bucket or pan and depress the bottle wand to let the StarSan drain out. It should start pulling beer through the tube as well, and after letting a little beer escape into the bucket clamp the tube. Now you're all set to start filling the bottles.
It is perfectly okay for there to still be foam in the bottles left over from sanitizing them. Push down on the bottle wand, filling the bottle with beer, just until the foam reaches the top of the bottle. When you remove the wand, the level will drop to about midway down the neck, leaving a perfect amount of air for the yeast to wake back up, consume the priming sugar, and complete the final job of carbonating your beer.
As you get to the bottom of the bucket, take care to siphon off clear liquid without disturbing the trub at the bottom. I like to use very drop I can, so as I fill the last few bottles and some trub inevitably gets in, I mark those bottles so I know they might have a lot of sediment in them. Sediment isn't a big deal, but I wouldn't want to pick one of those bottles to serve to a friend or family member.
Capping the Bottles
Take your bottle caps that came with the kit your bought and sanitize them. I just place them in my fine strainer and swish them around in the StarSan bucket. They can be wet when you clamp them onto the bottles of beer. The bottle capper is fairly self explanatory. Just place a bottle cap on the bottle, position the capper on the cap, and pull down on the handles to crimp the cap.
Bottle Conditioning
Move the bottles to a cool dark location. They should be stored at the same temperature as during fermentation. In a week to two weeks (sometimes longer) the yeast will reactivate and carbonate the bottles. Because you will be busting at the seems with anticipation by this point, try one bottle after a week. If it has no carbonation whatsoever, wait one more week. If you open a bottle and it has a little fizz, I give you permission to open one bottle per day until they reach perfect carbonation :).
Pouring
Your homebrew (aka personal nectar of the gods) will have some sediment in the bottles. You should always carefully pour the bottle into a glass, leaving a small amount in the bottom of the bottle. If you hold the bottle up to the light as you pour, you will see the white cloud of sediment start to move toward the opening. The sediment is a combination of spent yeast and other solids left over from the whole process, and consuming the spent yeast is known to cause headaches.
ENJOY!!!
If you enjoyed this post, please consider following me to read follow ups on topics such as killer recipes, additional equipment, and resources for home brewers. I also write about sustainability, solar energy, and urban homesteading.
Nice one. This is a very informative post on brewing beer @cstrimel.
Thanks @choogirl!
ohhh yeah! nice how to beer post :D
Really informative and interesting. Thank you, several things I've never considered before.