🐝 Beekeeping For Everyone! - #12 - Let's Make Splits & Queens
New to the "Beekeeping for Everyone!" series?
Consider starting with Post #1, search #beekeepingforeveryone, or scroll to the bottom of this post for the complete list.
Let's Make Splits & Queens

First of all let me apologize for taking so long to get this out. I went off to BeeFest and have been busy ever since my return. I procrastinated putting this post together as I knew it was important and would take time to do it right.
The main aspect of this post will be around a method called On The Spot (OTS) Queen Rearing which is a technic developed by Mel Disselkoen. I am in no way affiliated with Mel, nor do I stand anything to gain by promoting his method. My sole purpose in sharing this method is the fact that I find it the easiest way for novice beekeepers to raise quality queens.
While all the information on OTS can be found on Mel's website and his YouTube videos, I would strongly suggest purchasing Mel's book if you find OTS useful. Mel is a stand up guy and freely shares his knowledge and is the type of person that deserves to be rewarded for their effort.
OTS
What is unique about OTS is that you can take larvae destined to be workers and turn them into quality queens without having to graft. Grafting takes a lot of practice and continual use to remain proficient and therefore not practical for the average novice beekeeper.
The basic principle is to break out the bottom of the worker cells so that the bees can turn a larvae that was destined to be raised horizontally as a worker into being raised vertically as a queen. This is done without having to float the larvae out of the cell on watered down royal jelly first. I discussed the issues with walk away splits in the last post and the emergency queen cells in Honey Bee Queen - part 1.
OTS has other benefits as well. When the process is followed correctly, all queen cells are raised in a strong well populated mother colony with all the necessary resources to abundantly feed and care for the queen larvae. It also can be timed to give brood breaks that help with varroa control. With the current state of varroa and viruses, I'm not sure that a single brood break is sufficient, but any reduction in varroa is a positive. With a brood break, all varroa become phoretic (ie. riding or being transported on a bee) as opposed to being in a brood cell mating and reproducing. These phoretic mites ride on the bees looking for 8 day old larvae. The mites go into the cells just before they are capped over to pupate to feed off the larvae and reproduce. When there is a brood break, the mites have to wait until new larvae reaches the 8 day mark. When the first new brood hits day 8, the mites will overload the cells and kill the larvae and die themselves.
Here is a photo of the first larvae after a brood break that has been inundated with hungry varroa. Although the life blood is sucked out of these first larvae, it is a small price to pay to consolidate and starve the varroa mites.

Process
The process starts by identifying the strong mother colony you wish to create new queens from. Timing is obviously dependent on your location and the environmental conditions. Rule of thumb is to start 1 week before your swarming season. Here is the northeast (43rd parallel) that is around May 1st.
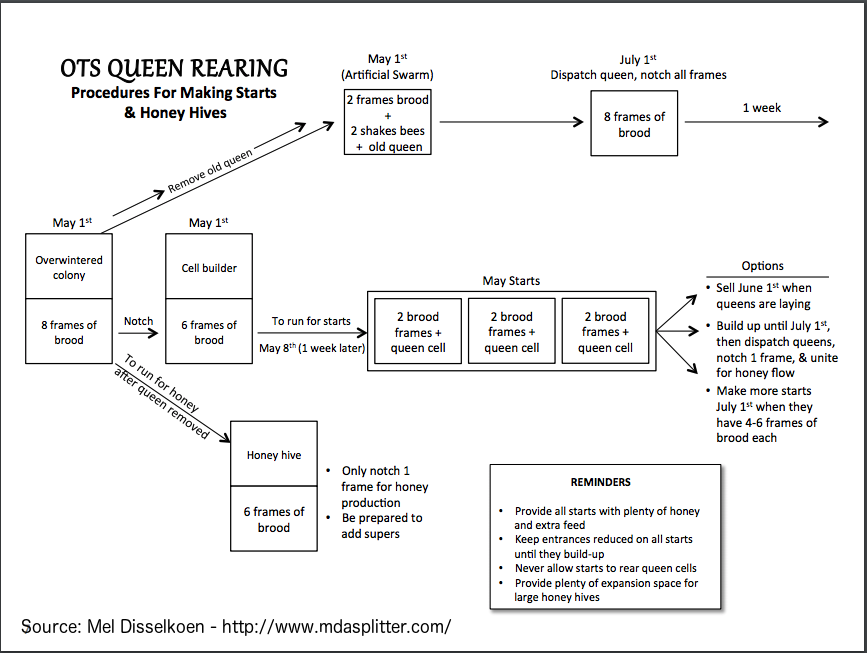
The first step is to remove the current queen and two frames of brood to a nuc box and shake another frame or two of nurse bees into the box. Set this nuc box off to the side. What you have just done is created an artificial swarm. Now comes the ingenious part of Mel's process. On each brood frame that you wish to raise a queen (and make a potential split from), find a section of larvae that is younger than 36 hours and break the bottom of the cell walls open with your hive tool. I have found it best to push the hive tool straight into the comb all the way down to the mid-rib and then push the hive tool down in a prying motion to clear a space below for the queen cells to be built. Newer comb is easier, but with a little extra effort older comb can be used as well. Do two to three notches on each frame. I like to mark on the top bare the locations of the notches. You would be amazed at how well the bees can repair the comb if they decide not to raise a queen.
Return to the hive in 1 week and inspect ALL the frames. If there are frames with queen cells that were not notched, destroy these cells as the larvae was floated. On the notched frames destroy all but two of the queen cells. Depending on the size and strength of the mother colony you can take each of the frames with queen cells and make a split from them. Either with resources from this hive, or from another.
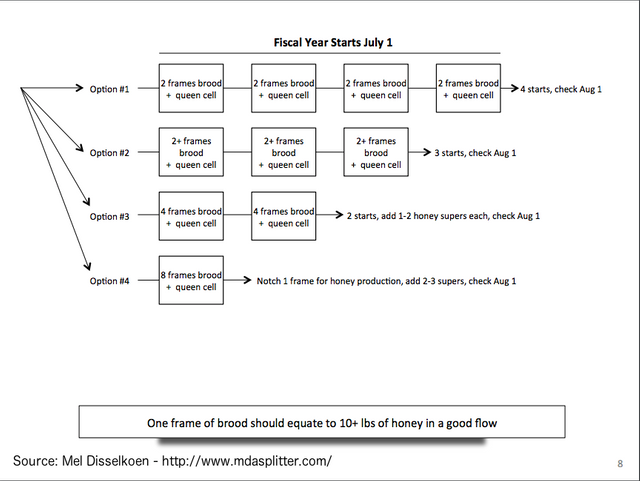
Mel also walks through the options available depending upon what your goals are. It is beyond the scope of this post, but I will include the flow chart that Mel has provided on his website.


Additional Info
Mel Disselkoen's website
Mel's book OTS Queen Rearing: A Survival Guide for Beekeepers Worldwide
Mel's presentation on OTS and varroa control
Mel Disselkoen speaks on OTS Queen Rearing and Miticide-free beekeeping

Beekeeping for Everyone! Series
Follow me (@bushkill) so you don't miss the next post in the Beekeeping for Everyone! series
Check out all the posts in the Beekeeping for Everyone! series
#1 - Introduction
#2 - The Importance of Pollinators
#3 - Honeybee Castes
#4 - Honeybee Queen - part 1
#5 - Honeybee Queen - part 2
#6 - Honeybee Worker
#7 - Honeybee Drone
#8 - There is Nothing Natural About Beekeeping!
#9 - Honeybee Nucs - Buyer Beware
#10 - Package Bees - Understanding What You'll Get
#11 - Let's Talk Splits

Talk Beekeeping

https://discord.gg/RwmvvFH

Keep On Keeping!
@bushkill
Thank you for your continued support of SteemSilverGold
Very interesting
This post is buzzing! Upvoted :)
Much to complicated. Don't get me wrong it will work just more complicated than actually needed. I have raised queens professionaly for many years. There is no need to damage comb to get a new queen. It is far simpler to just remove bees eggs and larvae into a nuc box. Let them draw cells. Watch @beemasterca for up coming post and videos.
You surely can't be advocating emergency queens raised by a nuc as quality queens. Walk away splits are the biggest cause for fall queen failures.
Did not say that. Queens should be raised to capped in the largest queenless hives you can create. In properly done splits you can be right. Mating is done in the smallest nuc practical. By the way you distributed a nuc for the queen. Not a artificial or shaken swarm. Which in fact has no brood in the box the queen and bees are placed in. This a direct simulation of a natural swarm queen bees no brood. Just a clarification of the terms to avoid confusion in a world of confusion for the new bee.
OK, then I'm still not following you about your 'much to complicated' statement. Every professional queen breeder I know uses grafting for queen rearing, myself included. Grafting is not feasible for the average novice as it takes practice and continuous use to maintain the skill, not to mention additional equipment. Yes there are other none grafting methods, but in my experience OTS has been easy to teach to students, they comprehend the process and need no additional equipment. I have a lot more novice beekeepers raising their own queens now that I teach OTS than before OTS.
As far as 'artificial swarm' terminology, I used it in reference to the mother hive in which the queen was removed from. In their perspective, the queen and a partion of the bees leaving is 'seen' as swarming and it will prevent/remove the swarming impulse. The removal of some brood with them is irrelevant to the way the mother colony reacts. Yes, you are correct that the nuc made from this removal is not an artificial swarm in itself.
I will do a main post on beginner and small operations queen rearing in the next week or so. No cutting of comb required.
I have grafted thousand of queens over the years. But like you don't recommend it to anyone with less than 100 hives. Then only if they want to be stock producers.
Over the years of mentoring not being clear with terms has lead to much confusion among inexperienced and not vary knowledgeable beekeepers like yourself. We as mentors take it for granted that because the term seems so simple that all should know. Forgetting that it took years to overcome our own confusion of terms. You did make a nuc with the old queen. She will recover to a full size hive in short order. We do this every spring with our last years queens for sale.
We sell shaken swarms or artificial swarms as an alternative to brood based nucs. There are disease and equipment reason for doing this. Simply put we shake the bees and add a queen in the customers box, in the position of the old hive. A full box of bees is our aiming point. Far stronger than a natural swarm. We move the brood to another yard and place on incubators. We keep the equipment that would normally gone out with.
The customer gets a natural varoa mite treatment, due to the interruption of the brood cycle. Reduced risk of accidental brood disease transmission contained in the breeders equipment and brood.
Of course there are disadvantages.
For the breeder there is a lot of extra work. Moving brood and equipment. Monitoring customer hives until pickup after conformation of egg laying.
For the customer. Hauling full size equipment to the breeders yard killing time for conformation of eggs.
One reason most folks go for nucs.
AND they are getting locally acclimated bees which is a big advantage over package bees from the south. Though I'm not sure where Canada gets packages from. I have a good friend in Nova Scotia and know the bee "laws" are much stricter.
Mostly Kowna and new Zealand because of varoa. issues. You make a vary good point about localised bees. Our queens from the Okanagan BC over winter in Alberta Saskatchewan and Manitoba outside on their first winter. Imported from tropical and semi tropical areas must be wintered inside the first year. If they even survived introduction in the spring. Majority are replaced. due both to the nature of packages and coming from areas with vary different climates.
local bees are far superior to imports provided of course there are enough bees in your area for proper mating. Queens need to mate with lots of drone from different hives to keep the genetic diversity high in the hive. I like to see 20 families in the box one for each drone they mated with.