How To Edit Photos Quickly Using a Smartphone || Adobe Lightroom
Hi everyone, today I want to share a little experience or knowledge for editing a photo using a smartphone. Actually the world of graphic design and the world of editing is not a profession for me, but has become a hobby for me. When I express the ideas that exist in my imagination, there I feel like all my selfishness can be solved, because I do it with my passion and I already consider it as my hobby, no longer as my profession.

A work will produce maximum results if it is done with its own passion or because of a hobby, compared to a work that is done only to release obligations or responsibilities. I also remember my teacher's message, he once said "it's not how much knowledge we get, but how much and often we share that knowledge".
So that's what really motivates me to share my knowledge and skills with all of my friends, maybe there are some friends who can and are even more proficient than me, please provide guidance and input if there are shortcomings in my post.
Now we enter the stages of editing photos using an application on a smartphone. Here I use the Adobe Lightroom application.
For the first step, we first open the lightrom application and this is how the user interface of the application looks. After the application is open, we first insert the image we want to edit, it's very easy, just click the plus icon at the bottom right, it can be seen in the following image

After we click the icon we are directed to our smartphone gallery where we can choose some photos we want to edit, here I give an example by entering 4 photos with the same angel. After we select the image directly click ADD.

After we add, the photo will go into the album of all photos in our Adobe Lightroom.

Now we just have to select one of the photos for us to start the editing process. The method is very easy, here I give an example for the lighting setting process first, to enter the settings, just click on the light icon.

After that we can adjust the lighting according to our wishes, I will give an example in the image below which I set based on my taste and imagination.

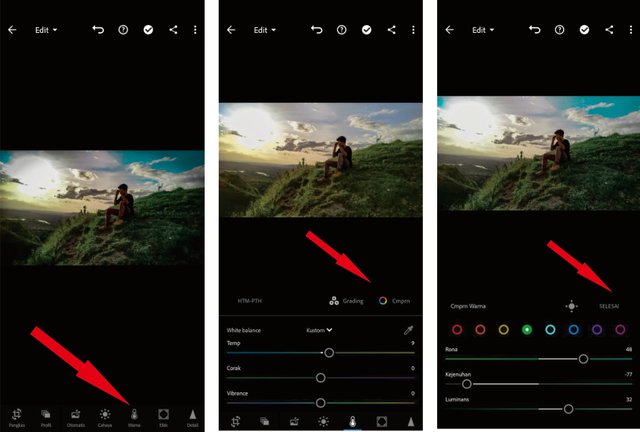
After we set the lighting according to our taste, now we move on to the stage of setting the coloring, the trick is to just click the icon next to the lighting earlier, less like this picture before and after I adjust the coloring. If it is in accordance with what we want, the next step is to press Finish, so that the settings we have done earlier are saved.
After that we give a little dark light effect around the photo or Vignette. We press the icon next to the color that is the effect. Now we create it as we wish, not too dark too, it can affect the image that is not pleasing to the eye. And this is an example of my settings in this Vignette stage.

Here, I will share a few tips for doing photo editing as above in a very fast way, after we finished editing photos both in terms of lighting, coloring and vignette effects that we have done above, the settings we do are called presets. So now we have a preset that we can apply to other photos that have the same angel, it's very easy. Click the three dots in the upper right corner, then select COPY SETTINGS. Check all sections then click the tick icon in the top right corner.

Now we paste the preset that we copied earlier, the method is still the same, select the three dots in the upper right corner, then select ADD SETTINGS, and this is the result.

With the same angel photo we only need time to edit one photo, the rest we can do COPY and PASTE the preset we made earlier.
Now we enter the stage of saving the preset that we have created, what is its function for? Its function is that when we are going to edit another image, we don't have to edit it from scratch again, just by selecting the presets that we have created. .
The method is very easy, we can select the three dots in the upper right corner, then we select CREATE PRESET.

Don't forget to check all the presets in it and we name the preset as you wish, here I give an example of the name MXN_PRESET, after that click the tick in the right corner on. Well now we have a preset that we are ready to use in another image.
Now we will try to use it, select a photo that we have not edited, then we will see below there is a PRESET menu, this is where the preset we created earlier is stored, now I will try to use it, it can be seen in the image below.

That's how to edit photos easily and quickly, and of course also very good according to my taste. Because tastes are different, so you can try it with your own tastes. This is the final result of some of my images that I have finished editing in the way I shared above.

Thank you for reading my post, if there is input from friends, please leave it in the comments column below.
See you next time.
Nice work, congratulations!
This information will be very useful for me, i am struggling all the time with my photos!
Thank you @willeusz