[ESP-ESP] Steem Women Club Community Contest #8 ' Handicrafts ' Time to Show Ingenuity || Handmade soutache sticks ✂️ DIY (Hazlo tú mismo)
Hi, Steemit community and friends of SteemWomen's Club.


Español
Bienvenidos a mi blog, es un gusto estar nuevamente con ustedes en una nueva publicación pero esta vez con arte de manualidades en esta comunidad de las mujeres #Steemwomenclub, es un placer trabajar con amor en lo que quieres y por lo que quieres.
La técnica del soutache es más que todo hacia el occidente, las mujeres de grandes países que constituyen este continente usan mucho este tipo de trabajos, actualmente se ha venido implementando en casi todo el mundo, ha cruzado fronteras y aquí lo tenemos, aunque originalmente se hace con hilo, aquí les traje el tutorial más fácil. El soutache es hermoso y sus prendas quedan de un diseño genial para todas, además que podemos usar en los colores que deseemos y el tamaño que pongamos.
English
Welcome to my blog, it is a pleasure to be with you again in a new publication but this time with craft art in this community of women #Steemwomenclub, it is a pleasure to work with love in what you want and for what you want.
The soutache technique is mostly towards the west, women from large countries that make up this continent use this type of work a lot, nowadays it has been implemented almost everywhere in the world, it has crossed borders and here we have it, although originally it is made with thread, here I brought you the easiest tutorial. The soutache is beautiful and its garments are a great design for everyone, plus we can use in the colors we want and the size we put.
Vamos a comenzar:
Estos sarcillos son usado por muchas chicas que les gusta lucir jovial, con un diseño exclusivo y marcar la diferencia dónde llegan. Podemos encontrar diferentes tipos de trabajos realizado con esta técnica, desde broches, cadenas, cinturones, ganchos, tiaras, pulseras, en aplicaciones de ropa, también en bolsos, como dije, y un sin fin de trabajos que quedan geniales. Lo podemos encontrar en muchos tamaños, con otros accesorios incluidos y hasta con piedras súper brillantes ya va depender del gusto de cada persona.
Let's get started:
These tendrils are used by many girls who like to look jovial, with an exclusive design and make a difference where they arrive. We can find different types of work done with this technique, from brooches, chains, belts, hooks, tiaras, bracelets, in clothing applications, also in bags, as I said, and an endless number of works that look great. We can find it in many sizes, with other accessories included and even with super bright stones and it will depend on the taste of each person.
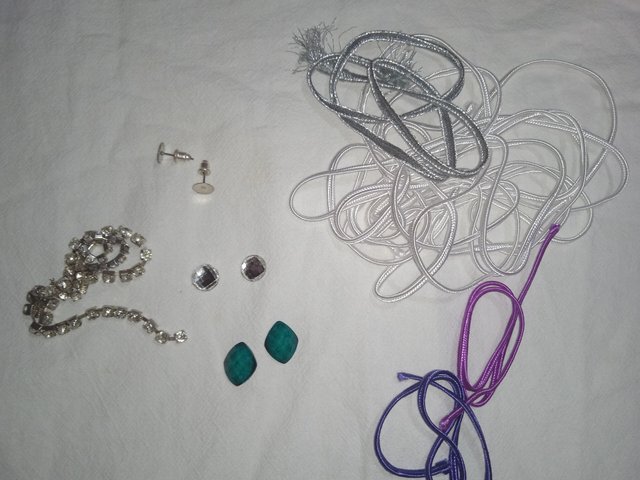
Materiales
- Hilo de soutache (colores).
- Piedras centrales planas.
- Piedra plana plateada.
- strass plateado.
- Trancas
- Tela P.O.P.
- Silicon.
- Yesquero
- Tijera
Materials
- Soutache thread (colors).
- Flat center stones.
- Silver plated flat stone.
- Silver plated rhinestones.
- Strasses
- P.O.P. fabric.
- Silicone.
- Yesquero
- Scissors
Procedimiento
Process
Part 1
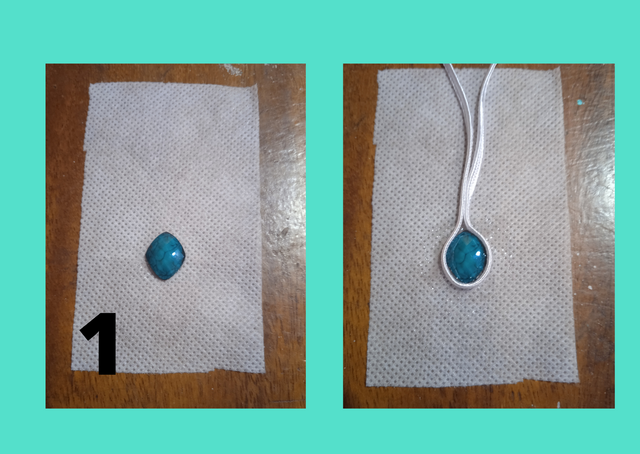
Para dar comienzo a nuestros sarcillos de soutache debemos recortar dos rectángulos de nuestra tela pop aproximadamente de 4 cm de ancho con 7 cm de alto, una vez que tenemos estos trozos procedemos a pegar nuestra piedra plana verde en el centro y fijamos muy bien, podemos ir trabajando los dos al mismo tiempo o por separados. Posteriormente procedemos a cortar hilo soutache blanco aproximadamente 7 cm y lo pegamos alrededor de la piedra y fijamos con silicón.
To start our soutache twill we must cut two rectangles of our pop fabric approximately 4 cm wide and 7 cm high, once we have these pieces we proceed to glue our green flat stone in the center and fix very well, we can work both at the same time or separately. Then we proceed to cut white soutache thread approximately 7 cm and glue it around the stone and fix it with silicone.
Part 2
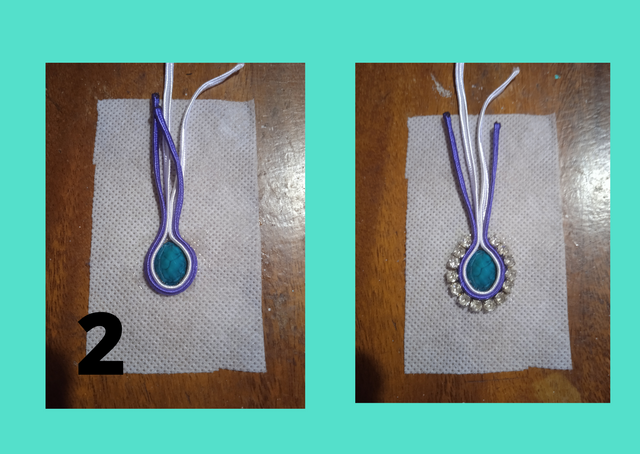
Para la segunda parte pegamos hilo soutache morado justo al lado del blanco y fijamos, de este también es 7 cm, una vez que ha secado, procedemos a pegar el strass plateado con ayuda de un palillo de altura y vamos ajustando alrededor, del strass tome el largo de 14 piedras que trae.
For the second part we glue purple soutache thread right next to the white and fix, this is also 7 cm, once it has dried, we proceed to paste the silver rhinestone with the help of a toothpick height and we are adjusting around, the rhinestone take the length of 14 stones that brings.
Part 3
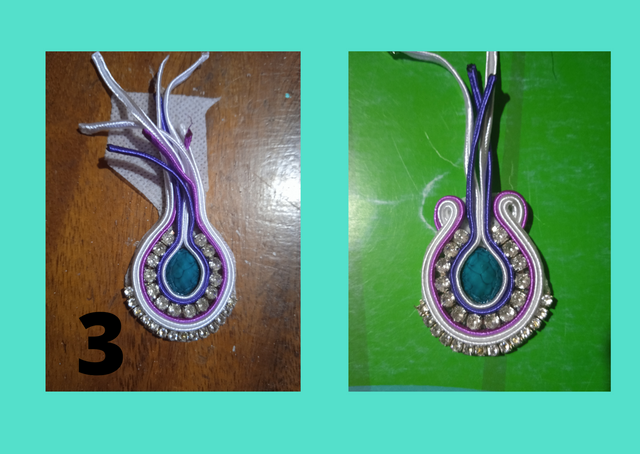
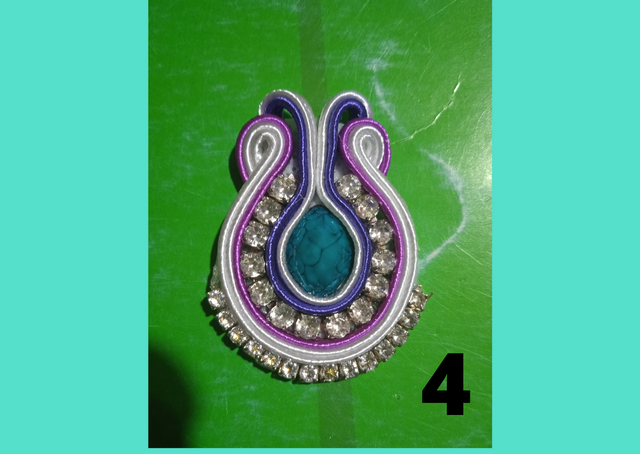
Una vez terminado paso anterior, tomamos hilo soutache blanco 9 cm y pegamos, al igual que hilo blanco pero este lo hacemos doble para dar más dureza, luego de eso pegamos strass nuevamente pero un modelo más delgado (también pueden usar el mismo), esperamos que seque y seguimos.
Una vez seco, procedemos a recortar por la orilla con cuidado la tela pop y sellamos con un yesquero esas puntas del sarcillo.
Dentro de este mismo paso vamos atar los hilos de soutache hacia la parte trasera uno por uno comenzando por los que se encuentran más hacia afuera, sujetamos atrás con silicón.
Once finished the previous step, we take white soutache thread 9 cm and glue, just like white thread but this we make it double to give more hardness, after that we glue strass again but a thinner model (you can also use the same), we wait for it to dry and we continue.
Once dry, we proceed to carefully trim the edge of the pop cloth and seal the ends of the twig with a tinder.
In this same step we are going to tie the soutache threads to the back one by one, starting with the ones that are more towards the outside, we fasten them at the back with silicone.
Part 4
Luego esperamos que seque y finalizamos pegando los demás que se encuentran al centro del sarcillos , igualmente hacia atrás pero en este caso lo sujetamos un poco más alto que el anterior.
Cortamos y sellamos la tela sobrante o algún hilo que notemos para que todo quede fijo.
Then we wait for it to dry and we finish by gluing the others that are in the center of the sarcillos, also towards the back but in this case we hold it a little higher than the previous one.
We cut and seal the excess fabric or any thread that we notice so that everything is fixed.
Part 5
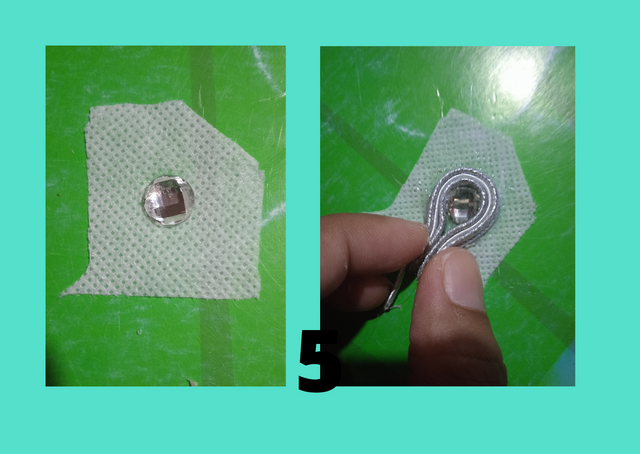
En este paso vamos a tomar pequeños cuadros de 4x4 cm y fijamos en el centro nuestra piedra plana plateada y esperamos que seque. Luego vamos a tomar doble hilo de soutache plateado en tamaños de 5 cm y un hilo de color blanco misma medida que el plateado, lo colocamos alrededor con precisión como se mira en imagen y esperamos que seque, luego recortamos alrededor y sellamos con yesquero.
In this step we are going to take small squares of 4x4 cm and we fix in the center our silver flat stone and we wait for it to dry. Then we are going to take double silver soutache thread in sizes of 5 cm and a white thread of the same size as the silver one, we place it around precisely as shown in the picture and wait for it to dry, then we cut around it and seal it with tinder.
Part 6
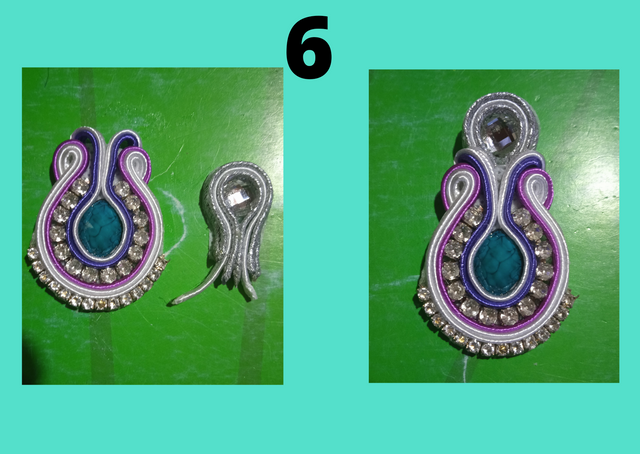
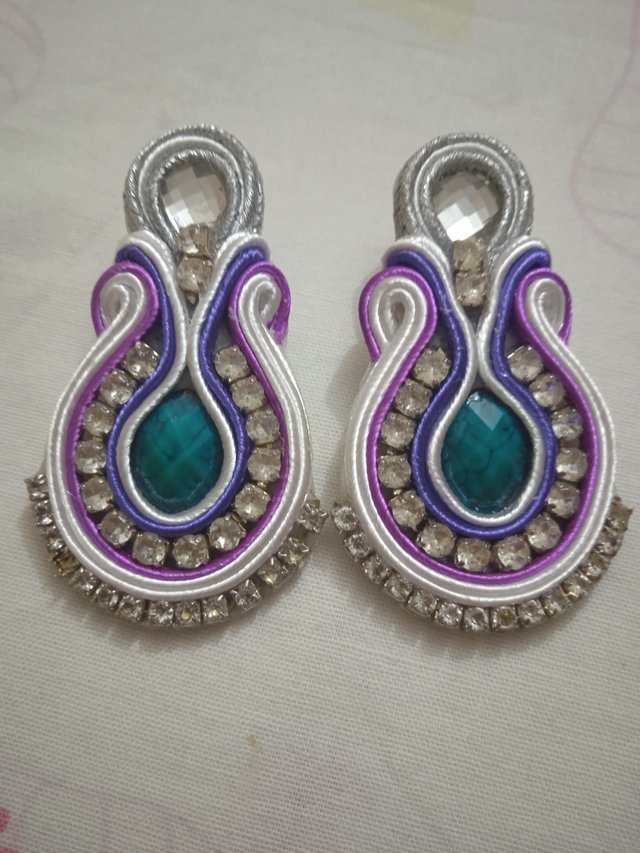
Una vez que tengamos las piezas secas, recortadas y en orden, vamos a unir la pieza grande con la pequeña, situando la pequeña detrás de la grande en la parte superior para alargar el sarcillo, como se mira en imagen.
Once the pieces are dry, trimmed and in order, we are going to join the large piece with the small one, placing the small one behind the large one at the top to lengthen the sarcillo, as shown in the image..
Part 7
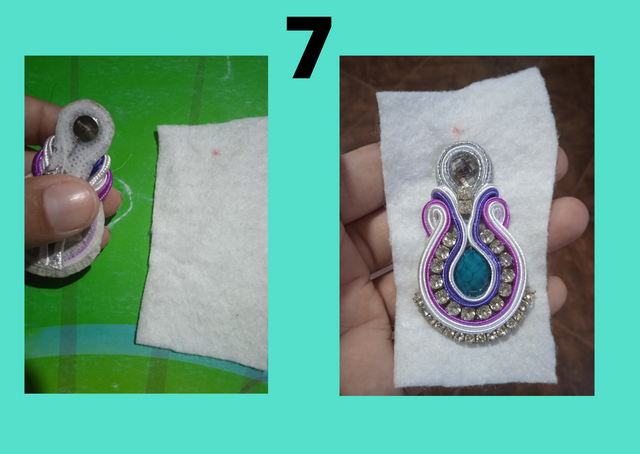
Una vez que ha ha secado el paso anterior, procedemos a pegar nuestra tranca en la parte superior trasera, luego rellenamos toda la parte de atrás con silicón y llevamos a una tela para finalizar, en mi caso use fieltro pero pueden usar otras. Una vez seco, procedemos a recortar alrededor y quemas con un yesquero todo el borde dando forma con nuestros dedos.
Once the previous step has dried, we proceed to glue our tranca in the upper back, then fill the entire back with silicone and take a fabric to finish, in my case I used felt but you can use others. Once dry, we proceed to cut around and burn with a tinder all the edge giving shape with our fingers.
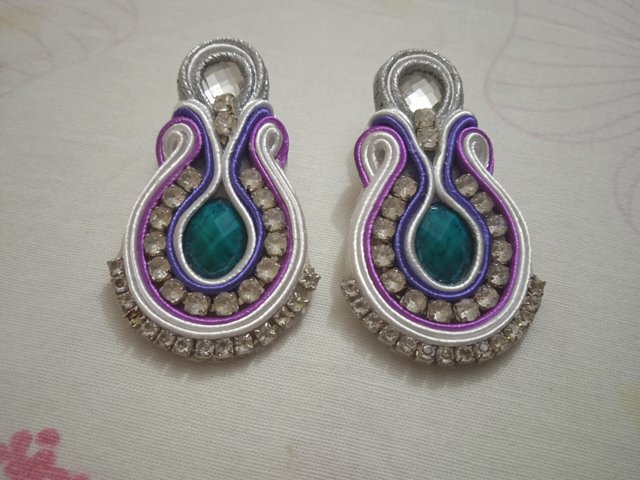
Finalmente esperamos que seque muy bien por un buen rato y lo podemos usar , es ideal para una salida con amigas, para salir en pareja, con familiares, al igual que se pueden usar de noche o de día dependiendo el evento, no pesan y son ligeros. En lo particular me gusta usar estas cosas como diario porque me hacen sentir joven, fresca y audaz, espero se animen porque realmente es fácil, aquí les dejo algunas imágenes de como queda en nosotras.
Finally we wait for it to dry very well for a while and we can use it, it is ideal for an outing with friends, to go out as a couple, with family, as well as they can be used at night or day depending on the event, they do not weigh and are light. In particular I like to use these things as daily because they make me feel young, fresh and bold, I hope you dare because it really is easy, here are some images of how it looks on us.


Muchas gracias a @steemcurator01 y @steemcurator02 @ booming01 y @ booming04 por su valioso apoyo.
Many thanks to @steemcurator01 and @steemcurator02 @ booming01 and @ booming04 for their valuable support.
Invite: @daysiselena @nayromero @theresa16


Todo el contenido que se encuentra en esta publicación es amplia-mente original del autor, cualquier duda y recopilación del mismo, deben hacer mención de mi persona.
All the content that is in this publication is widely original of the author, any doubt and compilation of the same, they should make mention of my person.
- El texto es original de: @nathyortiz
- Todos los Derechos Reservados / © Nathy Ortiz
- Fotografías tomadas de mi teléfono Xiaomi Redmi 9A
- The text is original from: @nathyortiz
- All Rights Reserved / © Nathy Ortiz
- Pictures taken from my Xiaomi Redmi 9A phone.


Muy bonitos...
Muchas gracias cariño @yacksylondon
Hermosos sarcillos con esta técnica del soutache. Me encantaron. Saludos
Muchas gracias @daysiselena
Nathy, que lindos sarcillos y que bonito verte por acá, como siempre es un placer compartir contigo en el mismo sitio. saludos y abrazos de amor y amistad. #onepercent #venezuela
Muchas gracias amiga @carolinacardoza es un placer verte de nuevo.
Saludos