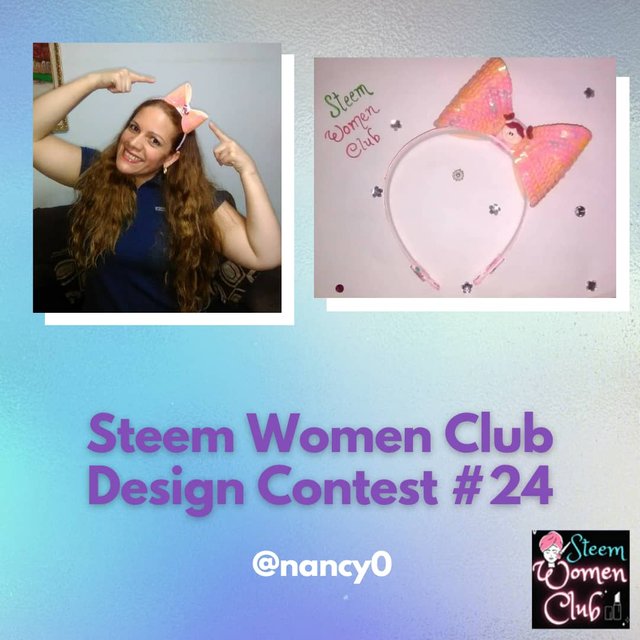
Steem Women Club Design Contest #24 | The design of anything you want! | | Beautiful headband with sequin bow / Hermoso cintillo con lazo de lentejuelas / By/ Por @nancy0
Hello beautiful enterprising women, a cordial greetings to all and to this community @steemwomenclub
Very happy to participate in this contest # 24 with all of you, I like this contest because we all bring good and beautiful ideas.
I want to share with you a nice and elegant headband that we can make to give to our princesses, or for nieces, goddaughters and granddaughters, we can also make to sell.
It's very easy and inexpensive to do, and the girls will thank you.
Now I will show you how I did it, and for that I will show you the materials that I used.
🎀Materials.🎀
- Sequins
- Decorative ribbon
- Headband
- Decorative appliques
- Liquid silicone
- sparkling
- Scissors
- Machine sheet
- Pencil
- Measuring tape
- Rule
Hola hermosas mujeres emprendedoras, un cordial saludos para todas y para esta comunidad @steemwomenclub
Muy contenta en participar en este concurso # 24 con todas ustedes, me gusta este concurso porque todas traemos buenas y bonitas ideas.
Quiero compartir con ustedes un lindo y elegante cintillo que podemos hacer para regalar a nuestras princesas, o para las sobrinas, ahijadas y nietas, también podemos hacer para vender.
Es muy fácil y económico de hacer, y las niñas te lo agradecerán.
Ahora les mostraré como lo realicé, y para eso les enseñaré los materiales que utilicé.
🎀Materiales.🎀
- Lentejuelas
- Cinta decorativa
- Cintillo
- Apliques decorativos
- Silicón líquido
- Foamy
- Tijera
- Hoja de máquina
- Lápiz
- Cinta métrica
- Regla
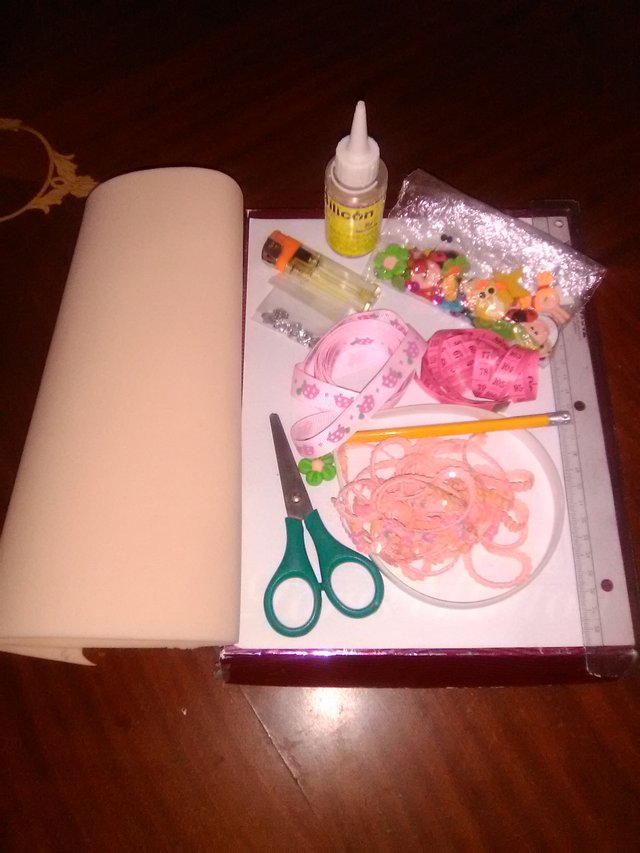
Materials/Materiales

Next I will show you the steps to make this beautiful headband.
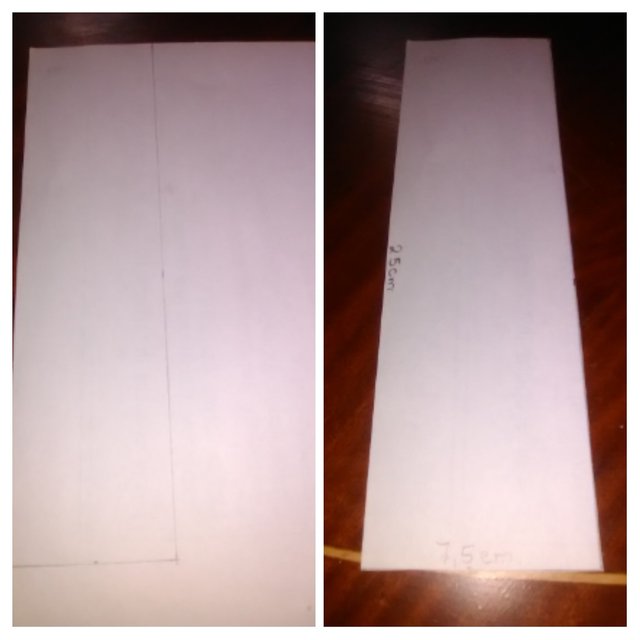
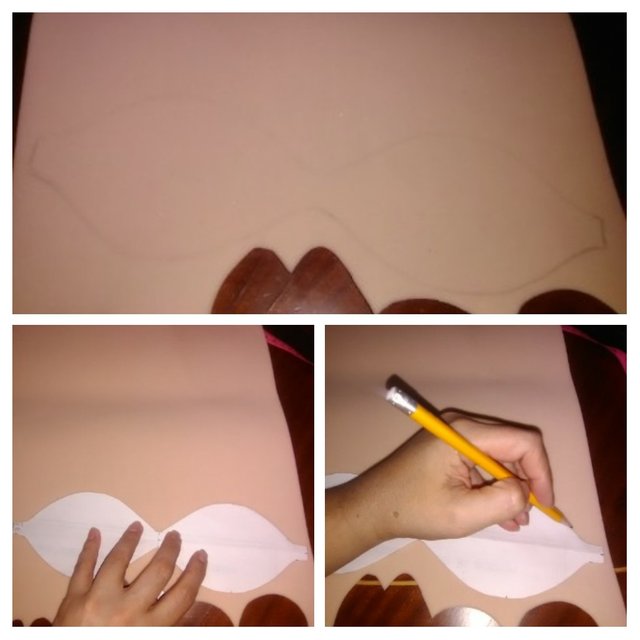
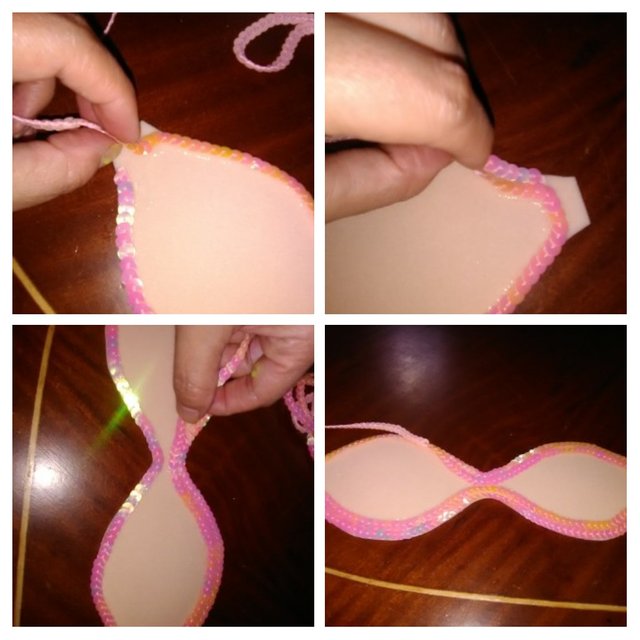
Step 1
In this first step we elaborate the loop pattern.
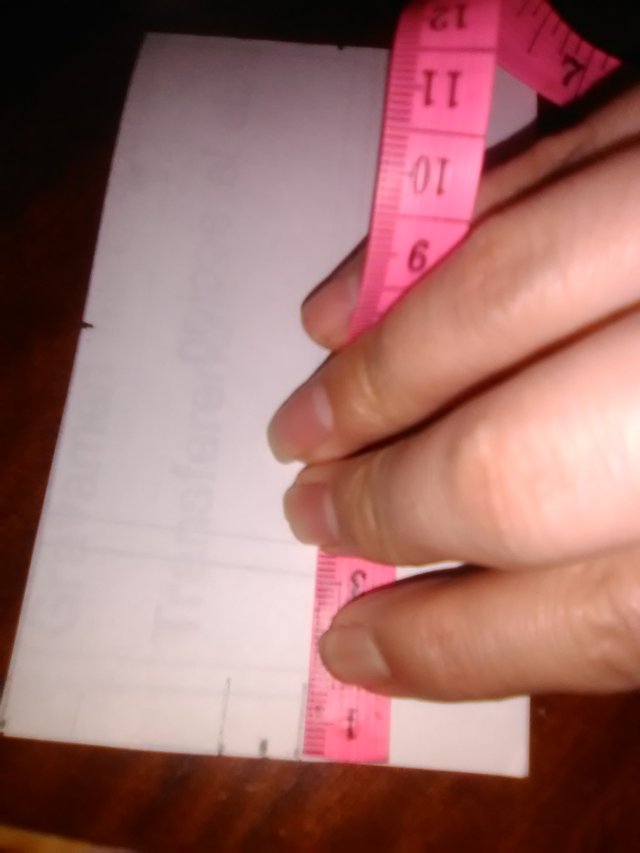
The first thing we are going to make is the loop pattern, and for that we need the machine sheet, pencil, tape measure, ruler, and scissors.
We measure 25 centimeters horizontal by 7.5 centimeters vertical.
A continuación les mostraré los pasos para realizar este hermoso cintillo.
Paso 1
En este primer paso elaboramos el patrón del lazo.
Lo primero que vamos hacer el patrón del lazo, y para eso necesitamos la hoja de máquina, lápiz,cinta métrica regla y tijera.
Medimos 25 centímetros horizontal por 7,5 centímetros vertical.
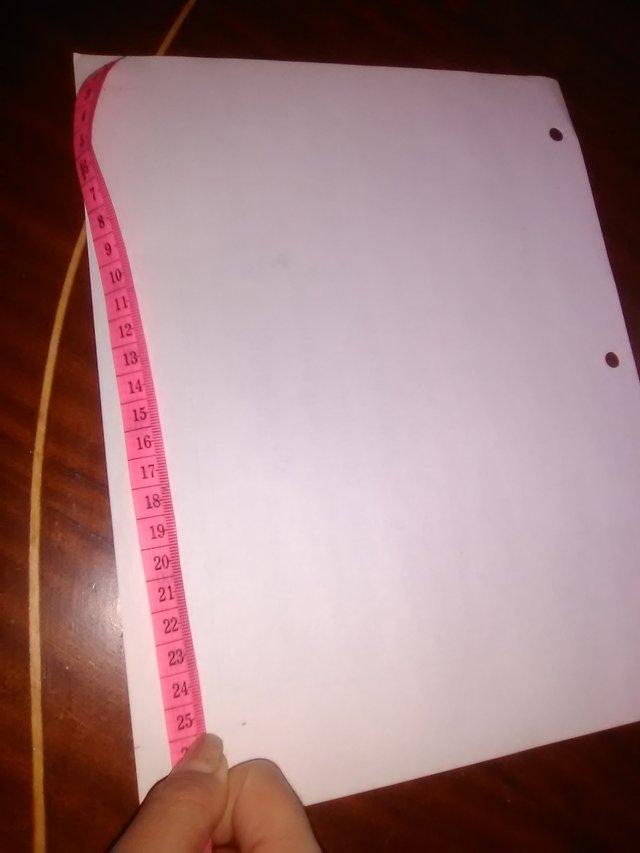
25 cm horizontal
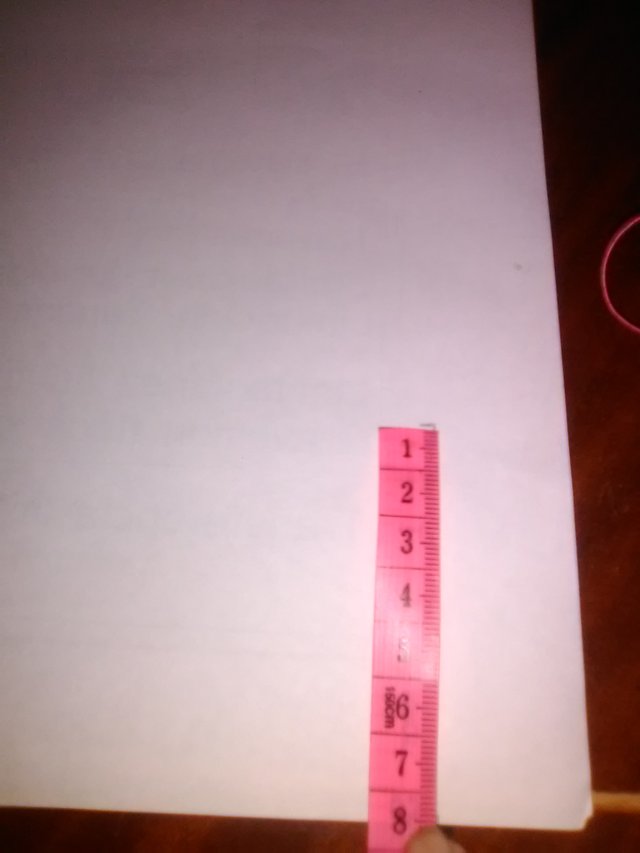
7,5 cm vertical
Then we join each point of the measurements by drawing the lines with the pencil and cut out.
Luego unimos cada punto de las medidas trazando las líneas con el lápiz y recortamos.
We draw the lines and cut out/ Trazamos las líneas y recortamos.
Then we fold in half
Después doblamos por la mitad
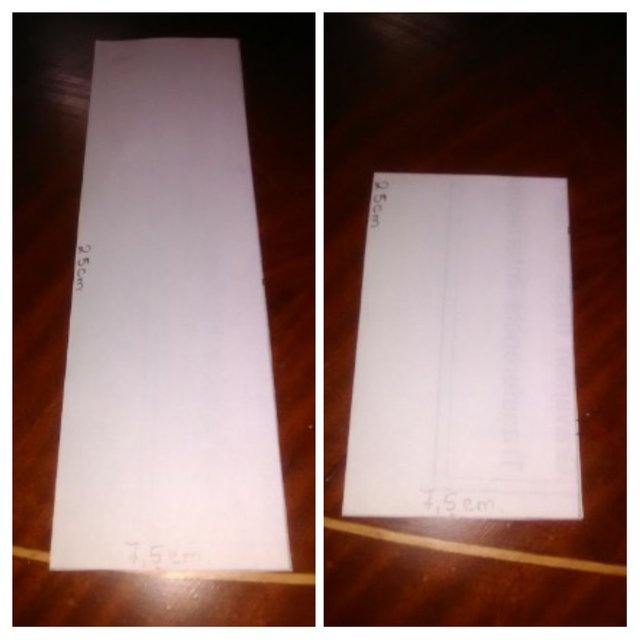
We fold in half/ Doblamos por la mitad.
To take half of the measurements from both sides, we mark with a point in the middle of each side
Para tomar la mitad de las medidas de ambos lados, marcamos con un punto en la mitad de cada lado.
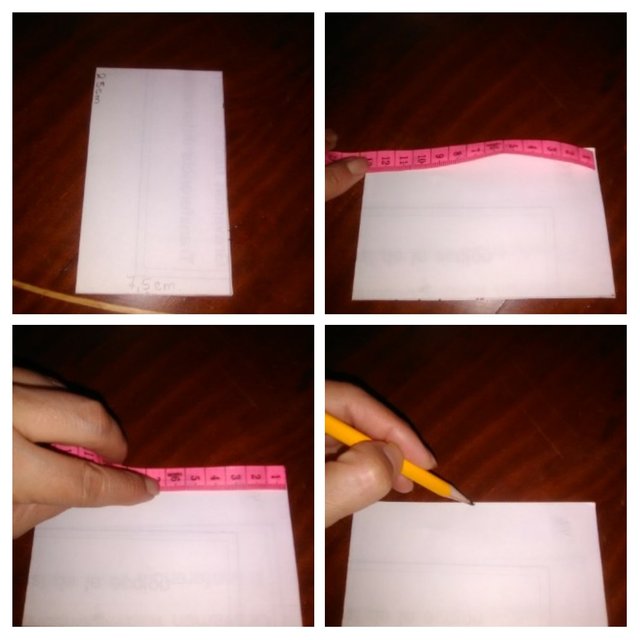
We mark the points/ Marcamos los puntos
At the point of the vertical side where we bend from the end to the bottom, where the sheet rises, there we measure and draw 1 cm horizontal and 1 cm vertical.
En el punto del lado vertical dónde doblamos del extremo hacia abajo, dónde se levanta la hoja, allí medimos y trazamos 1 cm horizontal y 1 cm vertical.
We mark 1 cm horizontal and 1 cm vertical./ Marcamos 1 cm horizontal y 1cm vertical.
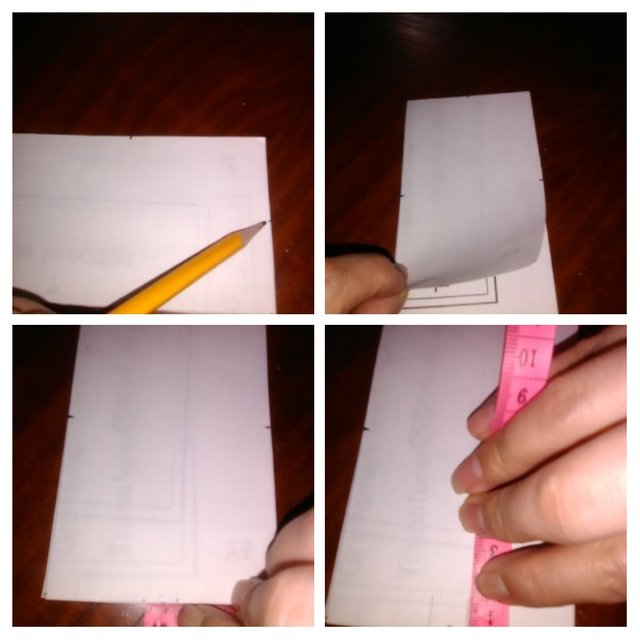
After marking 1 cm horizontal and 1 cm vertical as I show you in this other image.
Después de marcar 1 cm horizontal y 1 cm vertical como les muestro en esta otra imagen.
Marked 1 cm/ Marcado 1 cm
We proceed to make a semi curve to the point we marked above and then from that point to the other end.
Procedemos hacer una semi curva hasta el punto que marcamos arriba y luego desde ese punto hacia el otro extremo.
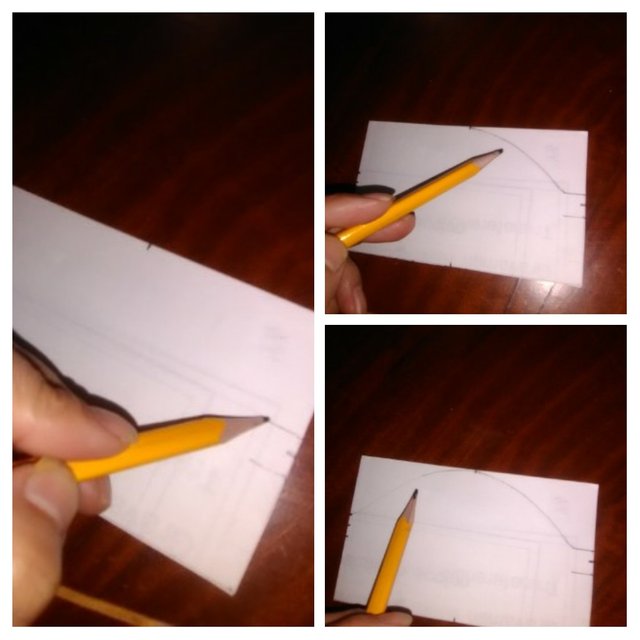
Marking the semicurve/ Marcando la semicurva
Then we fold in half, where I will show you in the first square of the collage, there we fold to get the other semi-curve and cut where we mark the semi-curve.
Después doblamos a la mitad, dónde les mostraré en el primer cuadrito del collage, allí doblamos para sacar la otra semicurva y recortamos por dónde marcamos la semicurva.
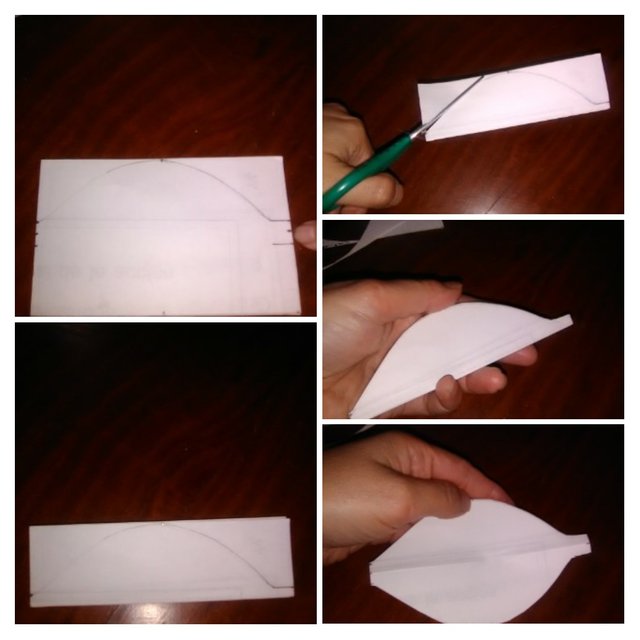
We take the other semi curve./ Sacamos la otra semi curva.
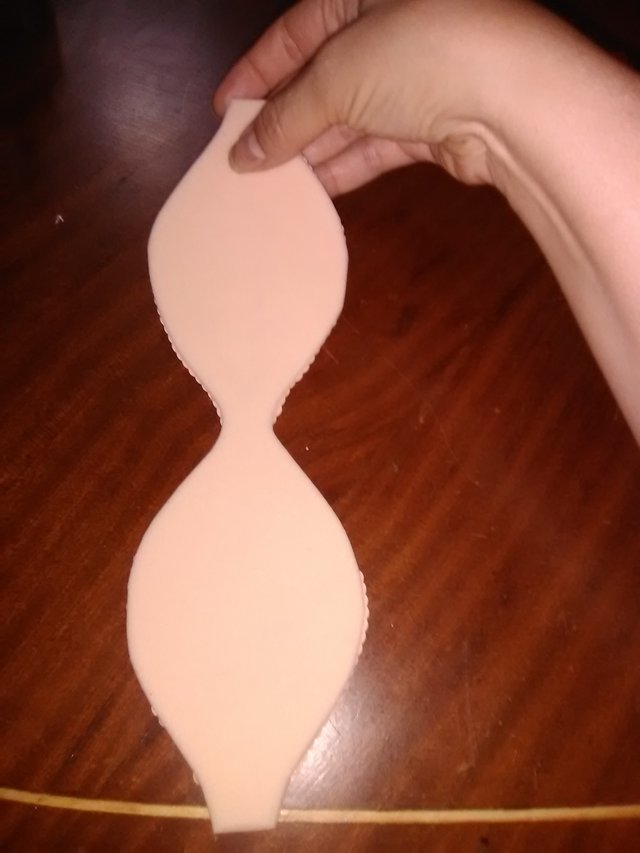
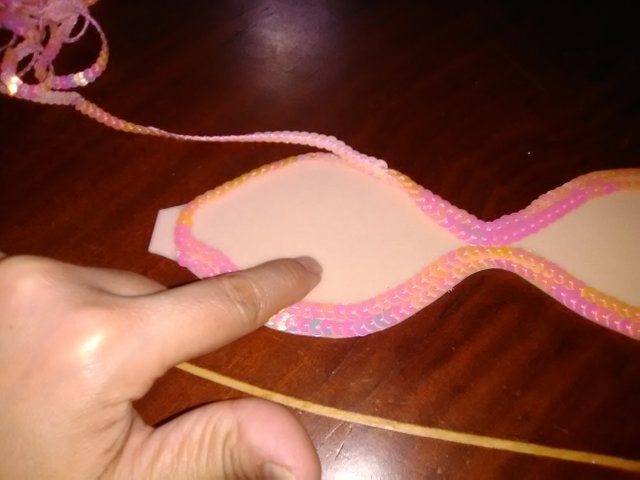
We open and obtain the pattern to make the loop.
Abrimos y obtenemos el patrón para elaborar el lazo.
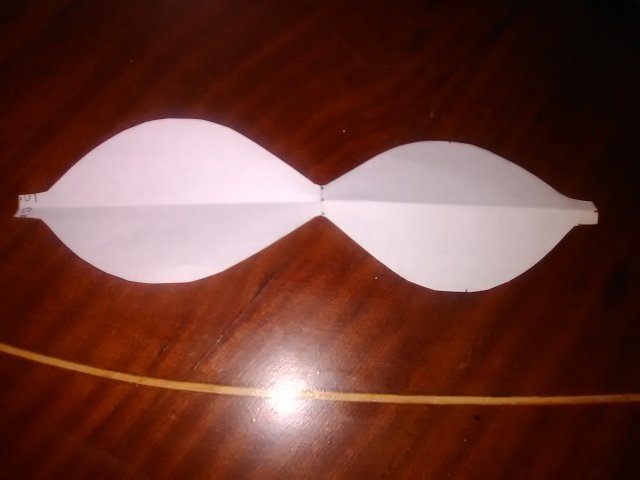
Loop pattern/ Patrón del lazo
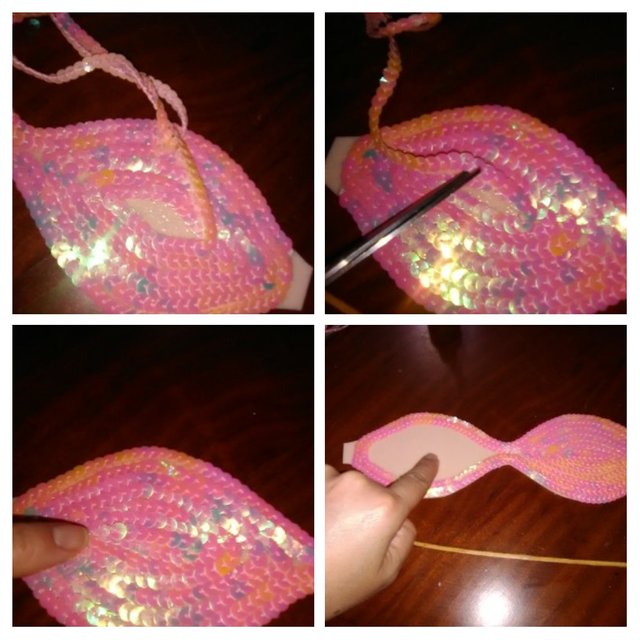
Step 2
This step is to make the foamy mold.
We place the pattern on top of the foamy to remove the mold, in this case it is flesh-colored.
Paso 2
Este paso es para elaborar el molde de foamy.
Colocamos el patrón encima del foamy para sacar el molde, en este caso es de color carne.
Making the mold for the bow/ Elaborando el molde para el lazo
And we get this foamy mold.
Y obtenemos este molde de foamy.
Foam mold to make the loop/ Molde de foamy para hacer el lazo
Now we go to the next step.
Step 3
Materials to start making the headband.
Ahora vamos al siguiente paso.
Paso 3
Materiales para empezar a elaborar el cintillo.
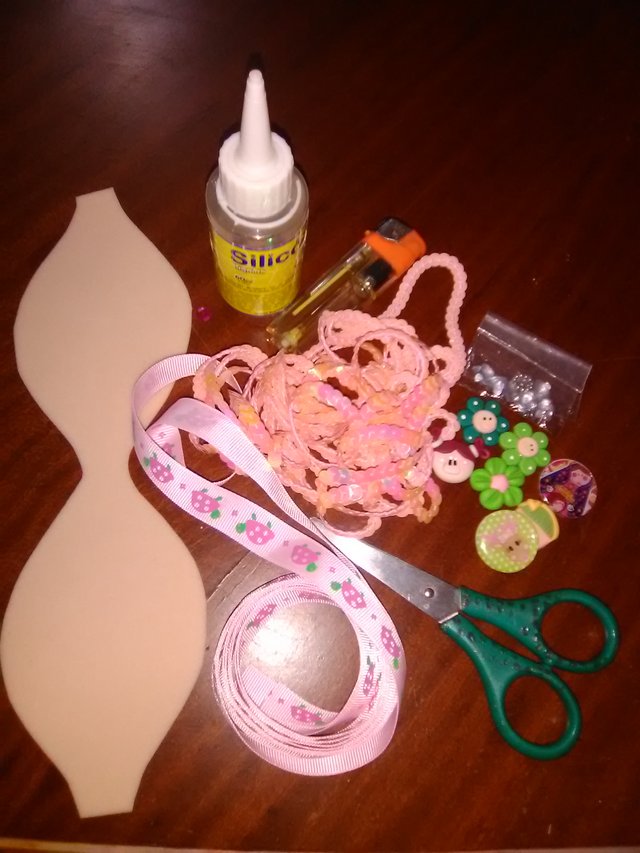
Materials/ Materiales
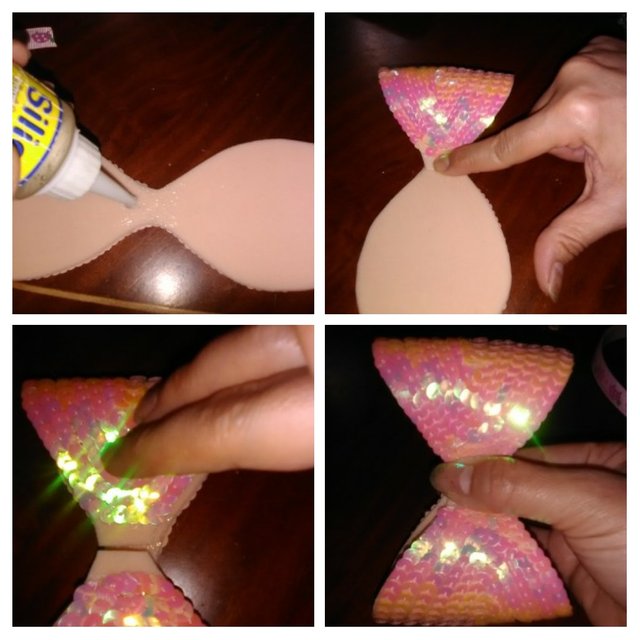
We start by placing liquid silicone on top of the foamy mold, and then sticking the sequins.
Empezamos colocando silicón líquido encima del molde de foamy, para luego ir pegando las lentejuelas.

placing silicone and gluing sequins. /Colocando Silicón y pegando lentejuelas
Let's stick the sequins all over the edge of the foamy
Vamos pegando las lentejuelas por todo el borde del foamy
Gluing sequins/ Pegando las lentejuelas
When we get to the other end, we continue turning it over, gluing the sequins.
Al llegar a la otra punta, seguimos dándole la vuelta pegando las lentejuelas.
Gluing sequins/ Pegando las lentejuelas
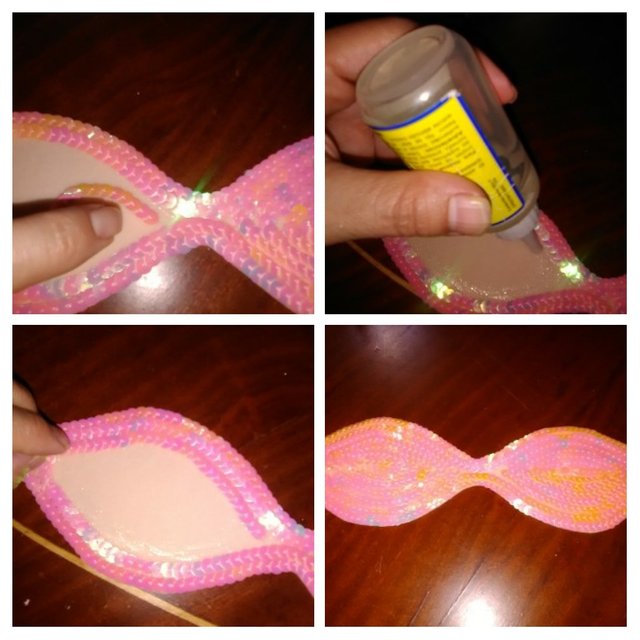
How, by this edge, there is no space to continue gluing the sequins.
Cómo ya por este borde no queda espacio para seguir pegando las lentejuelas.

Ready this edge./ Listo este borde
So we just finish gluing on one side first and then go to glue the sequins on the other side.
Entonces solo terminamos de pegar por un lado primero para luego ir a pegar las lentejuelas en el otro lado.
We glue the sequins on this side first./ Pegamos las lentejuelas de este lado primero
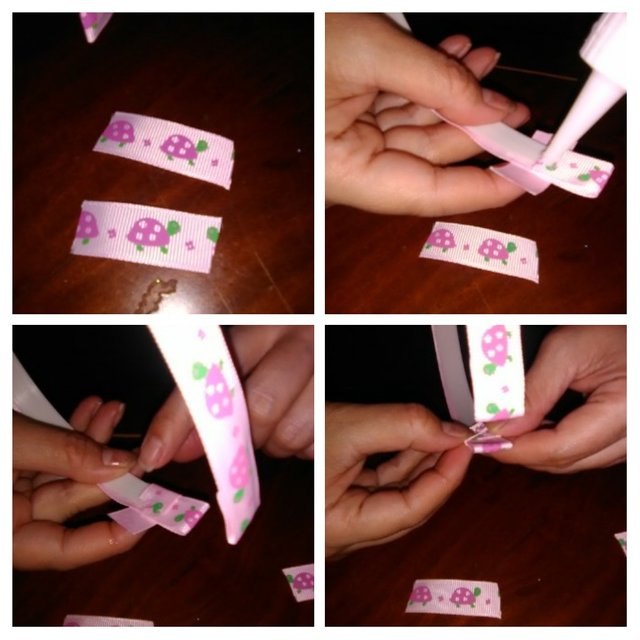
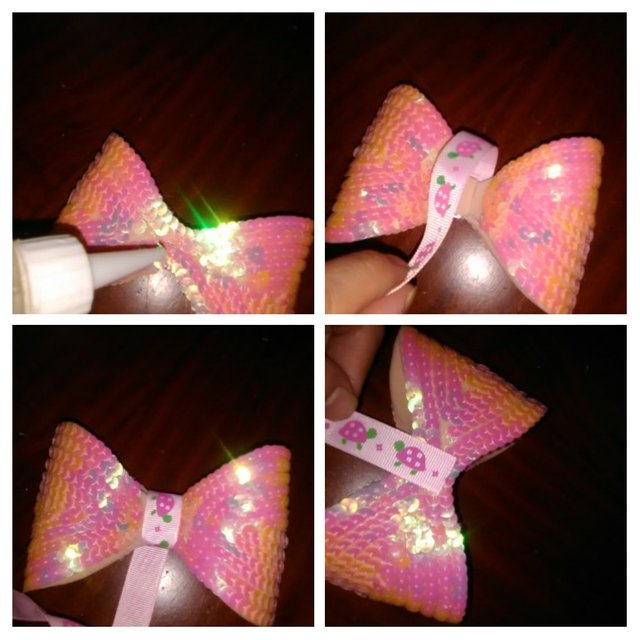
When we finish gluing, we cut with the scissors, and we begin to glue the other end.
Al terminar de pegar, cortamos con la tijera, y comenzamos a pegar el otro extremo.
Finishing gluing sequins./ Terminando de pegar lentejuelas
We glue the sequins on the other end, we put silicone and we begin to paste all the remaining space until we finish.
Pegamos las lentejuelas en el otro extremo, colocamos silicón y comenzamos a pegar por todo el espacio que falta hasta terminar.
Sticking sequins on the other side./ Pegando lentejuelas por el otro lado
Staying like this this way.
Quedando así de esta manera.
Finishing gluing the sequins./ Terminando de pegar las lentejuelas
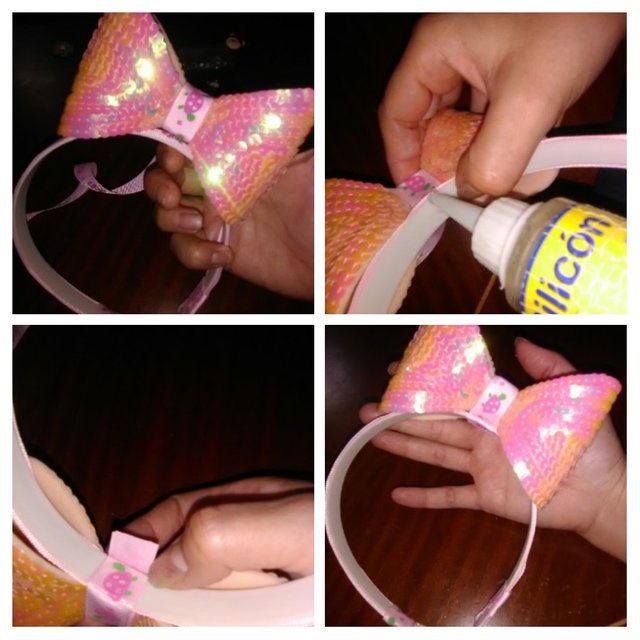
We let it dry well, and in the meantime, we go to the next step.
Step 4
In this step we cover the headband with the decorative tape.
Dejamos que se seque bien, y mientras tanto, vamos al siguiente paso.
Paso 4
En este paso forramos el cintillo con la cinta decorativa.
Colocamos primero silicón en la punta de un extremo del cintillo.
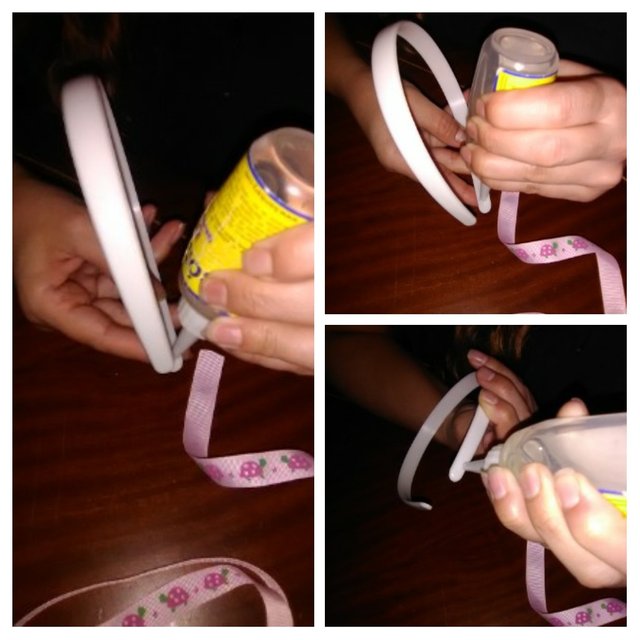
Placing silicone on the headband/ Colocando silicón en el cintillo
Then we place the tip of the ribbon, this ribbon is of the design that you like, it can be unicolor that is left to your imagination, I used this for little turtles motif.
Then, as I was saying, they glue the end of the tape inside the headband, leaving two centimeters on that side, then turn it over until they reach the other end, ending up the same as the other end, inside the headband, the same to two centimeters and cut the excess with the scissors
Luego colocamos la punta de la cinta, está cinta es del diseño que ustedes gusten puede ser unicolor eso se lo dejo a su imaginación, yo utilicé está de motivo tortuguitas.
Entonces como les decía, pegan la punta de la cinta por dentro de la parte del cintillo, dejando de ese lado dos centímetros, luego le dan la vuelta hasta llegar al otro extremo, terminando igual que el otro extremo, por dentro del cintillo, igual a dos centímetros y cortan el sobrante con la tijera.
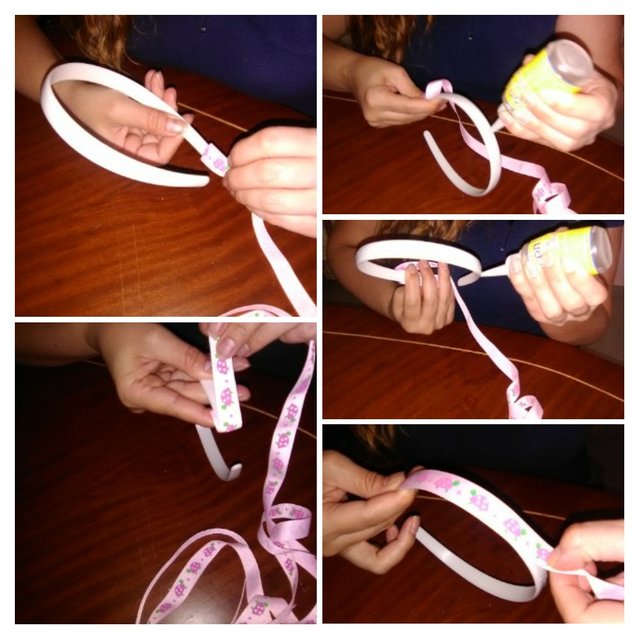
Sticking the decorative tape./ Pegando la cinta decorativa
At the end we cut and seal with the lighter.
Al finalizar cortamos y sellamos con el encendedor.
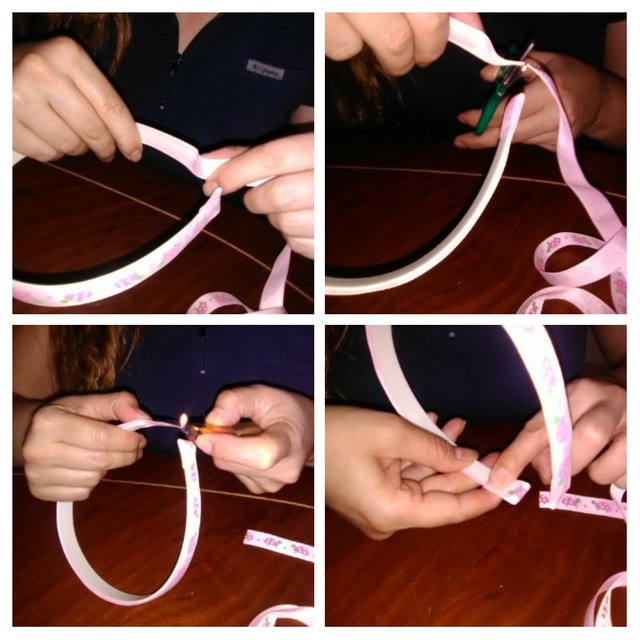
Finishing gluing the tape to the headband/Terminando de pegar la cinta al cintillo
Then we cut two pieces of 4-centimeter tape, this is so that it is more reinforced, does not come off and with a better finish.
Luego recortamos dos pedacitos de cinta de 4 centímetros, esto es para que quede más reforzado, no se despegue y con un mejor acabado.
Gluing the bits of ribbons/ Pegando los pedacitos de cintas
Staying this way.
Quedando de esta manera.
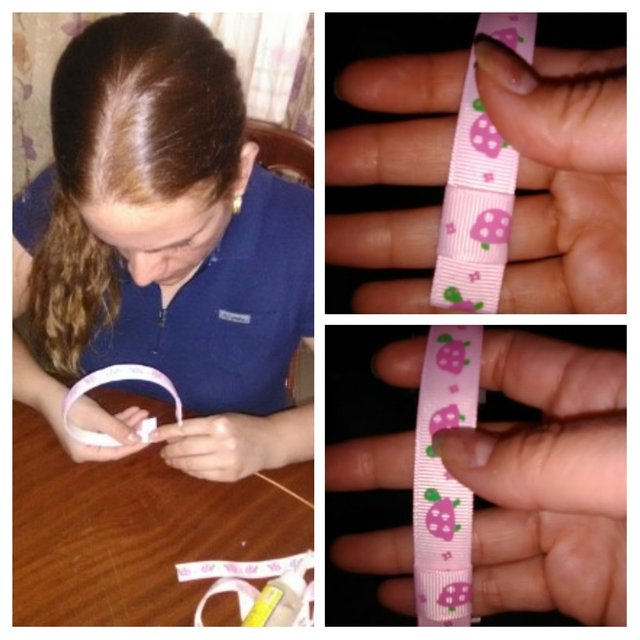
Clever/ Listo
Now we move on to the next step.
Step 5
In this step we finish the bow, with the mold that we made in step number 3, and we finish the headband.
We turn the mold of the loop and place silicone in the middle, then we bring one end to where we place the silicone, and we do the same with the other end, we press for a few minutes until it sticks.
Ahora pasamos al siguiente paso.
Paso 5
En este paso terminamos el lazo, con el molde que elaboramos en el paso número 3, y terminamos el cintillo.
Volteamos el molde del lazo y colocamos silicón en el medio, luego traemos un extremo hacia dónde colocamos el silicón, y así mismo hacemos con el otro extremo, apretamos por unos minutos hasta que pegue.
Finishing gluing the bow/ Terminando de pegar el lazo
We place silicone on one side and then cover and secure so that it does not come off.
Colocamos silicón por un ladito para luego tapar y asegurar para que no se despegue.
Reinforcing the bond/ Reforzando el lazo
Now we proceed to glue the bow to the headband, placing a little silicone and then we pass the tape twice and finish underneath.
Ahora procedemos a pegar el lazo al cintillo, colocando un poquito de silicón y luego pasamos la cinta dando dos vueltas y terminar por debajo.
Glued the bow to the headband/ Pegando el lazo al cintillo
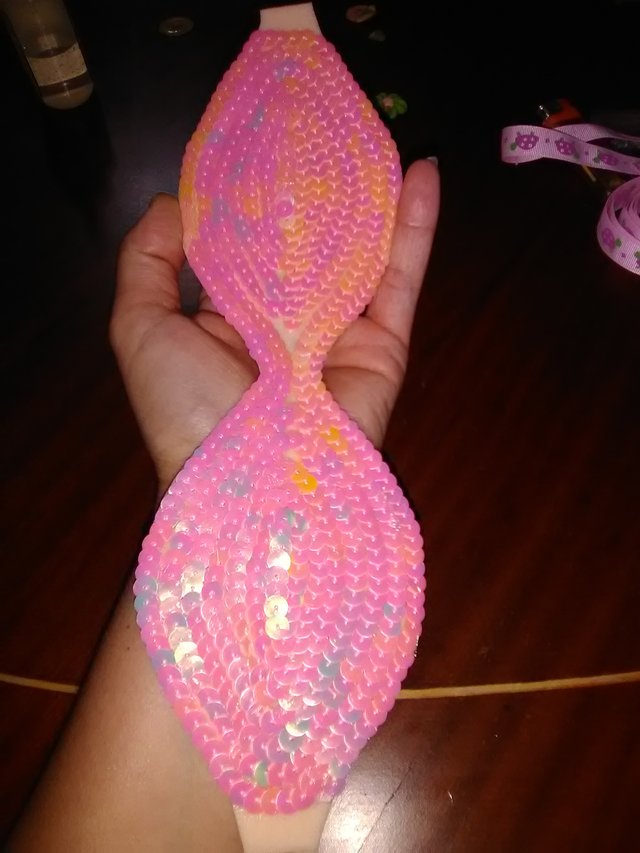
We glue the appliqué to the bow and that's it.
Now I will show you several photos how this beautiful headband turned out.
Pegamos el aplique al lazo y listo.
Ahora les mostraré varias fotos como quedó este precioso cintillo.
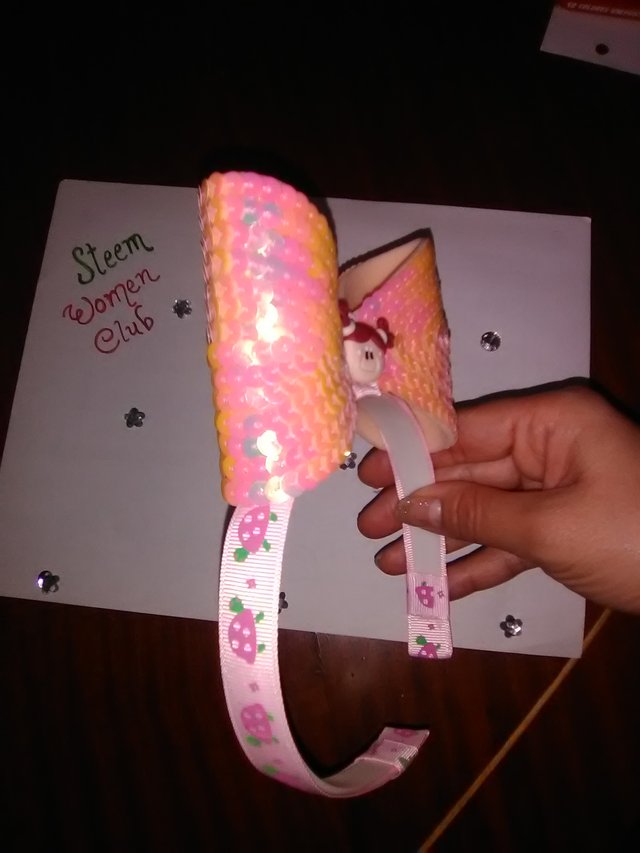
Finished headband/ Terminado el cintillo
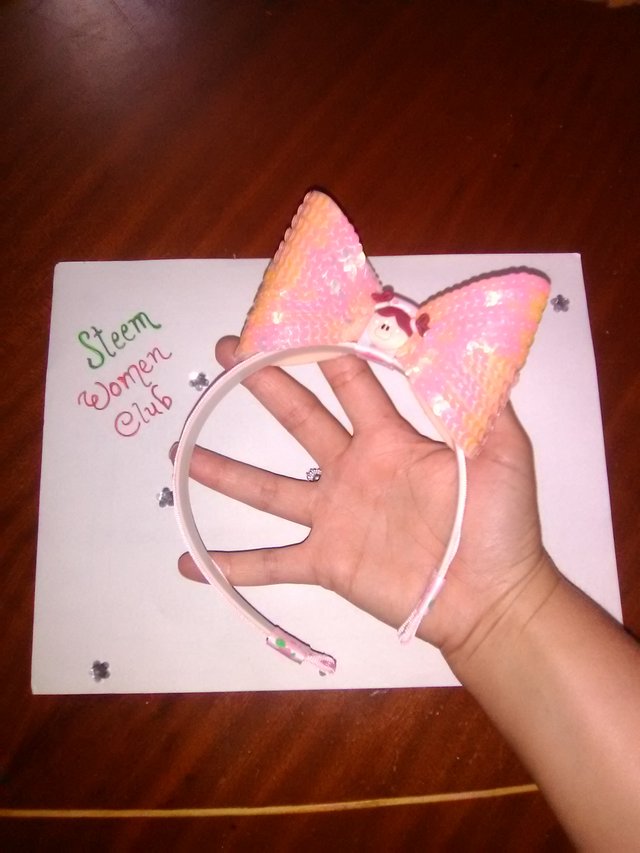
Clever/ Listo
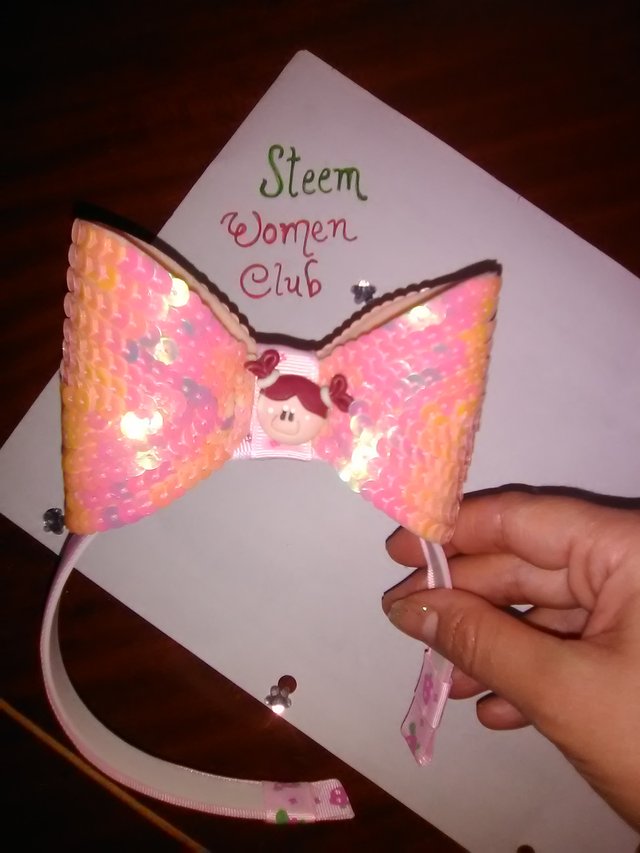
Beautiful headband/ Hermoso cintillo
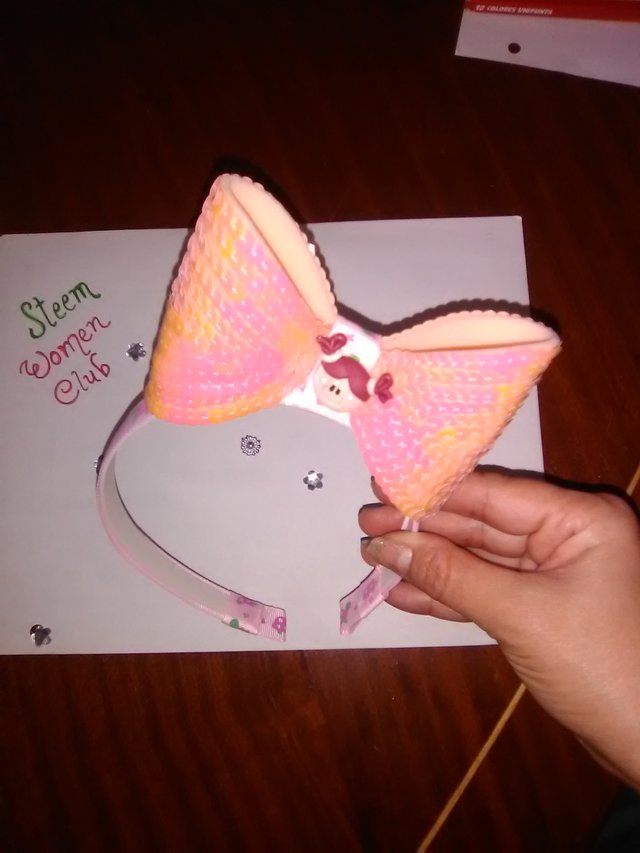
Beautiful headband/ Hermoso cintillo
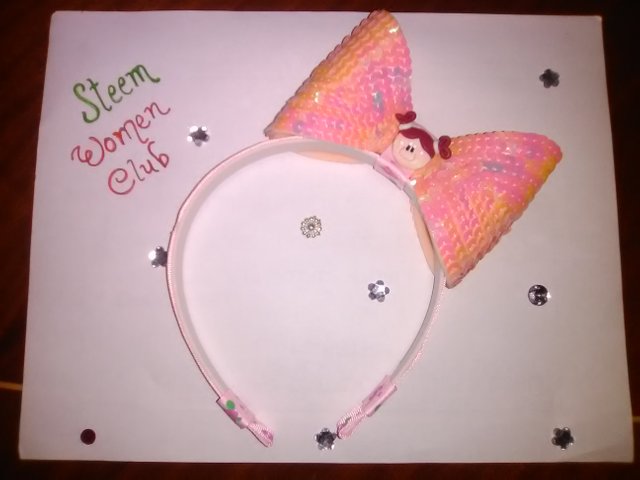
Beautiful headband/ Hermoso cintillo
I hope you like it and can do it.
Grateful to all of you for visiting me, I wish you many blessings and luck in the contest 💖
I invite @eliderojas @andreinamar @ yannellys-32 to participate in the contest
Here I leave the link of this contest so that you can participate.
https://steemit.com/hive-188403/@steemwomensclub/steem-women-club-design-contest-24-or-the-design-of-anything-you-want-or-or-70-steem-awards -10-winners-20-womenclub-charity
Espero les guste y puedan hacerlo.
Agradecida con todas ustedes por visitarme, les deseo muchas bendiciones y suerte en el concurso 💖
Invito a participar en el concurso a @eliderojas @andreinamar @yannellys-32
Aquí les dejo el link de este concurso para que participen.
https://steemit.com/hive-188403/@steemwomensclub/steem-women-club-design-contest-24-or-the-design-of-anything-you-want-or-or-70-steem-awards-10-winners-20-womenclub-charity
Pl
If you like to know more about me here I leave my achievement1
All photos are my own, taken by my Alcatel cell phone.
Si gustan conocer más de mi persona aquí les dejo mi logro1
Todas las fotos son de mi autoría, tomadas por mi celular Alcatel.
Hermoso cintillo amiga, y muy facil de hacer. Me gusto tu paso a paso. Saludos :)
Hermoso cintillo amiga, muy hermoso, es bueno trabajar y desarrollar esas habilidades que tienes y que las compartas para que otros aprendan de ti, eres muy creativa, felicitaciones, me gusto mucho tu post y tu paso a paso, gracias por compartirlo con todos nosotros. Suerte. Un abrazo
Gracias, amiga @zulay7059 tus palabras me motivan, siempre agradecida, te deseo muchas bendiciones amiga 🙏😘💖
Hermosoooo te quedó amiga lo tendré presente para realizarlo!! Le quedara perfecto a mi hija!!! Muchos éxitos en el concurso!! 🤗
Ay que tierno jeje me encantó para cuando mi Amalia esté grande.
Gracias mi bella 😘 así es le puedes hacer de varios colores quedan hermosos.
Muy hermoso te quedo ese cintillo amiga, ideal para las princesrita de la casa. Muchas gracias por compartir con todas nosotras tu creación. Saludos ❤️
Gracias mi bella, me alegra que te haya gustado 🤗
Hermoso cintillo amiga, me gustó a mucho.
A nice design. Keep it up.
Thanks 😘