Wonder Woman Makeup (comic type), Step by Step, tutorial - 🌹 "BECAUSE WE ARE ALL WONDERFUL" 🌹[ESP - ENG]
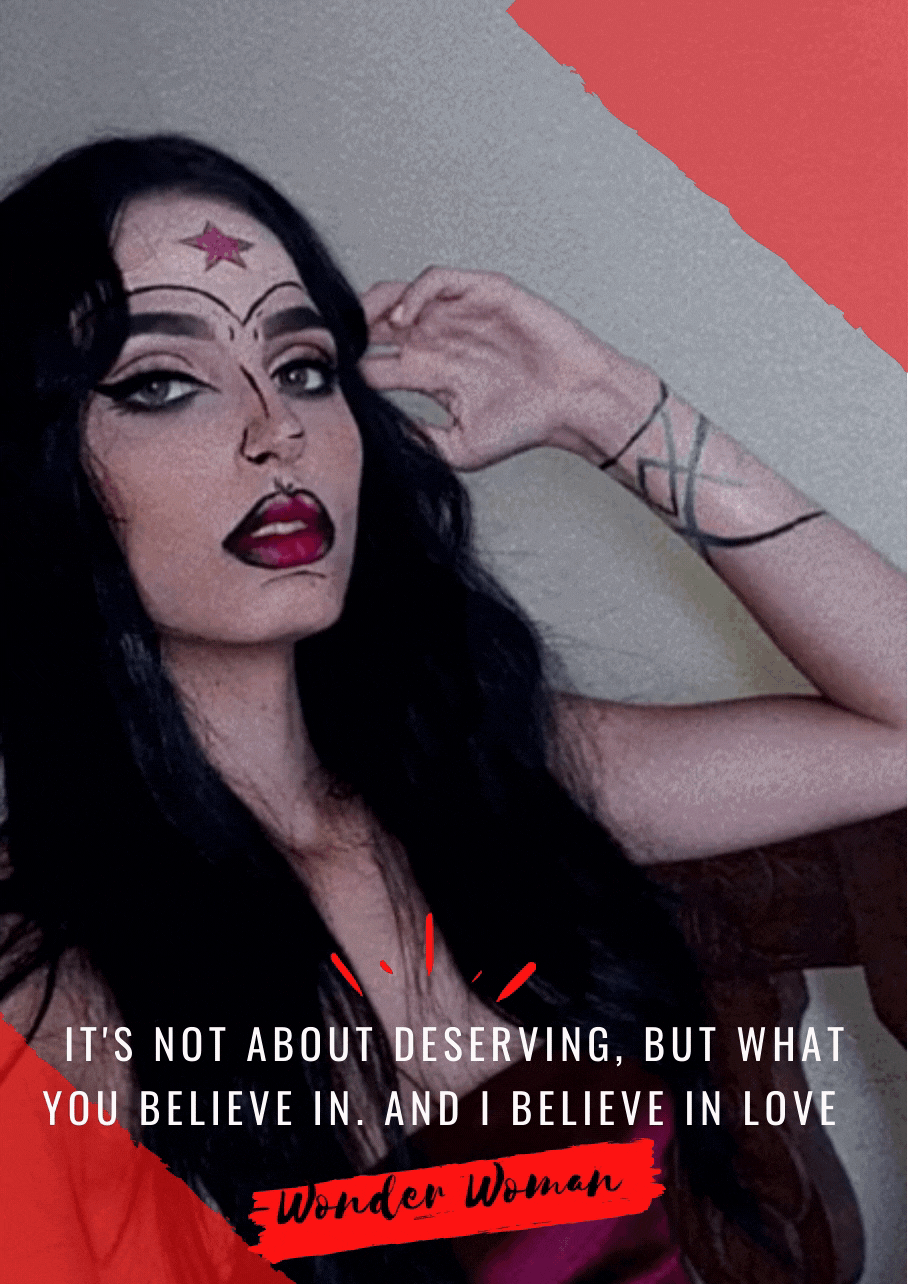
No se trata acerca de merecer, si no de lo que uno cree. Y yo creo en el amor”. –La Mujer Maravilla.

PASO A PASO / STEP BY STEP
Colocamos nuestra base
PASO 2
Difuminamos muy bien con ayuda de una esponjita.
PASO 3
Corregimos las ojeras.
We lay our foundation
STEP 2
We blend very well with the help of a sponge.
STEP 3
We correct dark circles.

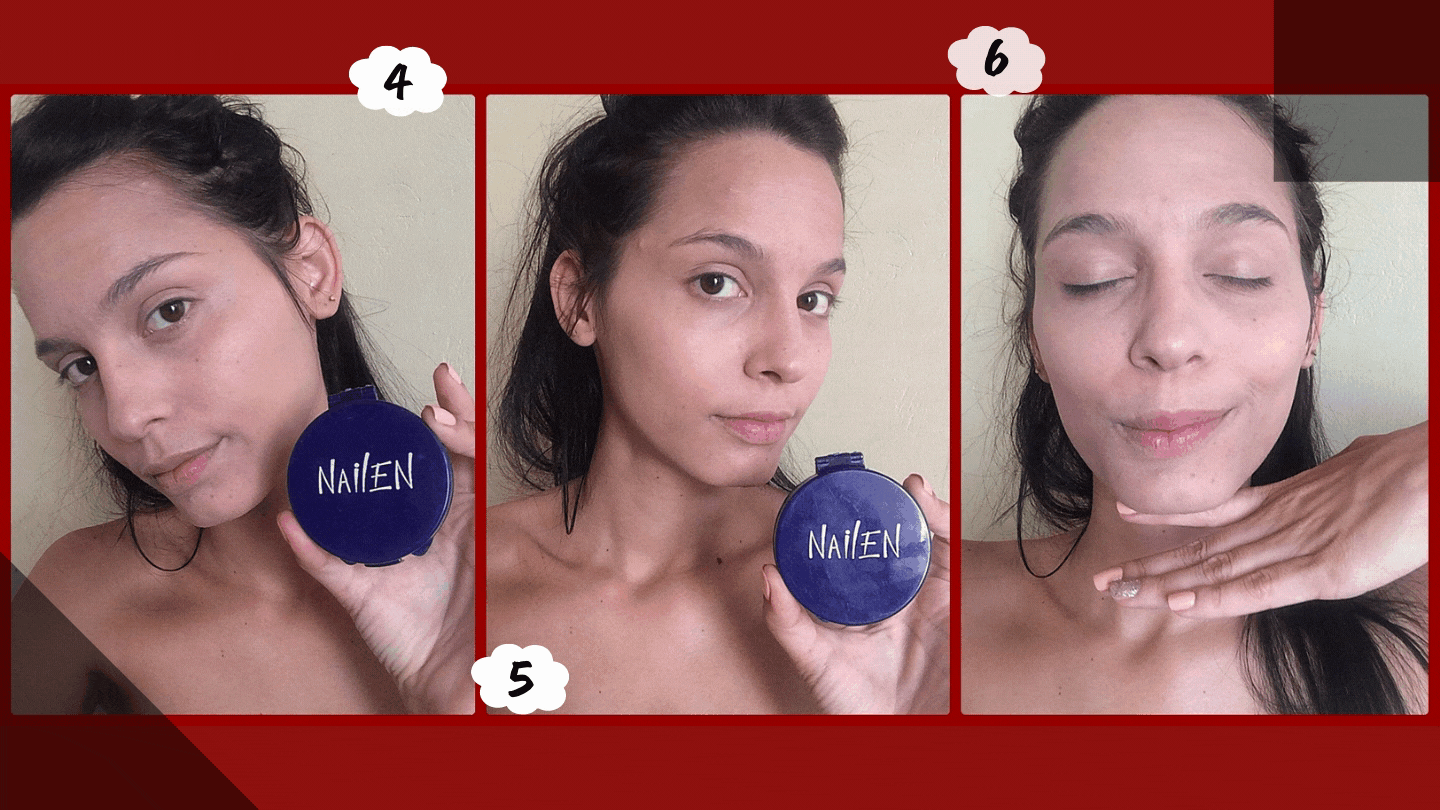
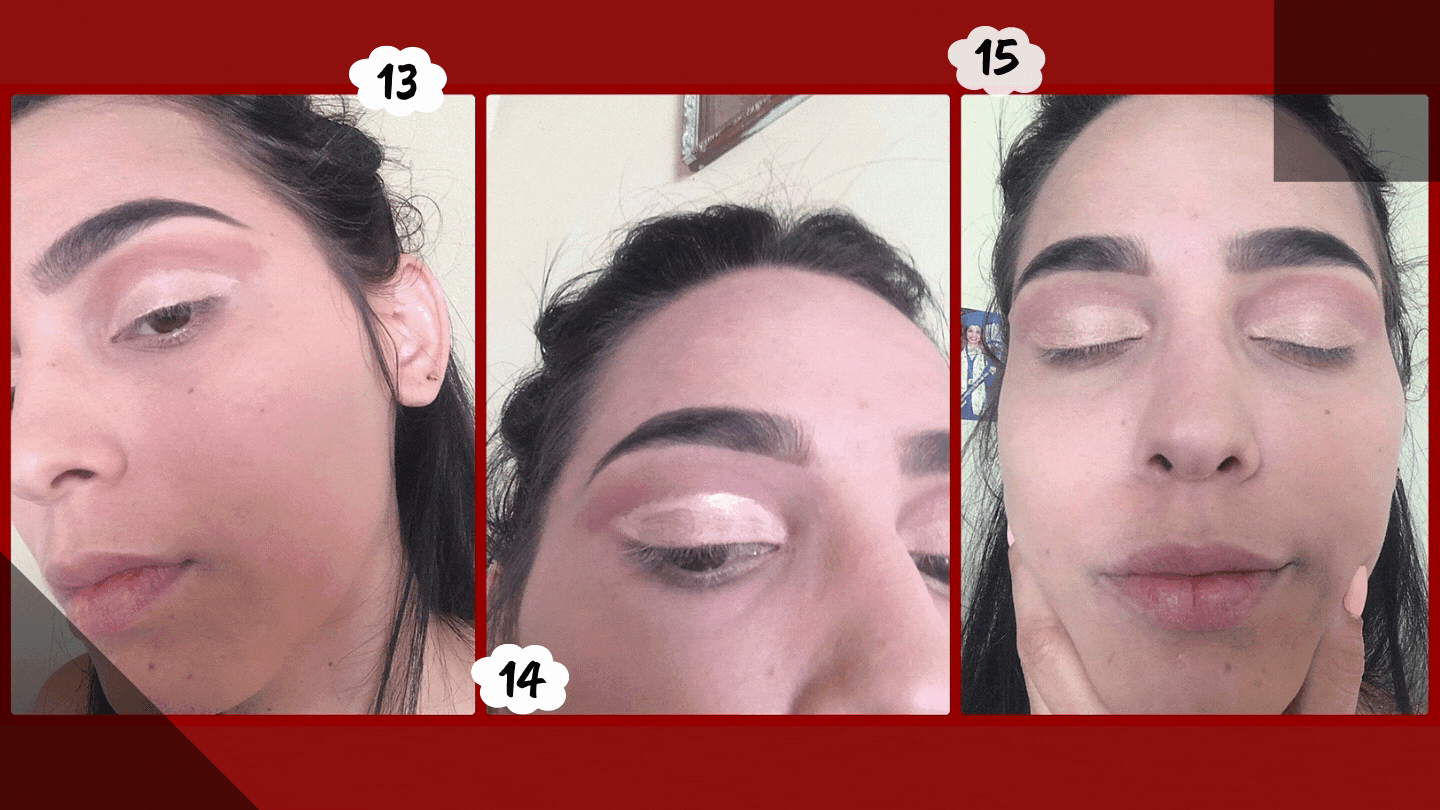
Tomamos nuestro polvo compacto o suelto.
PASO 5
Aplicamos muy bien para sellar nuestra parte de los ojos.
PASO 6
Nuestra base debe quedar completamente sellada.
We take our compact or loose powder.
STEP 5
We apply very well to seal our part of the eyes.
STEP 6
Our base must be completely sealed.
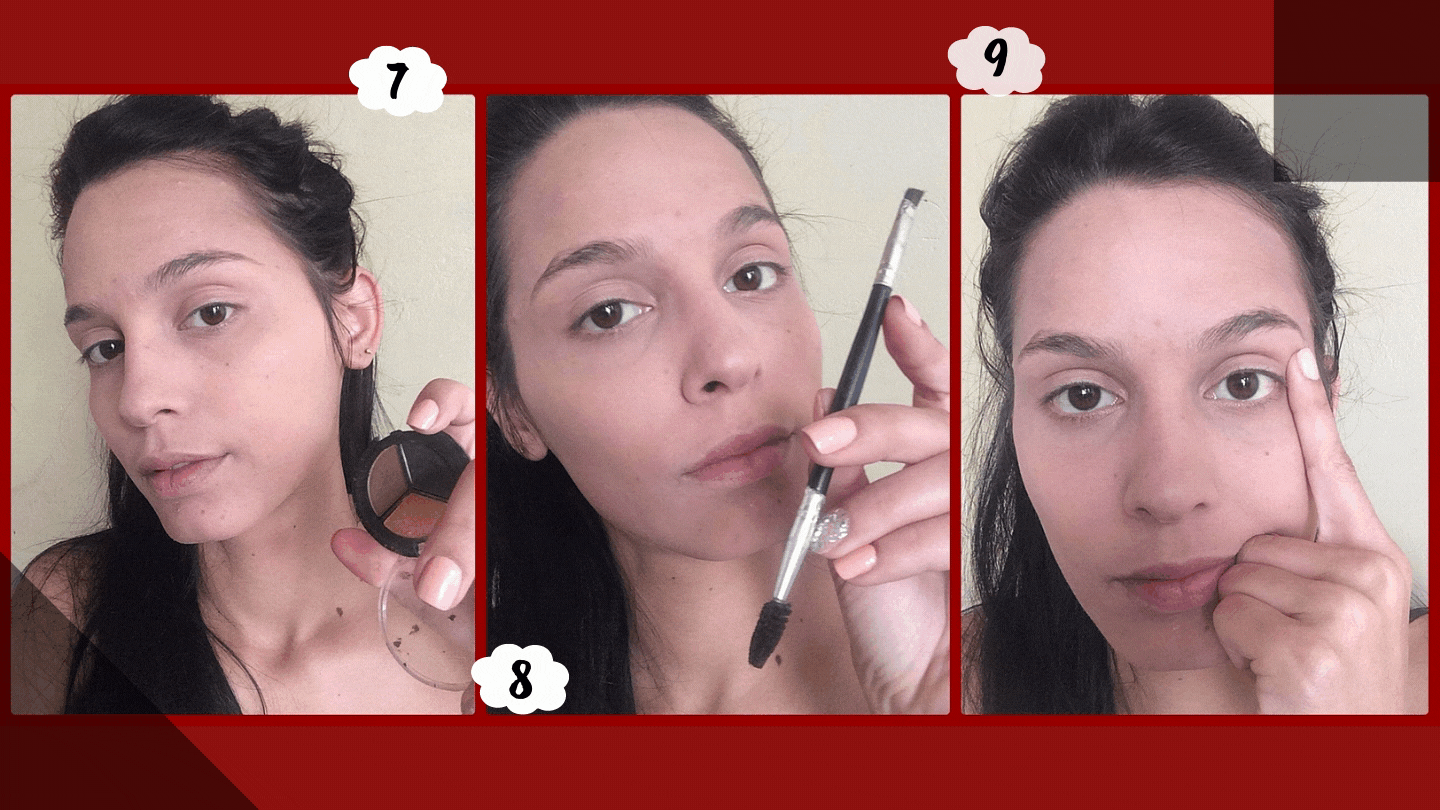
Tomamos nuestra sombra de cejas, preferiblemente negra.
PASO 8
Nuestro pincel para cejas doble
PASO 9
Con el cepillo de nuestro pincel peinamos nuestras cejas.
We take our eyebrow shadow, preferably black.
STEP 8
Our double brow brush
STEP 9
With the brush of our brush we comb our eyebrows.
Mojamos el pincel en agua y tomamos un poco de nuestra sombra de cejas negra y comenzamos a marcar.
PASO 11
Luego de marcar nuestro bordes de las cejas, comenzamos a difuminar con nuestro cepillo.
PASO 12
Difuminamos bien para que nuestras cejas no queden tan oscuras.
We dipped the brush in water and took a bit of our black brow shadow and started to mark.
STEP 11
After marking our edges of the eyebrows, we began to blend with our brush.
STEP 12
We blend well so that our eyebrows are not so dark.

PASO 13
Con ayuda de un pincel para sombras, por arriba de nuestro parpado móvil aplicamos sombra color terracota y difuminamos bien.
PASO 14
Luego de esto, realizamos un cup crease cerrado, en mi caso utilice base, pero pueden utilizar corrector ya que es mejor.
PASO 15
Por encima de nuestro cup crease aplicamos sombra color dorada.
OPCIONAL: Pueden colocar glitter dorada en el cup crease para darle un poco de brillo. (Yo no aplique porque no conseguí glitter dorado)
With the help of a shadow brush, above our mobile eyelid we apply a terracotta shade and blend well.
STEP 14
After this, we make a closed cup crease, in my case I used base, but you can use concealer as it is better.
STEP 15
On top of our cup crease we apply golden ombra.
OPTIONAL: You can put gold glitter on the cup crease to give it a little shine. (I did not apply because I did not get gold glitter)
Tomamos nuestro delineador liquido y hacemos nuestro delineado en nuestro ojo derecho, procuremos que quede largo.
PASO 17
Seguimos con nuestro ojo izquierdo con el delineado. Y en la parte de la cuenca de nuestro ojo hacemos una raya.
PASO 18
El mismo procedimiento para ambos ojos.
We take our liquid eyeliner and make our eyeliner in our right eye, let's try to make it long.
STEP 17
We continue with our left eye with the outline. And in the part of the socket of our eye we make a line.
STEP 18
The same procedure for both eyes.

Nos colocamos rimel en nuestras pestañas de arriba. (las de abajo aun no)
PASO 20
En nuestro parpado inferior vamos a colocar sombra de ojos color negro, difuminar muy bien.
PASO 21
Con ayuda del delineador trazamos una linea por nuestro parpado inferior y hacemos un delineado tipo pestañas, asi como muestra la foto.
We put mascara on our upper lashes. (the ones below not yet)
STEP 20
On our lower eyelid we are going to place black eyeshadow, blend very well.
STEP 21
With the help of the eyeliner, we draw a line through our lower eyelid and make an eyeliner-type outline, as shown in the photo.
.gif)
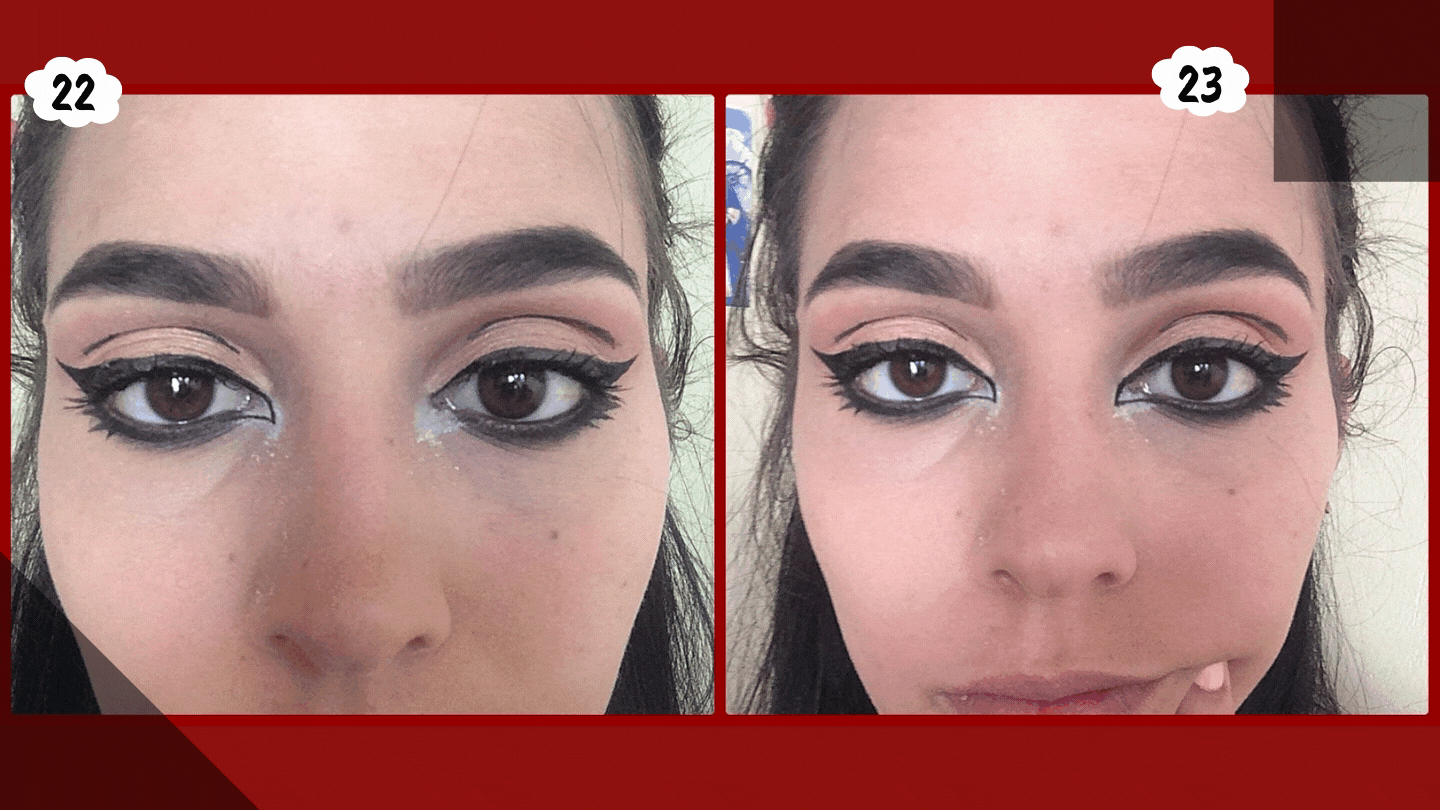
Con ayuda de un pincel vamos a colocar sombra blanca en lagrimal, en forma de triangulito.
PASO 23
Con el delineador marcamos los bordes del triangulo, haciendole seguimiento a nuestro delineado.
With the help of a brush we are going to place white shadow on the tear, in the shape of a triangle.
STEP 23
With the eyeliner we mark the edges of the triangle, following up with our outline.
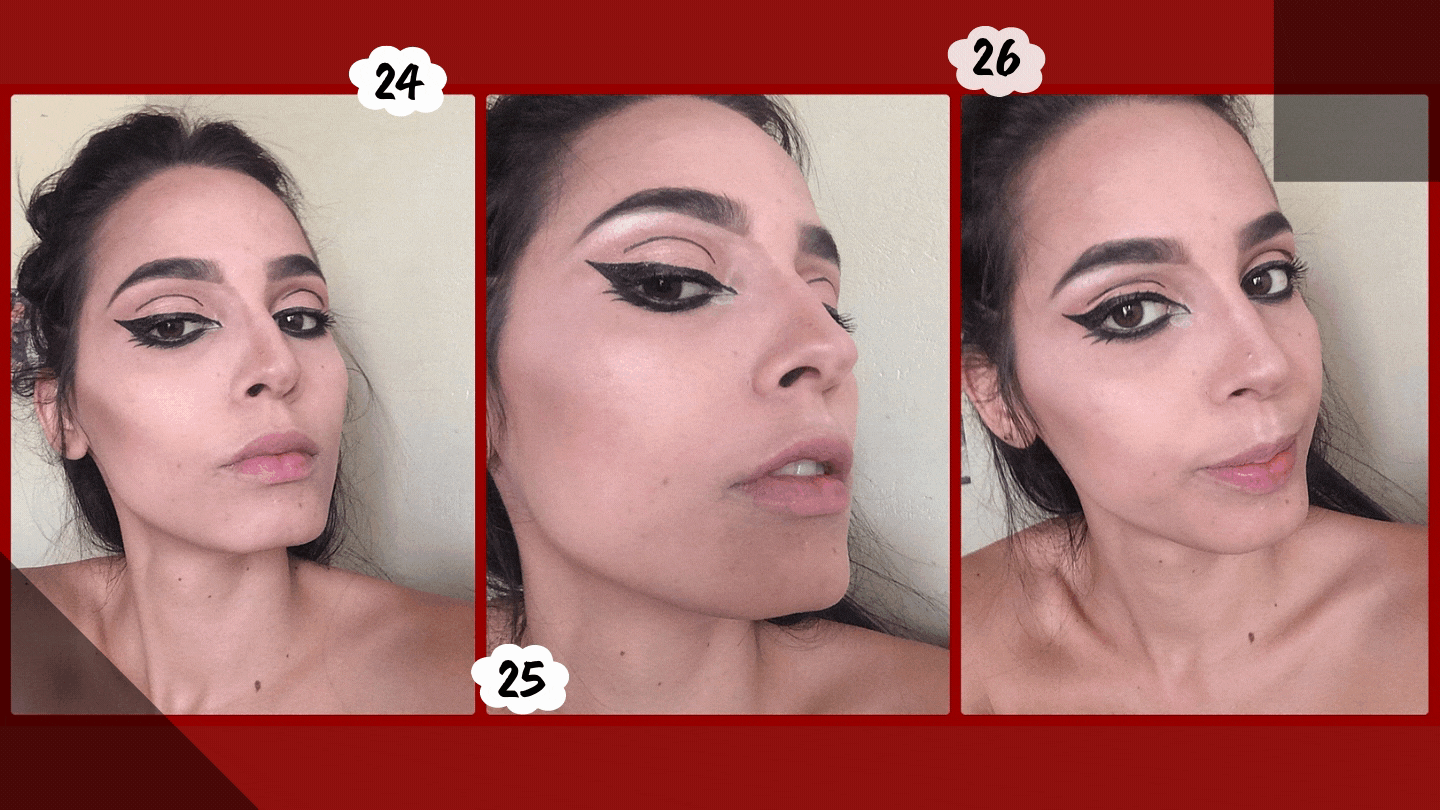
Comenzamos con nuestro contorno, con una brocha y contorno en polvo marron, comenzamos a difuminar el contorno de la frente. Asi afinamos nuestro rostro.
PASO 25
Luego procedemos con el contorno de nuestros cachetes, asi reducimos cachetes y afinamos las mejillas.
PASO 26
Por ultimo en nuestra nariz, para asi lograr una nariz mas delgada y respingada.
We start with our contour, with a brush and brown powder contour, we begin to blur the contour of the forehead. This is how we refine our face.
STEP 25
Then we proceed with the contour of our cheeks, thus reducing cheeks and refining the cheeks.
STEP 26
Finally on our nose, in order to achieve a slimmer and upturned nose.
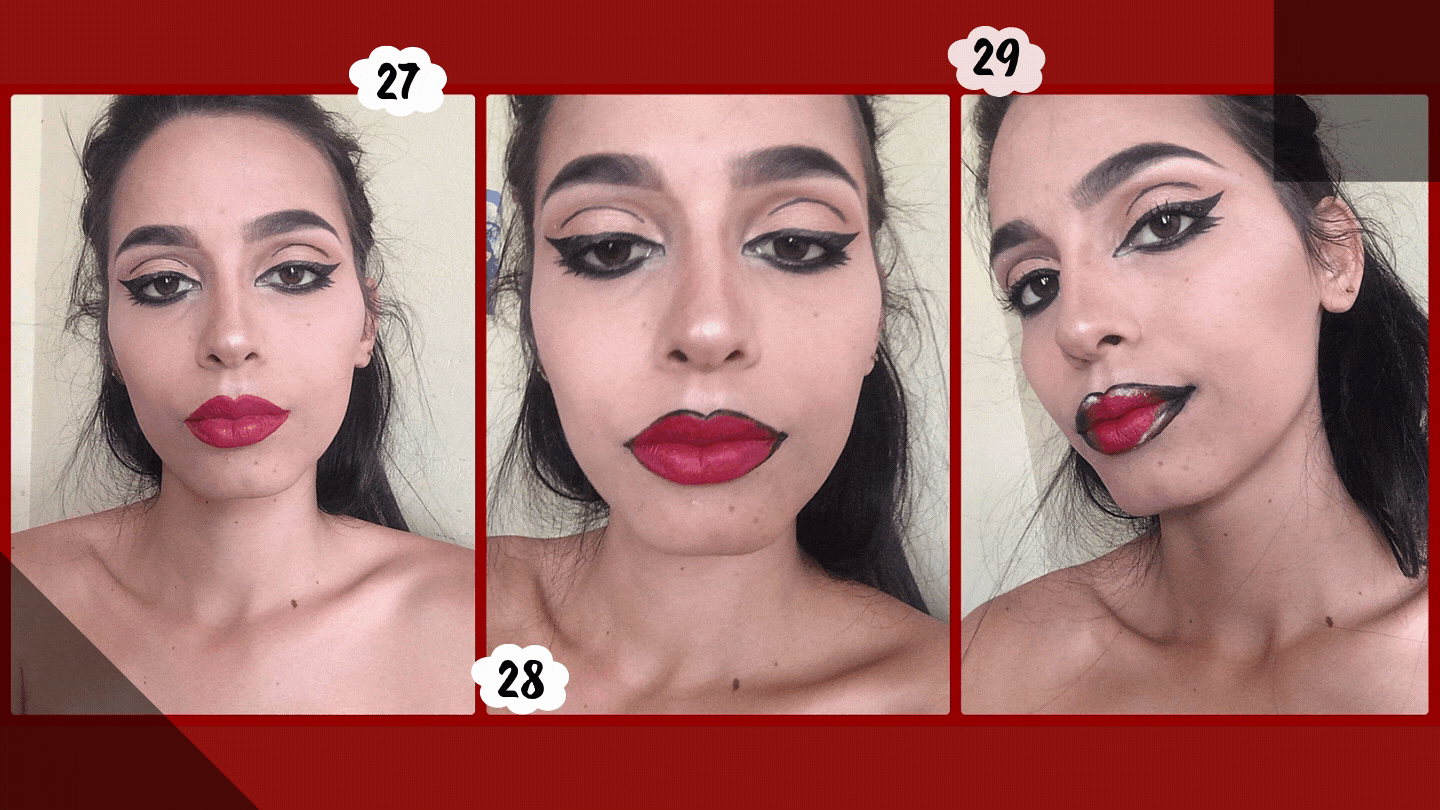
Con un labial un tono rojo intenso pintamos nuestros labios muy bien.
PASO 28
Luego con un lapiz negro vamos a marcar los bordes de nuestros labios, que quede muy bien.
PASO 29
Con ayuda de una brocha y sombra negra, vamos a sombrear la parte de la comisura de nuestros labios, muy delicadamente, que queden sombreado, y con sombra blanca iluminamos un poco para que de ese estilo comic.
With an intense red lipstick we paint our lips very well.
STEP 28
Then with a black pencil we are going to mark the edges of our lips, which is very good.
STEP 29
With the help of a brush and black shadow, we are going to shade the part of the corner of our lips, very delicately, that they are shaded, and with white shadow we illuminate a little so that it gives that comic style.
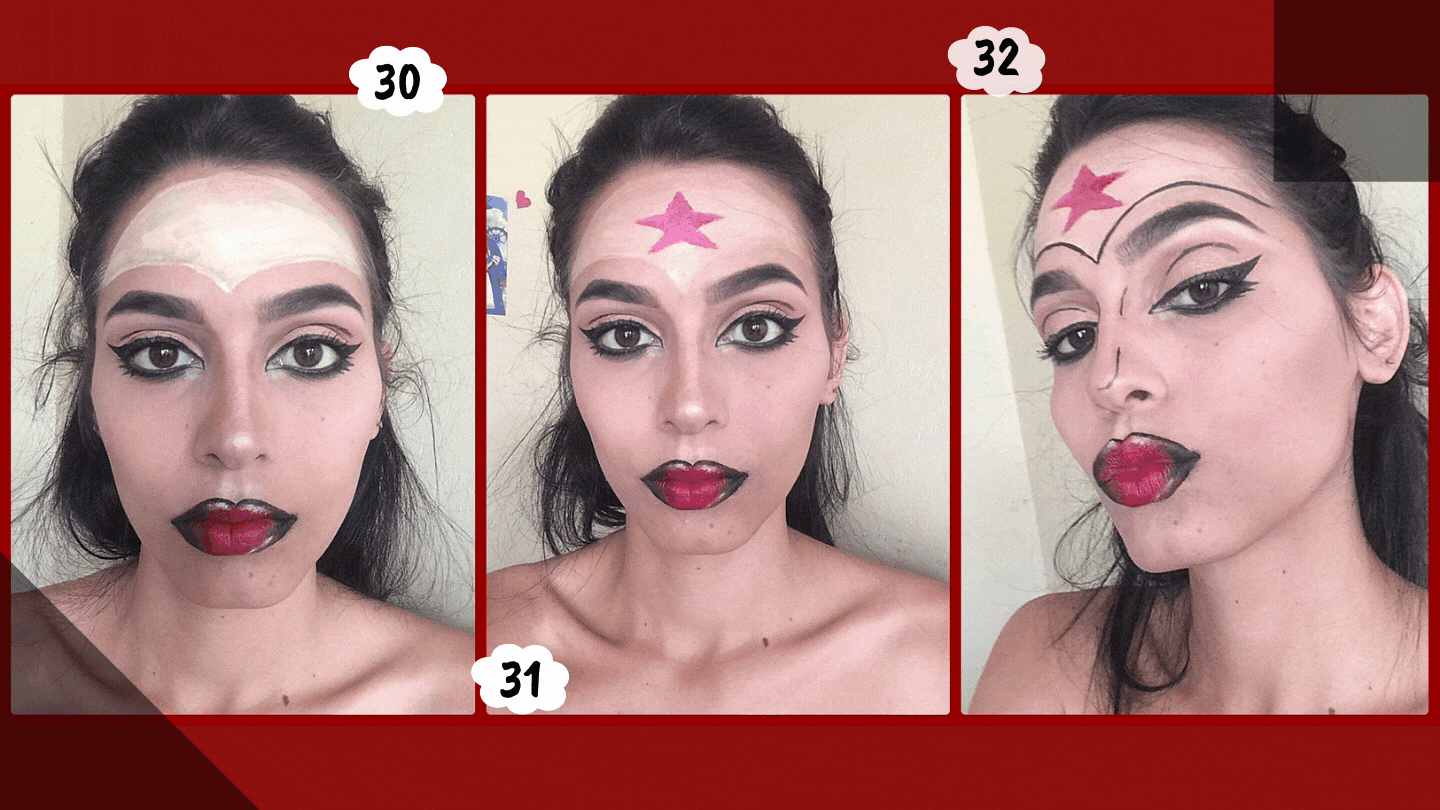
Para este paso haremos la corona que tiene la mujer maravilla, utilicé base primero, pero pueden utilizar pintura dorada o amarilla.
PASO 31
Despues de la base, coloque sombra dorada para llegar al color deseado, y hice la estrella con pintura de labios roja, la misma que utilice.
PASO 32
Con delineador negro, vamos a comenzar a hacer las lineas de la nariz para darle el parecido de comic.
For this step we will make the crown that the wonder woman has, I used base first, but you can use gold or yellow paint.
STEP 31
After the base, I put gold shadow to reach the desired color, and I made the star with red lip paint, the same as I used.
STEP 32
With black eyeliner, we are going to start making the lines of the nose to give it the comic look.
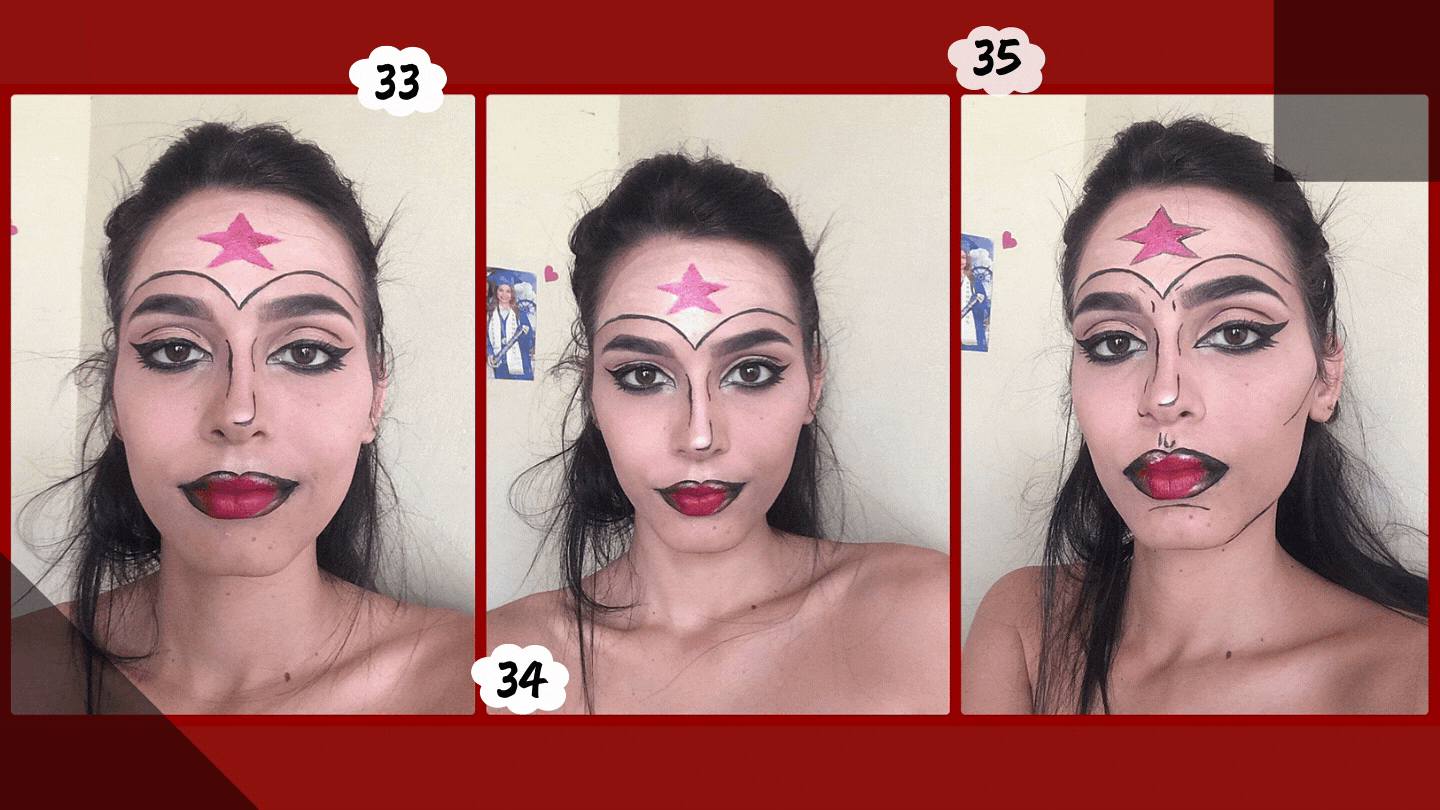
Delineamos la parte de nuestra corona.
PASO 34
Luego delineamos la parte de la estrella, el contorno de cachetes y barbillas.
PASO 35
Y por ultimo afinamos detalles, en la parte de las cejas, cachetes, labios, nariz y barbilla.
We outline the part of our crown.
STEP 34
Then we delineate the part of the star, the contour of cheeks and chins.
STEP 35
And finally we refine details, in the part of the eyebrows, cheeks, lips, nose and chin.
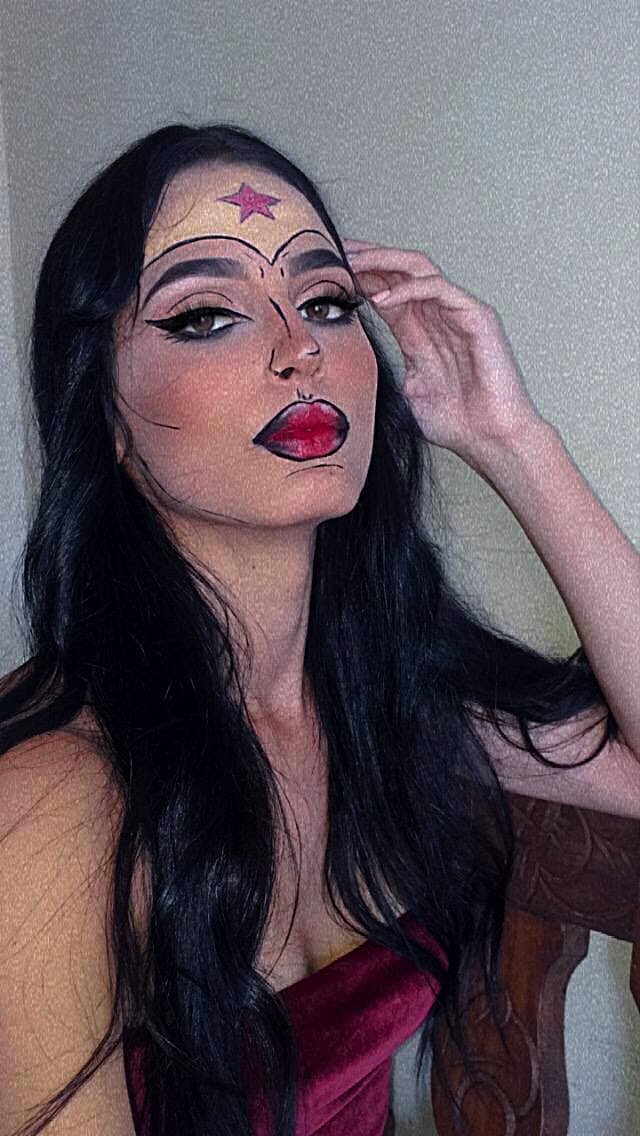
Resultados / Results:
Gracias por su apoyo de siempre hermosa comunidad @steemwomensclub y a @steemitblog @steemcurator01, @steemcurator02, @steemcurator03 y cuentas @booming quienes día a día nos brindan su gran apoyo.
Thank you for your support of always beautiful community @steemwomensclub and @steemitblog @steemcurator01, @steemcurator02, @steemcurator03 and @booming accounts who give us great support every day.
.gif)
TODAS LAS FOTOS ME PERTENECEN, FUERON TOMADAS POR MI EN NUEVA ESPARTA, VENEZUELA, CON MI TELEFONO IPHONE 5S, EDITADAS EN UN PROGRAMA LLAMADO PHOTOSCAPE Y LOS GIF LOS REALICE EN CANVA.
TODAS LAS FOTOS ME PERTENECEN, FUERON TOMADAS POR MI EN NUEVA ESPARTA, VENEZUELA, CON MI TELEFONO IPHONE 5S, EDITADAS EN UN PROGRAMA LLAMADO PHOTOSCAPE Y LOS GIF LOS REALICE EN CANVA.