Realistic Pencil Drawing of Ade with explanation
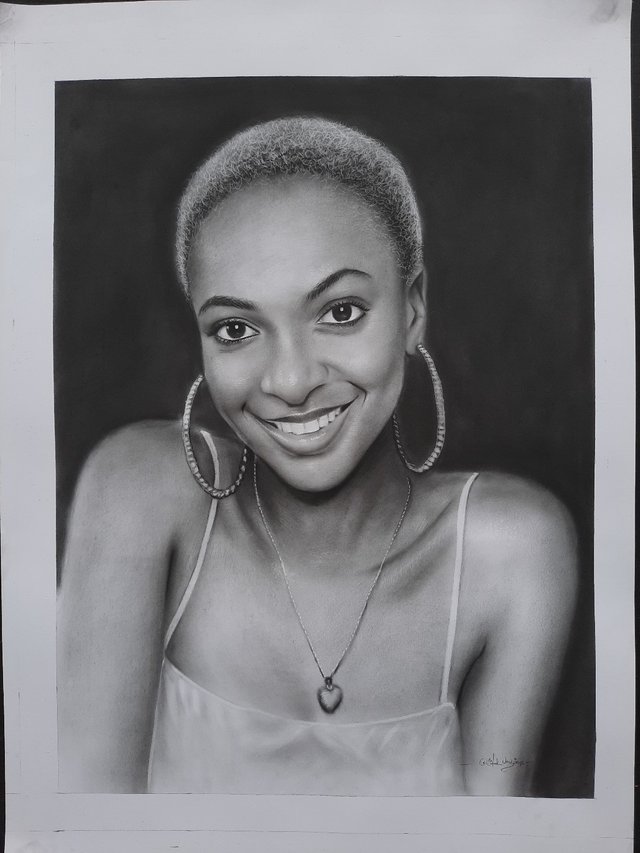
This art piece here is kind of huge, it is 24inches by 30 inches and because it is a bit big, It was best for me to stand and draw. It took approximately 8 hours to be through. This has to be one of my favourites drawings, I think the reason for that is because I have fallen in love with drawing gray hairs. Oh what a joy it gives me. For this piece I worked with Charcoal and graphite pencils on pelican paper. I have been asked "why I use pelican paper" Now the most reasons I use it is that,
- it is always available,
- It works so well with charcoal and even graphite because of the texture it has.
- It is cheap lol forgive my resource managing skills
Before now, I used to start my drawings from the mouth, that's because I used to smudge a lot and that used to be a very big problem for me. Let me explain so grab a sit and a popcorn let's gossip 🤣.
Now Let's begin!!
Smudging in a lay man terms is simply unintentionally messing up your drawings with your palms while drawing. This happens when your palm rubs on the area of the drawing therefore smearing that area with either charcoal, graphite, dirt's, oil or sweat from your palm. I hope it is explanatory enough.
So before I finish drawing the eyes and the nose, I must have messed up the mouth areas and sometimes, I end up cleaning the outline of the mouth. To draw back that mouth, let's not go there at all for it is always a problem.
.png)
after my sketch has been made, I start by drawing the eyes using my charcoal pencil, and because I want to achieve a realistic drawing, I will try as much as possible to blend my charcoal and even my graphite shades. Another good reason I begin my drawings from the eye is because the eyes have a way of connecting me with the work making it easy and fun. I noticed here that my mouth is opened lol that happens most of the time. That's to show us that I lost consciousness and was in deep connection with the work. Straight facts!!!!
.png)
Now let me talk about the paper tape seen on my drawing paper.. The paper tape seen here was used to create a border that you have seen on the finished work. I needed that border to be there to separate the background from my frame and also to add beauty.
.png)
I made progress gradually to the other part of the face by shading with my 2b pencils to get the right forms and then blending it with my charcoal dust, brush and tissue.
Materials I use in blending skin are soft brushes, tortillon and tissue each of them has different textures so experimenting it before use is strongly advised.
.png)
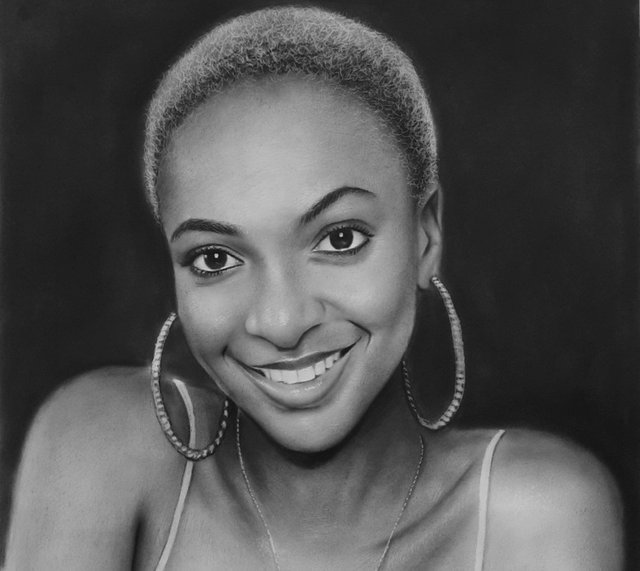
From the result coming out so far, the drawing is relaxed and soft-blended and the look of my drawings have attracted questions like "how do you achieve the soft texture in your drawing?" It is simple: with the use of tissue and soft brushes.
You must have in mind that no where on the human skin is hard or stiff unless someone that is very old. But there are ways to draw a subtle and soft wrinkles. Aggressive wrinkles will end up making the drawing stiff and it may add more to the age of your subject
.png)
So gradually using the method mentioned earlier, we move step by step till we reach the end.
.png)
If you are in an area where you can't find charcoal dust, you can get it by shaving your charcoal pencils to get fine dust. You can do this by using razor blade or by using smooth sand paper. Smooth sand paper helps get very fine dust particles which is perfect for making realistic pencil piece.
.png)
Drawing forehead has to be the hardest part in drawing a face. Why that is, is because the face surface area is wide and blending the shade made on the forehead takes practice. You have to practice a lot to be good at it. Since the materials we are working with are smaller than the forehead, we may run into problems of blending the shades evenly. If the forehead isn't even, especially that of a lady or a child, then the drawing may look offensive to the eye. I really don't know the right words to use here but just know the larger the surface area, the harder it is to blend with even tones.
.png)
In one of the progress shots, you have seen me with a white kind of stuff that looks like a pencil. That's the almighty mono Zero Eraser!!! It is best for adding highlights to our drawings. Awesome material!!!
Always remember that a good highlight will add life to you drawings! Never forget!
.png)
And please for intricate areas, use a small flat brush to blend or a Blending stump(tortillon) or better still a cotton bud.
I have seen some artists use small round brushes for intricate areas so let me not restrict you to flat ones only, explore other alternatives and you will certainly find one that works well for you.
.png)
.png)
And to our gray hair, how to make it realistic is to shade the hair first observing shadows, midtones and highlights. When that is done, with the help of mono zero eraser, add the hair strands.
Keep in mind that even in the hair strands, there are midtones and highlights even shadows. This will add in giving the hair a realistic look.
Use charcoal dust with brush to make the shadows and midtones of the hair
.png)
Achieving a dark background on drawing is easy as far as you have charcoal dust and a duster.
Pour the dust on the area to be shaded and use a soft duster to blend. Do it gently and carefully.
.png)
I hope you have fun reading through. Please watch a video I made while making this piece thank you
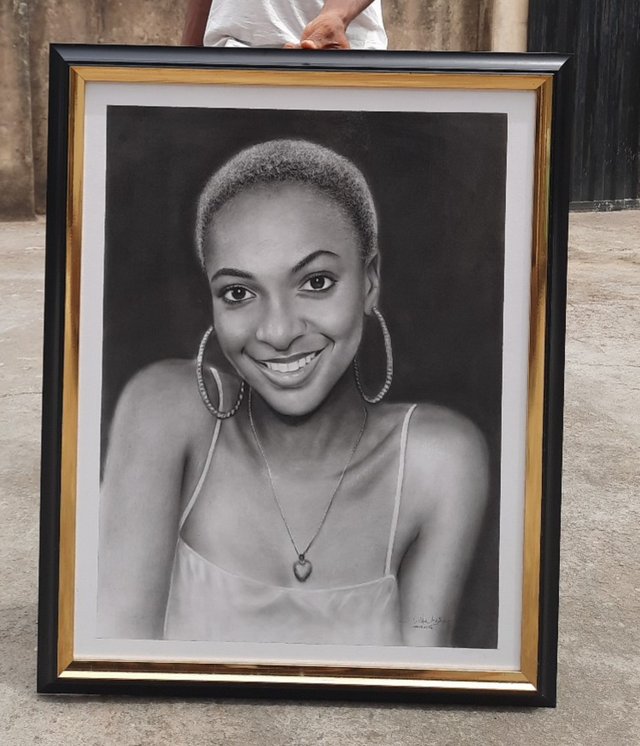
Here is the framed piece. Does it look good?😁
You post is nominated for „@art-venture“ Support Program, @booming account upvote. Only the posts that are not cross posted, original and posted from Xpilar community page and using tag #art-venturehave priority. If your post gets approval, then you get upvote within few days. Good luck!
Thanks a whole lot. I really appreciate this
Perfección y calidad! La mejor definición de este trabajo realizado por ti, tu nivel de detalle es admirable!! Postúlare tu post para el programa de @xpilar.
Te doy un consejo para que tu lectura sea más agradable, usa el markdown para justificar tu texto y dejar espacio entre párrafos, así la lectura será muchísimo mejor #onepercent #venezuela
Muchas gracias. Realmente aprecio la sugerencia y también el apoyo.
Your post was upvoted by the @art-venture account after manual review. Support of Visual Artworks and Photogrpahy on Steem by @stef1 and @art-venture
This is beautiful! Thanks for sharing
your work is of great quality, a first class work of art, you are a great artist I congratulate you
Your post has been nominated by @erickyoussif
Congratulations @unyimeetuk your post will receive
20% upvote from World of Xpilar Community Curation Trail
Incredible!
Thank you😊😊😊