Anatomy Tutorial for Drawing : The Head and Neck.
Hi everyone!
This is the next part of my series, based on human anatomy in drawing. For remembering, this was the intro:
https://steemit.com/hive-185836/@pipoune/intro-to-my-anatomy-tutorials-the-body-rules
So, let's focus now on the head.
The construction of the head.
I have previously discussed the notion of volume, and the importance of seeing things in basic shapes to construct easily our drawings. And it will be exactly the same process here :
We will train our brain to decompose the head in a ball. (with a little box below, you will see ;) )
The process I will show you is the Andrew Loomis method.
So, we will first draw this ball and put a marker on the top and on the below, to see the orientation of the head.
We will also mark the horizontal middle of the ball, which refers which corresponds to the eyebrows level.
The head ball is not a perfect ball. In fact, this look like the earth, which is flattened on the poles. (Noo I don't say flat earth! 😂)
So, the head is flattened on the sides. We will draw a circle on it ; it measures about 2/3 of the entire ball head. The ear will come to stand in the quarter at the bottom right of the circle.
Finally, we will put the jaw. We will trace a line following the center of the head already traced.
The nose will be placed in the middle of this line, in line with the bottom of the previous circle.
-> Now that it is explained, let's go back to my first sketch to see how it constructs.
An important thing to master, which can be difficult when we are a beginner, is to keep all things in the same alignments. You have to imagine the 3D of the face, and the fact that when me move our head, the eyes moves in the same line, itself parallel to the nose, and so on.
The proportions of the head.
Now that we know how to build it, let's review the proportions.
/!\ Keep in mind that is general proportions, they differ according to people.
Divide the head in two : here are the eyes. In this half to the chin, we find the nose in the third, and the end of the mouth in the second third.
Often, we find the eyebrow in the same alignment than the ears, and the nose aligned to the bottom of the ears.
In the top half of the head, we can find the hair implantation in the top third.
I hope it was clear... 😂
If we look at the verticals, we see that we can almost divide the head between 5 verticals parts.
Each eye is equal to the other, and the space between them is also equal. The nose fits in line between the two eyes, but the space between eyes and end of the face doesn't have the same equality, which smaller.
(Can we compare this difference with the fact that the face is not a perfect ball, but a ball with flattened poles? I think it is mathematically correct.)
We can also see that, instead of the nose reaching eye level, the mouth is at the level of the pupils.
But of course it's relevant only in a perfect front view.
Review of the different parts of the face.
--> For the eyes, I already made an article two years ago. I refer you to it :
https://steemit.com/art/@pipoune/drawing-tutorial-1-eyes
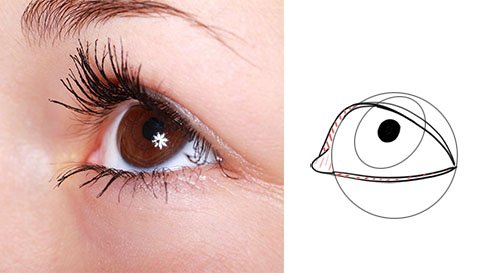
To resume, you have to see the eyes as a ball, and consider the fact that the skin goes over it, to protect it. Beginners have to draw the eye with lashes directly on it. So, pay attention of considering these parts. (The red parts below)
--> Now, the nose.
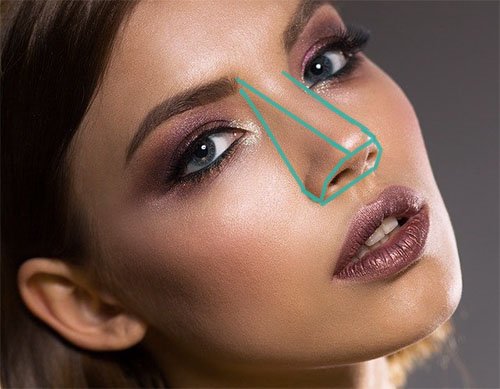
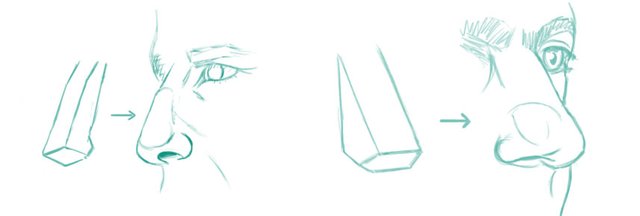
We will decompose it into a box (a toblerone! ;) ) 
With 4 parts : the top, the bottom, and the two sides.
If you begin your nose drawing by putting this form first, you will get a 3D effect more easily.
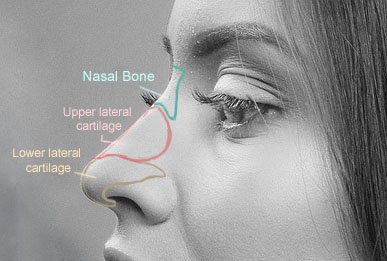
Let's check the anatomy :
The two bumps on either side of the nose are tissue.
In some people, the bones are very apparent.
--> The mouth :
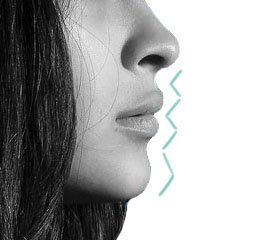
We can see a staircase in the space between the nose and the chin. So pay attention to render these volumes, not just the hump of the chin.
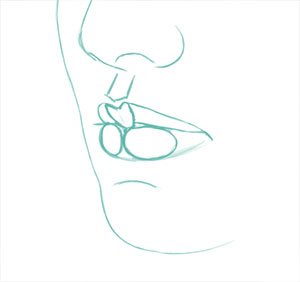 The lips are not simply smooth.
We can see two balls in relief on the bottom lip, and one form on the top that exceeds, which look like a heart. But the form of the lips depends on the person.
I remember when I was young envy girls who have a strongly traced heart on the upper lip 😄
Don't forget the hollow below the nose, and also the one in the corners of the lips.
As for the others parts, the important thing to think was the bones, here for the mouth, it's the muscles which are important.
It is all these muscles that give the facial expressions.
--> What about the ear ?
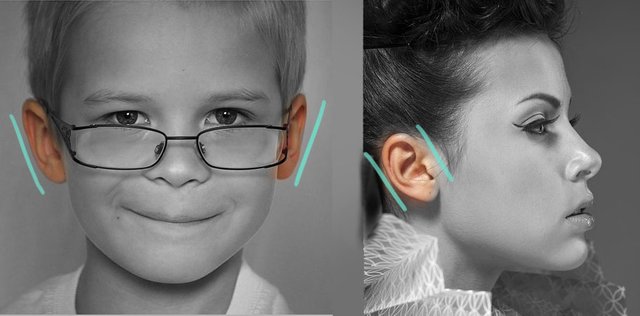
The ear is not the easier part to draw, as it have a complex form.
Also, it doesn't appear right. It is oblique both from the front and from the side.
Okay. I show you the eyes like a ball, the nose like a box,... but what about the ear ?
We can resume it into a "?" and a "y"
The "?" is called the helix and the "y" the antihelix.
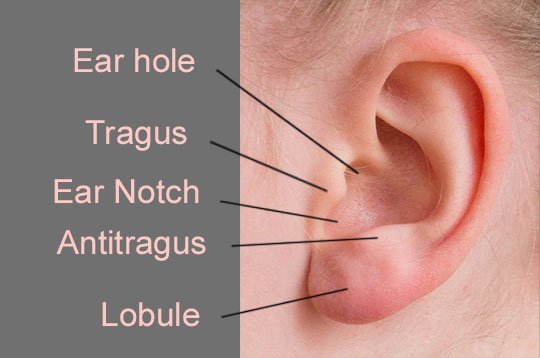
Here are further details about the ear anatomy. It is important to recognize the different parts : as I say, you will construct your drawing correctly. Don't try to just copy lines that you see without understanding them.
The other complicated thing with ears is shadows and lighting, as it have a lot of volumes and curves. Here, the only advice is to practice, drawing a lot of ears and observe where the light comes from.
The neck.
The neck does not lie perfectly straight, but is tilted. It counterbalanced the angle of the rib cage.
It works something like this :
0- = head
/ = neck
\ = rib cage
His width coincides with the width of the first rib.
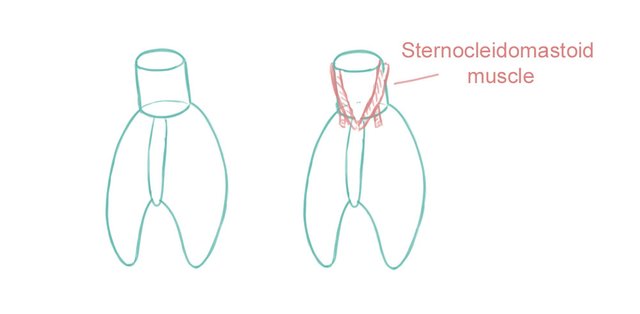
Then, the sterno-cleido-mastoid muscle is wrapped around the neck, a bit like a scarf 😉
This is an important thing, because this muscle causes these big folds in the neck.
Don't put them anywhere! 😄
The other big mass in the neck is the thyroid. It's like a tube with a cup on the top.
We speak often about the Adam's apple, which give this ball on the man's neck.
But women have too ; it's just the form of the women thyroid that makes it less visible.
What's left on the neck ? Some muscles.
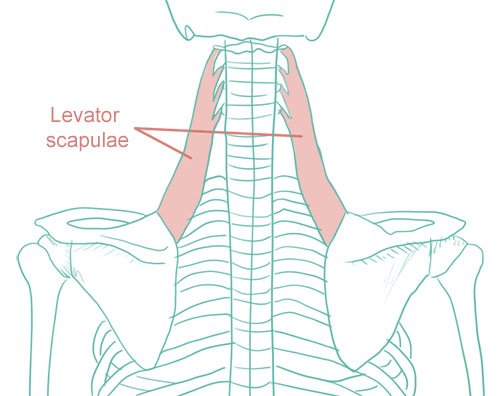
--> The levator scapulae :
It is the muscle that allows the rise of the shoulders. It is very discreet and almost entirely hidden, but we see it in certain poses.
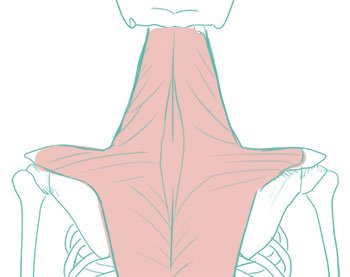
But we will talk more about this kind of thing in my next tutorial which will be about the torso.
And that's all for this tutorial part. I didn't forget the hairs ; but I think it is a subject in its own right which deserves its own article. 😊 But it's also a very good subject to aboard.
I hope we will appreciate this article and that it will be useful for you ; don't hesitate to leave a comment, a suggestion or any question.
/ All the photos used in this article are Royalty free, and all the illustrations were made by myself. \
See you soon for others creations or tutorials! 😄





Muy bueno todo el post. Debe ser muy bien recompensado. Esta muy completo y bien trabajado.
Muchas gracias. 😊