[ESP / ENG] MASTERCLASS ▬ Clase # 4 ▬ Punto de Fuga || Class # 4 ▬ Vanishing Point ▬ (100% Power Up)
ESPAÑOL
Hola Amigos Steemians
Sean todos Bienvenidos a esta CLASE 4 de nuestra MasterClass , la cual esta abierta para todo el que quiera sumarse.
TEMAS

TEMA 4 ▬ Punto de Fuga
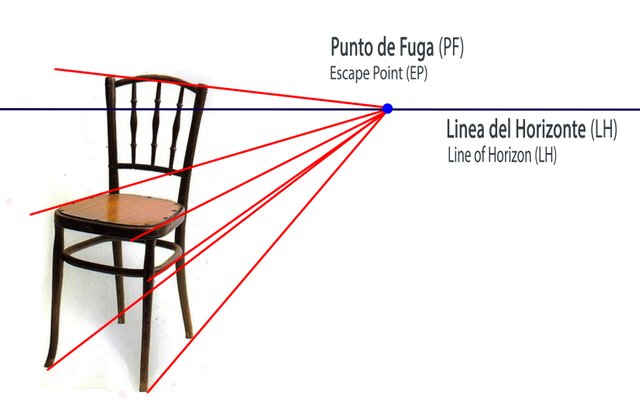
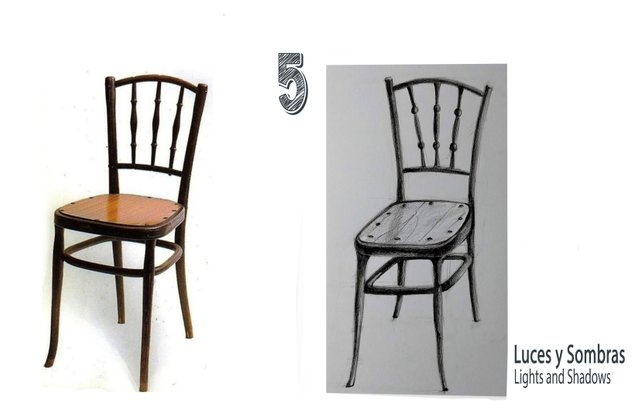
Observemos detalladamente la siguiente imagen tomada en dos posiciones diferentes.

1.- El observador (nosotros).
2.- La línea de horizonte que se ubica a la altura de nuestros ojos.
3.- Punto de fuga, punto donde convergen todas líneas de profundidad y siempre estará ubicado en la línea de horizonte.
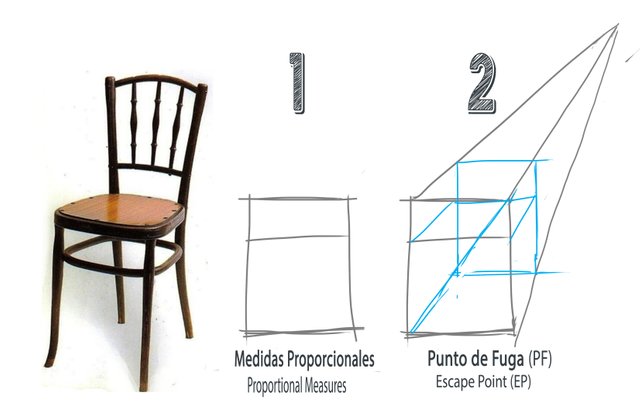
→ Paso 1
Hacemos un rectángulo con las medidas proporcionales a los diferentes niveles de altura dela silla.
→ Paso 2
Ubicamos nuestro punto de fuga sobre la línea del horizonte y ese será nuestra ubicación como observador y sobre las líneas podemos construir un prisma que contendrá nuestra silla.
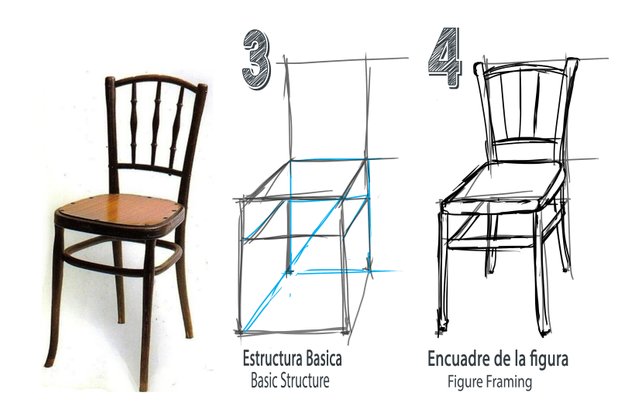
→ Paso 3
Realizamos una estructura básica para identificar donde ira ubicado cada elemento, espaldar ,asiento y patas.
→ Paso 4
Ahora podemos encuadrar nuestra figura trabajando un poco mas los detalles.
→ Paso 5
Finalmente aplicamos luces y sombras con la técnica de las tramas aprendida en la MasterClass 2.
RECOMENDACIONES
◘ Evitar salir del margen de la figura esto te ayudara a ser mas preciso en la ejecución.
◘ Para sombrear utiliza las tramas como aprendimos en la Master Class 2 Tramas Cruzadas.
◘ Evita trazos o rayas que no puedas borrar.
◘ No usar difumino, algodón o los dedos, la idea es dominar esta técnica.
◘ En lo posible utiliza dos lápices de grafito, un HB y 5B para las zonas mas oscuras.
TAREA
Hacer el ejercicio paso a paso como esta explicado en la clase utilizando la misma imagen.
Las sombras deben ser realizadas en tramas cruzadas.
El alumno debe publicar el post de @bambuka de la MásterClass # 4 y este post para difundir más información sobre el proyecto en la plataforma.
Realiza un post que contenga una breve descripción del proceso de ejecución de la tarea.
El post debe incluir mínimo 3 fotos del paso a paso.
Dejar en comentarios la fotografía final y el enlace a tu post.
Agregar los #master-class y #assignment4 y así ubicarlos con facilidad.
Pasados 7 días desde su publicación la tarea culminara.
Si tienes alguna duda déjalo saber en los comentarios.
Agradezco a esta Gran Comunidad World of Xpilar y a @bambuka por el apoyo brindado a todos los que hacemos arte.
ENGLISH
Hello Friends Steemians
Welcome to this MasterClass which is open to everyone who wants to join us.
You are all welcome to this CLASS 4 of our MasterClass, which is open to anyone who wants to join us.
TOPICS
TOPIC 4 ▬ Vanishing Point
Let's take a closer look at the following image taken in two different positions.
1.- The observer (us).
2.- The horizon line that is located at the height of our eyes.
3.- Vanishing point, the point where all lines of depth converge and will always be located on the horizon line.
→ Step 1 .
We make a rectangle with the proportional measures to the different levels of height of the chair.
→ Step 2
We place our vanishing point on the horizon line and that will be our location as an observer and on the lines we can build a prism that will contain our chair.
→ Step 3.
We make a basic structure to identify where each element will be located, back, seat and legs.
→ Step 4
Now we can frame our figure working a little more details.
→ Step 5
Finally we apply lights and shadows with the plot technique learned in MasterClass 2.
RECOMMENDATIONS
◘ Avoid going outside the edge of the figure this will help you to be more precise in the execution.
◘ For shading use the hatches as we learned in Master Class 2 Cross Hatches.
◘ Avoid strokes or dashes that you cannot erase.
◘ Do not use smudger, cotton or fingers, the idea is to master this technique.
◘ If possible, use two graphite pencils, one HB and 5B for the darker areas.
ASSIGNMENT
Do the exercise step by step as explained in the class using the same image.
Shadows should be made in cross hatching.
The student should publish @bambuka's post from MasterClass #4 and this post to disseminate more information about the project on the platform.
Make a post containing a brief description of the process of executing the task.
The post must include at least 3 photos of the step by step.
Leave in comments the final photo and the link to your post.
Add the #master-class and #assignment4 in order to locate them easily.
After 7 days from its publication the assignment will be completed.
If you have any questions let me know in the comments.
I thank this Great Community World of Xpilar and @bambuka for the support given to all of us who make art.
@nelsondoor

BASTANTE INTERESANTE!
Si....es fundamental para entender el dibujo....
Great lesson, very well done. I think you can place links to previous lessons in the text. Maybe even in the table of topics, replace the names of lessons learned with references to them?
Hola! @bambuka, que bueno que le haya gustado la clase, he querido hacerla de manera que sea fácil de entender, excelente aporte!! , voy a implementarlos enlaces en la próxima clase, muchas gracias!!
Sí, necesita enlaces a clases magistrales anteriores y publicaciones de los participantes. Los nuevos participantes deben poder encontrar fácilmente lecciones anteriores para dominar mejor el material.
Buenísimo chamo
Gracias, @nahumsamuel, estoy trabajando para mejorar cada día en la plataforma...
Guauuuu! Tanto por aprender. Gracias Nelson
Así es @natyart, cada día aprendemos algo nuevo, todavía tienes oportunidad de participar en las Master Class...te espero!!
Hola amigo @nelsondoor.
Mi participación.
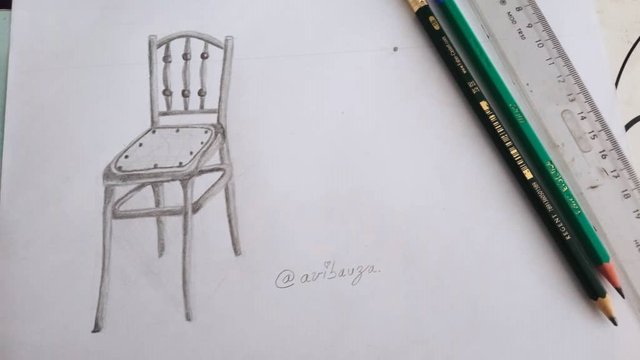
https://steemit.com/hive-185836/@avibauza/masterclass-clase-4-punto-de-fuga
Hola! @avibauza, excelente, puedo apreciar lo que has aprendido, en el resultado...te felicito!!
Hola aquí mi tarea. Espero este bien. Traté de hacerlo lo mejor posible. Me esforcé mucho.
CLIK AQUÍ
Hola!! @ladyleilei, excelente, muy buena proporción de medidas, es unas de las cosas que mas cuesta en el dibujo a mano alzada, te felicito!!
Gracias. Seguiré prácticando para hacerlo cada vez mejor y así saber mucho jajaja. 🤗
Hola @nelsondoor, me diverti realizando mi tarea 4.
Y aquí la entrego:
Mi tarea 4
Hola! @maelichb, excelente participación, me alegra que a tu edad estés dedicando tiempo para aprender a dibujar, tienes buen futuro como dibujante!! te espero en la próxima clase!!!
Hola @nelsondoor, muchas gracias, si, a mi me gusta dibujar mucho desde pequeña y por eso estoy aprovechando esta oportunidad, para ir mejorando y puliendo mi habilidad, gracias por esta oportunidad para mejorar en el dibujo.
#onepercent
#affable
#venezuela
Saludos.