Greetings dear
@tasonya, I am delighted with your contest that is why I am with you again with a piece of paper. Next I will describe the step by step to make the flowers first and then the bag, this craft is useful to place inside a gift or a sweet that you want to give to someone.
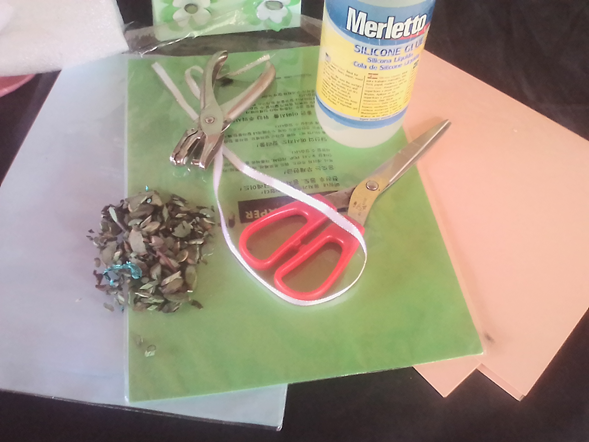
Materials, paper, pencil, glue, cardboard, satin ribbon or cord, scissors, hole punch and wood chips.
Paper flowers
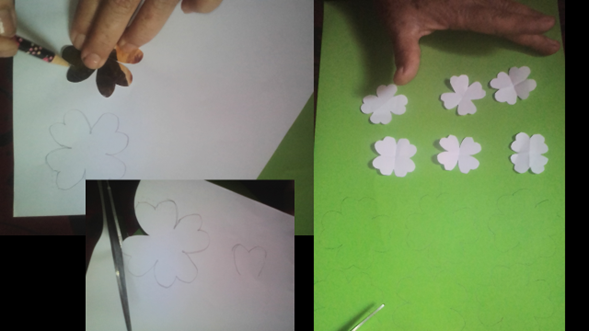
Step 1: With the help of the pencil I traced the four-leaf clover patterns (6 small for the center and 6 larger). For the clover pattern, fold a piece of paper in four and draw a heart, then cut out, unfold and you're done. Cut out all the flowers with scissors.
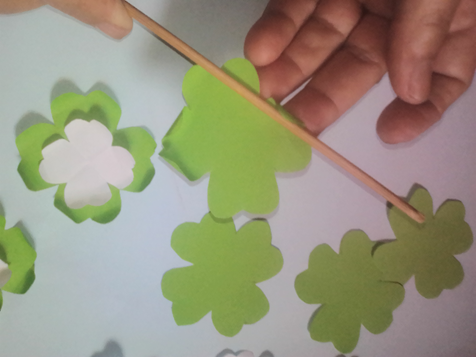
Step 2: with the help of a wooden toothpick or a knitting needle, roll the edges of each petal towards the inside of the flower.
3: Assemble each flower: With glue joining two pieces of different color to make a contrast, if you wish you can place a plastic bead, a piece of wood, or a paper circle in the center.
We begin to make the paper bag, with a sheet of paper (in the color of your preference)
Step 1: Glue the ends of the sheet horizontally, forming a cylinder, then fold the sides at a distance of 2 centimeters to form the sides of the bag. Make the rest of the folds as indicated in the figure, do not use glue yet, when you are sure that everything matches, then we go to the next step.
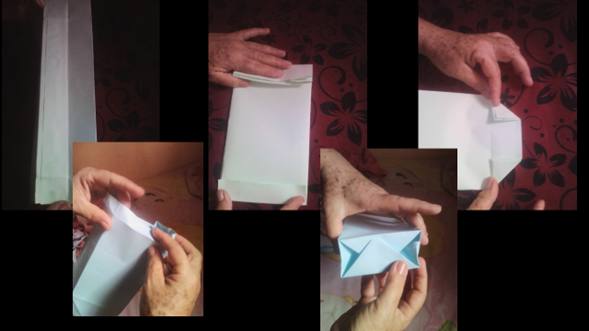
Step 2: Fold the bottom parts in and glue it, let it dry for a few minutes.
Step 3: Cut out a cardboard rectangle for the bottom and two small ones for the handles, measure it with the same bag (try to make it a little smaller). Lay the bottom and fold the top and place the cardboard inside the fold.
Step 4: Punch through the paper along with the cardboard rectangle you placed. Make two holes one on each side as indicated in the image.
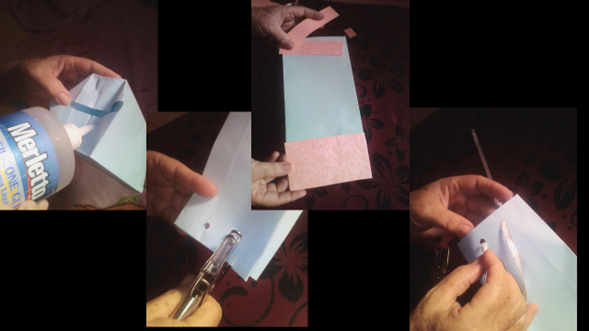
Step 5: Place a piece of ribbon or string on each side of the bag and secure with a knot on the inside.
Step 6: Glue the flowers on the bag according to your taste, wait for it to dry and that's it, finished work.

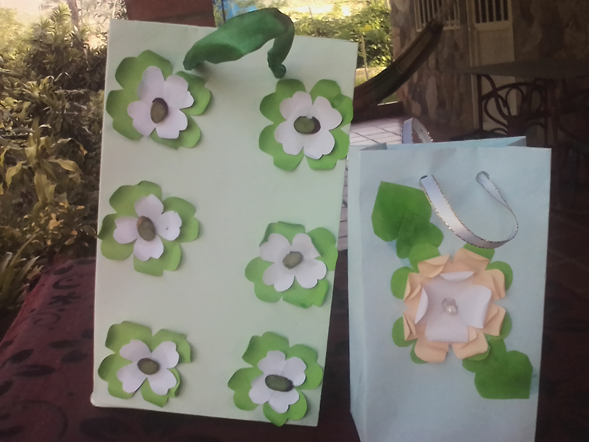
Here are two models that I made for this contest, the little one I made with a sheet of paper and for the big one I joined two sheets, thank you very much. I want to invite
@sol02,
@susej2013 @scarletlara247.

# Bolsa de regalo con flores de papel por
@Zulma2021.
Saludos estimada @tasonya, estoy encantada con tu concurso por eso estoy de nuevo con ustedes con una obra de papel. A continuación te describiré el paso a paso para hacer primero las flores y luego la bolsa, esta manualidad tiene utilidad para colocarle dentro un obsequio o un dulce que le quieras regalar a alguien.
Los materiales, papel, lápiz, pegamento, cartón, cinta de raso o cordón, tijeras, perforadora y trocitos de madera.
# Flores de papel
Paso 1: Con ayuda del lápiz tracé los patrones de trébol de cuatro hojas (6 pequeños para el centro y 6 más grandes). Para el patrón del trébol dobla un trozo de papel en cuatro y dibuja un corazón, luego recorta, desdobla y listo. Recorta todas las flores con una tijera.
Paso 2: con ayuda de un palillo de madera o de una aguja de tejer, enrolla los bordes de cada pétalo hacia el interior de la flor.
Paso 3: Arma cada flor: Con pegamento uniendo dos piezas de diferente color para hacer contraste, si es tu deseo le puedes colocar en el centro una cuenta de plástico, un trocito de madera, o un circulo de papel.
Comenzamos a elaborar la bolsa de papel, con una hoja de papel (del color de tu preferencia)
Paso 1: Pega los extremos de la hoja en sentido horizontal, formando un cilindro, luego dobla los laterales a una distancia de 2 centímetros para formar los lados de la bolsa. Realiza el resto de los dobleces como indica la figura, aún no utilices pegamento, cuando estés seguro de que todo coincide, entonces vamos al siguiente paso.
Paso 2: Dobla hacia adentro las partes del fondo y coloca pegamento, deja secar unos minutos.
Paso 3: Recorta un rectángulo de cartón para el fondo y dos pequeños para las asas, mídelo con la misma bolsa (procura que quede un poco más pequeño). Coloca el fondo y dobla la parte superior y coloca el cartón dentro del doblez.
Paso 4: Perfora el papel junto con el rectángulo de cartón que colocaste. Realiza dos perforaciones una a cada lado como indica la imagen.
Paso 5: coloca un trozo de cinta o cordel en cada lado de la bolsa y asegura con un nudo en el interior.
Paso 6: Pega las flores sobre la bolsa de acuerdo a tu gusto, espera que seque y ya listo, obra terminada.
Aquí te dejo dos modelos que hice para este concurso, el pequeño lo hice con una hoja de papel y para el grande uní dos hojas, muchas gracias. Quiero invitar a
@sol02,
@susej2013 @scarletlara247
I love paper flowers. I used to decorate my house with it. They are really amazing. Nice post @zulma2021.
Hey, do you know that STEEMIT now has 100+ contests with a total prize pool of $735+? You can participate and win.
👉Contest Alerts: Active Contest List on 30th June 2021 – Win 2300+ STEEM
Make the most of these competitions! Good luck! For more updates you can follow and resteem.
I was fascinated by this scene. It was really beautiful.
Thank you for your kindness in leaving a comment.
Hello here I leave the link of another publication that may interest you
https://steemit.com/hive-193637/@zulma2021/miercoles-de-obras-creativas-bolsa-de-regalo-con-material-de-provecho-por-zulma2021.