Achievement Task 4| Applying Markdown
Objective/ Outcome of this task:
-- Newcomers must have basic markdown skill ie. it will help them to present the blog's in a much organized way and helps them to make their blogs attractive by using easy syntax.
-- Second is newcomers are able to use the advance markdown with the given markdown templates for their presentations. Increasing the quality of the post.
Applying various Markdowns
1. Headline
First thing that guides and is noticed my a reader is your Heading or Sub-heading which visually conveys level of importance. It is help for the user to get the sense and structure of what it is going to be about.
Headlines can be drafted in various ways such as first one is like I did is by using hashtag # for example if I want to write Achievement Task in bold and increased font , I will use a # symbol first followed by space and then the text. We can play with the sizes according to the requirement or presentation that I want to have, like
Achievement task
Achievement task
Achievement task
Achievement task
Here I have presented some examples before you about how we can go with different sizes of heading and this can be done easily by using # symbol for the first one I have used just 1 # so it turned out to be the biggest in size of all, further by increasing 1 # we can reduce it's size like for the 4th one I've used 4 # symbols which resulted to be the smallest of all.
Codes used here are:
# Achievement task
## Achievement task
### Achievement task
#### Achievement task
We can also style our headline in italics by using _ before and after text , can centre it using code <center> before and </center> after the headline.
Further we can replace # by applying = 3 times or _ 3 times like
Achievement
===
Achievement
___
Was super easy isn't it? Let's move on to the next one!
2.Justifying Text
To give a good presentation on steemit we can utilizes different techniques to make it well presented effortlessly with some codes.
Using <div class="text-justify"> in the beginning of the text, after completing stuffs to be written inside at the end we use </div> for text justification.
There are many more options to make it attractive by using text alignments, adding subscripts and super subscripts.
-- Text alignment: <div class="pull-right">
this code helps to allign the text according to your preference ie. right or left and ending the text with a code </div>.
-- Adding a Subscript: You can use this code at the starting <sub> text or number </sub> while ending with this code this helps to make a text or number to appear below the baseline. Can be used mostly to right molecular names.
-- Add a Super Script: We generally see this in Google or different web pages , in this the text appears to be above baseline. Using the codes at beginning and ending respectively will help me to do this <sup> and </sup>.
Moving forward--->
3. Adding Link's 🔗
This is such an important thing, specifically should be known by each and every member of Steemit family so that to avoid plagiarism as we discussed in task 3. It's important to know code for this since we sometimes paste photos from other website's we need to state the link.
This is how we can do that:
[🌷🌷🌷My life's diary on 31st🎄🎄🎄🎄🎄](https://steemit.com/thebettterlife/@rkorganic/my-life-s-diary-on-31st)
Result:
🌷🌷🌷My life's diary on 31st🎄🎄🎄🎄🎄
Next we can also use @ ti mention someone like @rialifestyle or if we simply paste a link it'll be automatically be considered as a clickable link.
4. Tables
You can design your post by making tables for better understanding or representing.
Example:
Name | Country
--------- | ----------
Ria | India
Result:
| Name | Country |
|---|---|
| Ria | India |
Isn't it making more clear and structured?
5. Codes
By now looking at this task from begining you all must be aware of how important writing codes are.
We can write codes in various ways as well by putting a back-tick (``) at the beginning and at the end or again using codes to write code ie. <code> at the beginning of a code and </code> at the end.
6.Inserting and aligning image
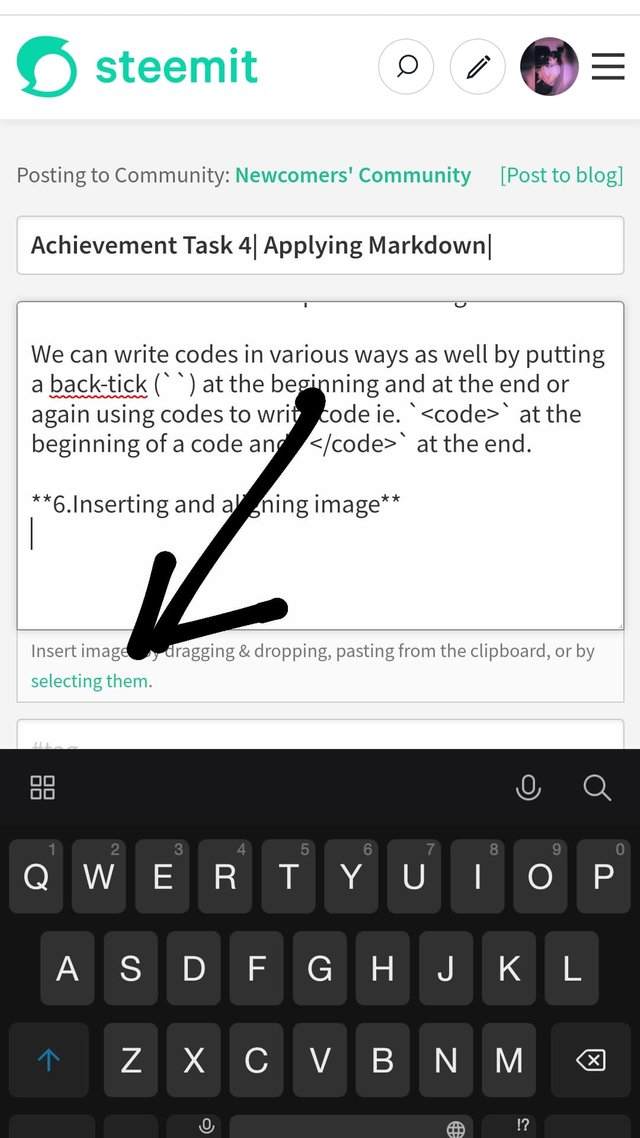
To select the image you can tap on the green text shown with arrow.

How to align image?
Here is the answer...
Using this code helps us to put image to the left
< div class = pull-left > image link </ div >
And for right
< div class = pull-right > image link </ div >.


There are various ways we can make the post creative and presentable. Hope I explained it clearly.
And how can I end without saying a special thanks to @reddileep who patiently helped me so much in my previous task and helped me getting it verified.
This is the catchup vote for your Achievement 4. Tomorrow we will reward for your previous achievement post to your any active post.
Thank you so much!!! Your support means a lot🙏😄
Great Work!
Congratulations, your achievement 4 has been verified by Haidermehdi, a member of the Newcomers Greeters Team.
Curators Note: R3
Thank you so much!!!
@reddileep thankfully this achievement of mine is verified as you asked me to tag you in this task here doing the same. And once again thank you so much for supporting.
Ok let me check.
Hi, @rialifestyle,
Your post has been supported by @reddileep from the Steem Greeter Team.
Glad to hear😄.. Thank you everyone for supporting 🙏
Congratulations 🎉🎉👏🎉👍 @rialifestyle
Thank you so much!!!