Tutorial: Understanding Arbitrum Technology and How to Add It to MetaMask
HELLO friend
Greetings to you from @josepha. Indeed I am so much glad to have you here. Today I want to share with you a blockchain technology that is known as Arbitrum with you.

Designed with PowerPoint
I know the word Arbitrum may sound so new to a lot of us and it's the reasons why I want you to have an understanding of what arbitrum is all about and how you can add it to your MetaMask. Let's get started right a way without delay.
What is Arbitrum?
Hello friend, Arbitrum is a Layer 2 solution project that is created to enhance the capabilities of Ethereum Smart Contracts (ESC). The essence of designing arbitrum is to helps transaction speed to be more faster (i.e Increase transaction speed) and scalability while adding more additional privacy features to make the system work more better.
The main aim as to why arbitrum is design is to make sure that developers find it very easy to execute unmodified Ethereum transaction at layer 2 and also (EVM) Ethereum Virtual Machine contracts as their keep on benefiting from ETH layer 1 security.
You know the Ethereum based smart contracts is sometime face with shortcomings which developers see as weaknesses such as high execution costs and low transactions cost. To this, arbitrum helps both Ethereum users and developers to avoid the high gas fees that is associated to Ethereum network.
Arbitrum make uses of transaction rollups techniques to record transactions that are submitted on Ethereum main chain and execute them on layer 2 sidecain that is cheaper. At the point of optimistic or transaction rollups, the computation and storage burden that is associated with the Ethereum main chain is reduce to minimum. There are several Ethereum DApps like Arbitrum and others that are available on the layer2 solutions.
A popular New York based development company known as Offchain Labs is the company where Arbitrum is developed from. The initiative that led to the development of arbitrum was gotten from Ed Felten, Steven Goldfeder and Harry Kaloder who are all lovers of cryptocurrency and big players in the blockchain industry.
How Arbitrum Technology Work
Okay friend, as I have said earlier, arbitrum technology is an optimistic rollups. Arbitrum allows smart contracts transaction from Ethereum to pass by sending messages between the smart contracts and those in the arbitrum layer 2 solution. The image below show how messages is send through smart contract and that of the arbitrum layer 2 solution.

Designed with image paint
Also, almost all the transaction that is still processing usually get completed at layer 2 and after that Arbitrum will then record the results of the transaction in the main chain. It is from this point that the system then increases its working speed and provide more efficiency.
Just like several other blockchains, individual nodes can also join and participate in the Arbitrum chains. Validator nodes are the nodes that are used to monitor the state of the chain, whereas full nodes are the nodes that's is used to assist in accumulating the transaction in Layer 1. Normally, ETH Is what use as a rewards to pay any aggregators who has submitted his/her transactions to Layer 1 chain.
How to Add Arbitrum to Metamask And Using Arbitrum
In order for you to start using arbitrum, you will need to access it either through DApps like 1inch or you can connect your MetaMask Wallet to the Arboretum token bridge. As I have earlier said, the main aim of Arbitrum is to allow sending of tokens from Ethereum mainnet to Arbitrum network, because of the high gas fees that is associated with Ethereum transaction.
In order for you to understand how to use Arbitrum, we will start by installing MetaMask extension before connecting our wallet to the Arboretum network and add bridge token. Let's get started with the process below.
Installing MetaMask extension
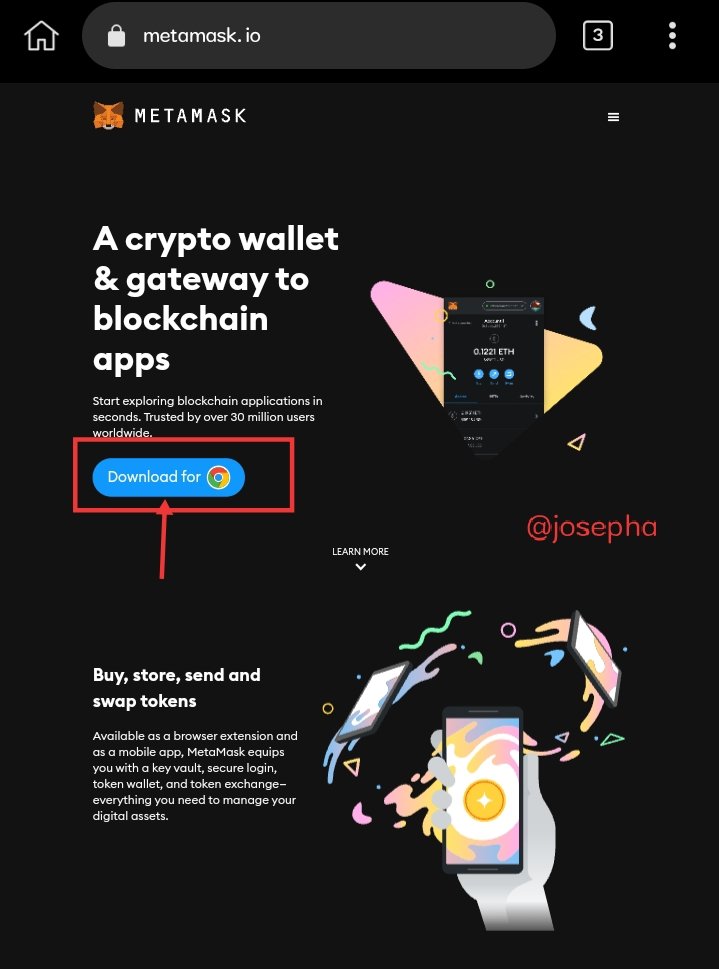
MetaMask is currently available for chrome browser, kiwi browser, iOS Android etc on the MetaMask website.
Step 1:
Visit https://metamask.io/ and install the right MetaMask extension on your browser.
 |  |
|---|
Step 2:
After installing the extension, you will then see the MetaMask welcome page. Click on Get Started to begin.

Step 3:
If you are using MetaMask for the first or you want to have a new wallet, click on Create a Wallet as shown on the screenshot. However, you can import your existing wallet by entring its seed phrase after you have click on Import Wallet button.

Step 4:
At this point, you can decide if you want to share anonymous usage data with MetaMask or not by either Agree or No thanks which will not disrupt your usage with MetaMask.
Step 5:
At this point, create a strong password for your wallet. Note you are to enter the password twice.
 |  |
|---|
Step 6: Once you have create your password, MetaMask will then provide your wallet's seed phrase. Note; you have to make sure that you copy your seed phrase and safe it somewhere. Click on next to see your seed phrase.

Step 7: Once the seed phrase is shown to you. Click the lock view the phrase and copy it to a safer place as stated in step 6. Click on Next to continue.
Step 8:
Now at this point, you will need to repeat your seed phrase by selecting the word according to how it was arrange (i.e correct order) and click on Confirm once you're done.

Step 9: After you have click on confirm, you will then see congratulations click on All Done to start using your new wallet.

How to Configure your wallet and add network
In order to configure the wallet,you will need to add Arbitrum functionality to your MetaMask wallet, by adding a network details. The steps will help you do that.
Step 1: Open your MetaMask and click on the network drop-down menu as shown from the screenshot below.

Step 2: At this point, click on Add Network on the pop-up window.

Step 3: Now, you will need to add the following information on the Add a network page that appear to you and click Save once you're done.

- Network Name: Arbitrum one
- RPC: https://arb1.arbitrum.io/rpc
- Chain ID: 42161
- Currency Symbol: ETH
- Block Explorer URL: https://arbiscan.io
Step 4: After clicking on save you will then be connected successfully to the Arbitrum network.

How to Add Arbitrum token to your MetaMask
In order, for Arbitrum tokens to display on your MetaMask wallet user interface, you need to add whichever token that you want manually by following the steps below
Step 1: First,go to https://arbiscan.io/ and find the token contract and details of the token that you want to add. In my case I am adding USDT.
 |  |
|---|
Step 2: After seeing the contract and details of the token you want to add, return back to MetaMask and click on Import tokens.

Step 3: Copy and paste contract address in the box and automatically MetaMask will fill in the rest details. Click on Add Custom Token.
 |  |
|---|
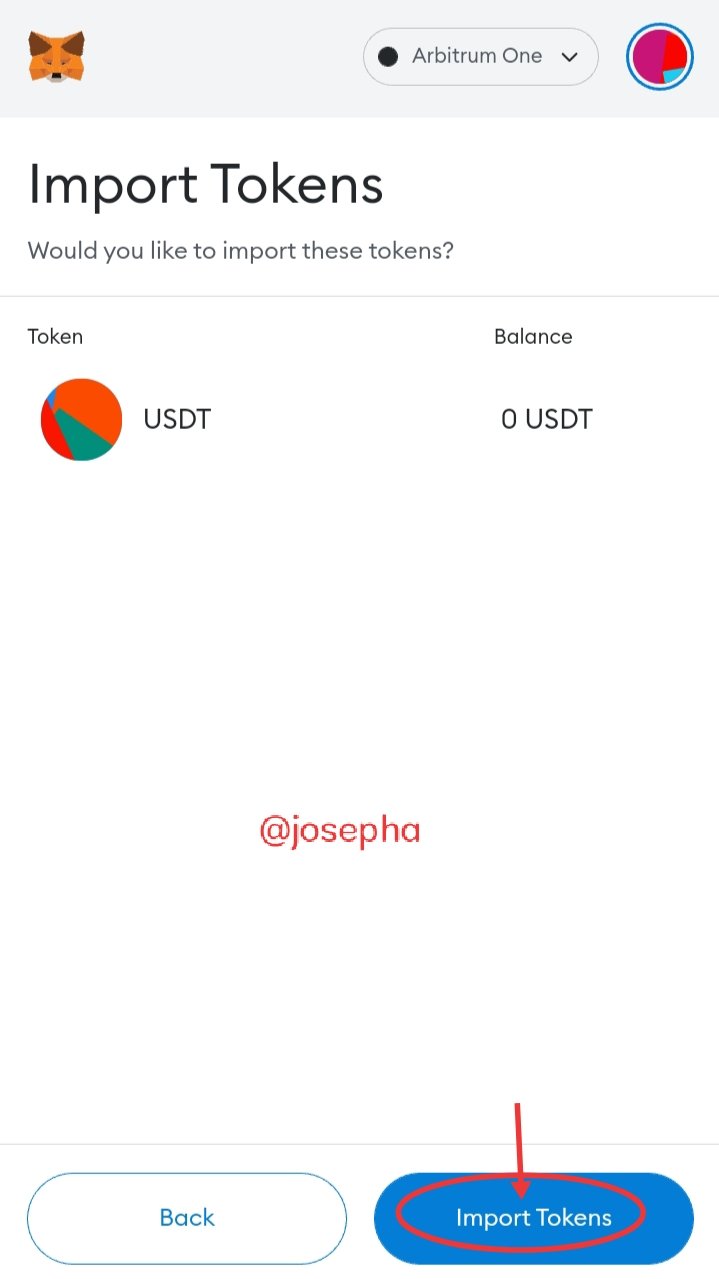
Step 4: Now, click on Import Tokens you will then see your token and the balance of the token you just added.

Congratulations you can start send Ethereum token from Arbitrum network without paying for gas fees.
Advantages of using Arbitrum
Hello friend, at this point, I have detail out the main advantages of Arbitrum network below.
- Low transactions cost.
- High Ethereum Virtual Machine contracts (EVM) compatibility
- Better ecosystem that is partnering with UniSwap, Sunswap and other Ethereum DApps.
- Powerful developer tools.
Conclusion:
Arbitrum is one of the easy way that you can send Ethereum token for free without paying for gas fees and also once you have setup your Arbitrum mainnet in MetaMask, you can immediately, start sending tokens, accepting NFTs and also using DeFi smart contracts and finally to this you can swap token also.
HELLO friend, at this point, we have come to the end of our Tutorial on Arbitrum technology and I am sure that everything that you have read are all useful information.
| 10% Goes to @steemforsdgs |
|---|
Thank you for sharing post and stay original.
Remark :
This is a very essential post which offers a tutorial using meta musk.
I would like you to add learnwithsteem rather then fintech
Note: You must enter the tag #fintech among the first 4 tags for your post to be reviewed.
Your post is manually rewarded by the @nftmc Community Curation Trail.
Join the NFTMC community to get rewarded.
USE TAG - #nftmc
Curation Trail- @nftmc
Discord- https://discord.gg/5P57gwYYcT
Twitter- https://mobile.twitter.com/NFTMC3