SteemFoods Contest -16-| Special Cake Recipe for Steemit's 5th Anniversary | Lemon Pie by Karupanocitizen
Perfectly polished shoes, that's it! All that remains is a good bath, a little cologne, and ready for the party, let's celebrate!
That was the prelude to what would be the celebration of the fifth anniversary of our beloved steemit platform, the joy was mixed with the anxiety to share with all the attendees of such a great event, everything seemed to be perfect until a little voice in my head reminded me:
@Karupanocitizen and the gift? You will not think of arriving empty-handed at the party, right?
Oh no, the gift. Amid so much emotion I had forgotten the gift, I have to cook something to entertain the birthday boy, a paella, a pizza, maybe a grill and so while my mind wandered @alikoc07 surprises us with the SteemFoods Contest -16- | Special cake recipe for the fifth anniversary of Steemit and their gentlemen began this story of suspense, unexpected twists and a sweet ending, be my witnesses in this culinary journey.
It all started when my mind took its creative flight to offer the best cake that could be made, I came up with a thousand ideas, from a giant three-tiered cake with the Steemit logo adorned with balloons and confetti, to a sculpture that makes Buddy Valastro.
Only two things separated me from my dream ... the first is that I don't know how to make cakes and the second is that much less decorate them, what a predicament!
My only attempts at baking are finished in phrases like: "it looks ugly, but it doesn't taste so bad", "I have eaten worse", "is that a cake?".
But since for me, cooking means taking risks and getting out of my comfort zone, experimenting, and having fun, with a lot of nerves, but with great determination, I decided to make a simple cake inspired by the colors of steemit, green and white ... green and white ... lemon and… cheese, lemon, and coconut… done. Lemon and cream, I got it!
Ropa limpia y ordenada, ¡hecho!, zapatos perfectamente lustrados, ¡listo!, solo resta un buen baño, un poco de colonia y listo para la fiesta, ¡a celebrar!
Esa era la antesala de lo que sería la celebración del quinto aniversario de nuestra amada plataforma steemit, la alegría se mezclaba con la ansiedad por compartir con todos los asistentes a tan magno evento, todo parecía estar prefecto hasta que una vocecita en mi cabeza me recordó:
@¿Karupanocitizen y el regalo?, no pensarás llegar los manos vacías a la fiesta, ¿verdad?.
Ohhhh no, el regalo. Entre tanta emoción se me había olvidado el regalo, debo cocinar algo para agasajar al cumpleañero, una paella, una pizza, quizá una parrilla y así mientras mi mente divagaba @alikoc07 nos sorprende con el SteemFoods Contest -16-| Special Cake Recipe for Steemit's 5th Anniversary y allí señores comenzó esta historia de suspenso, giros inesperados y dulce final, sean mis testigos en esta travesía culinaria.
Todo empezó cuando mi mente emprendió su vuelo creativo para ofrecer la mejor torta que se pudiese elaborar, se me ocurrió mil ideas, desde un pastel gigante de tres niveles con el logo de steemit adornados con globos y confetis, hasta una escultura de las que hace Buddy Valastro. Solo dos cosas me separaban de mi sueño… la primera es que no sé hacer tortas y la segunda es que mucho menos decorarlas, ¡que predicamento!
Mis únicos intentos de repostería habían terminado en frases como: “se ve fea, pero no sabe tan mal”, “las he comido peores”, “¿eso es una torta?”.
Pero como para mí la cocina significa arriesgarse y salirse de mi zona de confort, experimentar y divertirme, con muchos nervios, pero con gran determinación, me propuse hacer una torta sencilla inspirada en los colores de steemit, verde y blanco… verde y blanco… limón y… queso, limón y coco… listo. Limón y crema, ¡lo tengo!
To make this recipe story easier to read, I have divided it into three acts: Short Pie Crust, Pie Filling, and Pie Decoration, let's start cooking. |
|---|
Para facilitar la lectura de esta historia receta, la he dividido en: masa quebrada, relleno para la tarta y decoración de la tarta, comencemos a cocinar. |
|---|

For the crust of our cake we will need:
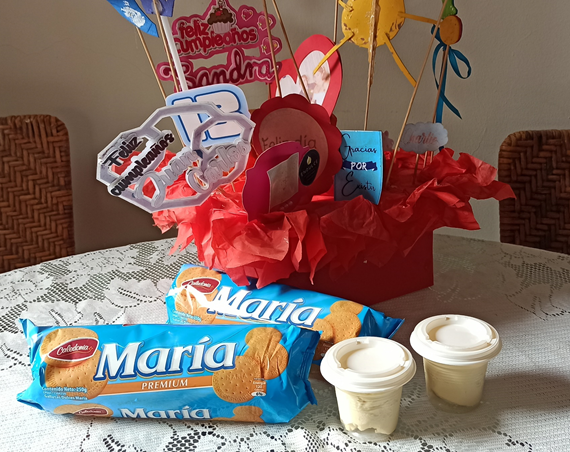
• 200 grams of Maria type cookies (approximately a package and a half of the one I used)
• 100 grams of unsalted butter
In a blender, pour the maria cookies little by little, taking the precaution of liquefying a little and removing them to avoid leaving large pieces without crushing (as happened to my xD). If you don't have a blender, you can put the cookies in ziplot bags and then crush them with a rolling pin or bottle.
 |
|---|
Once the cookies are pulverized, place this powder in a bowl, heat the unsalted butter until it is completely liquid, let it cool a little, and then incorporate the cookie powder, stirring with a spoon, until you obtain a dough that is a bit dry but malleable.
 |
|---|
Para la corteza de nuestra tarta vamos a necesitar:
• 200 grs de galletas tipo Maria (un paquete y medio aproximadamente del que yo utilicé)
• 100 grs de mantequilla sin sal
En una licuadora viertan poco a poco las galletas maria, tomando la precaución de ir licuado un poco y retirando para evitar que queden pedazos grandes sin triturar (como me pasó a mi xD).
Sino tiene una licuadora puede colocar las galletas en bolsas tipo ziplot y luego triturarlas con un rodillo o una botella.
Si la botella es de alcohol no se le ocurra tomársela antes de hacer la receta para vaciarla, los resultados podrían no ser los mejores, déjelo para después |
|---|
Una vez pulverizadas las galletas coloque ese polvo en un bol, caliente la mantequilla sin sal hasta que quede totalmente liquida, deje enfriar un poco y luego incorpore al polvo de galletas removiendo con una cuchara, hasta obtener una masa un poco seca pero maleable.
No se asuste como yo, la masa debe quedar algo seca no se vaya a ponerse a pensar (como hice yo) que no va a funcionar. |
|---|
¡Vamos que si lo lograremos!

When you have the "cookie dough" place it in a baking dish. There are special ones for making cakes made of Teflon or with an anti-slip coating, in my case since I didn't have one, I used a normal aluminum one and covered it with butter.
I have always heard that flour and butter are used so that the cake does not stick to the container, but in this case, it does not apply only butter. |
|---|
Shape the “dough” or a cracked cookie that will serve as a container for the pie filling. I used a pastry tongue, but you can do it with a spoon, a spatula, or even with clean hands if you want, the important thing is that it is well compact and without gaps.
Once you get the desired shape, take the container to the oven for 10 minutes at 180 - 200 degrees and then remove it from the oven, allow to cool. If you have a special container, unmolding should not give you major problems, otherwise ... suffer as I suffered thinking that I could not unmold it ... although ... definitely you can.
Cuando tenga la “pasta de galleta” coloque la misma en un molde para hornear. Hay unos especiales para hacer tartas hechos de teflón o con cobertura anti resbalante, en mi caso como no tenía uno, empleé uno de aluminio normal y lo cubrí con mantequilla.
Siempre había escuchado que se emplea harina y mantequilla para que la torta no se pegue al recipiente, pero en este caso no aplica solo mantequilla. |
|---|
Vaya dando forma a la “masa” o galleta quebrada que servirá de recipiente para el relleno de la tarta. Yo utilicé una lengua pastelera, pero puede hacerlo con una cuchara, una espátula o incluso con las manos limpias si lo desea, lo importante es que quede bien compacta y sin huecos.
Una vez que obtenga la forma deseada, lleve el recipiente al horno por 10 minutos a 180 - 200 grados y luego retire del horno, deje enfriar. Si tiene un recipiente especial el desmoldado no debe darle mayores problemas, de lo contrario… sufra como yo sufrí pensando que no podría desmoldarlo… aunque… definitivamente si se puede.

For the filling, my initial idea consisted of making a mixture of condensed milk, lemon, and unflavored gelatin, whipping Chantilly cream and incorporating it into the previous mixture, but ... like any good thriller, something unexpected always happens, this is where the story has a twist and the last minute heroine that saves the day… I'll tell you.
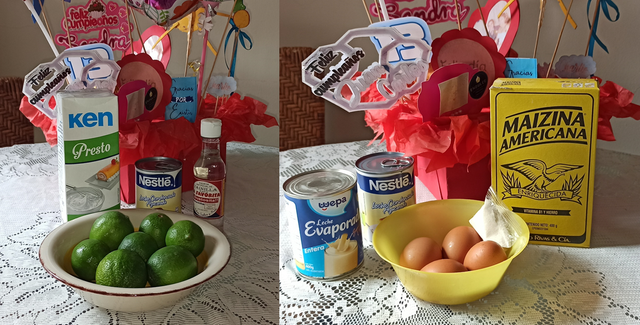
Ingredients for the stuffing:
• 400 ml of condensed milk
• 180 ml of lemon juice
• Lemon zest
• 500 ml of whipped cream mix
• 2 tablespoons cornstarch or cornstarch
• 1 tablespoon unflavored gelatin
• 80 ml of cold water (for unflavored gelatin)
The original recipe, which has four egg yolks and cornstarch, does not have whipped cream and is also baked once it has been placed in the mold. |
|---|
In my case, I didn't want to risk it so I wanted to make a lighter cold version, but ...
The first thing I did was the gelatin or gelatin in the cold water to hydrate it (minimum 10 minutes), then put the condensed milk with the lemon and the lemon zest in a bowl, beat them until they were well-integrated, and added the gelatin melted.

When hydrated, the gelatin solidifies a little, so it must then be placed in a saucepan and melted to be able to use it in the preparation. |
|---|
Para el relleno, mi idea inicial consistía hacer una mezcla de leche condensada, limón y gelatina sin sabor, batir crema Chantilly e incorporarla a la mezcla anterior, pero… como toda buena película de suspenso, siempre pasa algo inesperado, es aquí donde la historia tiene un giro y una heroína de último momento que salva el día… ya les cuento.
Ingredientes para el relleno:
• 400 ml de leche condensada
• 180 ml de jugo de limón
• Ralladura de limón
• 500 ml de mezcla para crema chantilly
• 2 cucharas de maicena o fécula de maíz
• 1 cuchara de gelatina sin sabor
• 80 ml de agua fría (para la gelatina sin sabor)
La receta original que lleva cuatro yemas de huevo y maicena, no lleva crema chantilly, además se hornea una vez que ha colocado en el molde. |
|---|
En mi caso, no quise arriesgarme por lo que quería hacer una versión fría más liviana, pero…
Lo primero que hice fue la gelatina o grenetina en el agua fría para que se hidratara (mínimo 10 minutos), luego coloque en un bol la leche condensada con el limón y la ralladura de limón, los batí hasta integrarlos bien y les añadí la gelatina derretida.
Al hidratarse, la gelatina se solidifica un poco, por lo que se debe colocar luego en una cacerola y derretirla para poder emplearla en la preparación. |
|---|

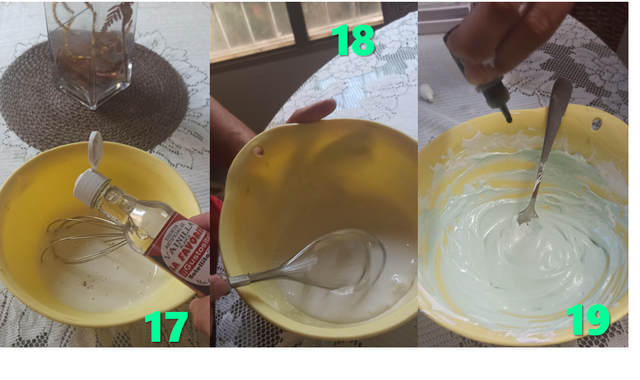
Then it was the turn of the other part of the mix. This is where my problems began.
It turns out that I don't have a mixer and I thought: “it can't be that difficult to make a whipped cream with a hand mixer”, but believe me that at 38 degrees and only with the power of the arm, it becomes very difficult.
There came a time when I thought I would not make it, my arms were no longer able to beat and beat, almost throwing in the towel and signing my surrender, my heroine appeared ... Miss cornstarch to the rescue.
Place the chantilly mixture in a saucepan and add two tablespoons of cornstarch previously dissolved in a little milk, simmer for five or seven minutes until the mixture boiled and reached the desired texture and incorporated into the previous mixture.
Después llegó el turno de la otra parte de la mezcla. Aquí empezaron mis problemas.
Resulta que no tengo batidora y pensé: “no puede ser tan difícil montar una crema chantilly con un batidor manual”, pero créanme que a 38 grados y solo con el poder del brazo, se hace muy difícil.
Llegó un momento que pensé que no lo lograría, mis brazos ya no daban para más de tanto batir y batir, casi tirando la toalla y firmando mi rendición, apareció mi heroína… la señorita maicena al rescate.
Coloque la mezcla de chantilly en una cacerola y agregue dos cucharadas de maicena previamente disuelta en un poco de leche, cociné a fuego lento unos cinco o siete minutos hasta que la mezcla hirvió y alcanzó la textura deseada e incorporé a la mezcla anterior.

The whipping chantilly requires that it be beaten at about 8 or 12 degrees Celsius, for this they can first cool the utensils to be used. Use a mixer, it will make your job much easier. |
|---|
Once the filling was done, I dumped it into the cookie dough or cracked cookie and flattened the mixture with a pastry tongue, and placed the cake in the refrigerator for two hours. Then I unmold it, for this I used a thin and flexible knife, making a complete turn while carefully separating the cookie from the mold, then I placed a large, round tray on top of the mold, I turned it over on top of the tray and began to tap it on the bottom until completely detached from the mold. Voila!
Tapping them lovingly please, not like rock band drums that can later break the cookie into pieces. |
|---|
El chantilly para montar requiere que sea batida a unos 8 o 12 grados centígrados, para ello pueden enfriar primero los utensilios a emplear. Utilicen una batidora, les hará el trabajo mucho más fácil. |
|---|
Una vez que el relleno estaba listo, lo vacié en la masa de galleta o galleta quebrada y aplané la mezcla con una lengua pastelera y llevé la tarta al refrigerador por dos horas. Luego la desmoldé, para ello utilicé un cuchillo delgado y flexible, dando una vuelta completa mientras separaba la galleta del molde con cuidado, a continuación, coloqué una bandeja grande y redonda encima del molde, lo volteé encima de la bandeja y comencé a darle golpecitos en el fondo hasta que se despegó completamente del molde. ¡voila!
Los golpecitos con cariño por favor, no como si fuese una batería de un grupo de rock que luego se puede romper en pedazos la galleta. |
|---|

For the Swiss meringue (after the failure with the chantilly I resorted to this meringue), you need:
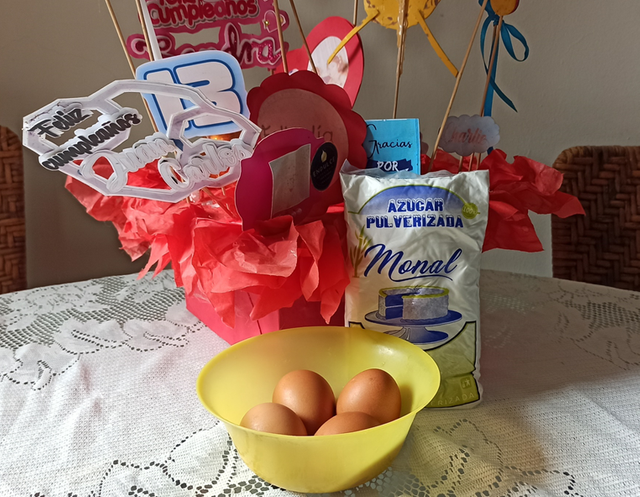
• 4 egg whites
• ¾ cup of sugar
• ¾ cups of powdered sugar or powdered sugar
• White vanilla
• Pastry bag
For the Swiss meringue, first place the whites and sugar in a container in a double boiler, beat the mixture until the sugar dissolves, about eight minutes, to check the consistency, you can drop a little of the mixture in the same container while feeling the sugar string, there should be no undiluted crystals.
Do not put the mixture directly on the fire because the egg whites can be cooked. |
|---|
Once the sugar has dissolved, remove it from the heat and begin whipping the mixture. Once again the bat that beats, at this point they were already shouting at my arms to leave them alone, that I better not go to the party, but I couldn't give up, I wouldn't let myself win for a Swiss meringue.
The meringue is ready when it reaches an intense white color and a foamy but firm texture with which you can easily make figures with a pastry bag. |
|---|
Place the meringue in a piping bag and select the peak you want to decorate. The most widely used recipe recommends making small flakes with the meringue and then brown them a little with a blowtorch, or place the cake in the oven for a few minutes, over high heat so that the topping is browned.
Believe me, during the entire execution of the recipe, my mother-in-law, seeing me beat and beat, beat and beat, encouraged me by saying: “don't worry, at least it will be tasty” as if she were preparing to see a Picasso painting once decorated the cake.
Para el merengue suizo (después del fracaso con el chantilly recurrí a este merengue), se necesita:
• 4 claras de huevo
• ¾ de taza de azúcar
• ¾ de tazas de azúcar impalpable o azúcar glass
• Vainilla blanca
• Manga pastelera
Para el merengue suizo, primero coloque las claras y la azúcar en un recipiente a baño de María, bata la mezcla hasta que se disuelva la azúcar, aproximadamente unos ocho minutos, para verificar la consistencia, puede dejar caer un poco de la mezcla en el mismo recipiente mientras palpa el hilo de azúcar, no deben quedar cristales sin diluir.
No coloque la mezcla directamente al fuego porque se pueden cocer las claras. |
|---|
Una vez que se haya disuelto la azúcar, retire del fuego y comienza a batir la mezcla. Una vez más el bate que bate, en este punto ya mis brazos gritaban que los dejase en paz, que mejor no fuese a la fiesta, pero no podía rendirme, no me dejaría ganar por un merengue suizo.
El merengue estará listo cuando alcance un color blanco intenso y una textura espumosa pero firme con la que se puedan realizar con facilidad figuras con una manga pastelera. |
|---|
Coloque el merengue en una manga pastelera y seleccione el pico que desee para decorar. La receta más ampliamente difundida recomienda hacer pequeños copos con el merengue y luego dorarlos un poco con un soplete, o colocar la tarta unos minutos en el horno, a fuego alto para que se dore la cobertura.
Créanme, durante toda la ejecución de la receta mi suegra al verme batir y batir, batir y batir me animaba diciéndome: “no te preocupes, por lo menos va a quedar sabrosa” como si se estuviese preparando para ver un cuadro de Picasso una vez decorada la tarta.

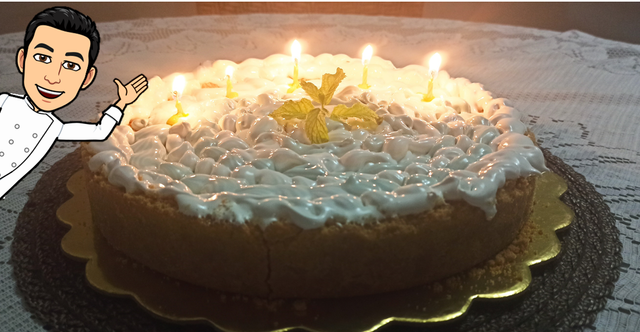
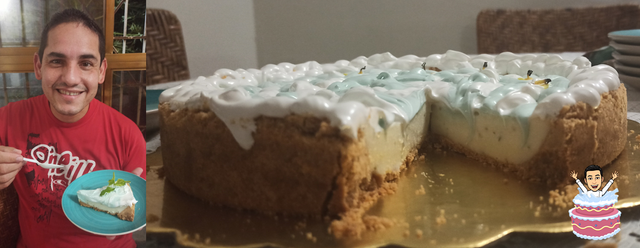
I can only tell you that in terms of taste my mother-in-law was right, it was delicious!, Worthy of our honored of the day, in terms of decoration ... umhhh, I don't know, what do you say?
Solo puedo decirles que en cuanto al sabor mi suegra tuvo razón, ¡quedó deliciosa!, digna de nuestro agasajado del día, en cuanto a la decoración… umhhh, no sé, que dicen ustedes.
Many thanks to the valuable community of steemfoods and @ alikoc07 for allowing me to participate in this fun contest, a pleasure and an honor to be able to share with such talented pastry chefs, I hope to continue practicing and learning more and more about the interesting world of pastry, any suggestions always It will be well received.
We keep reading!.
Muchas gracias a la valiosa comunidad de steemfoods y @alikoc07 por permitirme participar de este divertido concurso, un gusto y un honor poder compartir con tan talentosos pasteleros, espero poder seguir practicando y aprendiendo cada vez más del interesante mundo de la pastelería, cualquier sugerencia siempre será bien recibida.
¡Nos seguimos leyendo!


Hola :
Su participación en el concurso que organicé con la etiqueta #steemanniversary-cake ha sido aprobada con éxito. Muchas gracias por compartir una deliciosa receta de pastel para el quinto aniversario de Steemit en la comunidad SteemFoods. :)
Excelente!!!, muchas gracias @alicok07 por darnos la oportunidad de participar en tu concurso y por todo el trabajo que haces a diario para hacer crecer la comunidad de steem-food, saludos!!!