Greetings, Steemians! Having a good weekend? I hope that everybody is doing well. I'm incredibly happy to be taking part in
@fredquantum weekly
#iteach contest. I really didn't participate in the contest last week, but now I'll share an interesting article tittle, embedded system using Arduino programming. Even though this topic is lengthy I will try to schedule it once a week.
Stay tuned
An embedded system is a computer system designed to perform a specific function within a larger system. It is a combination of hardware and software components that are specifically designed to control a device or machines. Embedded systems are used in many different applications such as industrial automation, medical devices, consumer electronics, home appliances, automobiles, and more.
Introduction to Arduino Programming
Arduino programming is a form of coding that is used to control the functions of an Arduino board. Arduino boards are small, open-source microcontrollers that are programmed using the Arduino programming language. This language is based on C and C++, and was designed to allow users to quickly and easily create applications for the Arduino platform.
The Arduino programming language is composed of two main parts: the sketch, which is the main program, and the libraries, which contain the code for various functions and features. The sketch is written in a text editor and then uploaded to the Arduino board using a USB connection. Once uploaded, the sketch can be executed and the board will respond accordingly.
Arduino programming consists of a few simple steps. First, the user must choose a board and install the Arduino IDE (Integrated Development Environment). Then, they must write the sketch, either in the Arduino IDE or a text editor. Once the sketch is complete, it can be uploaded to the board and tested. If the sketch works as expected, it can then be deployed to the Arduino board.
Arduino programming is a great way to get started with coding and robotics. With its simple syntax and easy-to-use tools, it is an ideal choice for anyone looking to create interactive projects with electronics. Additionally, the Arduino platform is open-source, meaning that users have access to a wide range of resources and support.
Type of Arduino Board
There are many types of arduino board but these are the major ones.
- Arduino Uno
- Arduino Nano
- Arduino Mega
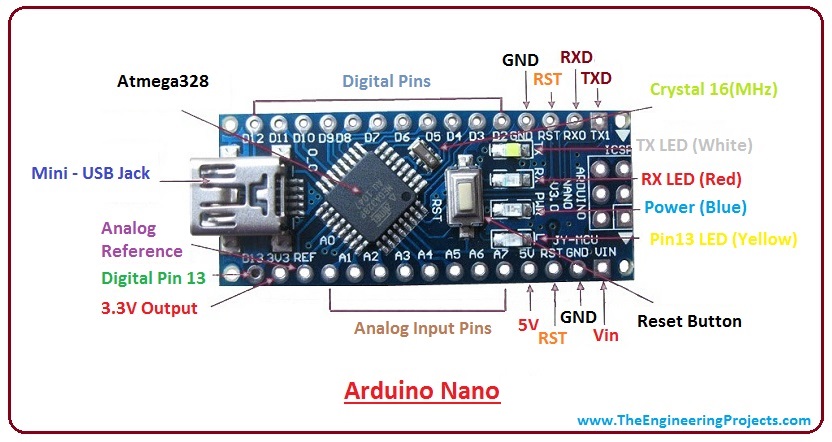
image source
Arduino Nano
The Arduino Nano is a small, complete, and breadboard-friendly board based on the ATmega328P (Arduino Nano 3.x) or ATmega168 (Arduino Nano 2.x). It has 14 digital input/output pins (of which 6 can be used as PWM outputs), 8 analog inputs, an on-board resonator, a reset button, and holes for mounting pin headers. It is designed to fit on a breadboard and has an operating voltage of 5V. It can be powered via the mini-B USB connection, 6-20V unregulated external power supply, or 5V regulated external power supply. It requires a USB to serial adapter to connect to a computer. The Nano can be programmed with the Arduino IDE (Integrated Development Environment) and comes with a number of built-in libraries.
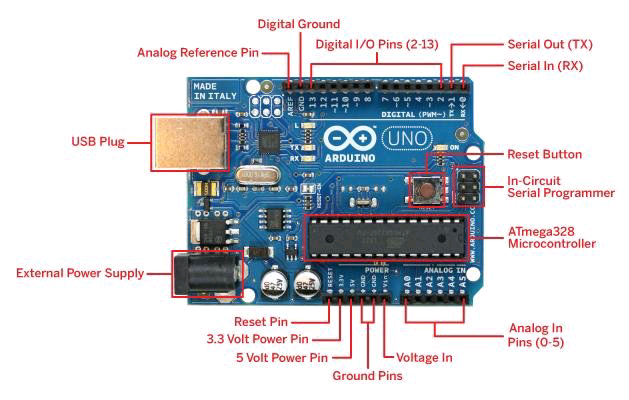
image source
Arduino Uno
Arduino Uno is a microcontroller board based on the ATmega328P. It has 14 digital input/output pins (of which 6 can be used as PWM outputs), 6 analog inputs, a 16 MHz quartz crystal, a USB connection, a power jack, an ICSP header, and a reset button. It contains everything needed to support the microcontroller and is typically used for projects that require interactive objects or environments.
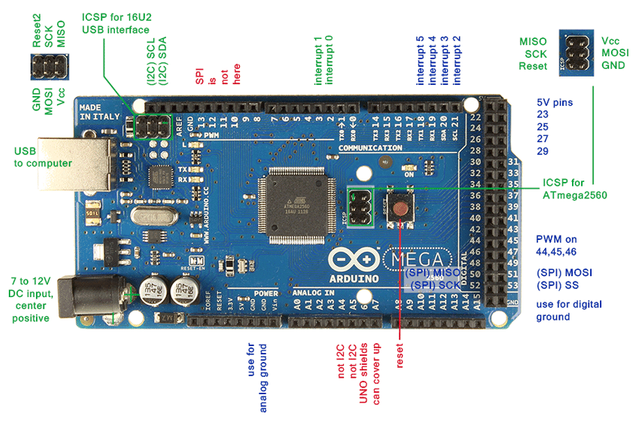
image source
Arduino Mega
The Arduino Mega is a microcontroller board based on the ATmega2560. It has 54 digital input/output pins (of which 15 can be used as PWM outputs), 16 analog inputs, 4 UARTs (hardware serial ports), a 16 MHz crystal oscillator, a USB connection, a power jack, an ICSP header, and a reset button. It contains everything needed to support the microcontroller; simply connect it to a computer with a USB cable or power it with a AC-to-DC adapter or battery to get started. The Arduino Mega is the larger version of the Arduino Uno and has more inputs/outputs and more memory. It can be used in a variety of applications such as robotics, home automation, and other projects that require more I/O than the Arduino Uno can provide.
Deffrent between arduino Uno and Mega
| Arduino Uno | Arduino Mega |
|---|
| 1. The Arduino Uno is based on the ATmega328 microcontroller. | 1. The Arduino Mega is based on the ATmega2560 microcontroller. |
| 2. It has 14 digital input/output pins, 6 analog input pins, and a 16 MHz crystal oscillator. | 2. It has 54 digital input/output pins, 16 analog inputs, and a 16 MHz crystal oscillator. |
| 3. There is 32KB of Flash Memory for storing code, 2KB of RAM, and 1KB of EEPROM. | 3. There is 256KB of Flash Memory for storing code, 8KB of RAM, and 4KB of EEPROM |
| 4. It has a USB connection, power jack, and ICSP header. | 4. It has a USB connection, power jack, and ICSP header. |
Conclusion
Arduino programming is an exciting and fun way to explore the world of coding and robotics. It provides users with the opportunity to learn a great deal about both coding and project-building, and even create their own projects. Arduino allows for users to become creative, explore new ideas and contribute to the ever-growing field of robotics. Arduino programming allows for users to create innovative projects and gain valuable knowledge, making it an excellent choice for anyone looking to explore the world of coding and robotics.
I'd like to put my pen down here; the article continue next week where I will discuss the functions of each pin on the Arduino Uno's legs and the software IDE.
I invite @awedignity @elzia @patjewell to join the contest
looking forward for your take
Thanks
Special Mention:
@fredquantum
@josepha
@steemchiller
By: @emultiplex
This is my first time of hearing about Arduino Programming and I can say that despite the fact that is my first time I have gain little understanding in it based on how you have explained everything. Best of luck to you.
Really, thanks reading
Having attended achievement 3 which is about content etiquette, you should understand that originality is very important as such your article should be free from all forms of plagiarism.
Unfortunately, your article appeared to have been copied from different sources, some of which would be shown below.
https://www.pubnub.com/blog/arduino-board-comparisons-picking-the-right-board
https://www.arduino.cc/en/Main/ArduinoBoardUno
https://inventr.io/product/arduino-uno
https://www.sparkfun.com/products/11061
https://docs.arduino.cc/hardware/uno-rev3
Please do not repeat this mistake, repeated offenders risk being muted in the community. After developing your articles, you can use online tools to check for plagiarism. But don't spun internet content. In addition, only use copyright-free images in your articles.
Invalid Entry.
Oops!
This is like we would say is Afrikaans “Bo my vuurmaak plek” :-)
I will give it a pass.
Good luck!
Hey friend,
I have used computer and programming languages for long, but honestly this is my first time of hearing this. I really appreciate your effort in sharing such a unique topic.
Thanks for reading through the post, arduino programming is specifically used by engineers to program some certain code into the integrated circuit to carryout some functions