Batterlife today dairy game ||||| 31-03-2021 How to make pratha at home Enjoy eating delicious and delicious food.
Hello friends, how are you? I hope you are all well.
Today I will tell you how the famous pratha is made in Pakistan, India and Bangladesh.
You can make it in your own home without having to go anywhere.
Four-year-old me acted like a little tyrant, stomping around and demanding to be entertained. Mr. Rogers and Elmo were never enough for me; I wanted magic markers that changed colors and I wanted to run through the house with all my digits dipped in finger paint. The only thing that kept me mesmerized and still for more than just a moment was making parathas with my mother.
All Saturday my mother would have a pot of butter gently simmering into ghee, perfuming the house with toasty notes of toffee like some kind of paratha foreplay. The next morning, while the neighbors were whipping up pancake batter, I spent Sunday watching my mom effortlessly roll out smooth dough, smear it with her heady all-day ghee, and transform it into a flaky flatbread with countless crisp and chewy layers. She’d always give me a lump of dough, a tiny rolling pin, even a mini cup of chai, and set me up next to her where I would mimic each motion. My parathas will never be as good as my mother’s, but with every batch they get a little closer to her magic.
What Is a Paratha?
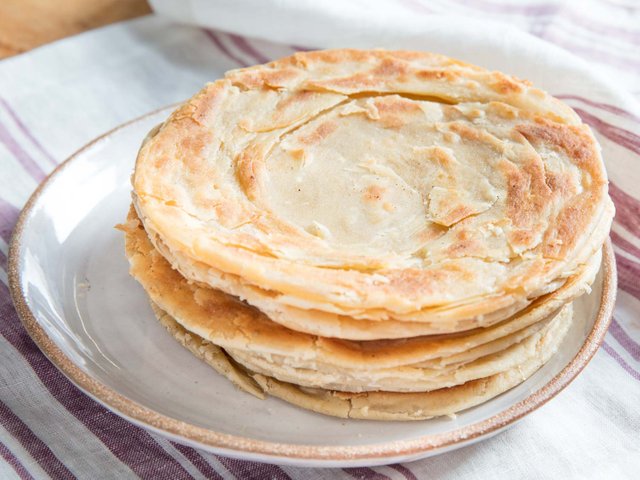
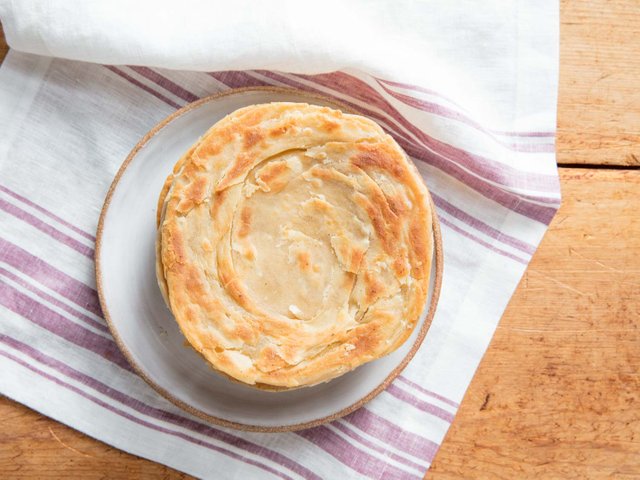
Flatbreads are common throughout India, Bangladesh, Pakistan, and Nepal, and appear in countless incarnations, from chewy, whole wheat roti to puffy, deep-fried bhatura. Parathas are a flaky, buttery, and layered style of flatbread, that can be served alongside curries, rolled up and dipped into hot chai, or made into a meal by themselves with a side of raitha for dunking. They can be made plain, as I have here, or stuffed with anything from a spiced potato mixture to the elaborate Mughlai parathas, which are filled with egg and minced meat and then deep fried.
Making parathas is definitely a labor of love. They contain no more than flour, salt, water, oil, and ghee—yet those simple ingredients are fully transformed through a process called lamination. Lamination may sound like an office task, but it’s also the name of an important pastry technique. It is the process of building alternating layers of fat and dough into a pastry, creating distinct, thin, and buttery stratum once cooked. Although lamination is generally associated with more advanced pastry techniques, such as croissants and puff pastry, it can be as simple as folding pie dough or biscuits a few times before the final roll.
Even though it’s a time consuming process, parathas offer an excellent introduction to lamination that anyone can master. Unlike puff pastry or croissants, parathas are not subject to the whims of temperature or yeast. They start with a simple dough, which is rolled out as thin as possible. Softened ghee is spread on top, and the dough is then rolled up to quickly create layers. The dough is rolled out one more time and then it’s cooked on a griddle to make the final, flaky flatbread. The result is a whole that’s greater than the sum of its parts, a perfect accompaniment to an Indian meal or the best way to start your Sunday.
How to Make Parathas.
Although it might seem like there are some long and laborious steps to making parathas, luckily the dough needs to rest at a couple points, so you can, too. This recipe can also be broken down into manageable chunks and spread out over the week, allowing you to work at your own pace.
In South Asia, wheat flour is categorized into maida and atta, both of which are milled from hard durum wheat. Maida is similar to American all-purpose flour, having had the germ and bran removed, while atta is a whole wheat flour that includes the entire grain.
Maida is often used for making parathas because it makes a more tender and flaky flatbread. All-purpose flour tends to be made from a mixture of hard and soft wheats, which means it has a lower protein percentage than maida, and therefore creates parathas that aren't as crisp or flaky.
You can order maida online or purchase it from a local Indian grocery store, but all-purpose flour works fine in a pinch. If you’ve got some Italian double-zero ("00") flour leftover from making fried chicken, its extra-fine grind size yields the lightest parathas. I recommend using what you’ve got—in side-by-side testing the difference in texture between flours was subtle. You can use maida, double zero, or all-purpose flour in this recipe without needing to make adjustments to the measurements or procedure.
Step One: Rubbing Oil Into Flour
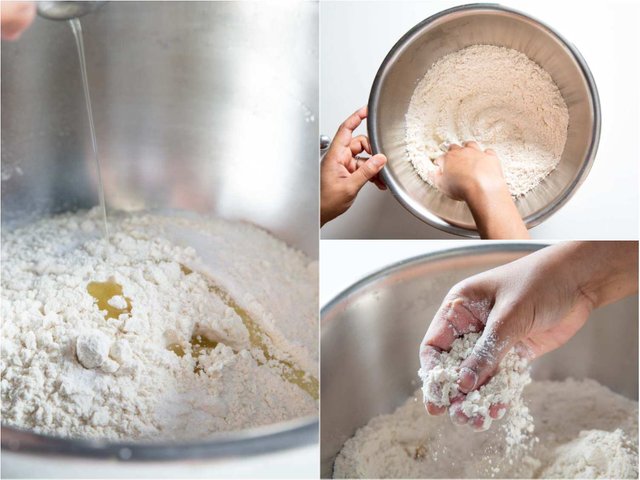
The dough comes together so quickly I usually mix it by hand, but if you prefer, it can be brought together in a snap in a food processor or stand mixer. I start by whisking kosher salt into the flour, before adding a couple of tablespoons of oil into the mix. Using my thumb and forefinger, I gently rub the oil into the flour until I feel no more lumps. Rubbing oil into flour was the first culinary task my mom ever trusted me with, and I would rub my tiny fingers together until they ached, determined to help her make paratha alchemy. Taking the time to thoroughly distribute the fat at this stage ensures a tender, chewy texture later.
Step Two: Mixing the Dough
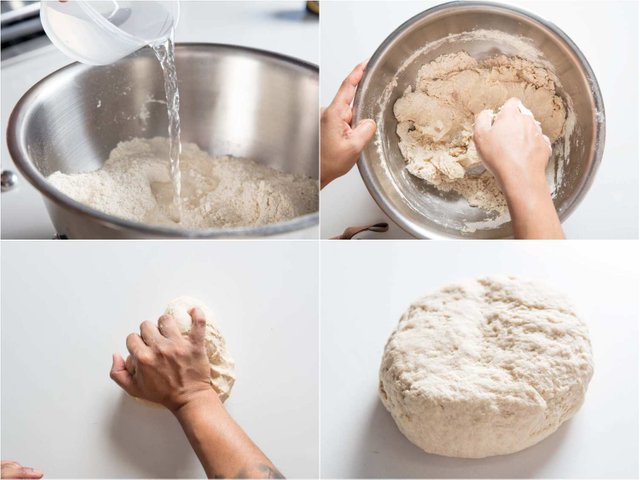
Next, I make a well in the center of the flour mixture before pouring in some warm tap water. The warm water helps the flour come together fast into an easy-to-handle, smooth dough. I first roughly mix the water into the flour using my fingers, before diving in with my palm to knead it into a sticky ball. We don’t need any window panes, smooth balls, or other indicators of gluten formation—I’m just bringing the dough into a homogenous mass. Although gluten development is vital to lamination, there’s no need to work the dough to death at this point. Gluten will continue to develop as the dough rests and hydrates, as well as during the double rolling process. Building too much gluten at this stage will only result in a dough that’s impossible to roll out.
Step Three: Resting the Dough
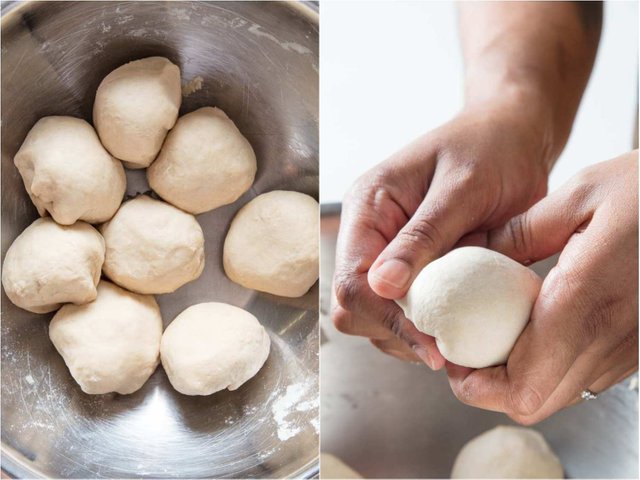
After mixing, I cover the dough with either a moist kitchen towel or plastic wrap and set it aside to rest for at least one hour. As the dough rests it grows smooth and relaxed, ready for rolling out. I eyeball the dough into eight portions, but this recipe can be multiplied to suit your flatbread needs.
Step Four: Lamination
In order to develop all its flaky layers, parathas get a double roll, so you can sneak in an upper-body workout while you cook. I work with one portion of dough at a time, keeping the rest covered to prevent them from drying out.
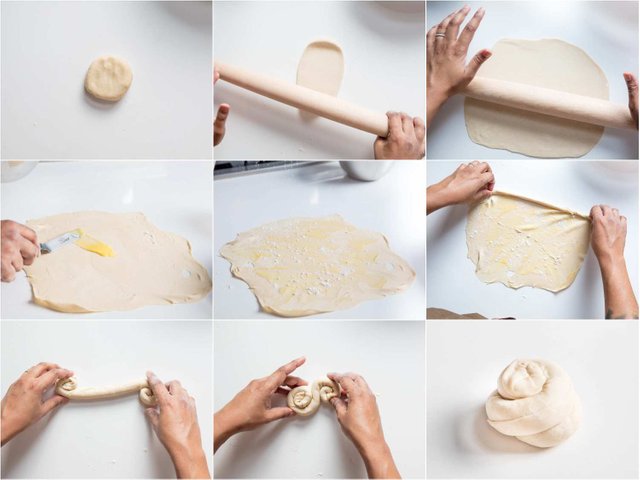
The goal of the first roll is to get it as thin as possible—by any means necessary. If you’re weak and short like me, that might mean standing on a milk crate for some extra height and pressing down on the rolling pin with your forearms. (In the past, large batches of parathas have left me bruised from elbow to wrist.) I find that it helps to have some tension between the board and the dough, so I keep the flour dusting to a minimum at this point, focusing my flouring on the top of the dough to keep the rolling pin from sticking.
Ideally, the dough should be rolled out paper thin, like fillo or a tight gauzy dress. In reality, it’s usually got some lumps and bumps, like myself in a tight gauzy dress. Don’t worry, it’ll still taste damn good; it’s just that it takes practice and experience to get just right.
Once rolled out, I spread on a spoonful of softened ghee. Ghee is an Indian style of clarified butter, where some choose to brown the solids, which infuse the fat with flavor before being separated out. The process of transforming butter into ghee not only increases its smoke point and shelf life, but also changes the butter’s flavor. My mother’s ghee was always gently browned all day, becoming deeply infused with toasty notes from the milk solids.
Spreadable ghee is key; while melted ghee might seem easier to evenly distribute, once coiled up and rolled out again, thick, softened ghee will stay put, while the melted stuff will ooze right out. I don’t worry too much about my flour choice in a paratha, but the quality of the ghee will determine the final flavor of the bread, so I always use the best I can. Good ghee starts with good butter, so this is the time to splurge. If you already have clarified butter or browned butter on hand, you can substitute them for ghee. In a pinch, regular whole butter or even Crisco can step up to the plate and deliver the same final texture, but keep in mind that they can’t deliver the same flavor as a long-cooked ghee.
I next sprinkle on a pinch of flour across the dough, which helps give the layers definition. I then coil the sheet of dough into a long snake by rolling tightly starting from the top. Finally, to finish adding countess layers to the dough, I roll each end of the log of dough inward until they meet in the center and fold them onto each other. I repeat this process with all the dough and set them aside to rest at least one hour.
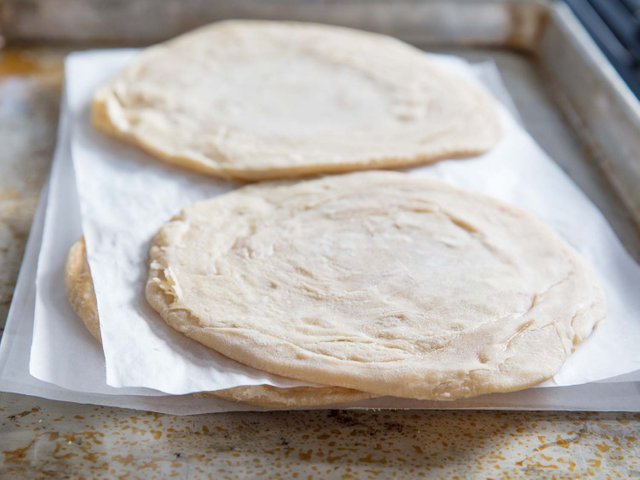
Step Five: Rolling Out the Dough
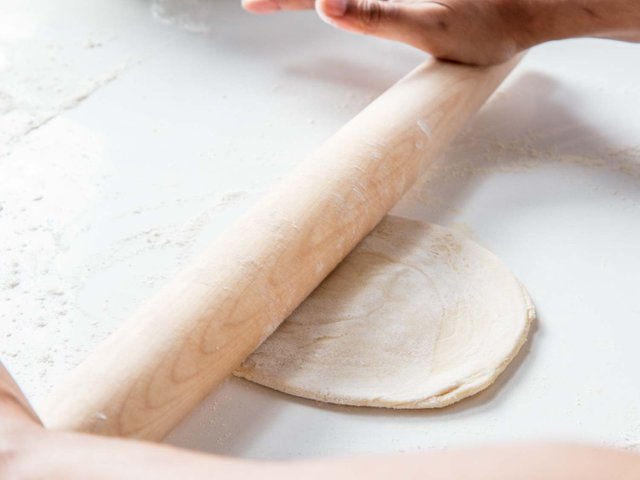
For the second roll, each coil of dough is rolled out until it is about eight inches in diameter and one-eighth of an inch thick. I use flour as needed to prevent sticking, and frequently rotate and flip the paratha while rolling, ensuring an even thickness and round shape. The paratha pros know how to manage the pressure of their rolling pin so efficiently that the paratha rotates beneath the pin all on its own. (I’m not there yet, but I expect to be in another fifty years or so.)
After rolling out the parathas, you can cook them up right away or store them wrapped in the refrigerator stacked between sheets of parchment or wax paper for up to three days.
Step Six: Par Cooking the Parathas
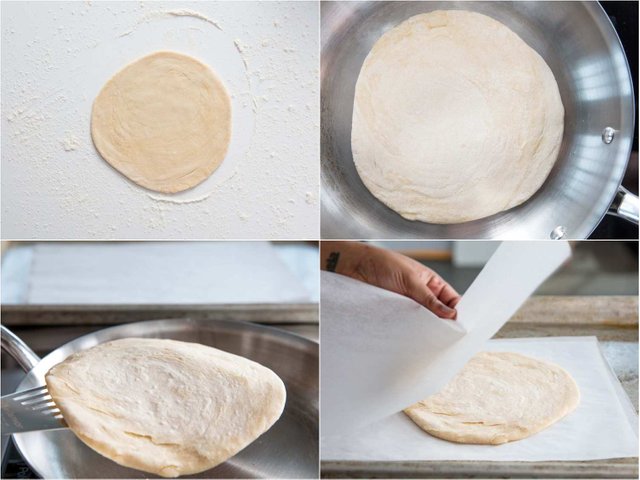
Most flatbreads are cooked over high, direct heat—just imagine naan charring against the wall of a tandoor or tortillas blistering over a comal. Parathas, on the other hand, require a relatively longer cooking time using lower heat, since they are thicker than most flatbreads. If parathas were rolled out as thin as a chewy chapati, the distinction within the layers would be lost.
Because of this longer cook time, cooking parathas can be tough to tackle for a crowd. The last thing I want to do during dinner is play the role of the short-order cook, hanging out in front of the stove making parathas to order. That’s why I follow the double roll with a double cook step: I first cook the parathas over low heat in a dry pan to cook the starches through, then I just need to quickly crisp them in ghee before serving. This allows me to get much of my prep squared away long before mealtime. When it does come time to serve up the parathas, they fry up fast so the stack can hit the table faster.
To par-cook the parathas, I start by preheating a dry sauté pan over medium-low heat. I stick to a stainless steel skillet, which better retains the heat and evenly distributes it. I next use a pastry brush to brush any excess flour off the rolled out paratha before adding it to the pan. The goal of the first cook is to cook the starches through, without developing any color. As they cook, the surface of the paratha will grow dry, dusty, and begin to firm up. After this first cook, the parathas can be stacked between sheets of parchment, wrapped up, and frozen. Anytime I have a hankering for the buttery flatbread they can be cooked up in ghee from frozen, for a homemade paratha in an instant.
Step Seven: Frying in Ghee
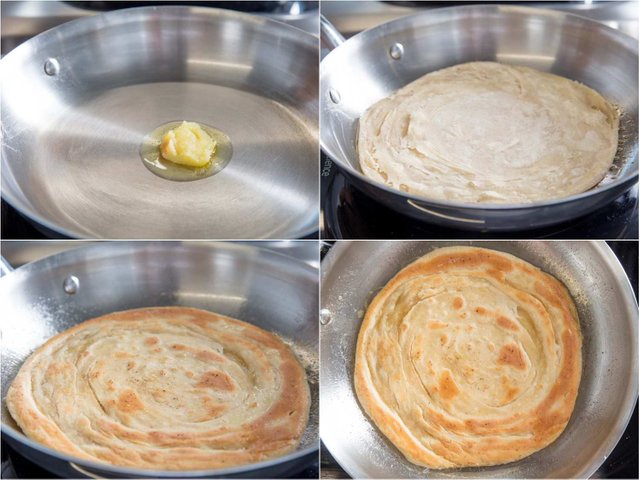
For the final cook, the parathas are fried in ghee to finish cooking and develop a golden brown color. I preheat the same skillet, this time over medium-high heat, before adding a spoonful of ghee and frying up one paratha at a time. In the hot fat the bread will begin to puff, emphasizing the distinct layers within it. I swirl the bread around in the pan to achieve an even color, flipping it to brown both sides.
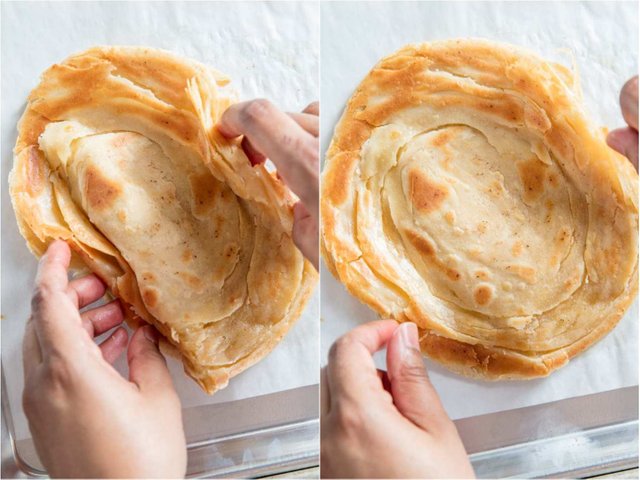
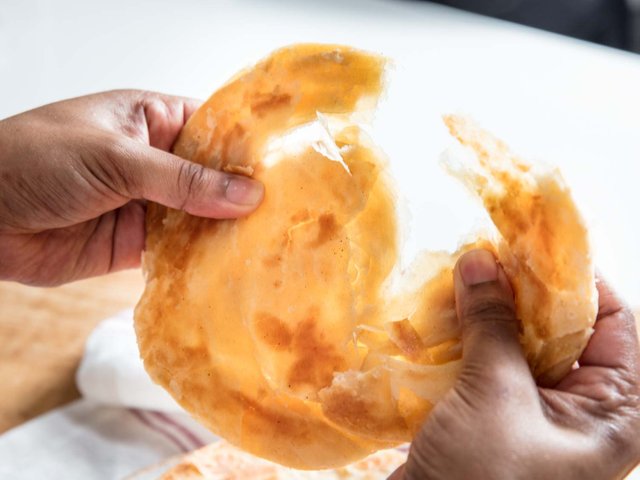
After the paratha is brown and crisp it’s important to give it a quick scrunch to crack it open, releasing all the steam built up inside, which will prevent the bread from growing soggy as it sits. Parathas are best served right away, but if I need to hold them a few minutes while frying up the rest, I always wrap them in a kitchen towel and hold them in a low oven until they hit the table.
Sure, I often go the obvious route, serving parathas alongside a creamy chicken korma or perky channa masala, but with a stash in the freezer it’s easy throw them into uncharted territory at a moment's notice. I’ve used the bread to wrap up succulent Peking duck, scallions, and hoisin for a change of pace from the usual steamed pancake. Spread with more softened ghee and a generous dusting of cinnamon sugar, parathas make a decadent cinnamon toast. And to my surprise, nothing beats a warm paratha with thinly sliced smoky Benton’s country ham. I think my mother would approve—because there’s nothing wrong with finding more opportunities to add flaky, buttery, crispy layers to life.
Cc;
@steemitblogs
@steemcurator01
@steembooming01
@steembooming02
@steemcurator03
@steemittags
@steemitfoods
Special thanks
#group admin.