Creative Dynamics/ week 6: DIY Creative, practical and functional for your home// by @enamul17.
Hello steemains friends.
How are you all? How is your day today?Hope well. I am fine too. At first I would like to thanks @roseri for bringing this beautiful contest among us.Compared to other communities, this community's contest is different & much interesting for me.Your thoughts are really admirable.The theme of the contest is "DIY Creative, practical and functional for your home" & I am participating in this contest very delightly. For this contest today I made a beautiful penholder. I like to reuse old things that we call recycle. I had some cardboard in my house which I could not use. But after organizing this contest, I thought now is the right time to use this cardboard. So today I made this penholder by using this cardboard. Hope everyone like it.**

Beautiful Penholder.

Instruments:
- Cardboard.
- Red paper.
- Blue paper.
- Navy-blue paper.
- Black paper.
- White paper.
- Signature pen / Colour pencil.
- Pen/pencil.
- Scissor.
- Ruler.
- Glue.
- Tape.
Let's start the process:
Step 1,
- At first I take a cardboard & cut it into three pieces & the shape of the cardboard are (24×7)cm,(24×9)cm & (28×11)cm size like the picture shown below.

Step 2,
- In the next step I take a piece of cardboard & fold four equal part & then attach the open part together by using tape (I have not the gluegun yet so i use tape for attach ). Similarly I complete the others like the picture shown below.
 |  |
|---|
Step 3,
- In the next step I take some colour paper & attach the paper bottom to the cardboard by using glue as shown below the picture.
 |  |
|---|
Step 4,
- In the next step I take another cardboard & cut it in the shape of (17×25)cm size & cut the all corner in round shape. Then I take a A4 size Navy-blue colour paper & attach it on the cardboard very carefully & the extra paper attatch bottom of the cardboard like the picture shown below.

Step 5,
- In the next step I take red (10.5×30)cm, blue(12.5×30)cm & violet(8.5×30)cm size colour paper like the picture shown below.

Step 6,
- Then I attach that colour paper around the cardboard by using glue like the picture shown below.

Step 7,
- Then I glue on the extra paper part & attach it inside the cardboard box. Similarly I complete the others like the picture shown below.
 |  |
|---|
Step 8,
- Then I take white paper & cut it into the eye shape & then attach it on the cardboard box & at the same time I draw mouth & eyebrows like the picture shown below.

Step 9,
- In the next step I glue bottom of the box & then attach it on the other cardboard nicely like the picture shown below.

Step 10,
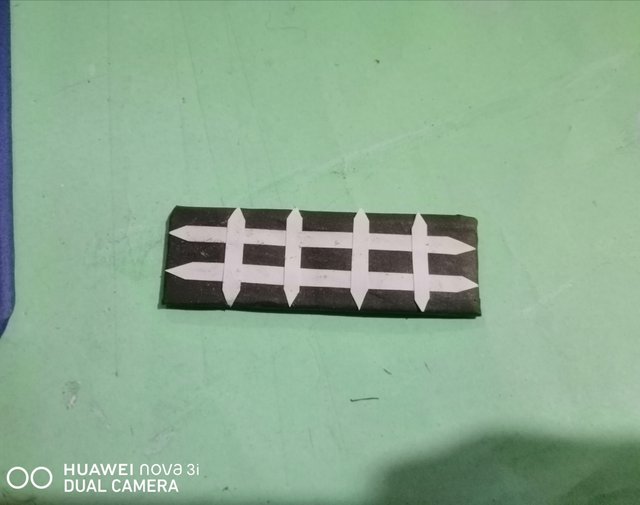
- In the next step I take a small piece of cardboard & then take black paper & attach together by using glue. Then I take white paper & cut it into thin piece & attach it on the black paper like the picture shown below.

Step 11,
- In the next step I attach it on the cardboard by using glue like the picture shown below. Finally I able to make the beautiful penholder.

The final look of the penholder with selfie that I taken by my phone.

Thank youbso much everyone. Have a nice day. Hope everyone enjoys my handicrafts. I would like to invite my all friends for join club5050, club75 & club100 for get more support from the community & also delegates our community & make our community more strong for get good support. I also like to invite my friends @atulk1995,@samia911,@sydnificent for join this beautiful contest.
Click here for the contest link.
| Category | Contest |
|---|---|
| Photographer | enamul17 |
| Device | Huawei Nova 3i |
| Location | Bangladesh |
Hi @enamul17, I like your work because it´s nice, practical and funny, love the characters. I think I could use that someway to express my emotions. Congrats
https://twitter.com/enamul171/status/1527983596929425410?t=HFNXY1yP34Xs1Z80EKnOGA&s=19
Your post is really awesome.... Like it💝💖🥰.
Thank you so much.
Hello @enamul17, what a beautiful art, without a doubt these types of things are essential at home to maintain order. Successes in the contest.
Thank you so much dear friend. ❤️❤️
Muy lindo y útil a la hora de ordenar los lapices y marcadores.
Saludos y Éxitos para ti !!!
Thank you so much friend.
Hola amigo, este porta lápices te quedo genial, tu proceso esta bien organizado y eso me gusto mucho, gracias por participar.
Thank you so much mam🥰❤️
Saludos amigo @enamul17, que bien que te animaste a participar. Que porta lápices y boligrafos tan interesante. Me imagino que la cerca que le pusiste es para que el enojado no se salga jajaja. Muy creativo.
Bendiciones y exito.
Yeah😁You r right & thank you so much for your beautiful comment.
Hola @enamul17 genial tu proyecto una buena forma de organizar todos los creyones y lápices de colores para que no anden regados y poder tenerlos a la vista
Yes.Thank you so much dear for your beautiful comment.
Te quedo lindo amigo, me gusta como trabajas con el papel, eres muy creativo.🙋♀️🙏😍
Thank you so much dear. ❤️🥰
Congratulations! This post has been upvoted through steemcurator07.
Curated By - @disconnect
Curation Team - The7up
Thank you so much @disconnect for your great support.