[How to Create Your Own Crypto Token] - Steemit Crypto Academy | S5W2 | Homework Post for @reddileep
Hey Guys..!!
Meet again with me Wahyu Nahrul on the other Steemit Crypto Academy homework. Today I will be working on homework given by one of our professors @reddileep.
The homework given by our professor this week is about How to Create Your Own Crypto Token.
Okay, just get to the discussion. Happy Reading !!

Difference Between Coin and Token
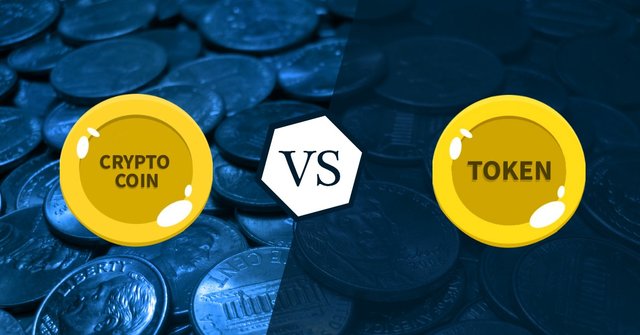
Coin and Token are two words that are often heard in the cryptocurrency world, many people think that these two words have the same meaning, yes they are not wrong, indeed both are cryptocurrencies that run on a blockchain.
But even though these two types of cryptocurrencies are the same thing, there is something that makes the two types of cryptocurrencies cannot be said to be the same type of cryptocurrency, the difference lies in the Blockchain where it runs.
A cryptocurrency will be referred to as "Coin" if it runs on its own Blockchain, in this way making a coin is a type of cryptocurrency that has a complex level of coding complexity where in addition to making cryptocurrency the developer must also create his own Blockchain network.
There are many examples of Coins that we have often heard of such as Bitcoin which has its own Blockchain called Bitcoin Blockchain, then other examples such as Ethereum, Solana, Tron, Cardano, Dogecoin, BNB, etc. All examples of such cryptocurrencies are Coins that own and run on their own Blockchain.

Whereas a cryptocurrency will be referred to as "Token" if the cryptocurrency is created and runs on the Blockchain of other cryptocurrencies. The token itself is very easy to create and anyone can create their own token without requiring a large fee and the creator does not require advanced computing skills. Because of that, until now there have been thousands of types of cryptocurrencies and most of them are cryptocurrencies with the type of "Token".
For example, there are so many tokens, I can't name them one by one, but there are some tokens that are well known and requested by many people such as Meme Token "Shiba Inu" which runs on the Ethereum Blockchain, then there is Token " SUN" running on the Tron Blockchain, etc.
In contrast to Coins, the cryptocurrency developer of the Token type must be able to make the Token he makes has value because everyone can create Crypto Token so that the value of the Token itself does not exist, so the token developer must create a good project so that the Token he makes has value. and use cases that can be used by the holders.
Preparation To Create Crypto Tokens
As we already know that in this assignment I will show you how to create a Crypto Token. However, before we create a Crypto Token, there are several things that we must prepare in advance, this is intended so that there are no obstacles during the token creation process, the things we must prepare include:
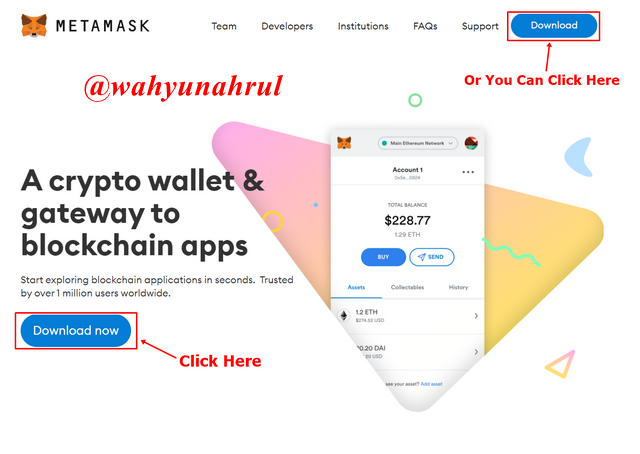
1. Installing and Creating a New Wallet on MetaMask
The first thing we have to prepare in the process of making Crypto Tokens is to create a wallet that will be a place to store the Token itself. There are many types of crypto wallets that already exist today, but this time I chose the MetaMask wallet as a place to store Crypto Tokens that I will create later.
Creating a wallet on MetaMask is not difficult but we must be careful so that there are no errors in the process of making the wallet, please read the following steps:
Step 1
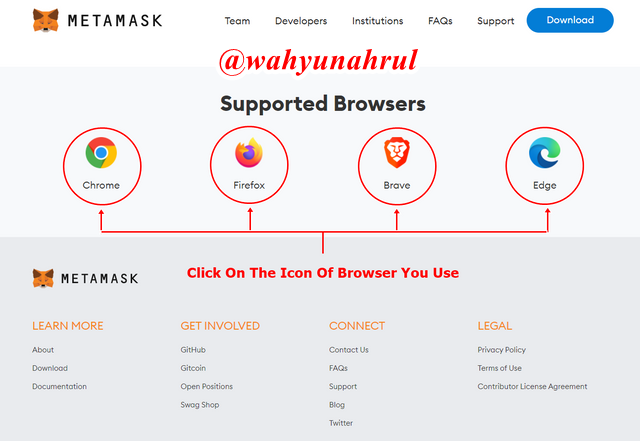
Visit the official page of MetaMask and you will be shown the start page that looks like the image below. To download it, all you have to do is click the "Download" button in the middle or at the top right of the page.

Step 2
After that you will be taken to a new page, then scroll on that page until you see browser icons that support MetaMask, click on the browser icon that you are using, here I will choose Google Chrome because I use that browser.
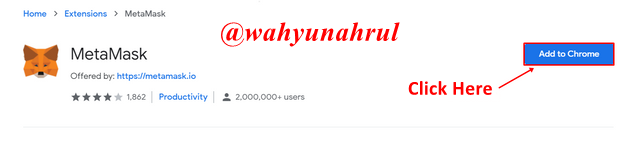
Step 3
Then, you will be taken to another page that will install the MetaMask extension to your browser. Click on the "Add to Chrome" button.
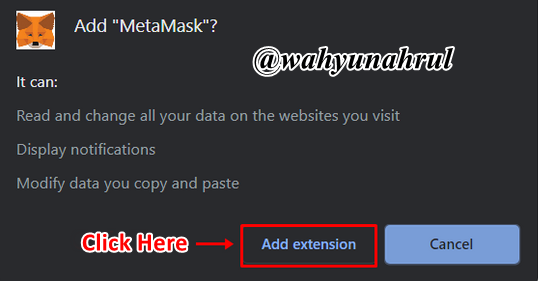
Step 4
A pop-up will appear asking for permission to install the MetaMask extension into the browser, click on the "Add Extension" button to continue the process.
Step 5
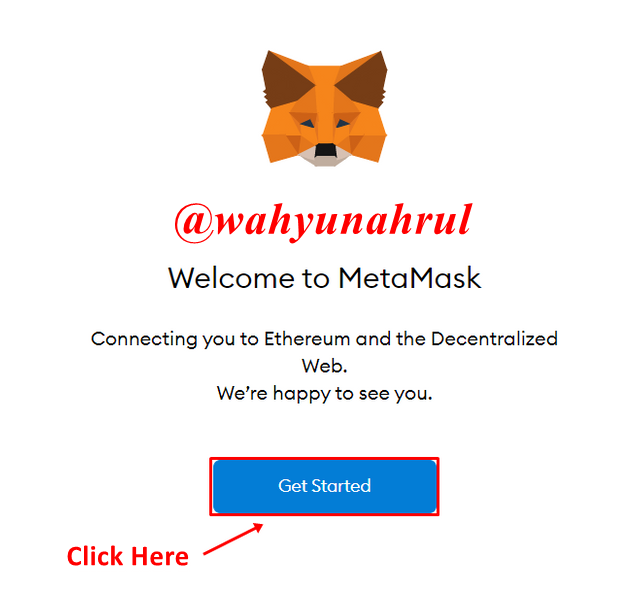
After the installation process is complete, you will be shown a page that looks like the image below.
The next step is that we will create a new wallet on MetaMask, to do this we click on the "Get Started" button.
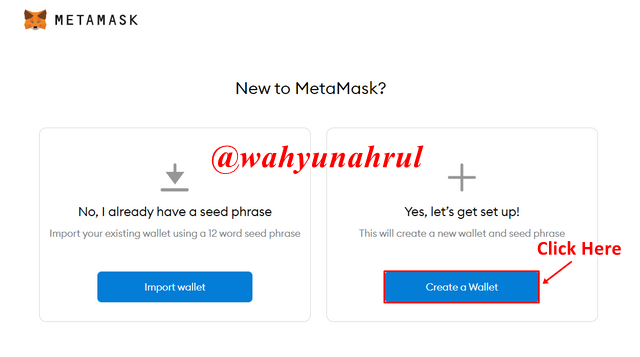
Step 6
There will be 2 options given by MetaMask, namely entering an existing wallet or creating a new wallet. Since we are going to create a new one, we select the "Create a Wallet" option on the right.
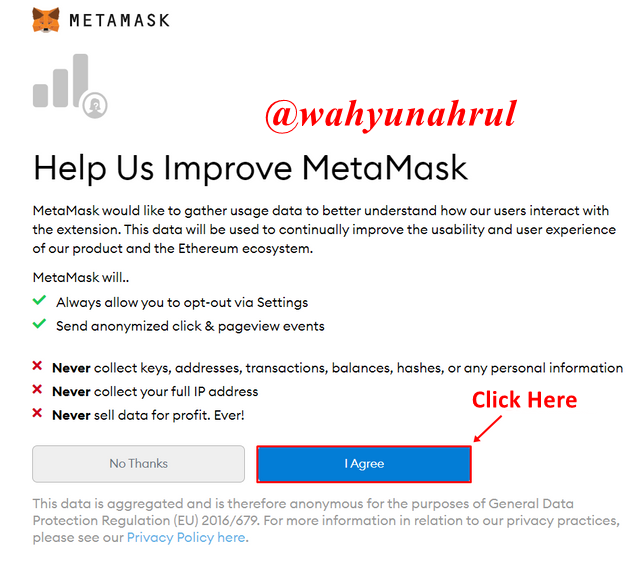
Step 7
A warning will appear telling you some details regarding the security of the wallet. To continue, click on the "I agree" button.
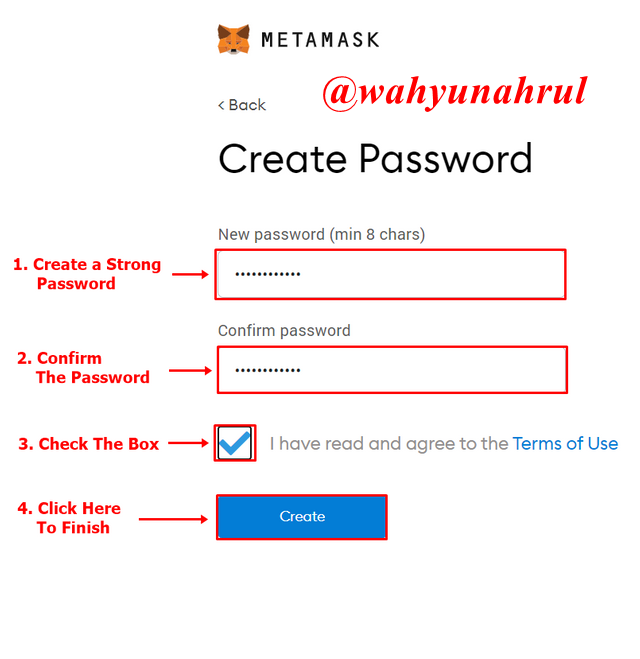
Step 8
In the next step, we will create a wallet password. Create a strong password that is a variation of capital letters, numbers, etc. This is to increase the security of the wallet that we will create. After we enter the password, check the approval box and click on the "Create" button.
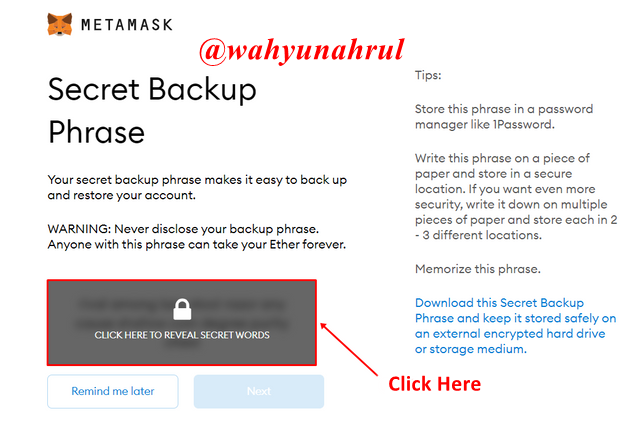
Step 9
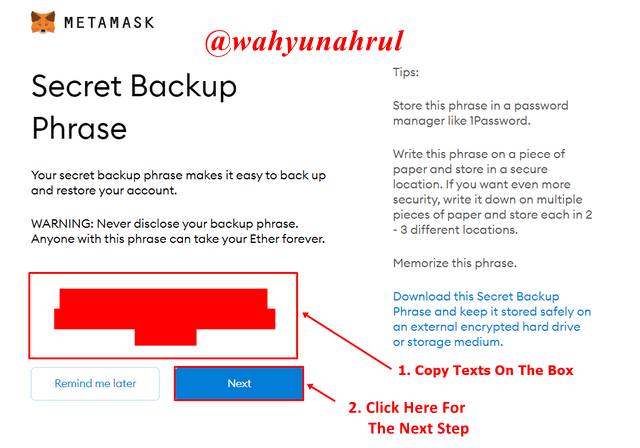
Next, we will create a password to back up our MetaMask wallet account. This will be useful if we accidentally uninstall our browser so that we can enter the same wallet when installing a new browser. To get this backup password, we click on the box shown in the image below.
Step 10
After we click the box will appear some mixed words. Copy these words and store them in a safe place. After that click on the "Next" button to continue.
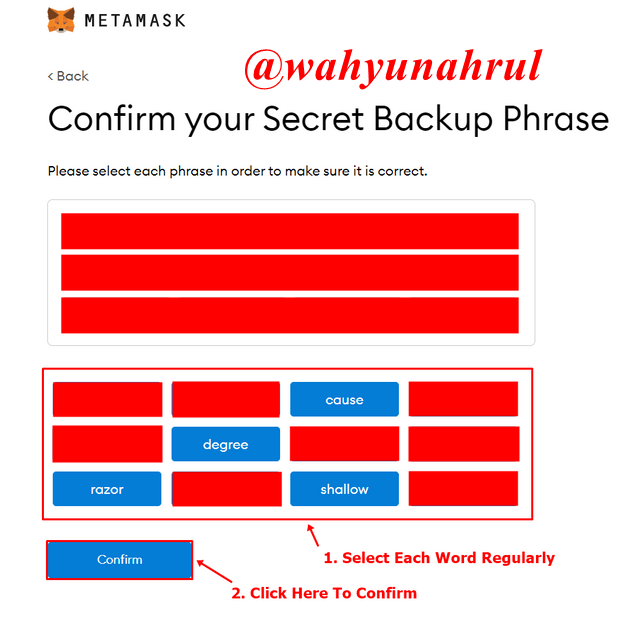
Step 11
Then we will be asked to verify the backup password. Choose the words provided in the column below in sequence according to the order of the words that we copied earlier. After all that is done, all we have to do is click "Confirm" to continue the wallet creation process.
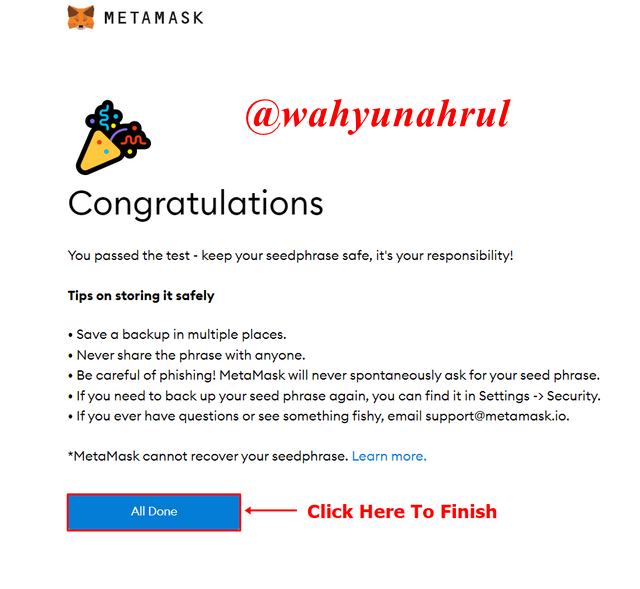
Step 12
And done!!
Our MetaMask wallet has been created and can be used, click on the "All Done" button to enter the wallet.
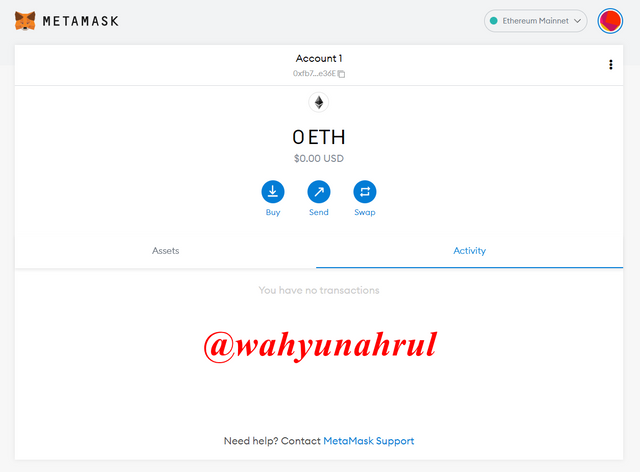
After that, we will immediately be taken to the home page of our wallet which will look like in the image below.

2. Adding BSC Network on MetaMask
The next thing we have to prepare in creating a Crypto Token is to connect the wallet that we have created with the Blockchain network that we want. As we know that MetaMask is a wallet based on the Ethereum Blockchain as its default network and I want to create a Crypto token that is on the Binance Smart Chain. Therefore, before I create the Crypto Token, I must first connect the MetaMask wallet that I have created with the Binance Smart Chain network.
To connect a wallet on MetaMask with Binance Smart Chain, please pay close attention to the following steps.
Step 1
Open the MetaMask wallet that we created earlier and click on the network menu next to the profile icon. After that, click on the "Add Network" button at the bottom of the menu.

Step 2
After that, we will be taken to the settings page and we will be given several fields that we must fill in.
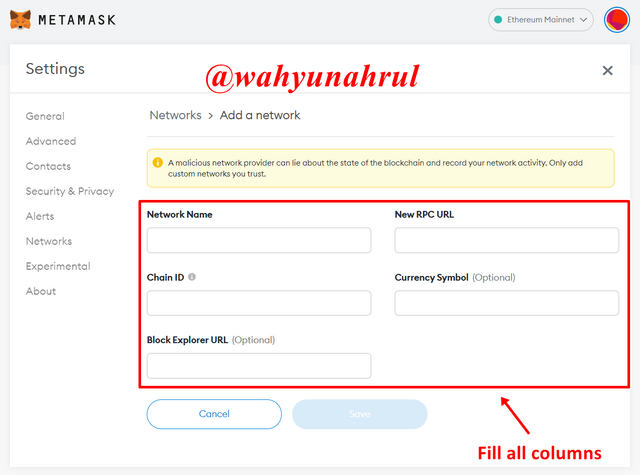
Step 3
Fill in the fields correctly so that the Binance Smart Chain network that we want can be connected to our MetaMask wallet, while the fields we will enter in these fields include:
- Network Name: Binance Smart Chain Mainnet.
- Chain ID: 56.
- Block Explorer URL: https://bscscan.com.
- New RPC URL: https://bsc-dataseed1.ninicoin.io.
- Currency Symbol: BNB.
After all the fields are filled in correctly, click the "Save" button so that the network is saved in our MetaMask wallet. For more details, you can see them in the image below.

Step 4
A pop-up will appear informing you that the Binance Smart Chin network that we entered earlier has been successfully added to our MetaMask wallet.

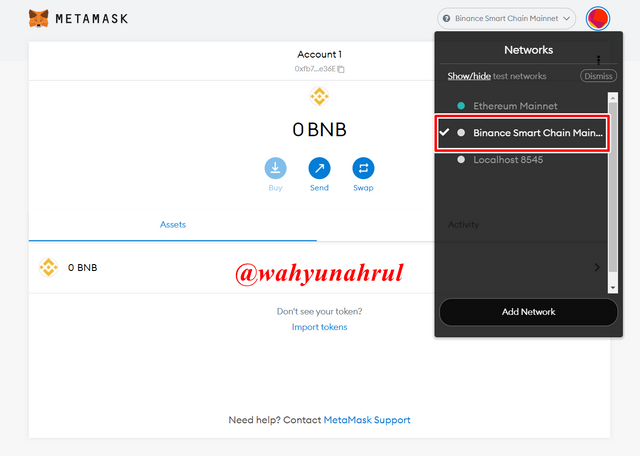
Step 5
To check it, we can see the network menu pad on the start page of our wallet. We can see that our MetaMask wallet has been successfully connected to the Binance Smart Chain network.
3. Deposit BNB ($15) to MetaMask
The last thing we have to prepare to create a Crypto Token is to deposit some BNB coins into our MetaMask wallet. This BNB will be useful as a gas fee payment when we are going to create Crypto Tokens, professor @reddileep suggests sending BNB which costs $15 so that it can be used on this task as well as on the next task so we only need to send BNB once.
In this example, I will send some BNB from my Binance account wallet because I can directly use the Binance Smart Chain (BEP20) network. For further understanding, consider the following steps:
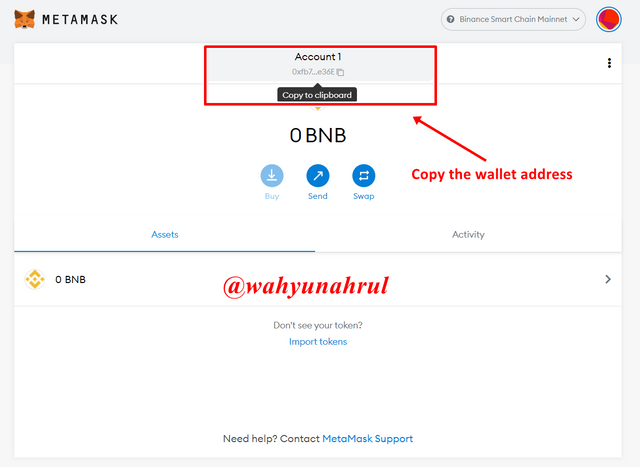
Step 1
The first step we have to do is to copy the MetaMask wallet address which we can find at the top on the home page of our wallet.

Step 2
After that, we log in to our Binance account and select the "Withdraw" option in the wallet menu of our account.
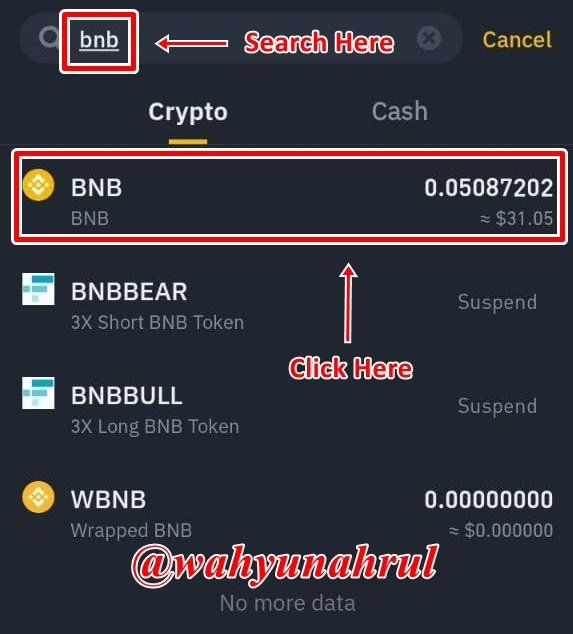
Step 3
Search for "BNB" in the search field and click on the BNB coin icon.
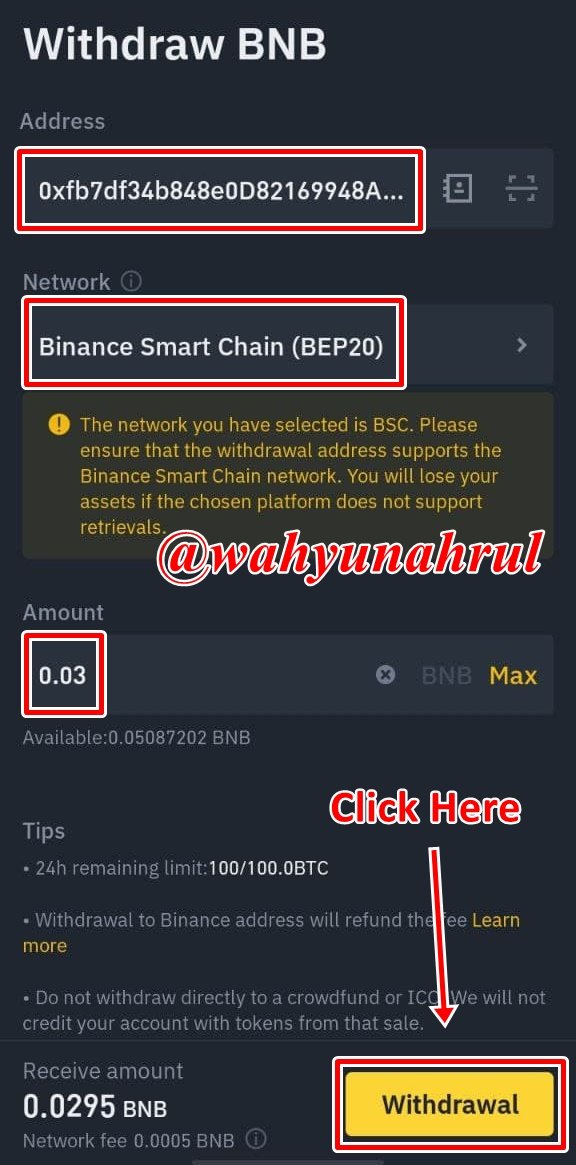
Step 4
Enter the wallet address that we copied earlier in the first column, then select the network "Binance Smart Chain (BEP20)" in the network selection column. After that, enter the amount of BNB that we will send, here I will give an example of sending 0.03 BNB and with a shipping fee of 0.0005 BNB, the number of BNB coins that enter my MetaMask wallet is 0.0295 BNB. Finally, click on the "Withdrawal" button to make the delivery.
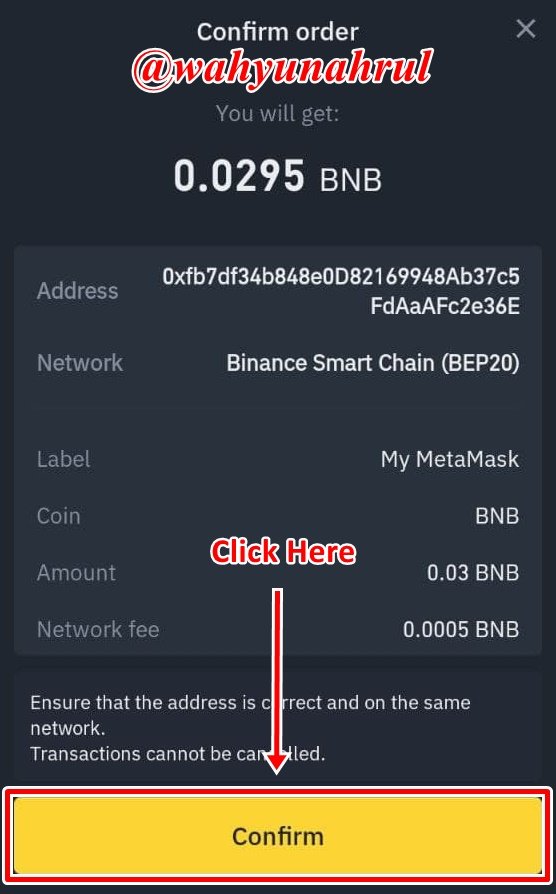
Step 5
A notification will appear to confirm the delivery of the BNB, click on the "Confirm" button to continue the process.
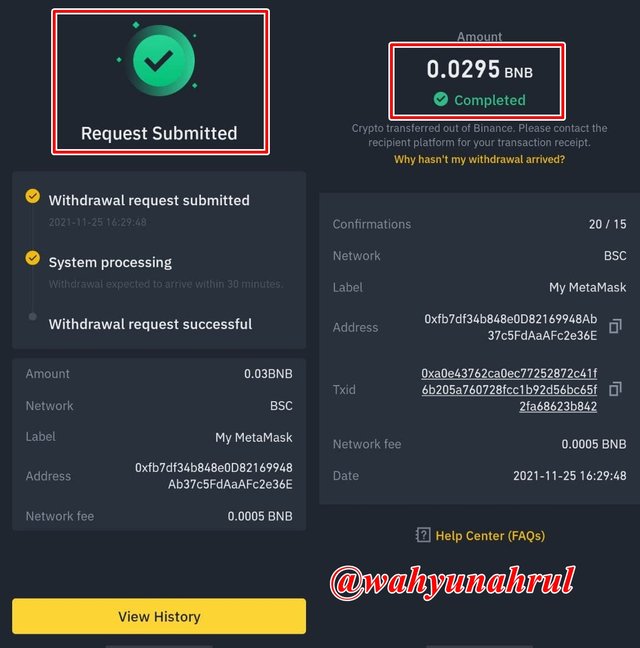
Step 6
After that, the BNB delivery process that we do will wait for the network validation process. And after the validation process is complete, a notification will appear telling you that sending BNB from Binance to the MetaMask wallet has been successful.
Step 7
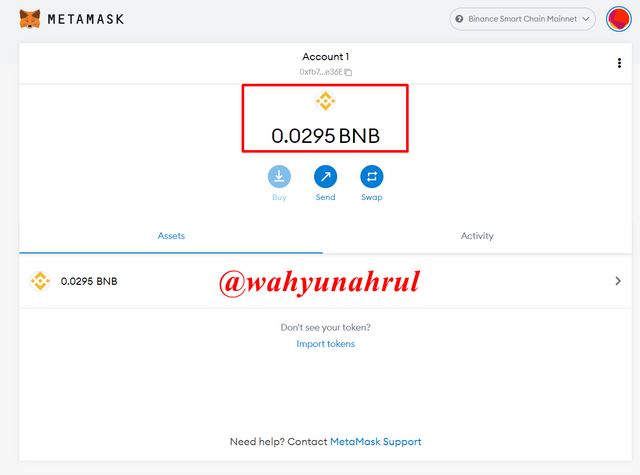
To make sure we can check whether the BNB has been entered into our wallet. As shown in the image below, the amount of BNB in my wallet which was originally 0 has changed to 0.0295 BNB, which means the BNB has successfully entered my MetaMask wallet. For detailed information related to the delivery, you can see it through BSCscan.
Remix IDE

Remix IDE is a website-based computer programming that is used to create a smart contract on a blockchain so that using Remix IDE allows users to create a Crypto Token. Blockchain types that are compatible with this programming are Ethereum Blockchain and Binance Smart Chain, so users can choose to create tokens of type ERC20 or BEP20.
By using Remix IDE, its users can freely create new projects, generate tokens, deploy tokens, modify contracts, etc. using only Source Code. This Source Code can be obtained easily by downloading it through the website that has been provided by the related Blockchain.
Remix IDE is deliberately created specifically for Token developers who do not have an understanding of advanced computer coding so that an application like Remix IDE will open up the widest possible opportunities for developers to create their own Crypto Token.
Download Source Code
In the process of creating a Crypto Token, we need a source code that will be used as a tool in the coding process in making Crypto Tokens. As I explained earlier that in making a Token is not difficult because every Blockchain has provided its Source Code to the public so that everyone can download and use it to create Crypto Tokens.
In this example I will create a token that will run on the Binance Smart Chain which means the token I will create is a BEP20 Token, so to create a BEP20 Token I must have the Source Code first. To download the Source Code of BEP20 please pay attention to the following steps.
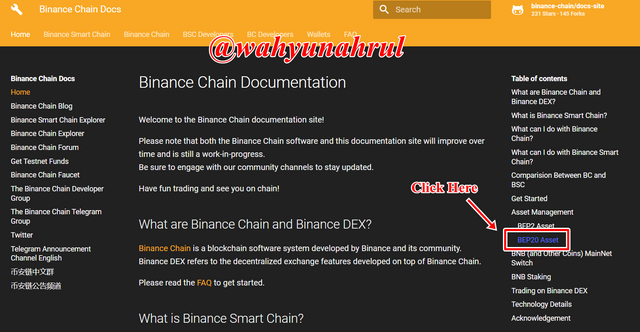
Step 1
The first step is to first visit the Binance Chain Docs web page which will look like the image below. After that, click on the words "BEP20 Asset" on the right side of the page.
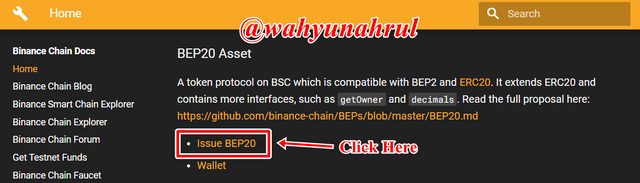
Step 2
After that, we will be taken to another page and on that page click on the "Issue BEP20" option.
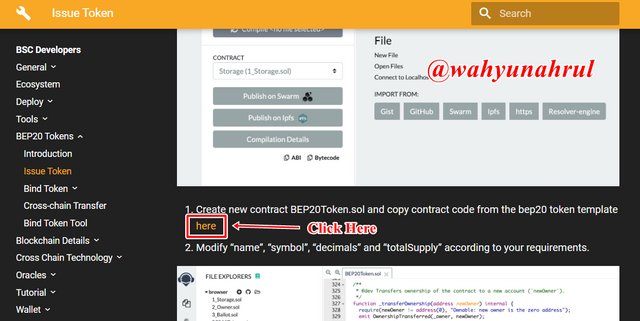
Step 3
Once again we will be taken to a new page, and on that page, we will scroll down until there are several bullet numbers visible, click on the words "here" at the end of the sentence in the first point, for more details see what is shown by the arrow in the image below.
Step 4
And done!
BEP20 Source Code has been successfully downloaded. You can see it on the download page in your browser.

Customize The Source Code
Now we will enter the most important stage in the process of creating Crypto Tokens. At this stage, I will explain how to use the Source Code that we downloaded earlier so that it can be used to create a Crypto Token. Pay close attention to the steps that I will explain because a slight error will result in failure in the token creation process.
Step 1
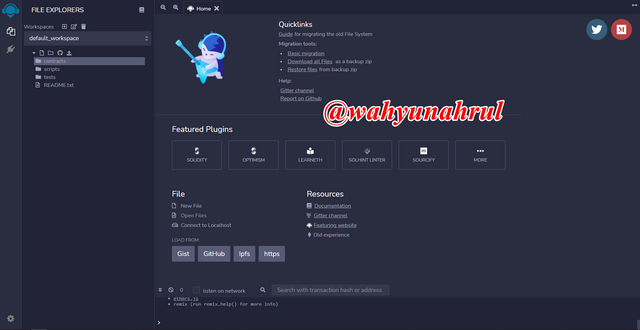
The first step is that we first visit the official web page of the Remix IDE and we will be shown the start page which will look like the image below.
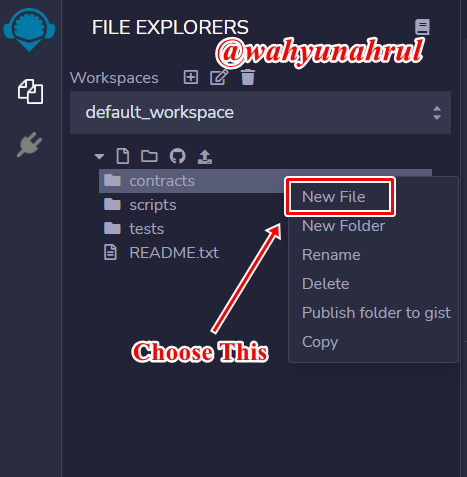
Step 2
Then we will create a new file on the page, the trick is to right-click on the "contracts" file, and then several options will appear, we will select the "New File" option.
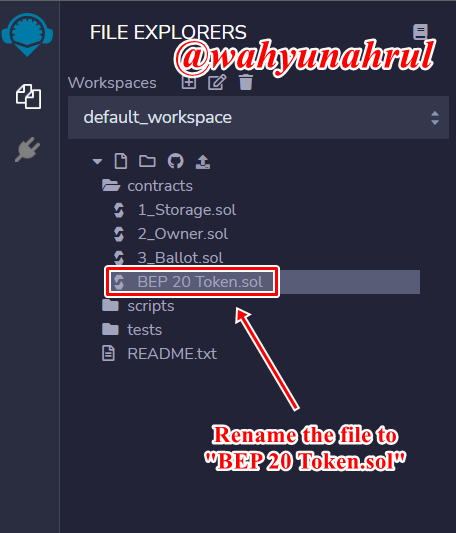
Step 3
The next step is to change the name from the new one we just created to "BEP20 Token.sol" as shown in the image on the right.
Step 4
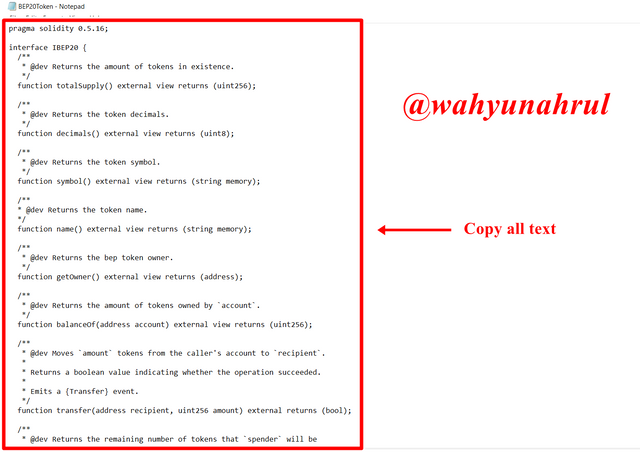
Open the Source Code file that we downloaded earlier using the Notepad application, then copy all the words in the file. Note that no letters are left behind during copying because all these letters are codes for the coding process, so a single letter error will cause the Token creation process to fail. So that no words are left behind during the copying process, use the shortcut "Ctrl + A" then "Ctrl + C".
Step 5
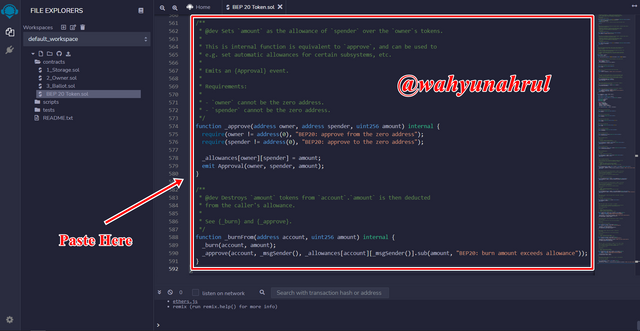
Paste all the code that was copied earlier in the column provided in the Remix IDE.
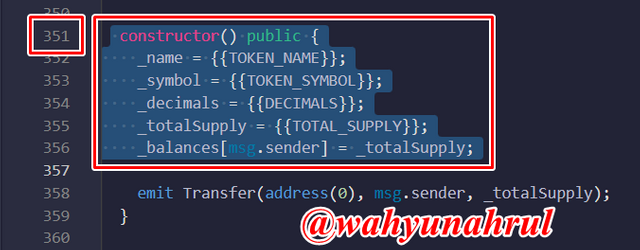
Step 6
Look for the line of code "constructor" in that part of the code, the code is on line 351. In this section we will set some important things that will be the identity of the Crypto Token that we will create, some of which will be set in this section are Token Name, Token Symbol, Decimal, and Total Token Supply.
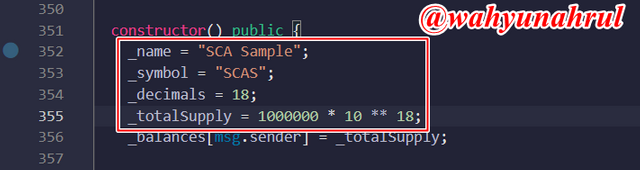
Step 7
Now I will set the parts of the Token that I will create. If you want to create Crypto Tokens, please adjust the settings according to your wishes but you must use the same format as I use below (the format I mean like quotation marks and semicolon punctuation), the details include:- Name: "SCA Sample";
- Symbol: "SCAS";
- Decimal: 18;
- Total Supply: 1000000 * 10 ** 18;
Step 8
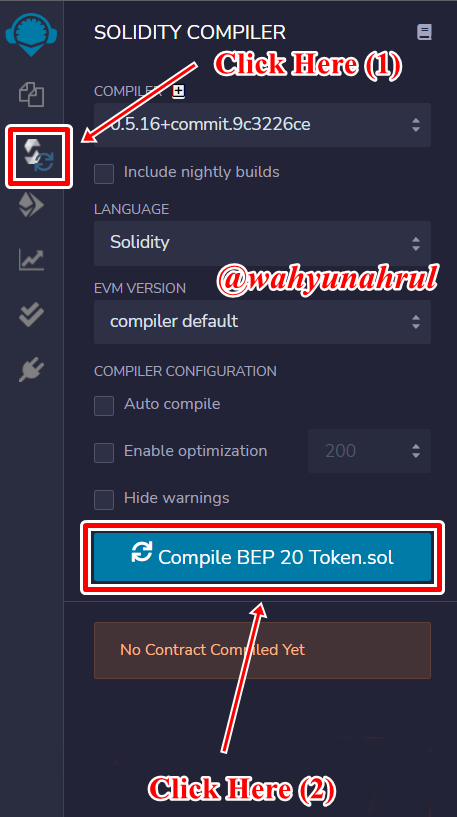
Once we're done tuning all of those parts, we'll be complicating the tokens. The first step is to select the Compiler icon on the left of the page and then click on the "Compile BEP 20 Token.sol" button.
Step 9
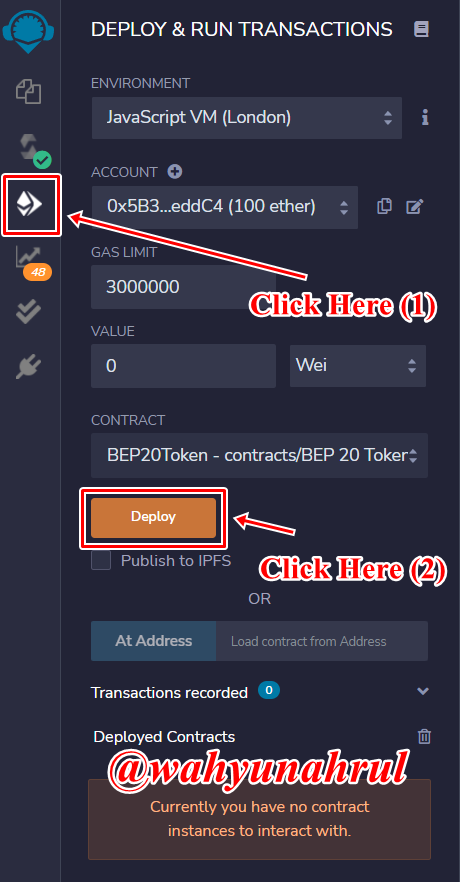
After the token complication process is successful, we will click on the Deploy and Run Transactions icon under the Compiler icon and then click on the "Deploy" button.
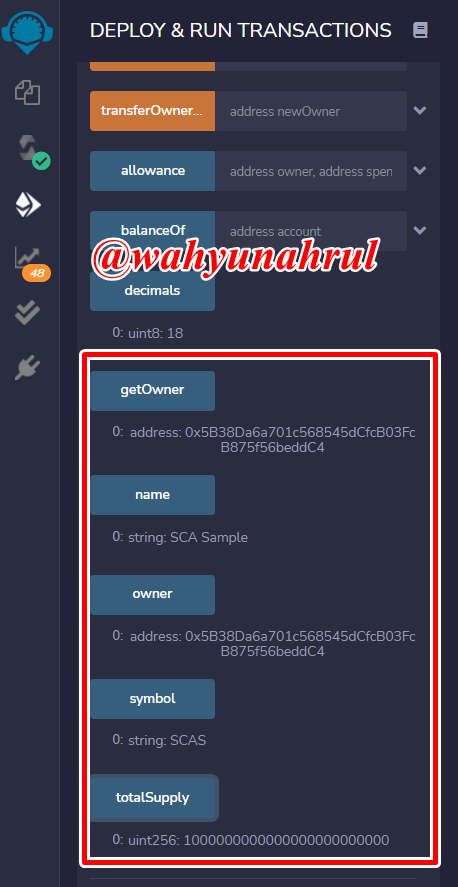
Step 10
After the entire process has been completed and successful, we can see the details of the Crypto Token that we have created in the window on the left of the page. This window shows details such as Token Owner, Token Symbol, Total Supply, etc.
Adding The Generated Token To The MetaMask Wallet
After we have successfully created a Crypto Token, the next step is to import the Crypto Token into our wallet which in this example I will enter the Crypto Token that I have created into my MetaMask wallet.
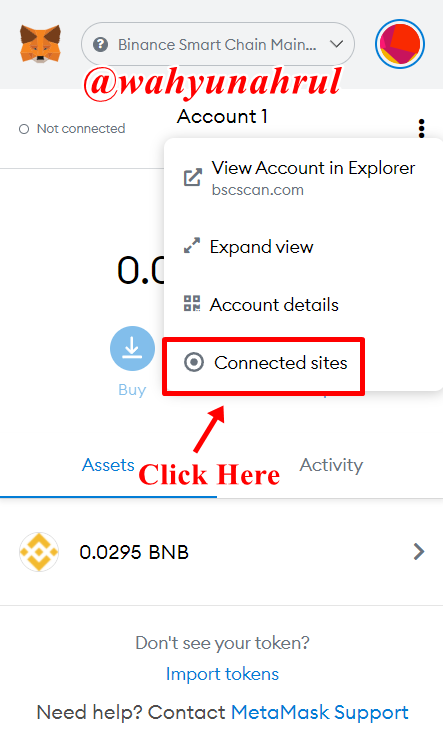
Step 1
The first step is that we have to connect our wallet first with the web page of the Remix IDE. The trick is to open the MetaMask Wallet then click the three-dot icon and select "Connected sites".
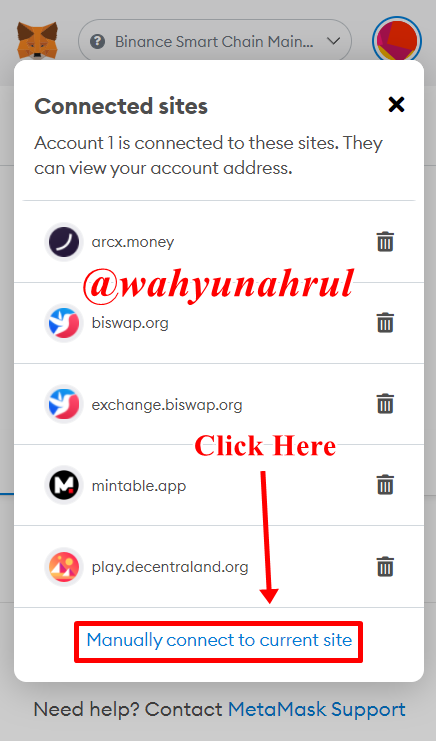
Step 2
In the pop-up that appears, click on the "Manually connect to current site" button at the bottom of the pop-up.

Step 3
Then a notification will appear to connect our wallet account with Remix IDE, click on the "Next" button to continue the connecting process.
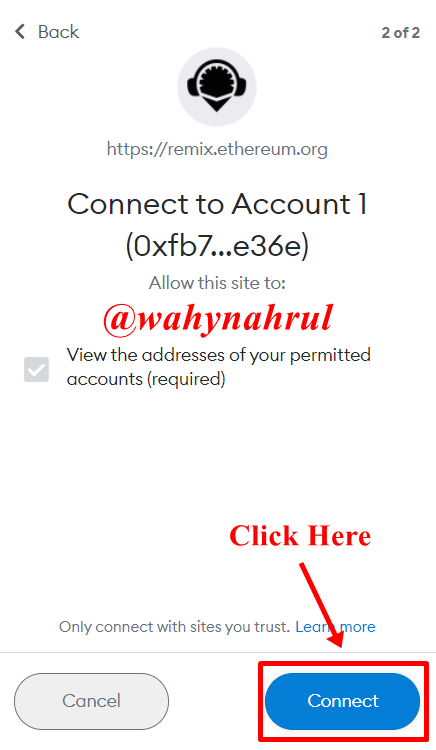
Step 4
Then a notification will appear again containing a request for permission from the Remix IDE. Click "Connect" to continue the process.
Step 5
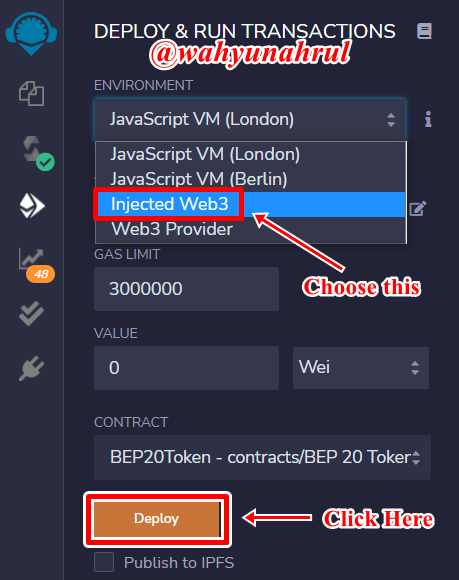
After the wallet has been connected to the Remix IDE, now we will carry out the process of sending Crypto Tokens to the wallet that we have, so that the ownership rights of all Crypto Tokens will be held by us. The trick is to select "Injected Web3" in the options in the Environment menu. Then click the "Deploy" button.
Step 6
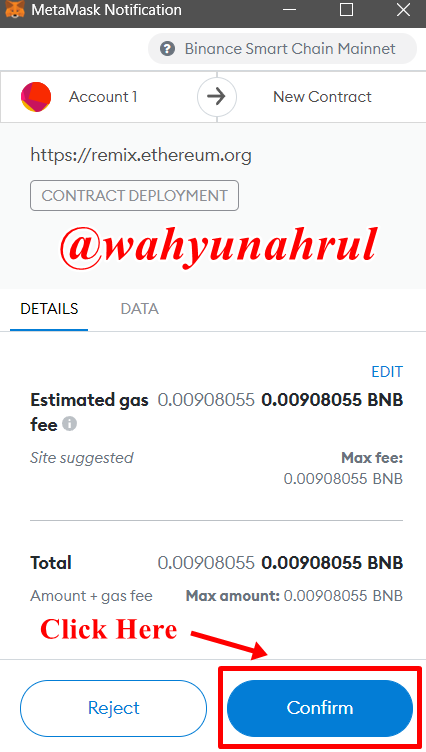
A notification will appear from MetaMask informing us that the Token delivery process will be carried out and we will be charged a gas fee of 0.00908055 BNB so that this transaction process can be carried out.
Step 7
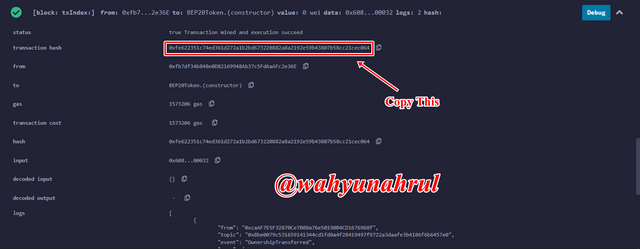
After the transaction process is successful, a notification will appear at the bottom of the Remix IDE window informing us that the Crypto Token we created has been successfully sent to our MetaMask Wallet. To see the details, we can click the arrow to the right of the notification.

Step 8
Next, we will import the Crypto Token that we created earlier into MetaMask so we can use it as we like. The trick is that we have to enter the contract address of the Token into MetaMask, to get the contract address we just need to copy the hash code in the notification from Remix IDE.
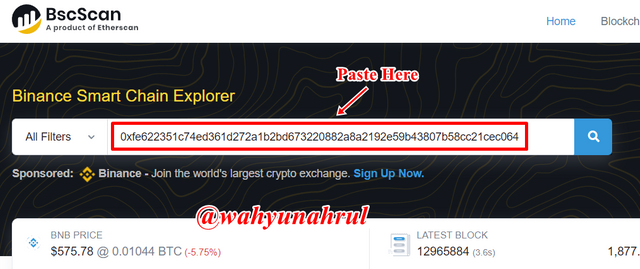
Step 9
Go to the BscScan web page and paste the hash into the search field.
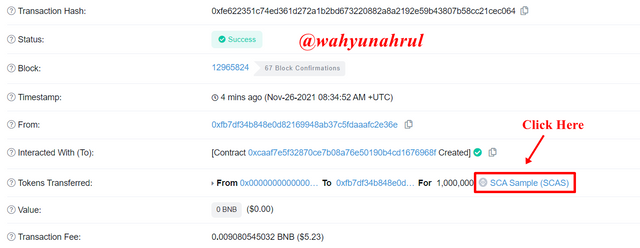
Step 10
We will be taken to the transaction details page that we have done previously. Click on the token name that we created earlier which is on the Token Transferred line.
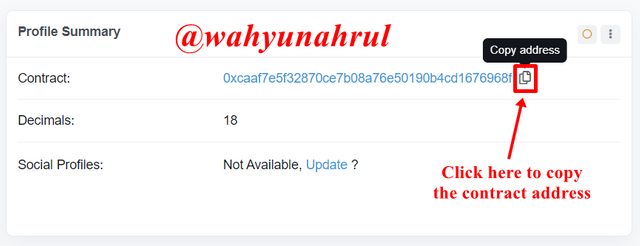
Step 11
In the Profile Summary menu, copy the contract address by pressing the icon at the end of the contract address.
Step 12
Open the MetaMask wallet, then select the "Import Wallet" menu in the middle on the wallet home page.
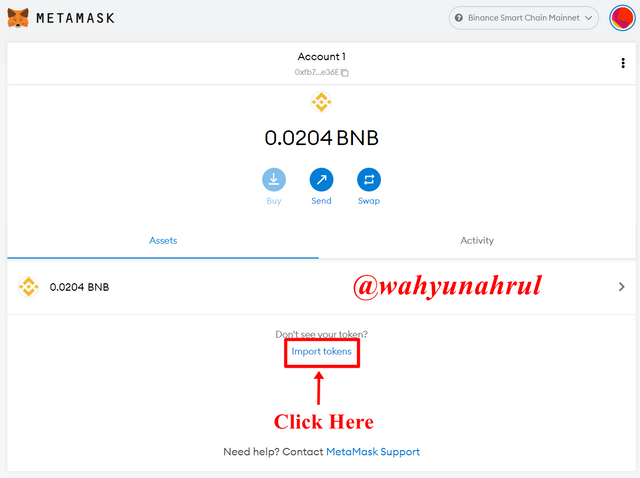
Step 13
Enter the address of the contract that was copied earlier in the first column, then click the "Add Custom Token" button.
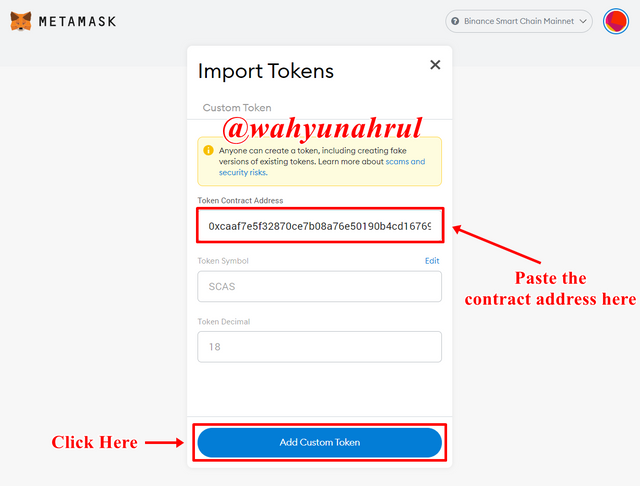
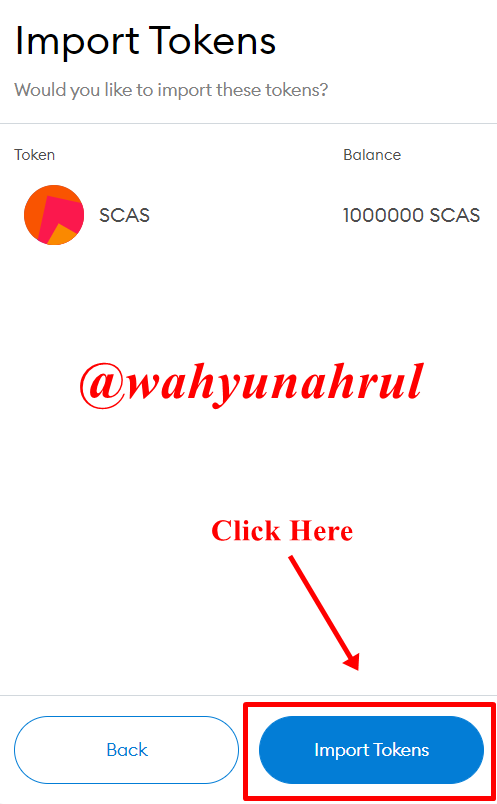
Step 14
A notification will appear that will show the details of the Token that we will enter into our wallet, click on the "Import Tokens" button to continue the token import process.
Step 15
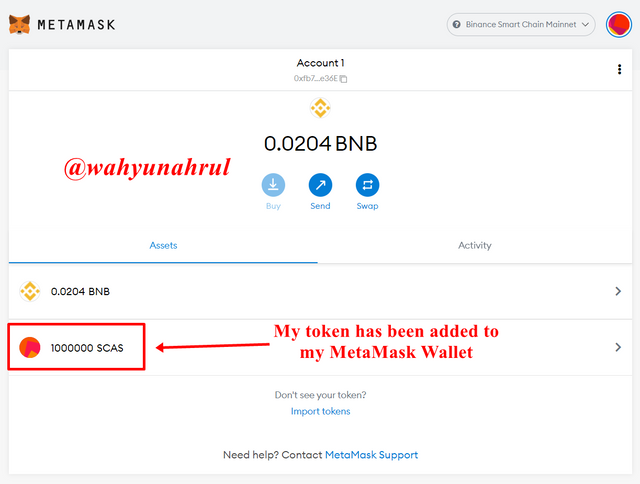
And done!
We can see that the SCA Sample Token that I created has successfully entered my wallet and can be seen on my wallet page.
Transaction Verification and Others Via Block Explorer
The transaction process that I did on Remix IDE was recorded on the Binance Smart Chain network so that we can see all the details of the transaction process through the BscScan website.
In the picture below, we can see the hash of the transaction that I did on the Remix IDE earlier
- Hash: 0xfe622351c74ed361d272a1b2bd673220882a8a2192e59b43807b58cc21cec064.

And based on data from BscScan the process was successfully carried out where the transaction made was the delivery of Token SCA Sample (SCAS) of 1,000,000 SCAS.
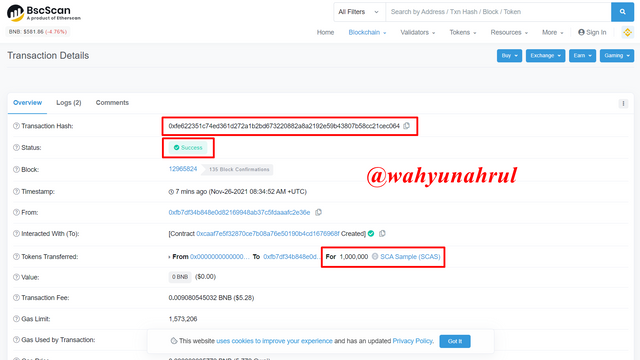
Then the data obtained from Remix IDE is the transfer of SCAS Tokens carried out by 2 wallets, namely:
- Sender: 0x0000000000000000000000000000000000000
- Recipients: 0xfb7df34b848e0D82169948Ab37c5FdAaAFc2e36E
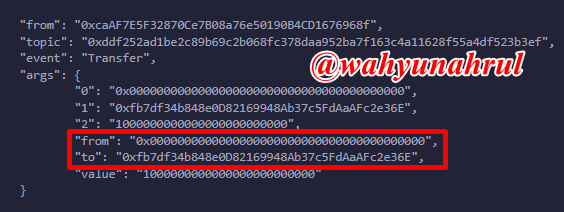
And this can be verified by looking at the sender and recipient data in the BscScan that matches the ones in the Remix IDE.

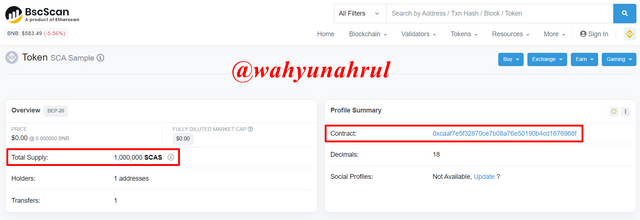
Then in the detail section of the SCA Sample Token in BscScan it is also shown that the total amount of supply made is only 1,000,000 SCAS with the contract address: 0xcaaf7e5f32870ce7b08a76e50190b4cd1676968f.
And lastly, based on data from BscScan, currently there is only 1 wallet that has 100% of the total supply of SCAS Tokens, which is my wallet.

Last Word (Conclusion)
Making Crypto Tokens is a very unique and interesting thing to learn, I am very happy that professor @reddileep brought this very unique topic into one of his topics. I think knowing this all members of the SCA community will be more competent in the blockchain and cryptocurrency field. And from this topic I just found out that making a Crypto Token is not a difficult thing, anyone can make it if he wants to study it seriously.
Those are some of my explanations regarding how to create a Crypto Token, I apologize if there are still many mistakes that you can get when reading my explanation earlier, I would be very grateful if you told me in the comments column below.
Thank you for reading my blog, hope it will be useful for all of you. 😁