How to list your own Token on a Public Exchange - Steemit Crypto Academy | S5W4 - Homework Post for @reddileep
Hello Everyone,
After a wonderful lecture on "How to Create Your Own Crypto Token", we are right back with an extension to the same topic. This week, we are going to list the token we have created previously in a Public Exchange. Let's dive into the homework given.

Define your idea of listing a Crypto token in a public Crypto Exchange and what its significance is

From the last lecture, we saw how easily one could deploy a crypto token. There I have created SriLanka Coin (SLC) token and moved 1000000 SLC to my Metamask wallet. But this token has no value, nor it has any public attention to invest and increase its monetary value.
Without any monetary value, this token is non-tradable and useless. This is where it is important to list any token to the public crypto exchange. The exchanger can put this token to the market and give exposure to their users and according to the demand, buyers and sellers will determine the value of the token.
The choice for an exchange is vast. In the market, we have centralized & decentralized exchangers. Both have different requirements from the token issuer. As of this writing, CoinmarketCap has listed 310 Centralized Cryptocurrency Exchanges.
As an issuer, I can choose my token to be listed on centralized exchanges such as Binance, Coinbase, FTX, Kraken and many more. However, choosing a centralized exchange is typically a long and costly process.
If we take Binance as an example, their requirement over the project is quite a high standard. They will take a manual review on project itself, looking into several specifications such as the management team, white-paper with tokenomics, security of the platform, legal & jurisdiction. The Binance CEO has tweeted below to express their view on this matter, link to the tweet
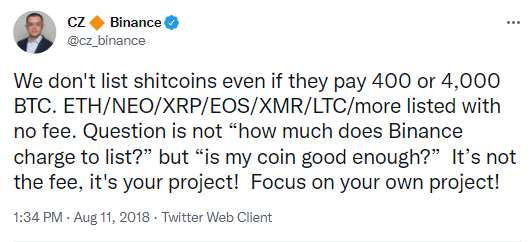
With this statement, you can see that there is no particular fixed fee on Binance to list the tokens. It will all depend on the negotiations by the issuer and Binance management. However, Binance has pledged all these fees to a charity.
The other way is to go for decentralized exchange (DEX). Since it is decentralized, there is no such negotiation or processes which overseen by a company or entity. As of this writing, CoinmarketCap has listed 133 Decentralized Cryptocurrency Exchanges. The most popular ones to choose would be, Uniswap, Pancakeswap, Sushiswap & Raydium according to the blockchain and platform we use.
The cost of listing on these exchanges is almost none except some gas fees. Also, the process is quite simple compared to the centralized exchange. The considerable thing here is the ability to provide liquidity to our token. Without liquidity, the price of our token will have no value and will not attract any demand from the market.
Popular decentralized exchanges image source
Summarizing the significance of listing a token,
◾ The exposure from the trading market will be directed to the project and token. This could be a potential for a new market thereby increasing the value of the token.
◾ The ability to buy, sell and exchange will allow exchange users to trade or swap the token.
◾ The security of the project is somewhat guaranteed when it's listed on a centralized exchange.
Demonstrate how to prepare everything needed to list your newly created Crypto Token in a public exchange such as selecting an exchange and adding a few BNB coins to your MetaMask wallet to accomplish the gas fee.
◾ The first and foremost thing we need is Our own token, in this case I have created SLC thanks to the previous lecture.
The contract address of my token is,
The contract address can be obtained through the hash key when creating the token and searched the same from https://bscscan.com. Otherwise the contract address is available on the transaction activity of the Metamask wallet as well.
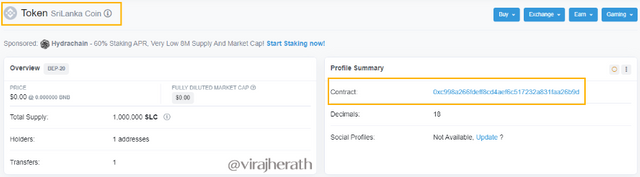
Contract address found through https://bscscan.com
◾ The next important thing we need is that the Metamask wallet. I'm using the Metamask wallet because I imported all the tokens to Metamask. In the next step I'm going to connect my wallet to the selected exchange and list my token in it. To do that I should have a small amount of BNB deposit for the gas fee.
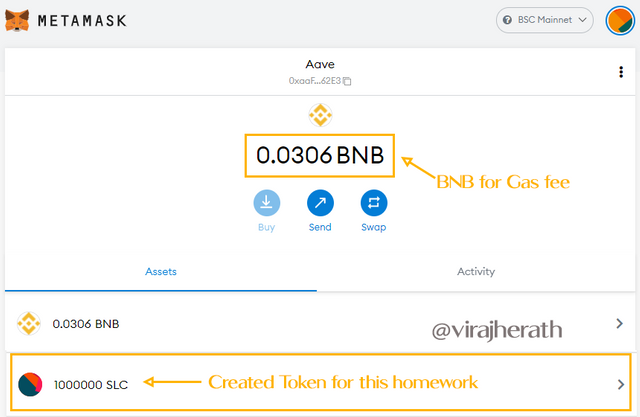
Metamask wallet: BNB balance & the token created
◾ And the last thing we need for this step is good decentralized exchange. I've selected PancakeSwap to proceed. PancakeSwap is one of the easiest to use exchange which supports BEP20 token.
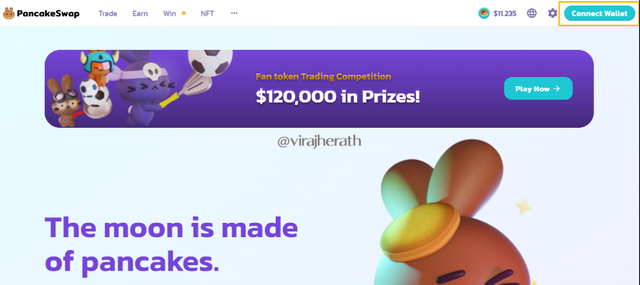
PancakeSwap Landing page
This is the landing page of the PancakeSwap. You can easily use this link to https://pancakeswap.finance/ find it. On the right top corner we have a tab to "Connect Wallet".
The next process will be elaborated in the next question.
Demonstrate all the steps of listing your own Crypto Token in a Public Crypto Exchange. (Screenshots required)
Continuing from the previous figure, once "Connect Wallet" is clicked, there is a pop-up to choose the wallet. I'm going to select Metamask. (make sure that you have signed in first to the wallet).

PancakeSwap: Connecting wallet
Once the wallet is connected, there will be a message saying that "Connected with (Wallet Address)"
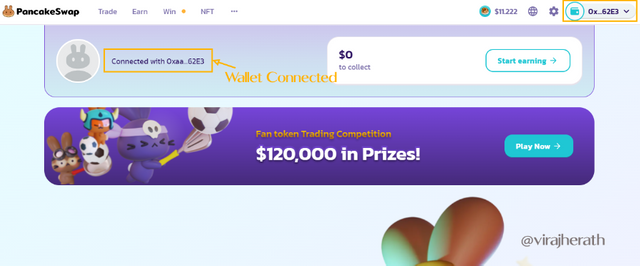
PancakeSwap: Wallet Connected
In the next step I will go to the "Trade" tab and select "Exchange" from there,
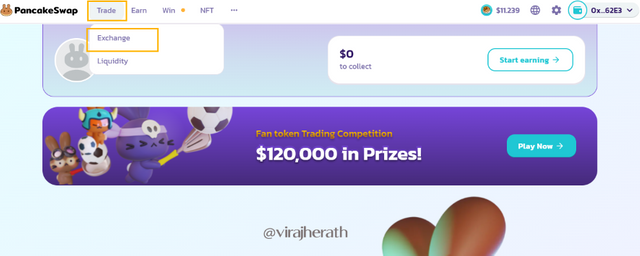
PancakeSwap: Exchange
The exchange will have an option to "Swap". As a default I can see BNB to Cake swap, however I can change either of them by just clicking on top of each. Here I'm going to click on top of Cake to proceed.
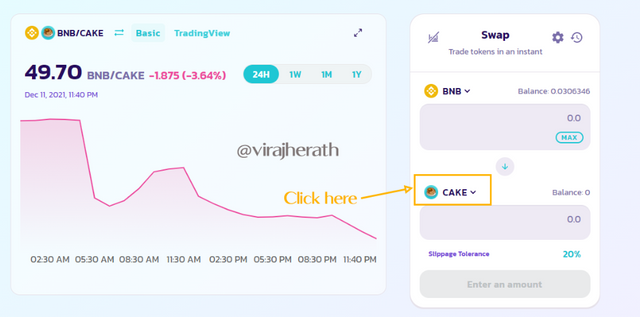
PancakeSwap: Swap
Then I can see my asset list as well as search bar to enter address, here I'm going to paste my SLC token contract address.
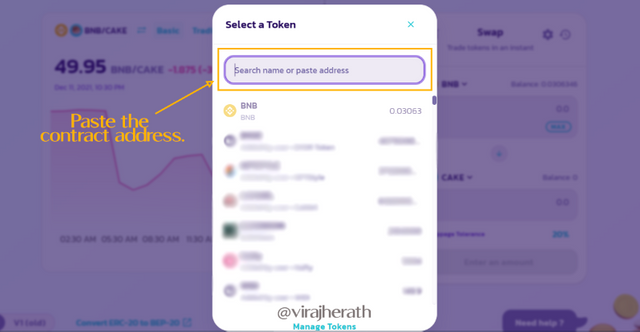
PancakeSwap: Insert contract address.
The contract address will automatically pick the token within a few seconds. Then I can "Import" the token to proceed.
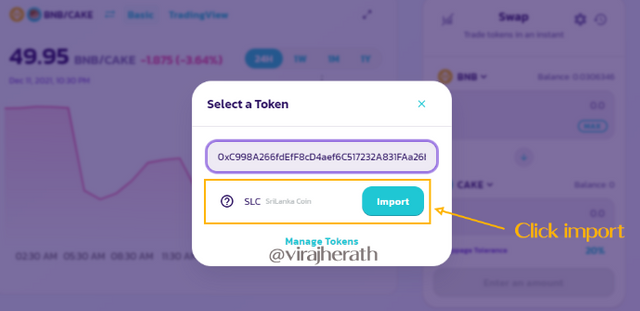
PancakeSwap: Import Token
Since, this coin has no source PancakeSwap will warn the user about the risk involvement. If I know the source and the project I can simply click the check box of "I understand" and proceed with "Import"
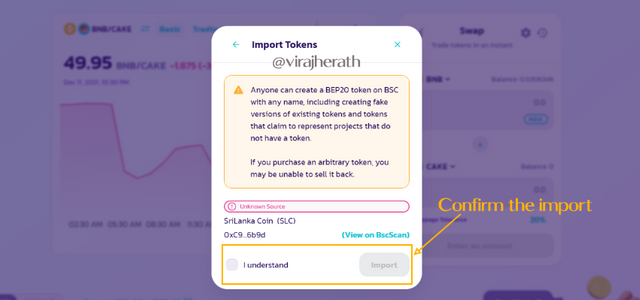
PancakeSwap: Confirmation to import
In the final step I can see the SLC token has listed in the swap window. Since, there is no value, there is no price action to show on the trading chart.
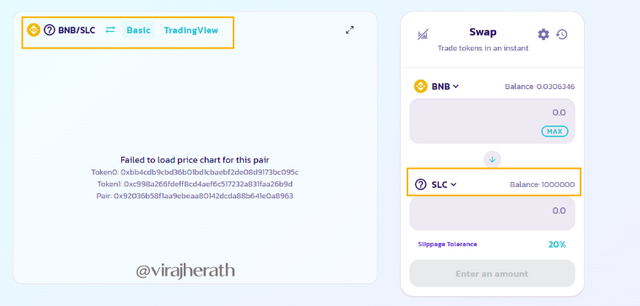
SLC token listed on PancakeSwap
Demonstrate all the steps to bring half of your newly created Crypto Token into a Public Exchange
Now that the SLC token is listed we have the ability to send the required amount of token to the Public Exchange. In this homework I'm going to send half the coin which is 500,000 SLC. Note that since I haven't added any liquidity to this token even after we listed in the exchange it will not have any value nor have trading capability. Let's go one by one step to demonstrate the process.
First, I have selected SLC coin form the Metamask wallet and chose "Send"
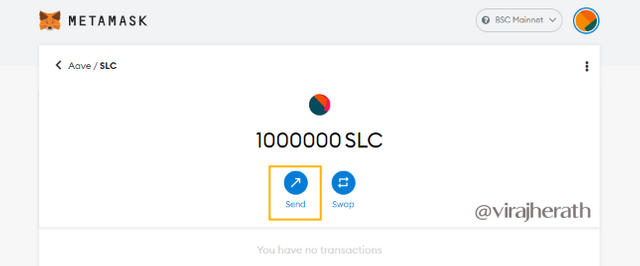
Metamask: Sending Token
In the next window I have a search bar to insert my contract address.
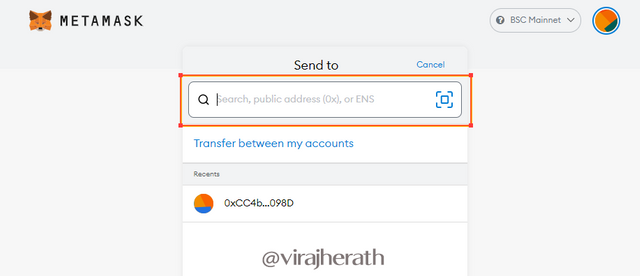
Metamask: Adding contract address
Once, I have pasted my token's contract address, the window will automatically show the transaction details. Here I can see that the Estimated gas fee and the total amount worth in dollars. The estimation is just $0.22 cents because 500,000 SLC is worth nothing at this moment.
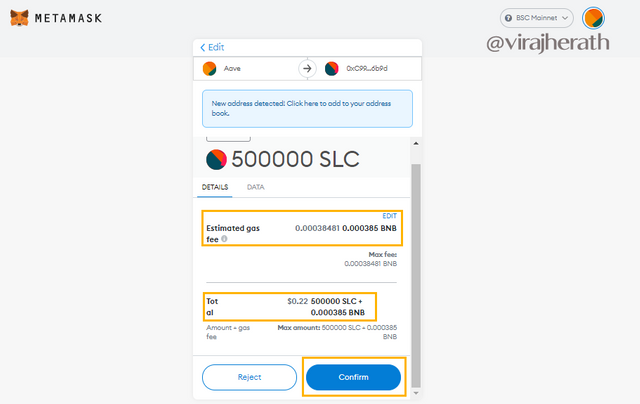
Metamask: Transaction confirmation
Transaction was successful and below you can see the Activity log. Further details can be investigate through the Transaction Hash as well.
Transaction Hash:
0xada2fd56a1771a4218089ff70869caec4e9a943fcd2395bd5dc174f16d2e5865Transaction Fee: 0.00025654 BNB ($0.14)
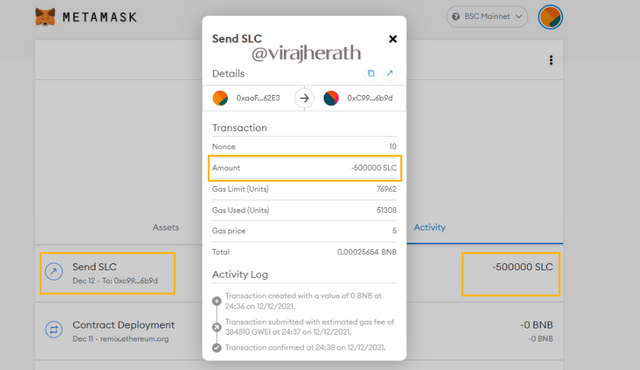
Metamask: Transaction successful
Withdraw some of your own crypto Tokens into any other wallet such as Trust Wallet and MetaMask wallet.
To demonstrate this task I'm going to use my Trust Wallet on the phone. Since this token is new I must add this token to the wallet first. In order to do that I tap on "Setting" key on the top right corner and tap the "Add Custom Token". Then in the fields I have to input the token details such as contract address, name, symbol & decimals.
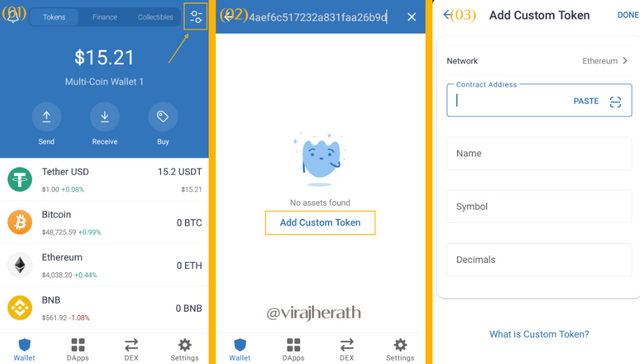
Adding the token to Trust wallet
Here in the 4th screen you can see that I have filled the fields with the token details and more importantly I have changed the network to Smart Chain. After I have tapped "Done" I moved to the 5th screen with the token I added "SLC". There I have clicked the "Receive" in order to get the receiving address. From the 6th screen I have copied the deposit address.
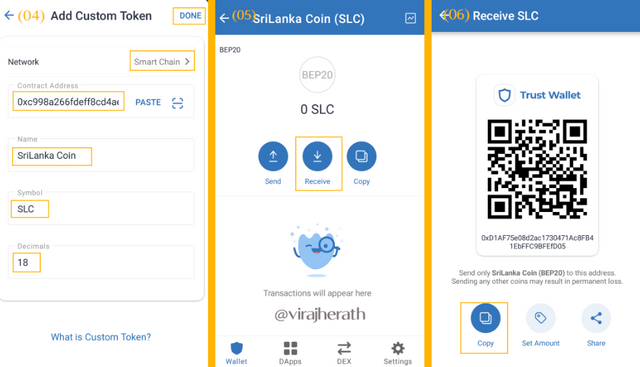
SLC token added to the Trust Wallet
Now that the token was added to the Trust wallet, I moved to the Metamask to deposit the SLC. I clicked the SLC from my asset list and tap "Send". Then I have pasted the deposit address which I copied from the Trust wallet in the previous step. I entered the amount as 250,000 SLC and confirmed the transaction tapping on "Next"
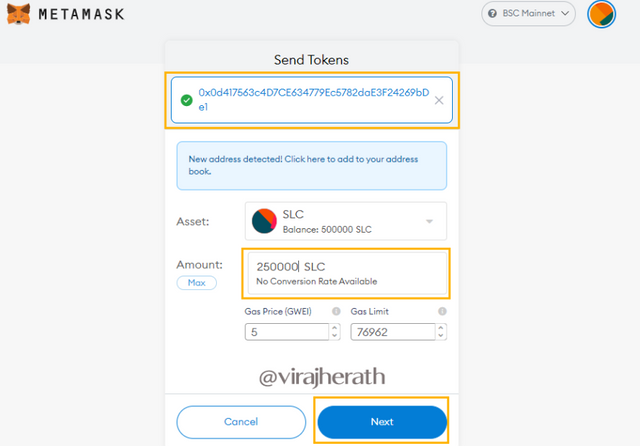
Sending SLC from MetaMask to Trust Wallet
As a final step, I have to confirm the details of the transaction. The estimated gas fee for the transaction was 0.000385 BNB which is equitant to $0.22/-
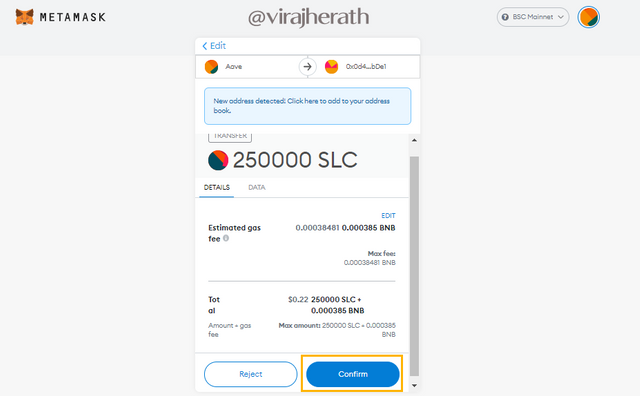
Confirmation to send SLP
Transaction was successful and below you can see the Activity log. Further details can be investigate through the Transaction Hash as well.
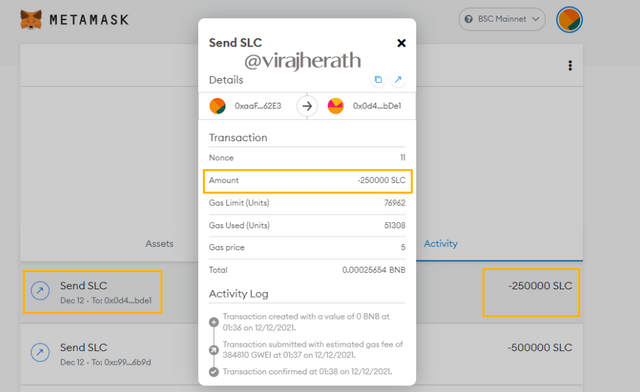
Transaction Confirmation
Transaction Hash:
0x9d9e5d95ed4a3d72b1fd70ab12ee23385f5ed2b4a60a96daacabde9f6ebd6a4d
Transaction Fee: 0.00025654 BNB ($0.14)
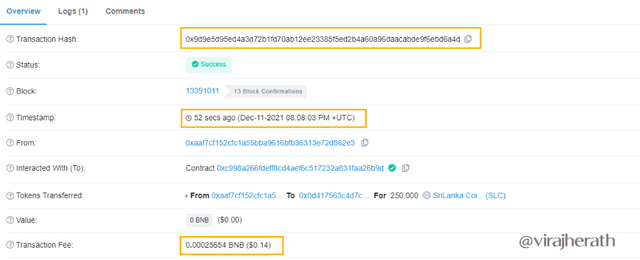
Transaction Confirmation: bscscan.com
Conclusion
Before this lecture and the previous week's lecture, I thought creating our own token is a hectic process which involves a lot of coding knowledge and time. However, I'm amazed to see how easy the whole process is. Continuing the last week, in this lesson, I was able to list my SLC token to decentralized exchange "Pancakeswap". There I have learned the difference between the CEX and DEX. Further, I was able to deposit my token to Pancakeswap & Trust wallet as a task.
A huge thank should go to prof @reddileep for this amazing lessons.