How to Create Your Own Crypto Token ]-Steemit Crypto Academy | S5W2 | Homework Post for @reddileep

Question (1)
Introduce how to create your own Cryptocurrency by differentiating between token and coin
Cryptocurrency is a digital currency, which means that it can be created digitally with the help of a computer and the internet. Over the years there have been different cryptocurrencies have been created and there are processes to their development that most crypto enthusiasts do not know.
Before the creation or development of a cryptocurrency, a lot of things would come into question which could be.
- What type of cryptocurrency?
- Would it be built on an existing Blockchain or Would a Blockchain be specifically be built for its use?
- Will it be a Token or a Coin?
- What type of Tecknomics technology should it have?
- What problem is the Coin or Token trying to solve in the Crypto-ecosystem?
All these questions listed above are what a Coin or Token creator or developer should consider before delving into the creation of a Cryptocurrency.
What is the Difference Between a Coin and a Token
COIN
A Coin is a type of cryptocurrency that is designed for their Blockchain, this men that to create a coin is no easy task, because the creator has to be well equipped intellectually on how to create a Blockchain, or they have to hire a team competition with the ability to create a Blockchain. After the Blockchain is created the Coin is then created to serve as the native COin of the Blockchain, this means the gas or exchange fees in that Blockchain will have to be paid with the native token of the Blockchain.
Also, all transactional operations that are to be carried out on the Blockchain would have to be executed with the native coin of the Blockchain. Examples of these coins are Bitcoin(BTC), Ethereum(ETH), Solana(SOL), Polkadot(DOT), Binance(BNB).
TOKEN
A Token is a type of cryptocurrency that is built or created on an existing Blockchain, this means that a Token cannot be used for transactional operation on the Blockchain it was created, rather it will only be used for transactional or operational activities only on its platform. Tokens are mostly created for a project that has been built on a Blockchain, for example, the UNIswap DEX project or platform is built on the Ethereum Blockchain, but its Token called the UNI is only used for transactional activities only on its platform. Other examples of Tokens include; PanCakeSwap Token, SUN Token and MANA Token.
Major Difference Between Coin and Token
| COIN | TOKEN |
|---|---|
| Coins are Built for their won Blockchain and serve as its native Coin | Tokens are Built on already existing Blockchains |
| COins are Hard to create or develop because of their complex procedure and requirement | They are easy to create, so much that a beginner or novice who just happens to have little funds and the required procedures can create it. |
Question (2)
Demonstrate how to prepare everything needed to create a crypto token, such as making a wallet and adding a few coins to it to pay the gas fee. (Here you should deposit at least 15$ worth of BNB coins from your exchange wallet to the newly created wallet)
For This operation, I will be making use of the Binance Smart Chain. Also, I will be making use of the MetaMask Decentralized Exchange for this Token creation. The process will involve the creation of a wallet on the MetaMask and the Transaction of the required amount of BNB into the wallet.
MetaMask Wallet Creation
The creation of a MetaMask wallet involves various steps of which I will list below.
- The first step is to visit the MetaMask homepage. On the page, you will see the Download Tab in Blue colour, Click on it.
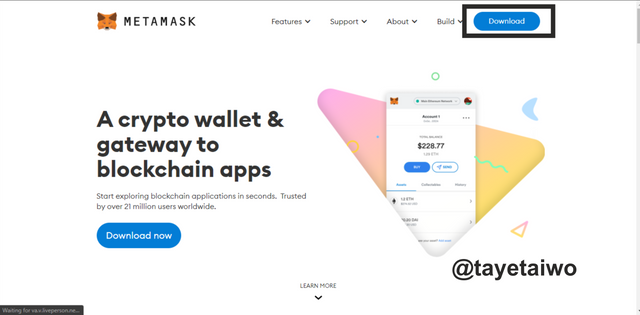
This Image was edited on Coreldraw.
- After you click on it you will be redirected to the installation page where you have to click on the Install MetaMask for Chrome Tab
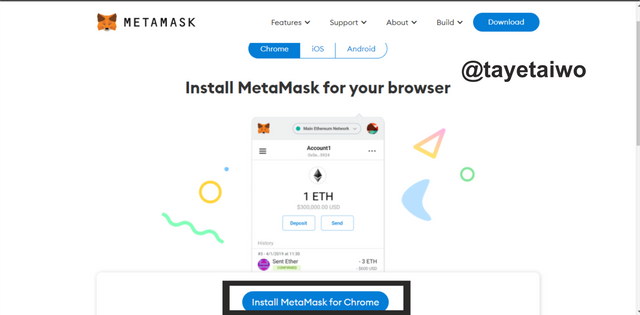
This Image was edited on Coreldraw.
- After Clicking on the Install MetaMask for Chrome Tab, you will be redirected to the Chrome Web Store, you will have to click on the Add To Chrome tab.
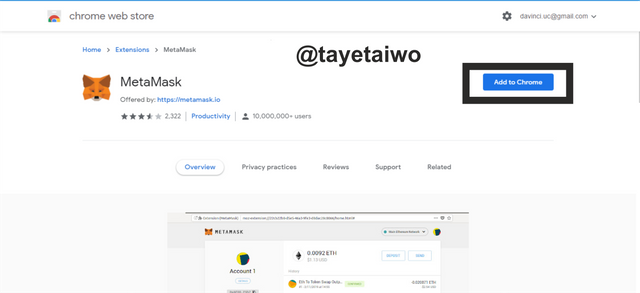
This Image was edited on Coreldraw.
- For the next step, click on Add Extenstion Tab which will pop-up after clicking on the Add To Chrome tab.
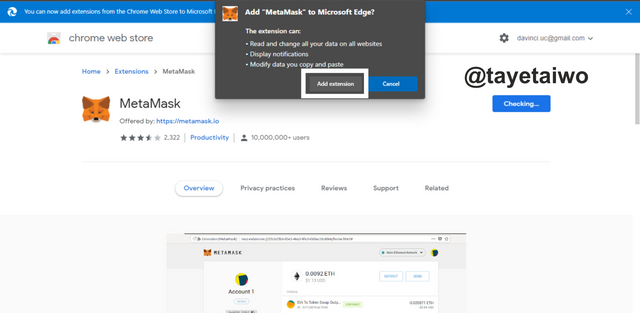
This Image was edited on Coreldraw.
The above illustration entails all the processes involved in the integration of the MetaMask wallet to Chrome.
- The next step is to create or add an already existing wallet and since I have none, I clicked on to get started to progress on to the wallet creation process.
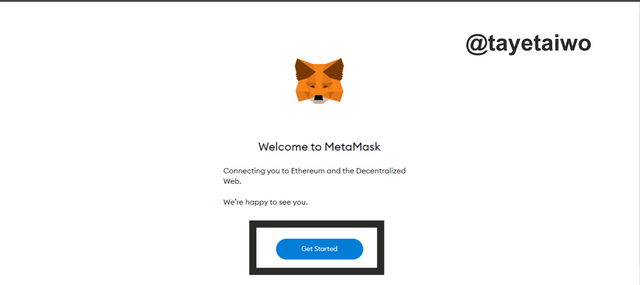
This Image was edited on Coreldraw.
- The next step is to click on the create wallet tab.
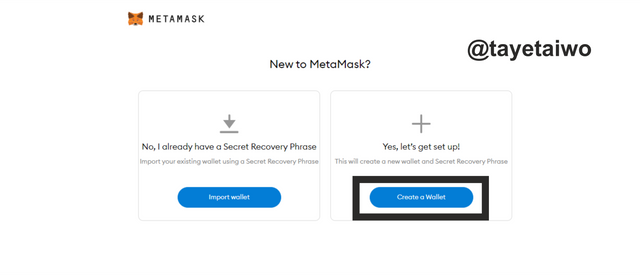
This Image was edited on Coreldraw.
- After clicking on the create wallet I was redirected to another page where I had to click on the I Agree tab, this shows that I have pledged to abide by the rule and also bear all the consequences of my actions.

This Image was edited on Coreldraw.
- The next step is to fill in the required password criteria for the platform, after which I will click on the Create Tab.
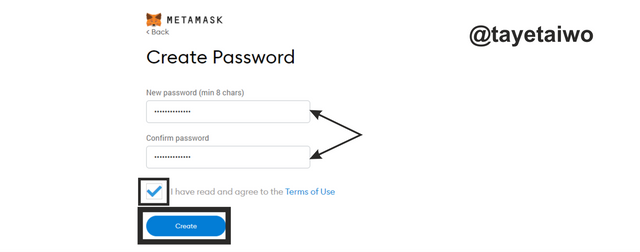
This Image was edited on Coreldraw.
- The next step is to backup the recovery phrase of the MetaMask, so I clicked the blurred space with the written word Click Here to Reveal Secret Words.
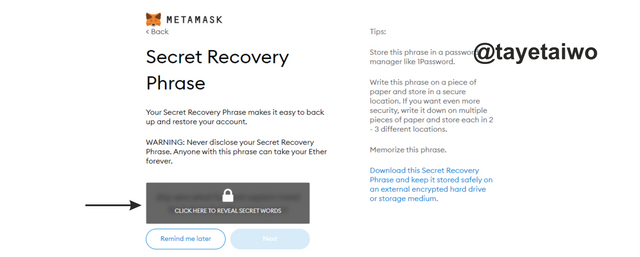
This Image was edited on Coreldraw.
- The next interface will show the hidden words which I will then copy and save in a secure place later.
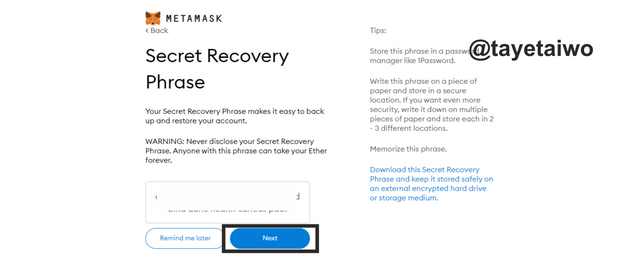
This Image was edited on Coreldraw.
- For this next step, I will be required to arrange the secret words accordingly into the box by clicking on them. After this, I will then click on the Confirm tab to proceed.
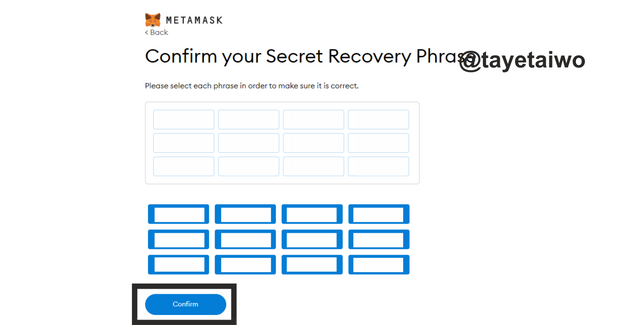
This Image was edited on Coreldraw.
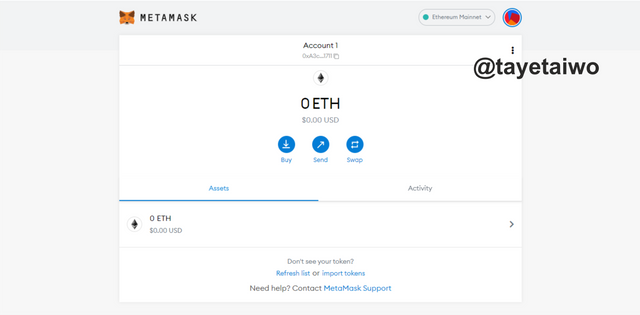
After clicking on proceed the next interface that will appear is new created wallet interface.
How to Add the Binance Smart Chain to the MetaMask Wallet
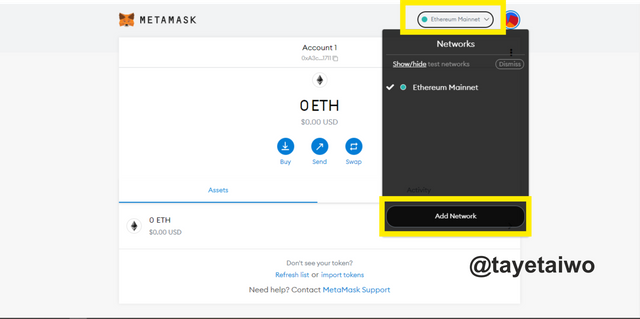
To begin this operation I clicked on the wallet Mainnet tab, This will bring out a dropbox which I will then click on Add Network.
- The next interface requires that I put the necessary information for the integration of the BSC Main Net to the MetaMask wallet. This information is stated below.
| BSC Main Net | BSC Details |
|---|---|
| Network Name | Binance Smart Chain Mainnet |
| New RPC URL | (I opt for https://bsc-dataseed.binance.org), https://bsc-dataseed1.ninicoin.io. or https://bsc.dataseed1.ninicoin.io. |
| Chain ID | 56. |
| Symbol | BNB. |
| Block Explorer | https://bscscan.com. |
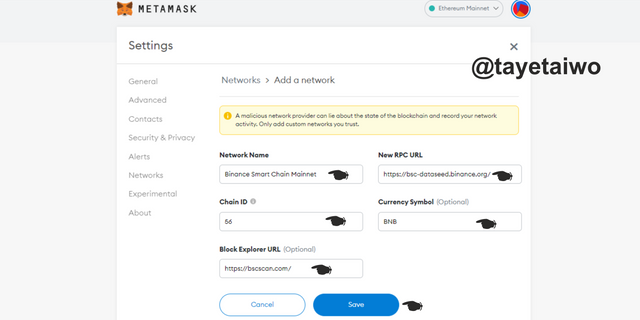
After putting in these details I then clicked on the Save tab. This will automatically add the BSC to the MetaMask wallet.

The next step is to fund the BSC account with some BSC coins. To do that I have to copy the account address identified in the above screenshot.
To make this deposit, I launched the Trust wallet application, where my BSC coins were kept, then I inserted the address in the required area and then approved the transaction for the BSC to be sent to my MetaMask BSC address.
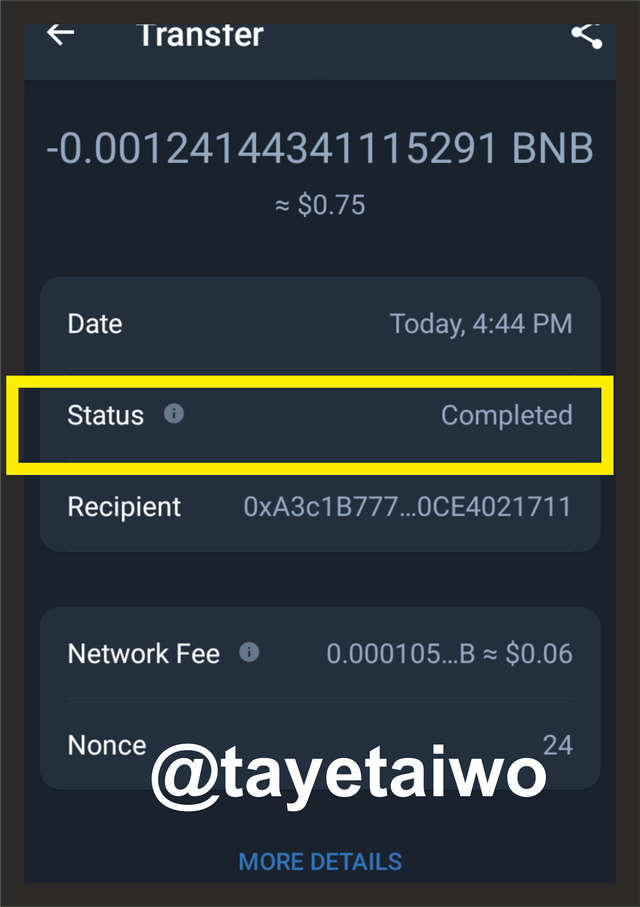
After I clicked on Confirm the transaction was then completed.
Transaction Hash: https://bscscan.com/tx/0x3d3ba7b7d33791001cd284acb7eb4696f6a6ae424ed5a9b26c01768c1d58698f
Note: PLease the above transaction was not up to the required amount for this task, this was as a result of me falling victim to a crypto scam while I was trying to transfer funds to the MetaMask wallet, during this process I lost $17 worth of BSC which was transferred to another address. This is the transaction Hash; https://bscscan.com/tx/0x0de0ee7c1eed8241f0b60f93b06251bf44f6cbffe40a0dc4e083f6bc1e6bc1ef, it also contains details of the scammer's activities.
Nevertheless, I went on to transfer what is left in my account to show proof that I was the one who carried out this transaction, also to prove that I now know how to send funds to a MetaMask wallet without falling victim to a scam.
Question (3)
Explain the Remix IDE and download the source code by showing each step
What is the Remix IDE
First, I will site the meaning of each of these words REMIX and IDE
- REMIX
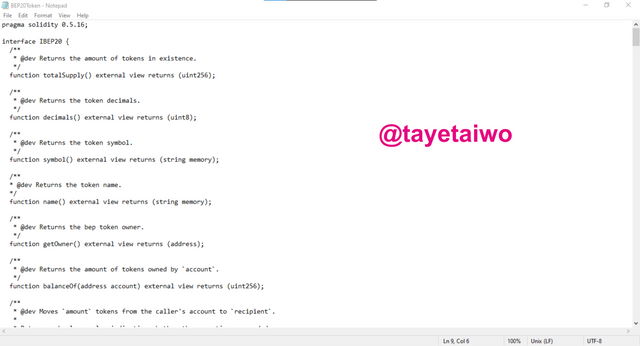
Remix is a Solidity IDE that’s used to write, compile and debug Solidity code. Solidity is a high-level, contract-oriented programming language for writing smart contracts. It was influenced by popular languages such as C++, Python and JavaScript.source
- IDE
IDE stands for Integrated Development Environment and is an application with a set of tools designed to help programmers execute different tasks related to software development such as writing, compiling, executing and debugging code.source
The Remix IDE is simply used for coding smart contracts that can be deployed on a blockchain, it is built on the Ethereum blockchain but it is also can be deplorable on the web. regardless of it is built on the Ethereum blockchain it can also work across chains that are similar to the Ethereum blockchain, eg, Binance Smart Chain.
How to download the source code
To download the source code involves various steps which I will explain below.
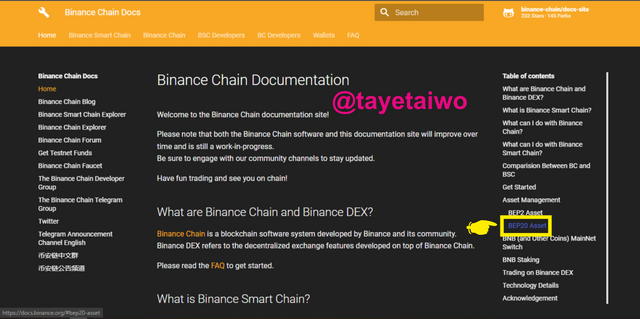
- First visit this page https://docs.binance.org/, this is the finance chain docs page, then click on the BEP20 Tab on the down right corner as indicated below.
This Image was edited on Coreldraw.
- The next step is to click on the Issue BEP20 tab on the next interface to give you details on the BEP20 tokens.
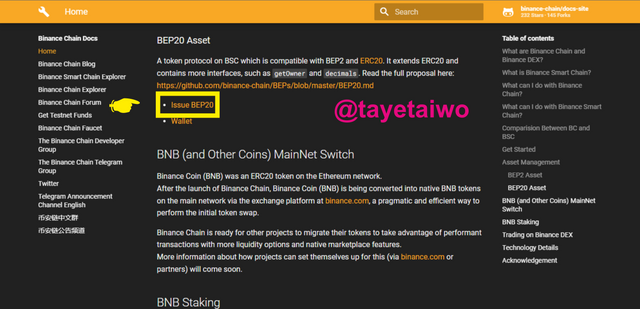
This Image was edited on Coreldraw.
- The next interface is where I have to find the Contract code in the BEP20 interface, then I have to click on the here link, after clicking on it the contract code was downloaded to my PC.
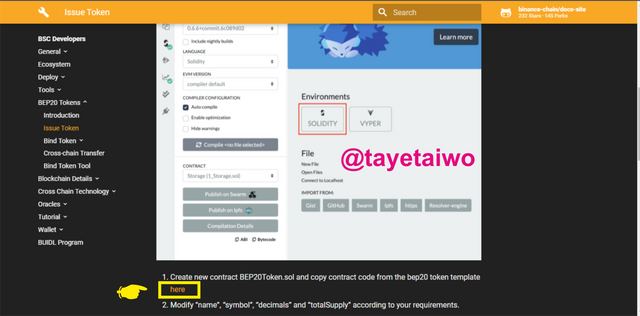
This Image was edited on Coreldraw.

Question (4)
Customize the source code according to your imagined future project. (In addition to simply stating the steps, you should provide a clear explanation about each customized code)
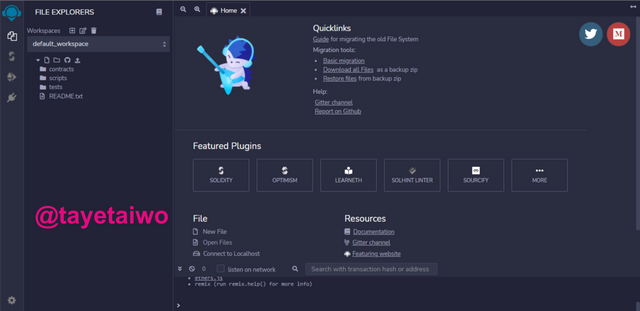
- For this Task I will have to visit the Remix IDE platform using this link https://remix.ethereum.org/. Below is its home page view.
- The next step is to right-click on the Contract tab and then click on the New File option.
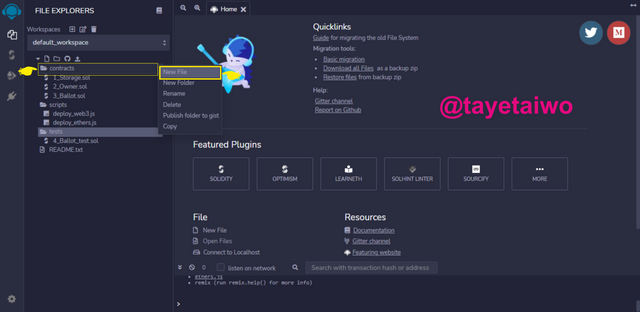
This Image was edited on Coreldraw.
- The next step was that I had to rename that New File to ** BEP20 Token.sol**

This Image was edited on Coreldraw.
- The next step was to open the already downloaded BEP20 Token Template with the Note-Pad application on my PC.
- The next step I took, was to copy the BEP20 Token Template and paste it into the New File created on the web Remix IDE, below is what it looks like.
This Image was edited on Coreldraw.
After Pasting the BEP20 Token Template, the next step is to alter some of the details to suit the type of project we have in mind to develop or already developed. For example, will be altering some of these details for the Token I will be creating:
- Name (Token's name)
Every Token created today in the crypto-ecosystem has a unique name assigned to it, for example, Ethereum, Ripple, Solana, therefore I will be assigning a name to the token I will be creating. - Symbol
All Tokens created also seem to have a unique symbol that is used to identify it, for example, Solana uses the SOL symbol while Ethereum uses the ETH symbol.
*Decimals
Decimals determine the number of fragments or denominations of a particular token that can be bought for example if a token has up to 15 decimals it means that a buyer can purchase up to its 15th decimal value.
*Total Supply
This is the total number of tokens that can be supplied or created at a specific period.
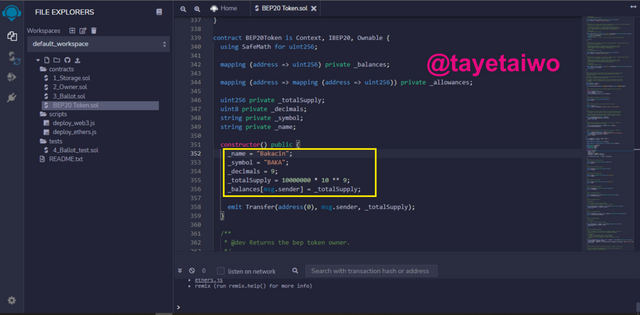
- The next step is to locate the code for altering these details explained above. The codes can be identified in line 351 directly under the constructor
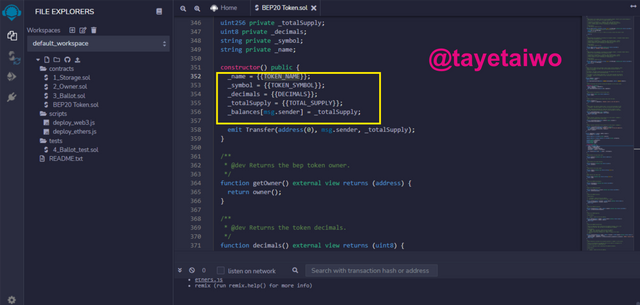
This Image was edited on Coreldraw.
The next step is to fill in the details which I want to alter in the code. Below are the details I used for this operation;
name: "Bakacin";
symbol: "BAKA";
decimals: 9;
totalSupply: 10000000 * 10 ** 19;
This Image was edited on Coreldraw.
- The next step after inputting the details is to click on the Solidity Compiler icon on the top left of the screen. After I clicked it, I then clicked on the Compile BEP20 Token.sol, just as indicated below in the screenshot.
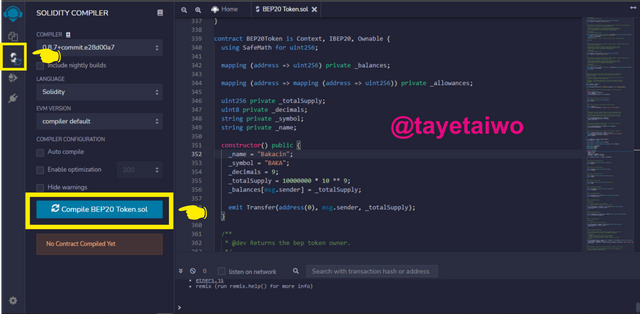
This Image was edited on Coreldraw.
- The next step is to deploy the contract. I executed this operation by going to the deploy and transaction interface by clicking on the icon, then I clicked on the Deploy tab.
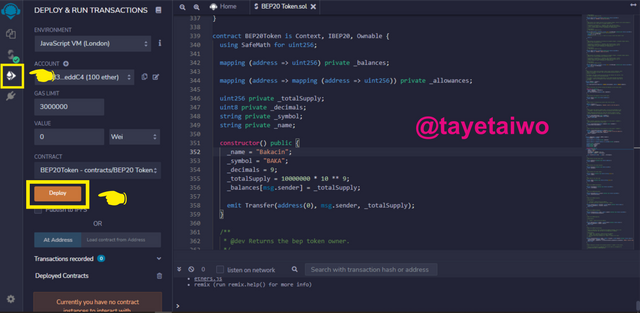
This Image was edited on Coreldraw.
- By clicking on the deploy tab the token was successfully deployed and I can see the token Name, Total Supply, Decimal, Owner address, e.t.c.
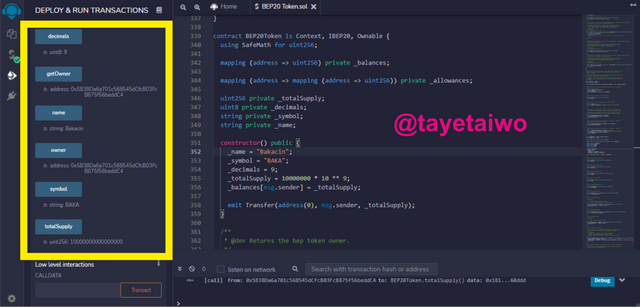
This Image was edited on Coreldraw.
Question (5)
Demonstrate all the steps to add your created crypto token into your any wallet such as Trust Wallet and MetaMask wallet. (Screenshots required)
For this task, I will be using the MetaMask wallet.
- The first step is to launch the MetaMask extension wallet on the chrome extension. Then click on the 3 dotted icons, this will pop up options which include connected sites, I will then click on this tab.
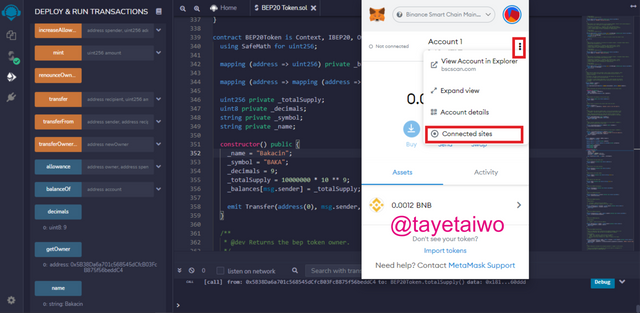
This Image was edited on Coreldraw.
- The next step is to click on the Manually connect to current site option.
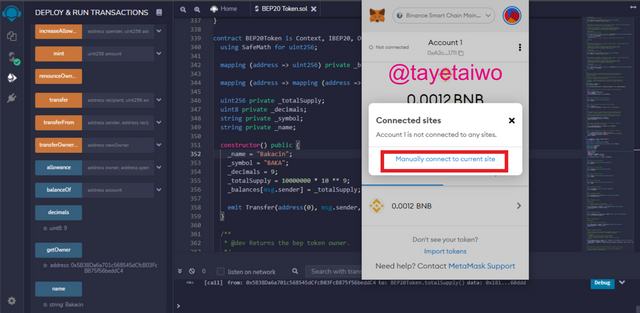
This Image was edited on Coreldraw.
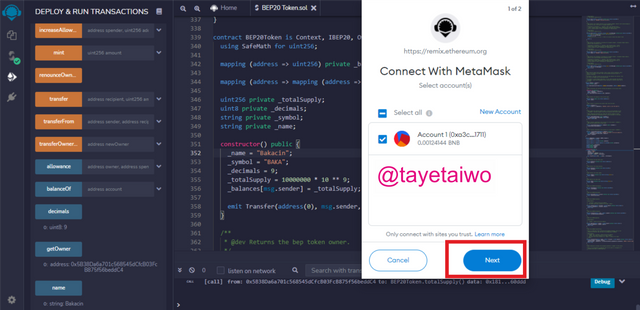
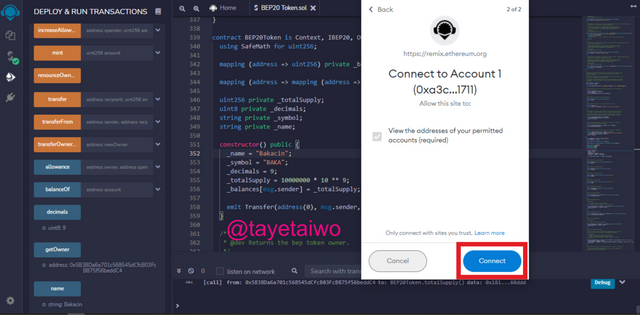
- After that I then clicked on the Next tab, after which I then clicked on the Connect tab to approve the connections.
This Image was edited on Coreldraw.
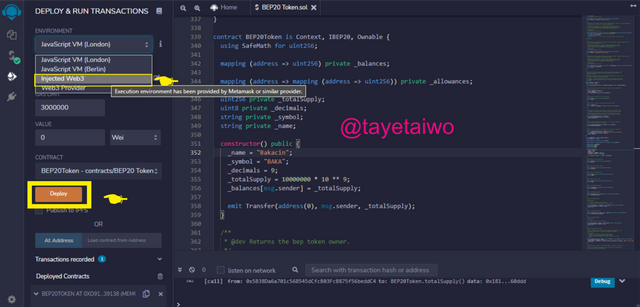
- The next step is to go to the REMIX IDE Environment section and choose the Injected Web3 option. After this, I then clicked on the Deploy tab.
This Image was edited on Coreldraw.
- After I clicked on the Deploy tab the MetaMask extension was activated again, With a request of 0.00786593 BNB as a gas fee for the deployment of the Token to my MetaMask wallet.
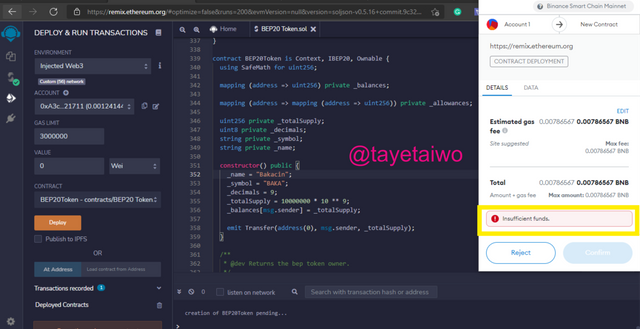
This Image was edited on Coreldraw.
Note: From the image above it is clear that I do not have sufficient funds to finalize this operation, because as stated earlier that I fell victim to scam activities thereby resulting in the loss of my BNB worth around $16.4.
Question (6)
Verify transactions and other details through the relevant Block Explorer. (Screenshots required)
Hello, @reddileep I was not able to completely answer the number 5 and 6 question because of loss and insufficient funds, please I hope that you can relate to my situation.
Conclusion
Coins and Tokens are relative in use but the major difference is that coins are built for their blockchains while Tokens are built on an already existing blockchain.
Over the years I also noticed that coins that have their blockchain tend to perform better than tokens built on already existing blockchains. The creation of the token on the Remix IDE platform was quite interesting, as soon as I acquire funds I will complete its deployment.
Thank you professor @reddileep for this enlightening lecture.