How to list your own Token on a Public Exchange ||Steemit Crypto Academy | S5W4 | Homework Post for @reddileep

The is again a very informative lecture that is full of practical knowledge of token listing. Like the previous lecture, this lecture is also very important regarding token creation and token listing on a public exchange. I have learned all the processes of token creation and listing in the public exchange process.

Define your idea of listing a Crypto token in a public Crypto Exchange and what its significance is.
When the token is created by someone then there are some functionalities and use-cases behind this token project. When someone wants to create a token then it is necessary to define the type of token that the token is either created for commercial purposes or for utility. When the new token is created then it is useless until it is will available for the general public for trading.
The process of tokens listed on both exchanges is different. If we want to list tokens on a centralized exchange is quite difficult. There are many formalities that are offered by centralized exchanges for listing the token. If we fulfill all the requirements of a centralized exchange, then we are able to list tokens on the particular exchange.

If we want to list token Binance exchange. Then we need to upload all the details about our token. It includes the **Project Name, Token Name, Token Symbol, and email address. Then click on the Next button and tick the check box and click next. In this way, our token creation application is submitted.

The team of Binance checks the project and token thoroughly. If we fulfill all the requirements then our token is listed on Binance.
But if we want to list our token on a decentralized exchange, then it is a very simple process. In decentralized exchanges, we do not need to put all the details and verifications. We can list tokens by just putting the essential information about tokens like project name, contact address, symbol, and supply.
We do not need to provide any other information about tokens. The token is listed without verification. Our token is meaning full when we provide liquidity to it. When it is available for the public then it becomes few worth otherwise it is worthless.

The significance of Listing Token on Public Exchange.
- When we list our token on a public exchange, then it is available to the public for trading.
- By listing a token on a public exchange, we can add value to the crypto token, the price token is creased as the demand of token is creased. It is possible after listing the token on an exchange.
- When we list tokens on the public exchange then it will increase the use-cases of the token as it expands between the public.
- The purpose of the token is achieved by listing the token on a public exchange for trading.
Simply, we can say that the token is only valuable when it is available to the general public for trading. It is worthless when it is not listed on any exchange. So, we want to increase the values of the token then, we should list the token on a public exchange.
Demonstrate how to prepare everything needed to list your newly created Crypto Token in a public exchange such as selecting an exchange and adding a few BNB coins to your Metamask wallet to accomplish the gas fee.
We listing the created token on the public exchange, we should have the contract address of the token. Next, we should have a few BNB in our Metamask wallet for paying a gas fee that is consumed, when we import our token on a public exchange.
1. Getting Contract Address
First, we need a contract to address our created token. If you save the contract address, then we can find the contract address by visiting the Metamask wallet. You need to do the following steps to get the contract address.
- Open the Metamask wallet.
- Click on the three-dot and then click on View Account in Explorer.

- Explorer shows all the transactions regarding our wallet. Click on the Contract creation transaction on the third number.

- In this figure you can see our token and contract address. Copy the address by clicking on the copy button.
Contract Address: 0x558fa979153110eEf1d6f201337d01EC50701fec
In this way, we can get our contract address.

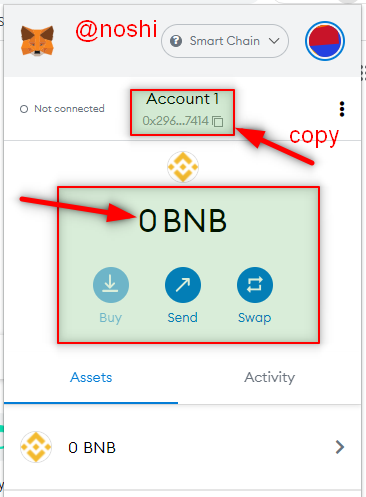
2. Depositing BNB token in Metamask Wallet
Secondly, we should have a few amounts of BNB in our Metamask wallet for paying a gas fee while importing for public exchange. I have participated in the previous class, but I withdraw the remaining BNB to my Binance wallet. Here again, I deposit BNB to Metamask wallet. You need to do the following steps.
- Go to the Metamask wallet and copy the BNB address.
Metamask Wallet ||Screenshot from Metamask Wallet - Next, go to your related exchange and select the BNB and then click on Withdraw.
- Next, the withdrawal window is shown, You need to pate the deposit address in number 2 and select the network BSC Binance Smart Chain (BEP20). Next, enter the amount of BNB that you have to withdraw.
- At the end Click on the Withdraw button.


||Screenshot Binance
In the following figure, you can see that our BNB was deposited successfully.

Demonstrate all the steps of listing your own Crypto Token in a Public Crypto Exchange. (Screenshots required)
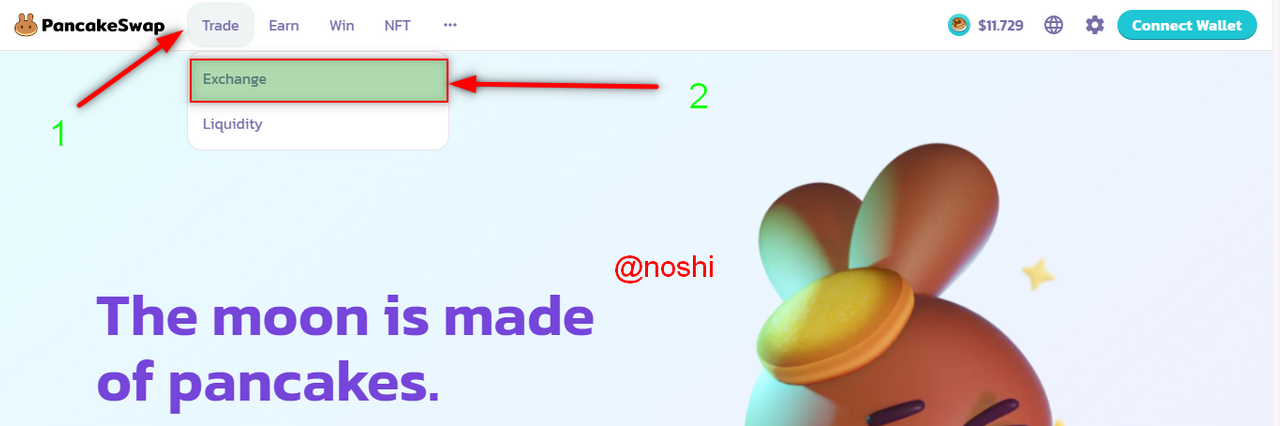
I chose PankcakeSwap exchange for listing our created token. For listing the token, you should complete the previous two steps. You can also list your token on PankcakeSwap by doing the following procedure.
- Visit the PankcakeSwap site.
- Click on the Trade at the top menu bar and then click on the Exchange button.
Screenshot PankcakeSwap
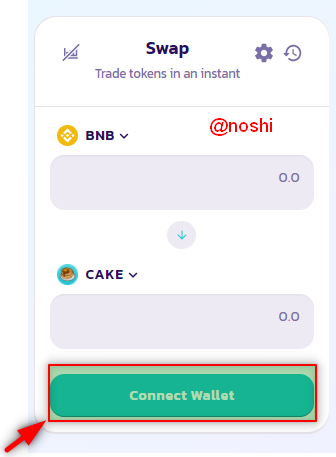
- You need to click on the Connect Wallet button.
- Then select the Metamask wallet.
|
Screenshot PankcakeSwap |
Screenshot PankcakeSwap |

- Metamask show pop-up message for accepting the connection request. Click on Next Button.
- Next, click the Connect Button.
|
|
|


Our wallet is connected successfully.
- After wallet connection, you need to click on the arrow button at the right of the CAKE token name.
- Then paste the Contract Address here and then click on the Import Button.
- Next, click on the check box (I understand) and then click on the Import button.
|
Screenshot PankcakeSwap |
Screenshot PankcakeSwap |


In this way, our token is imported into the public exchange.
Demonstrate all the steps to bring half of your newly created Crypto Token into a Public Exchange (In addition to simply stating the steps, you should provide a clear explanation about each step)
We can transfer our tokens on the public exchange. The process of transferring the token to public exchange is very easy. If we transfer our tokens to public exchange once, then we cannot get them back.
In this transfer, we again need a contracted address. We have to transfer our token to our contract address. So, to transfer the half of token, you need to do the following steps.
- Go to Metamask Wallet and Select our token that is CIF.
- Next Click on the Send Button.

- Paste the already copied Contract Address in the first text box.
- Next, Enter the amount of Token. I enter 500000 CIF which is half of the total.
- Then, click on the Next button.
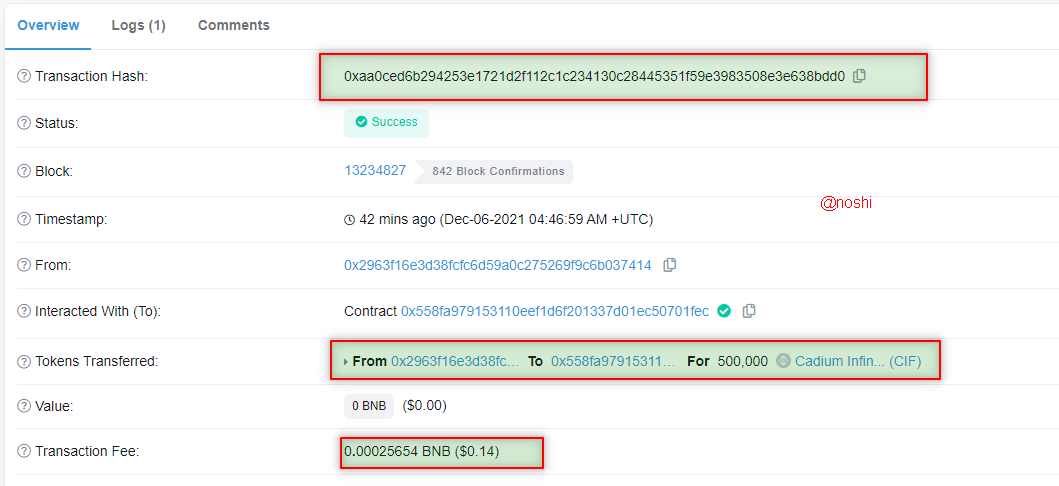
- Next, confirm the transaction by clicking on the Confirm button. Gas fee and amount token being transferred all that details are listed in this figure.
|
|
|


You can see that in the Metamask wallet Activity, half of my CIF tokens are sent to the PankcakeSwap public exchange.

Here in the following figure, you can see our token on PankcakeSwap that 50,0000. In this way, we can transfer our assets to the public exchange.

Screenshot PankcakeSwap
Here is my Transaction Hash:
0xaa0ced6b294253e1721d2f112c1c234130c28445351f59e3983508e3e638bdd0
Withdraw some of your own crypto Tokens into any other wallet such as Trust Wallet and Metamask wallet. (Confirm the transaction through the relevant Block Explorer)
I chose Trust Wallet to withdraw a few amounts of CIF tokens. First, you should have installed a Trust wallet. Then again, we need our contract address. To withdraw your token from the trust wallet, you need to do the following steps.
1. Adding Token to Trust Wallet
First, we need to install the Trust wallet and then create new wallet on trust wallet. For this purpose, you should go to google play store and search for Trust Wallet. Installed it and then open the Trust Wallet. Then click on Create new Wallet button. After the adding the details like name, password and phrases, my wallet is successfully created as you can see in the figure.

Screenshot from Trust Wallet

First, we need to add our token on Trust Wallet. For adding the token to the trust wallet, you need to do the following steps.
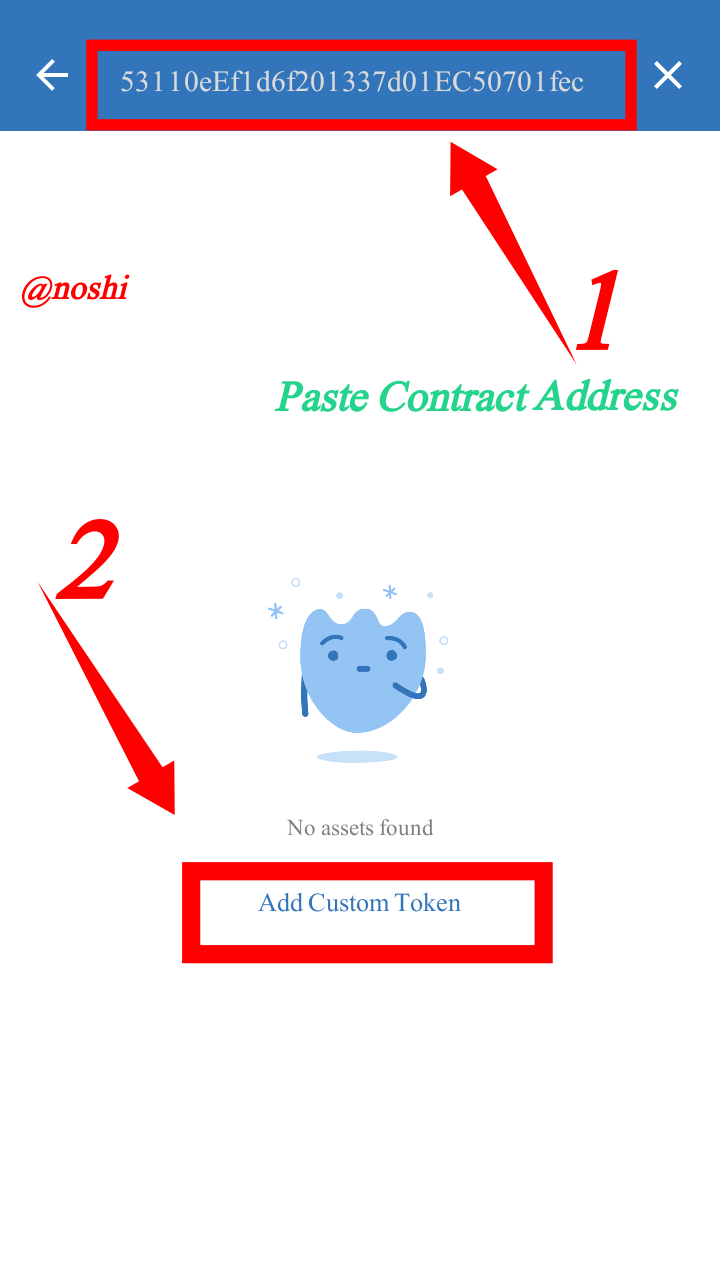
- Open the Trust Wallet and click on the top right corner button.
- Next, paste contract address in the top text box and then click on Add Custom Token Button at the center.

Screenshot from Trust Wallet
Screenshot from Trust Wallet
- In the next window first, you need to select the Smart Chain and then pate the contract address again in the second textbox. Our token is automatically selected after pasting the contract address.
- At the end, click on the DONE button at the right top.

Screenshot from Trust Wallet

Screenshot from Trust Wallet
In this way, our token is added to trust wallet,
2. Withdraw a few amounts of token to Trust Wallet.
Now we have withdrawn a few amounts of CIF token and deposit to the trust wallet. You need to do the following step to withdraw the token.
- Select the CIF token on Trust wallet and then, click on the Received Button.
- Then copy the deposit address.

Screenshot from Trust Wallet

Screenshot from Trust Wallet
- Next, go to Metamask wallet and click on send button.

- After that paste, the deposit address in the first text box.
- Then enter the amount of CIF, I enter 45000 CIF and at last, click on Next button.
- Again, confirm the transaction by clicking on the Confirm button.
|
|
|


In the following figure, you can see that 45000 CIF tokens are received on my trust wallet.

Screenshot from Trust Wallet
In this way, we can transfer our token on trust wallet.
Transaction verification on Block Explorer.
You can verify your transaction on the block explorer. We have done this transaction on the Binance Smart chain network, that is why we can get tour transactions on BinanceScan.com. To verify the transaction on the block explorer, you need to do the following steps.
- Open Metamask and switch Asset to Activity and Click on Send CIF.
- Next, click on the arrow at the top right corner. It will bring us to Binance Scan.


In the above figure, you can check our transaction detail. All the things all mentioned here like Transaction Hash, Status, Token Transferred and Transaction fees.

Here is my Transaction Hash:
0x07b2341e17c6cb17843d6f244c1dc19eb727c664d69df5196b5eefc5827384d6
Today world is moving from a traditional centralized system to a decentralization. This is why we should need to know about this technology. There are many decentralized exchanges and tokens are created. We should create our own token to get benefits in this advanced era.
If we do not want to create our own token then at least we should know that how it works and how it is created. So, In the previous lecture, we have learned that how to create tokens and in this lecture, we have learned how to list this token on an exchange. I hope you understand the process of token listing.
Thank You!