How to Create Your Own Crypto Token ]-Steemit Crypto Academy | S5W2 | Homework Post for @reddileep
Today in this post I will share with you my Homework Task (Season 5/Week-2) for Professor @reddileep. The course that the professor @reddileep has discussed with us "How to Create Your Own Crypto Token". I have learned a lot about The How to Create Your Own Crypto Token from this lecture of the professor.

1- Introduce how to create your own Cryptocurrency by differentiating between token and coin.
Nowadays it is very easy for us and anyone else to create cryptocurrencies. Because using some blockchain networks like Ethereum Blockchain, Binance Smart Chain, TRON Blockchain, we can easily create a token if we know or use a little coding knowledge, by paying a small fee. We can create a token by downloading the source code from the blockchain network without having to spend a lot of time, knowing the source code of our token, the symbol and also customizing some of the necessary information about our token.
Once the token is created we can easily promote it in the crypto real market and anyone in the real market can buy or sell it so we can distribute this token among the users who want crypto. Making coins is much harder than tokens. It takes a lot of time to become an expert in coding and also requires a lot of money to develop this project. It's easier said than done. This time I will talk about tokens and coins.
Token
One thing we already know is that tokens are very easy to create. Tokens are originally created under existing blockchain networks. Token developers do not create new blockchains to create tokens. Rather, they create a token with the name of their choice, based on the existing blockchain. As I mentioned above, there are currently many popular blockchains like Ethereum Blockchain, Binance Smart Chain, TRON Blockchain, with which a token developer can easily create a token using very little coding knowledge and for a minimal fee. Such as HT, BAT.
Coin
Making coins is much harder than making tokens. To create a coin, a coin developer must first create a blockchain of his own. After creating the blockchain, he creates a coin based on the blockchain. This coin survives to become the blockchain's native coin. To create a coin, a coin developer needs to have a much deeper knowledge of coding, and it takes a lot more money and time to create a coin than to create a token. Such as ETH-Ethereum Blockchain, TRX-TRON Blockchain and BNB-Binance Smart Chain. Built on their own blockchain.
Difference between token and coin
| Token | Coin |
|---|---|
| Creating tokens does not require much more difficult coding knowledge. | Creating a coin requires a lot of hard coding knowledge. |
| Tokens can be created in a very short time. | Coins take longer to create than tokens. |
| Tokens cost a lot less to create. | Coins are much more expensive to make than tokens. |
| To create a token, you don't need your own blockchain. | To create coins, you need your own blockchain. |
| Token Example HT, BAT. | Coin Example ETH, TRX, BNB. |
2- Demonstrate how to prepare everything needed to create a crypto token, such as making a wallet and adding a few coins to it to pay the gas fee.
Today I will use Binance Smart Chain to create tokens and I will use Metamask Wallet. So first I will download Metamask Wallet on my computer and create an account there. Then I will add Binance Smart Chain Mainnet in Metamask Wallet. Then I will deposit some BNB to pay gas fee in my Binance Smart Chain Mainnet and I will show you everything step by step.
How to Create a Matamask wallet

STEP-01: To create an account in Metamask Wallet, you must first go to their website. From this link you can go to Metamask's website. Clicking on this link Metamask.io will take you to Metamask's home page. After coming to the homepage, you have to click on the download button on the top right.


STEP-02: After clicking the download button, such an interface will appear. Here we will click on the "Install Metamask for chorme" button.

STEP-03: To add Metamask Wallet extension to Google chorme browser, click on "Add to chorme" button on top right.

STEP-04: Then a new window will open and we have to click on the "add extension" button in that window.

STEP-05: Metamask Wallet is connected to our Google Chrome browser. This time we will click on the "Get Start" button.

STEP-06: To create a new wallet, we will click on the "Create a Wallet" button.

STEP-07: Then we will click on the "I agree" button.

STEP-08: We will then enter a password of at least 8 characters of our choice and then re-enter that password. Then I will click on the "Create" button.

STEP-09: Then click "Click here to reveal the secret word". After clicking "Secret Recovery phrase" will come, we will copy it and save it in our own secret place. Because after that you will need this secret recovery phrase to login. I will click on the "Next" button.

STEP-10: The Secret Recovery phrase that we copied will be given randomly here. We will type it correctly and click on the "Confirm" button.

STEP-11: Then creating our wallet will be complete.
How to add Binance Smart Chain Mainnet to Matamask wallet

STEP-01: To add the Binance Smart Chain to the Metamask Wallet, we will click on the Ethereum Mainnet button above. Then a new window will appear, after the opening of a new window a button called Ad Network will appear at the bottom, I will click there.

STEP-02: Then the network add page will appear for adding network, after giving all the information there we will click on save button.

STEP-03: After clicking the Save button, Binance Smart Chain Mainnet will be added to our Metamask Wallet.
Deposit BNB to Binance Smart Chain
This time I will deposit BNB in my metamask wallet. Today I will use binance account to deposit.

STEP-01: Here I will make BNB deposit, for this I will copy BNB address from here to make BNB deposit of 0.27 BNB ($ 15) from my binance account.

STEP-02: Then I went to my binance account and selected BNB Coin. To make a withdrawal, I put the copied address in the Withdraw address and I entered the amount and clicked the Withdraw button.
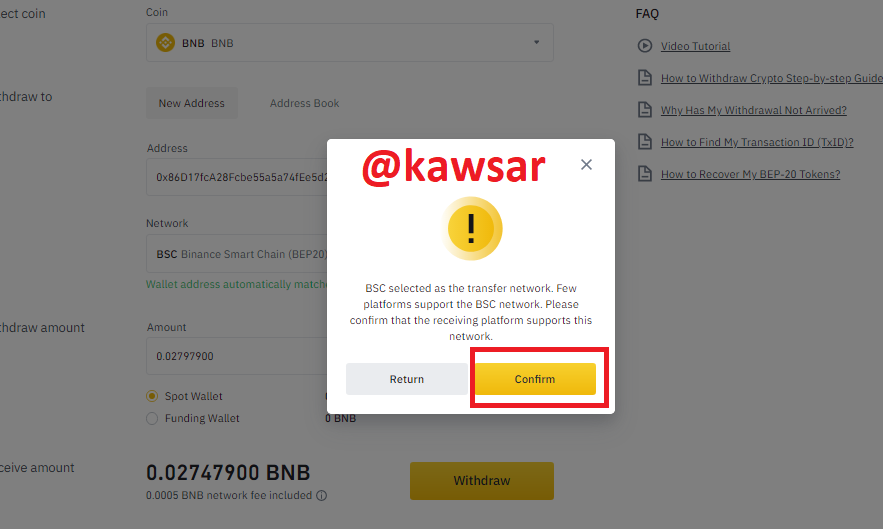
STEP-03: I clicked the confirm button to withdraw.

STEP-04: My withdrawal request has been submitted from Binance account, it shows here. I then clicked the complete button.

STEP-05: BNBs withdrawn from binance have been deposited in Metamask Wallet.
3- Explain the Remix IDE and download the source code by showing each step.
Explain the Remix IDE
Remix IDE is a platform through which we use coding sources to create tokens. IDE stands for Integrated Development Environment. This is Ethereum Blockchain's smart contact application. A token maker can easily create a token using the source code of Remix IDE, without knowing any high level of coding knowledge, using very little time using the sourcing code of this platform. This is open source. While this is an Ethereum blockchain, we can use this source code on other blockchains that are compatible with the Smart Agreement. As of today we will create a token using this sourcing code in Binance Smart Chain.
After downloading this source code, we will be able to customize it to our liking and create our own crypto token. We will show them later.
Download the source code
Since we will now create a token and use an existing blockchain to create the token. Today we will use Binance Smart Chain to create a token and from there we will download a source code. Each step of downloading the source code I am mentioning below.

StTEP-01: First we will go to this address docs.binance.org. After going to this address, an interface will open in front of us. From there we will click on this option BEP20 Asset marked in red in the screenshot above.

StTEP-02: Clicking BEP20 Asset will take us to the bottom of the pager. From there we will click on the Issue BEP20 button.

StTEP-03: After clicking on the Issue BEP20 button, another new page will open in front of us, at the bottom of that page (red marked in the screenshot above) we have to click on the here button. If you click on the here button, the source code will be downloaded to our computer.

StTEP-04:The source code has been downloaded to my computer.
4- Customize the source code according to your imagined future project. (In addition to simply stating the steps, you should provide a clear explanation about each customized code)
Earlier we downloaded the source code, this time we will create a token completely like mine by customizing the source code to create our own token. I will show you every step of customizing through screenshots.

StTEP-01: We will use this remix.ethereum.org platform for customization. That's why when we first click on this remix.ethereum.org link, an interface will open in front of us.

StTEP-02: Then we will right click on the Contract button, we will click on the New File button. There we will open a new file named BEP20 Token.sol.

StTEP-03: We have opened a new file named BEP20 Token.sol

StTEP-04: We will open the source code that we downloaded earlier, we will copy the source code after opening it.

StTEP-05: We will paste the source code that we copied here to customize it as we like.

StTEP-06: This time we will scroll down to customize the source code. I have to edit 352, 353, 354, 355 lines. So we scroll down to the bottom of this line.

StTEP-07: Here we have to do some work like we have to customize these lines. For example, here, Name, Symbol, Decimals, and Total Supply. For example (Huobi Token) is a name for a token. This way we will give a name to our token. That name must be given in place of the name. Then we will give a symbol of our token in such a way that the symbol (HT is the symbol of Huobi Token). Then there are Decimals, the minimum fragmented amount of tokens. We have to select it. Another important factor is the total supply and the quantity of tokens. We have to pay that too.
In these four cases we have to select in advance what I will give the name or symbol of my token. Come here and just edit the names and numbers that we have already selected and put them here.

StTEP-08: Here I have named my token and the rest of the information I have given below. After giving these I will click on that button on the top left side (marked in red color) and after clicking on that button we will click on this Compile BEP20 Token.sol button.
| name: | "Vanguard"; |
|---|---|
| symbol: | "VGD"; |
| decimals: | 18; |
| totalSupply: | 10000000 * 10 ** 18; |

StTEP-09: When my whole work is complete. Then I will select the Deploy button and click on it.

StTEP-10: After clicking on the Deploy button, an interface will be created in front of us. Token Name, Owner, Symbol, Total Supply will show these here.
5- Demonstrate all the steps to add your created crypto token into your any wallet such as Trust Wallet and MetaMask wallet.
In this step I will show how to connect Remix IDE to Metamask Wallet and also how to add this token to Metamask Wallet. I will try to show you step by step through each of these screenshots.
Connect Remix IDE to Metamask
At this stage I will show the metamask Connected to Remix IDE .

STEP-01: To connect metamask to the Remix IDE , open the extension of the metamask wallet then click on the three dot icon at the top and click on the connected sites button.

STEP-02: Then a new window will open here where we will click on the Manually connect to the current site button.

STEP-03: This time we will click on the Next button

STEP-04: After clicking on the Next button, a button called Connect will appear and we will click there.
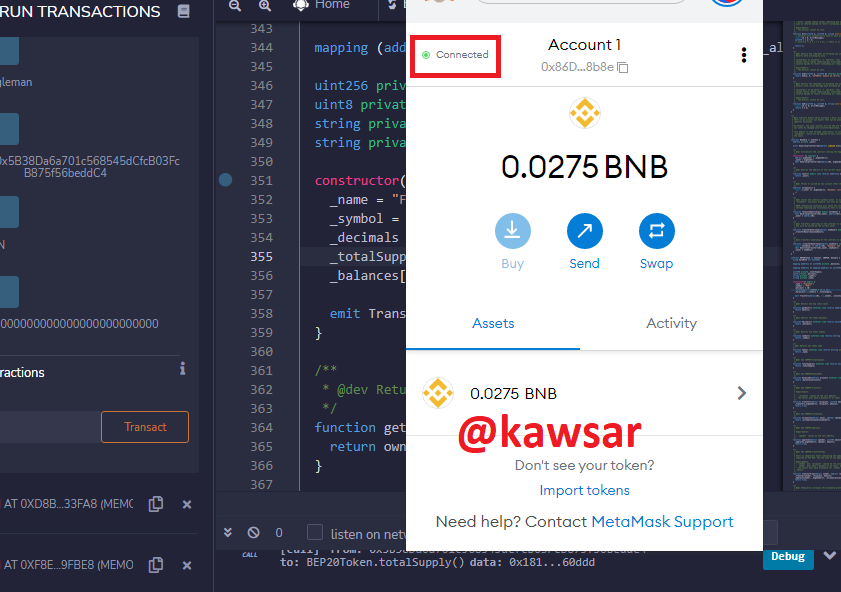
STEP-05: Above we get a signal that is Metamask Wallet to Remix IDE connected.

STEP-06: Once connected we will go to Remix IDE and after coming we will come to Environment section and select Injected Web3.
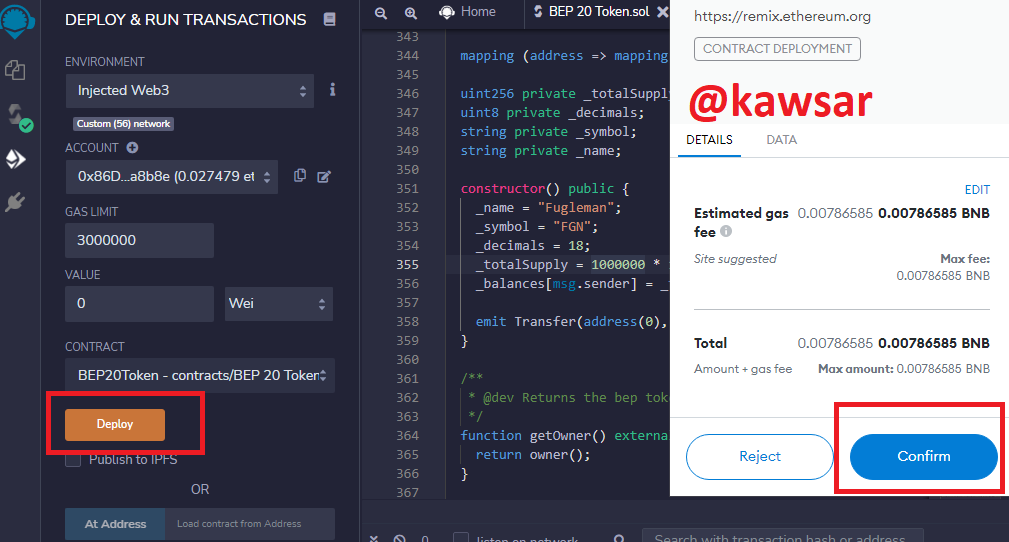
STEP-07: Then we will click on the deploy button and after clicking on the deploy button a new window will open in the metamask wallet. There is an estimated 0.00786585BNB amount of some gas fee we have to pay. We will confirm this in Metamask Wallet.
Import Token into Metamask
This time we will bring our generated token to our metamask wallet. I will show it in the form of screenshot.

STEP-01: This time since we will import our token in our metamask wallet. In order for us to import this token into Metamask Wallet, we will need the contract address of the Remix IDE that we paid for with Metamask above and have successfully completed it. That's why I copied the contract address I got from Remix ID.

STEP-02: At this stage we will come to Metamask Wallet, after coming we will click on the Import Token button to import our token.

STEP-03: This time we will paste the Contract address we got earlier and click on Add Custom Token button.

STEP-04: This time our token will show up and we will click on the Import Token button.

STEP-05: Our tokens are completely added to our metamask wallet which we can see.

STEP-06: We can actually see in the Asset button of our Metamask Wallet that our token has been deposited in our wallet.
6- Verify transactions and other details through the relevant Block Explorer.
I will show you some proof that our transaction has been a complete success.

STEP-01: When we were able to complete our process, Remix IDE confirmed to us that our transaction had been confirmed. Transaction Hash is "0xf2795b67a2937fe1423cf302638ac13dafc81555854fcc5ed6af1339882f711f"

STEP-02: We can see through bscscan.com that our status is showing success here and the address from which we are sending is showing here. Here's our transaction hash and the token we created (name: Vanguard, symbol: VGD) It also shows how much our transaction is free.
bscscan Transaction Link bscscan.com

STEP-03: We can also see the total supply, holder, transfer, decimal, contract address of the token we created through bscscan.com.
Conclusion:
Finally I can say that there are many differences between tokens and coins. We saw above how easy it is to create a token. A token developer without any difficult coding knowledge can easily, in a very short time, create a token using some platform for a minimal fee. But to create a coin, a coin developer must have a blockchain of his own and have a very high level of knowledge about coding. Only then is it possible for him to make a coin. It also requires a lot of investment to make coins. But in the case of tokens, a token developer can create tokens with minimal investment. From today's lecture I learned a lot about new things. So I am very grateful to the dear professor for discussing this important issue with us very simply.
best crypto trading training program 2022
https://www.cryptocrash.club/2021/11/best-crypto-trading-training-program.html
El Salvador Buys 100 More Bitcoins as Crypto Market Falls
https://www.cryptocrash.club/2021/11/el-salvador-buys-100-more-bitcoins-as.html
2022 Crypto Regulation Trends: Focus on DeFi, Stablecoins, NFTs, and More
https://www.cryptocrash.club/2021/11/2022-crypto-regulation-trends-focus-on.html
New airdrop: TudaBirds & SOL
Reward: 375 BURD (~$7.5)
https://cryptoeri.one/2021/11/30/sol-token-airdrop
That's a nice idea but I believe it's pretty difficult to do it on your own. Although I need to read more about it
That's a pretty good idea, why not. I can tell you that it can be really profitable if you manage to promote it the right way. I've been into this field for a while, and thanks to this platform https://changelly.com/buy/dash, it wasn't a problem to start making money on crypti. So I think you can learn more about it and try coming up with your own crypto.