[ How to Create Your Own Crypto Token ]-Steemit Crypto Academy | S5W2 | Homework Post for @reddileep


Introduction
Blockchain technology has given birth to thousands of tokens which serve many purposes. As more projects are implemented, we see the expanded roles that tokens play both as a utility that gives the user access to some services, or as a representation of some real- world assets such as a landed property.
With blockchain technology seeking mass adoption, many less tech-savvy users have sprung up and sometimes do not understand some blockchain technologies. In this article, we will look at how to create a token. But before then, let us find the meaning of two most popular terms in the blockchain sector - tokens and coins.
Question 1: The Major Differences between a Token and a coin
We are going to explain the major differences between a coin and token under the following definitions:
1. By Design: The number one difference between a token and a coin is that a token is designed to run on a different blockchain. A token which is basically a digital asset does not have its own blockchain. Rather, it runs and operates off an existing blockchain. Hence a token can inherit some of the properties or features of its host blockchain in addition to any other unique features which the token has. On the other hand, a coin is different.
A coin is designed to run and operate on its own blockchain. Unlike a token, does not operate on a separate blockchain. Instead, it has its own. Bitcoin is a typical example of a coin that owns and operates its blockchain.
2. By Use: A coin is basically designed to be a medium of exchange. We can call a coin digital money. It main purpose is to store some value which can be used to exchange for any services. A coin has almost every feature that money has. For example, coins are universally accepted as a medium of exchange and can easily be moved from person to person. On the other hand, a token is different from a coin in terms of use.
While a coin is usually designed for a single purpose, tokens can serve multiple purposes. A token can be used to represent shares in an organization. There are tokens which are used to represent tangible real-world objects such as land, gold or other objects. Tokens can sometimes be used as money when they represent existing fiat currencies. Hence, they can be exchanged for other monies or coins in the crypto market. A good example of this is USDT.
3. By ease of Creation: Tokens are easy to be created and launched. This is because they exist on top of a third-party blockchain. To launch a token does not require extensive programing and other technical activities. To make it easier, there are automated tools which are designed to streamline the process of launching a token on a particular blockchain, removing the headache of coding for the launcher. On the other hand, a coin is very difficult to make.
Launching a coin will mean building a blockchain from scratch. This requires specialized technical expertise and some huge capital investment. Not everyone will have the huge funds required to create a blockchain - or a coin. But because launching a token means building on an existing framework, anyone can easily launch a token. That cannot be said of a coin. Creating a coin is capital expensive, while creating a token is cheap.
Question 2: Getting Set to launch a token
This section of the article will demonstrate how to launch a token. There are many processes involved. So I will try to take it one at a time. I will divide it into many stages as follows:
- Stage 1: Creating a Wallet for the new token
- Stage 2: Deposit some BNB to my wallet
- Stage 3: Using Remix IDE to download the new token Source code
- Stage 4: Customize and deploy the downloaded source code
- Stage 5: Add the Newly created token to the Metamask wallet
- Stage 6: Using Blockchain explorer to verify the transaction
Stage 1: Creating a wallet for the token
Before creating a token, I will need a wallet where the token will be stored. So in this first stage, I will create a wallet for the token using MetaMask Wallet. I have already installed the browser extension to my Chrome browser. I have already created some wallets in MetaMask. So since I choose to use Binance blockchain for my token launch, I will have to reset my MetaMask default network mode to Binance Smart Chain. So check the image below and understand how I reset my Metamask network mode
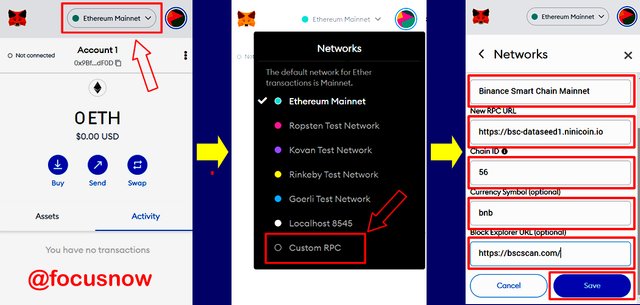
Step 1: I clicked on the Network button labelled Ethereum Mainnet to reveal a set of networks avalaible for selection.
Step 2: I then selected Custom RPC from the menu.
Step 3: In the new window, I filled the Network details such as the name, RPC URL. After that, I clicked save to add the new Network
Following the above steps, I have been able to successfully added the Binance Smart chain to my MetaMask wallet. We will now proceed with the next stage of work. I will try to transfer some BNB coin so that I will be able to pay for gas fees and other things.
Stage 2: Deposit some BNB to my wallet
In this stage of the work, I will transfer some BNB coins from my Binance wallet to metamask. This BNB will be used to pay for gas fee during the actual creation of the new token. So here are the steps I will follow to move the BNB:
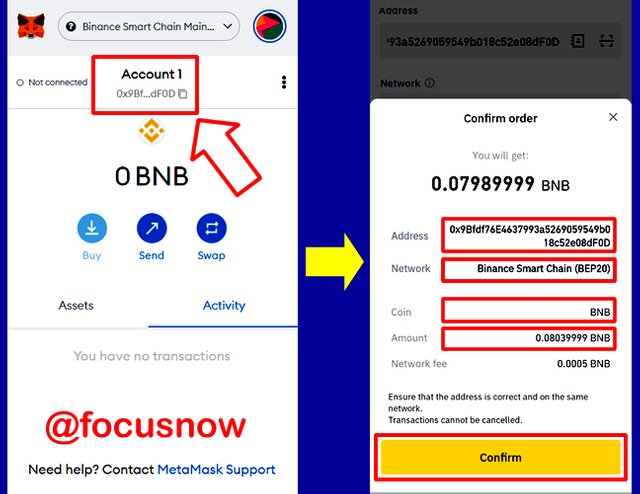
Step 1: The first thing is to copy my BNB wallet address which is what I did from the image above. Once copied to the clipboard, I moved to step 2.
Step 2: I opened my Binance account on mobile and went to withdraw BNB. I filled the address, network, and the amount to be transferred. After correcctly filling everything, I clicked Confirm as shown above to confirm the transaction. After some moments, it was successfully deposited in my Metamask wallet.
Stage 3: Using Remix IDE to download the new token Source code
Launching new tokens and creating Ethereum smart contracts have been made so simple using a application called Remix IDE. Remix is an integrated development environment will many useful tools needed to develop and launch smart contracts. Both the web and desktop versions of this application come with clean graphical user interface, making it very cool and easy for people that are not professional programmers. With its various tools and plugins, one can develop, deploy and test Etheruem smart contracts.
So I will now demonstrate how to use the Remix IDE to download my source code for the new token.
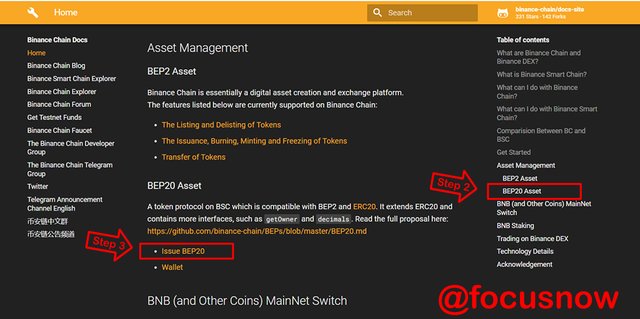
Step 1: I will go to the URL - https://docs.binance.org/
Step 2: Once the new window opens, I will locate and click the BEP20 Asset link towards the right hand side.
Step 3: Then I will also click on Issue BEP20 to open another window where the actual template download will happen.
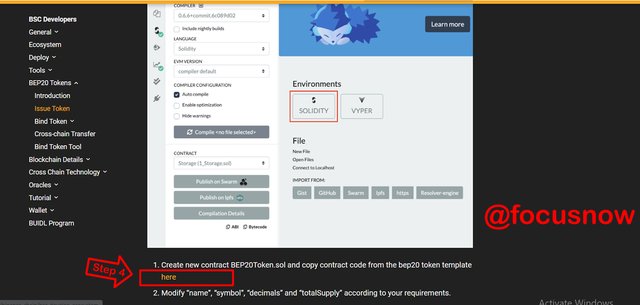
Step 4: On this new page, I will click the link labelled here to start the download of the template.
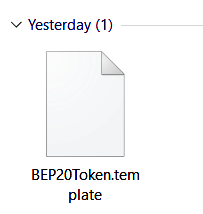
The template is not a large file, so after few seconds, it was completed downloaded. As you can see the zipped file below.
The next stage of this presentation is to customize the source I just downloaded
Stage 4: Customize the downloaded source code
At this stage, I will demonstrate how to edit the source code for the new token which I downloaded in the previous stage of this presentation. So kindly follow the steps below:
Step 1: I will log on to https://remix.ethereum.org/
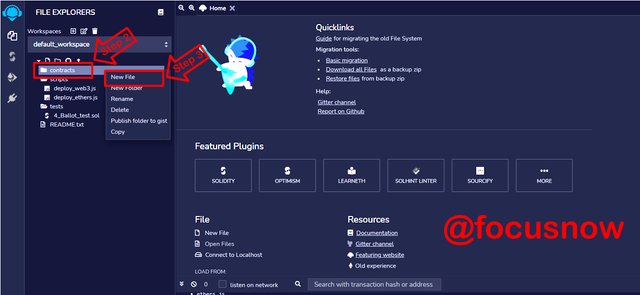
Step 2 Click on the Contracts folder to reveal some menu items. (Check the above screenshot)
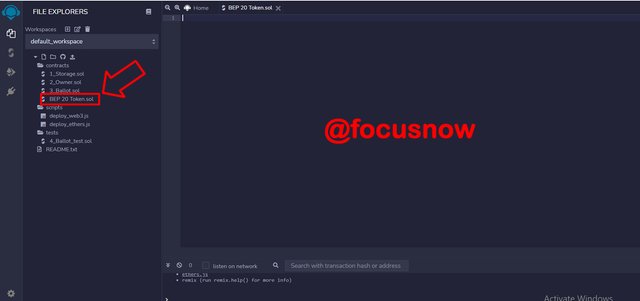
Step 3: Click on New file. When the new file opens, I will name it BEP 20 Token with a .sol extension
After taking the steps above, the new file was created. You can check the screenshot below and see the new file is open. The next thing now is to get the code from the downloaded template and start editing it.
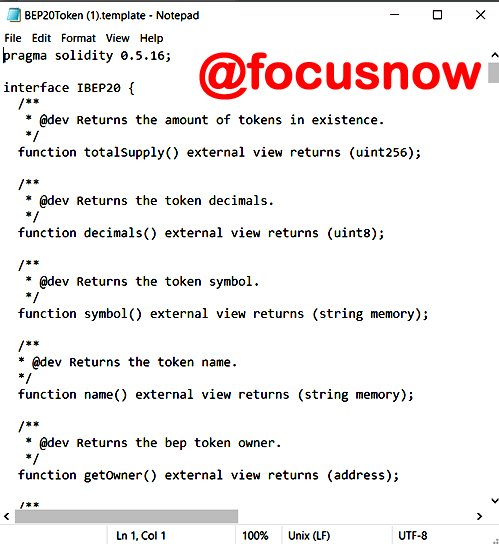
Step 4: I will open the downloaded BEP20Token.template with Notepad. From there, I will then copy it to the Remix IDE for editing. So here below is the screenshot of the code opened in Notepad. After copying it from this note pad, I then pasted it in the Remix IDE so that I can start the actual editing work on it. You can take a look below at the next image.
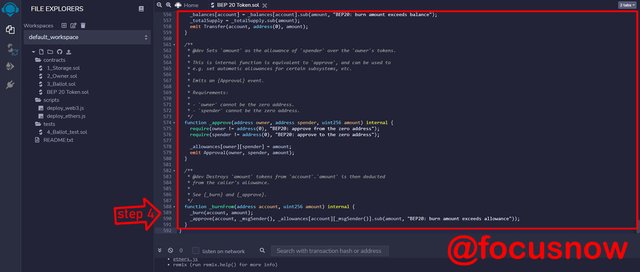
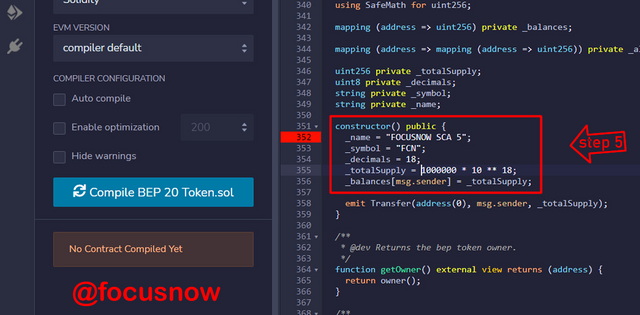
Step 5: This is the step where where the actual code modification happens. First, I will need to location line code 352. This is where I will enter the token details such as the token name, symbol and total supply. So I will edit that section with token details for my project.
- name = "FOCUSNOW SCA 5";
- symbol = "FCN";
- decimals = 18;
- totalSupply = 1000000 * 10 ** 18;
The above are the details of my token. The name is FOCUSNOW SCA 5 and the symbol of the token is FCN. The total supply is . Now that I have finished editing the details, I will need to compile it.
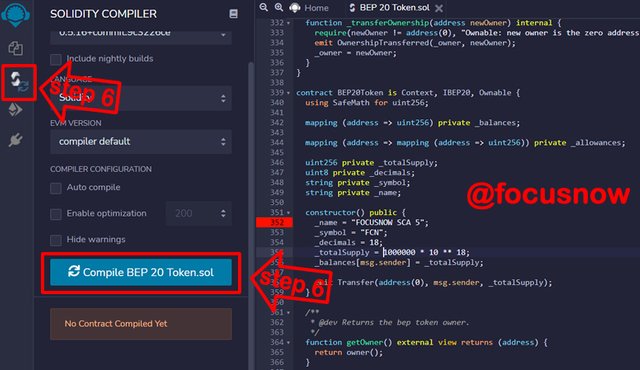
Step 6: Now that I have finished putting the details, I need to compile the code. The compiler icon is located at the left hand side as show below in the top arrow. I will click this arrow, and then click the button labelled Compile BEP20Token.sol . By this, I have compiled the code. Check the image below.
Step 7: Just below the compiler icon is the Deploy icon.So to deploy the program, I will click the icon below the compile icon. A button appears labelled deploy. Click this button to deploy. Check the image below.

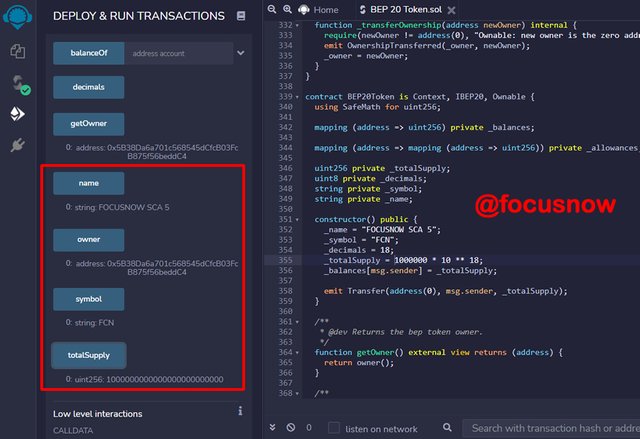
Now, I have successfully deployed the code. You can confirm the details of the project through this screenshot below.
Stage 5: Add the Newly created token to the Metamask wallet
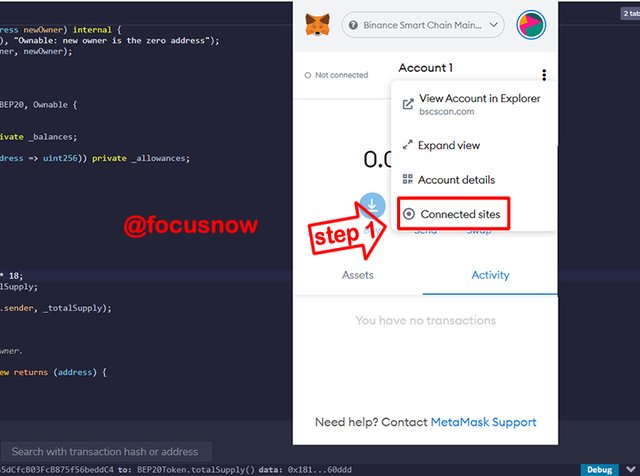
At this stage of this project, I want to demonstrate how i added the new token to Metamask. So while still in the environment of Remix IDE, I need to open the Metamask extension and connect it to the IDE site. So here are the steps:
Step 1: After launching the metamask extension, I will click the menu options represented by 3 dots. A new menu will open, then I click Connected sites as shown below.
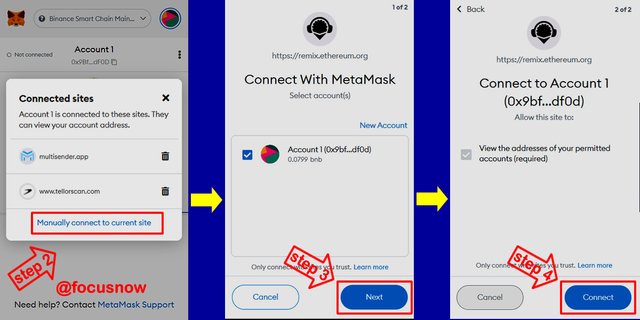
Step 2: Next I will click Manually connect to current site
Step 3: To finish it up, I will click Next in the new window.
Step 4: Finally, I will click connect as show below.
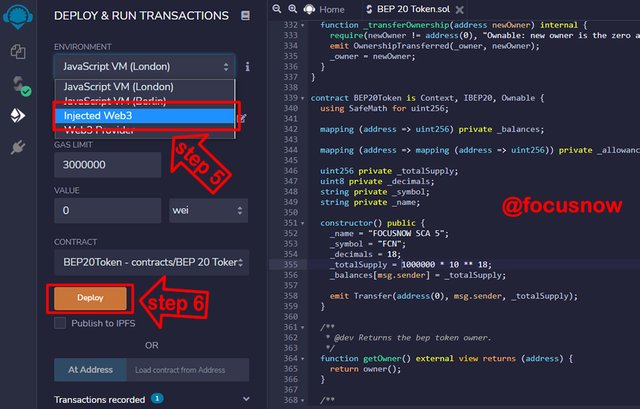
Step 5: To continue, I will return to the Remix IDE. Under the Environment menu, I will click Injected Web3.
Step 6: After that, I will click Deploy which is just below the Environment menu items.
Please check the image below
Step 7: After clicking deploy, the MetaMAsk window will pop up with the transaction fee of this particular project. I then clicked Confirm to finish up the transaction. Check the image below
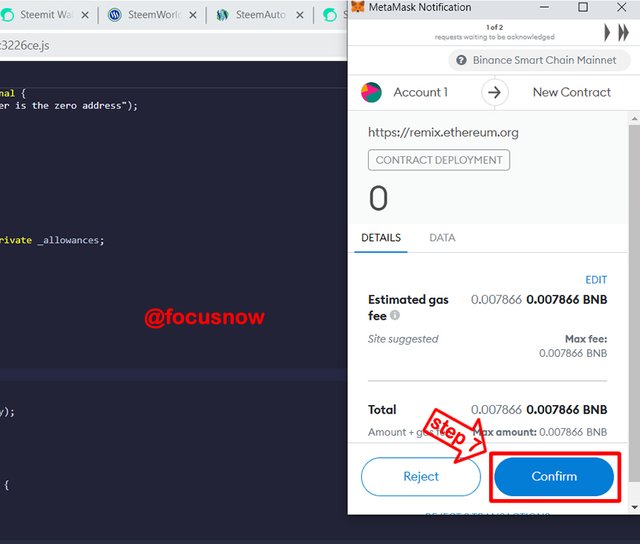
In this way, I have been able to bring the new token into MetaMask. The next stage of this project, which is also the last involves confirming the transaction.
Stage 6: Using Blockchain explorer to verify the transaction
Now its time to verify the transaction and make sure it has been stored on the blockchain. I will use https://bscscan.com/ to verify the transaction. To begin, I need to find the transaction hash in Remix IDE.
The transaction history is easily availible at the lower end of the Remix window. To get their faster, I clicked the arrow beside debug. As you can see below, the transaction hash is easily found through this method.

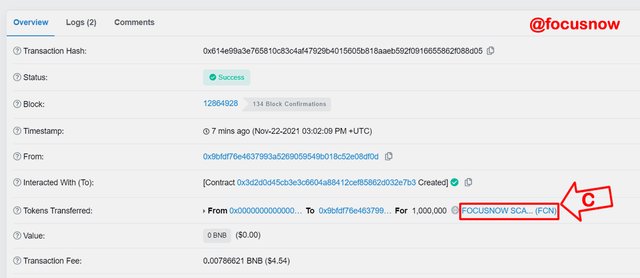
Now I will open and paste the transaction hash and hit the search button. When I do, you can see the search results returned below. Here is the transaction details:
A: This is the transaction hash
B: Here is the amount of tokens available 1,000,000
C: This is the token name
D: This is the transaction fee.

Next is to click on the name of the token labelled C in the image below to reveal the smart contract address.
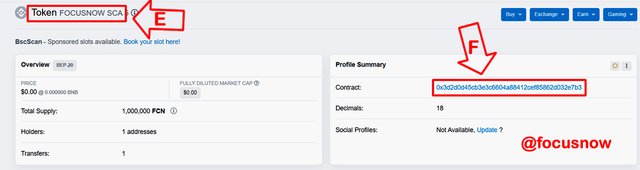
Here is the result of clicking on the token name. In the image below, Arrow E shows the name of the token. And arrow F is the Smart contract address.
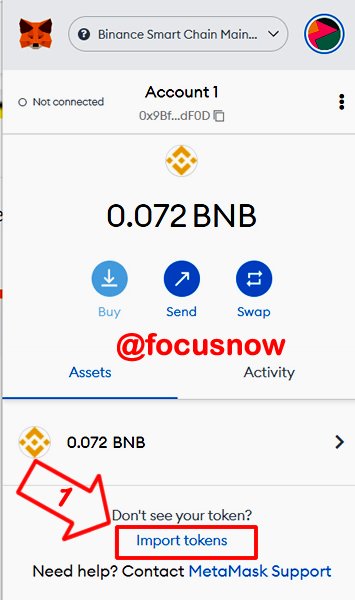
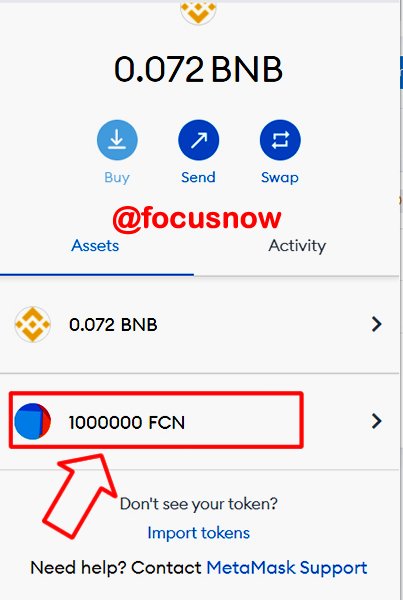
Having copied the Smart contract address, I will go back and open my Metamask wallet. I will click Import tokens as show in Arrow 1 below.
Next, I will paste the copied cntract address in the box labelled arrow 2 below. Then I will click the Add custom token button labelled arrow 3 below
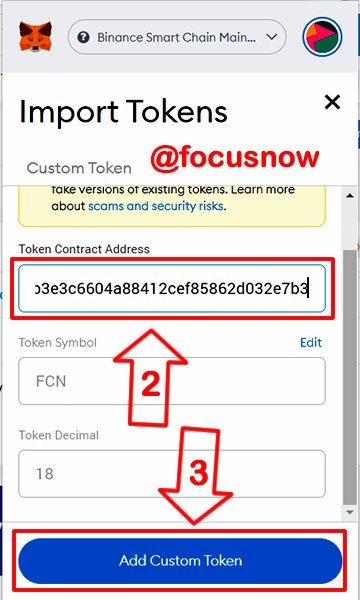
Congratulations, you can see my token has been added to my wallet balance.
Conclusion
Token represent a huge way to create and store value in the blockchain. This presentation has shown the limiteless opportunities available to project managers that will have need to create and launch tokens for various projects. The Remix IDE is a huge and powerful tool to launch tokens on the Binance Smart Chain. Its tools and plugins are very easy to customize. Someone with little or no knowledge of blockchains can easily find their way around this powerful and launch tokens.
I so much appreciate participating for the first time in your class Professor @reddileep . Thank you so much for the quality presentation