[Old] Crypto Academy Week 5 Homework Post for @yohan2on: MetaMask - A DeFi Web3 Wallet
Homework task: Getting involved in the DeFi ecosystem requires one to have a DeFi web3 wallet; one must even know how to use it. Select one wallet and explain how to use it.
We have selected MetaMask for this article. We will discuss it in-depth, but first let's review what a Web3 wallet actually is.

Source: Quote Inspector
What's Web3 Wallet?
A Web3 cryptocurrency wallet is a 'self-custody' wallet that enables its users to access the 3rd generation of the web, which includes dApps (or decentralized applications). To put it simply, web3 wallets are just browser wallets on top of the regular self-custodial wallet.
Most of the existing web3 wallets have a built-in browser to access the dapps that exists in the same platform. One example of this kind of wallet is MetaMask.

MetaMask
MetaMask is a web3 enabled browser for Ethereum and other tokens on the ETH blockchain (e.g ERC20 tokens, etc) that you can use in different kinds of devices like your PC and mobile phones. It is compatible with some browsers through the use of extensions. For the mobile version, you can either install the ones for Android or iOS.

How MetaMask looks like for desktop browsers like Firefox. Source: MetaMask
For desktop-based browsers, MetaMask is currently supported by 4 different browsers:
- Firefox - You can download the extension here.
- Chrome - Extension is available here.
- Brave - is a browser based on Chromium, get the extension here.
- Edge - You can get the Edge Add-on here.

How MetaMask looks like for iOS devices. Source: MetaMask
For iOS devices, e.g iPhones. You can get the application from the App Store here.
How MetaMask looks like for Android devices. Source: MetaMask
For Android devices like Samsung Galaxy phones, Xiaomi phones, Huawei phones, etc. You can use MetaMask by installing it from the Google Play Store here.
How to Use MetaMask

MetaMask landing/splash screen for Android devices.
We're using the Android version of MetaMask for this article. Just head over to the link I stated earlier and install it in your device. After you have installed the app, you should see the below splash screen. Click the ‘Get Started’ button to begin creating your Ethereum wallet using MetaMask.

Here's the Wallet Setup page in MetaMask.
After doing that, you will be asked to setup your wallet. There are multiple options here: Import with the use of seed phrase, Synchronize with your existing browser-based MetaMask wallet, or simply create a new wallet.

Creating a password for your wallet.
For this article, we will be creating a new wallet. When you click on that, you will then be asked to setup a password for it. Make sure to keep it within the requirements and keep it safe. You just have to agree to the terms, then click on "Create Password".

Secure your wallet screen, to start getting your seed phrases.
Securing your MetaMask wallet is a crucial step, so do not skip this process at all.

Manual/instructions on what to do with the seed phrase.
You will be asked to secure your wallet's seed phrase, which you can use to recover your wallet or import it elsewhere.

The page where you get your seed phrase.
You will be shown your seed phrase and be asked to write it down, to be kept in a safe place. You will need this on the next step because you will immediately have to put in your seed phase next.

Page to confirm the seed phrase that you copied.
Confirming your seed phrase is very simple, just put the seed phrase words in the correct orders. The words I have are located underneath these numbered capsules (I did not include it in the screenshot).

Improvement data opt-in or out page.
Lastly, MetaMask will ask you to join a usage gathering program to help them make sure the experiences with the app are of quality. You can Agree or just choose No Thanks.

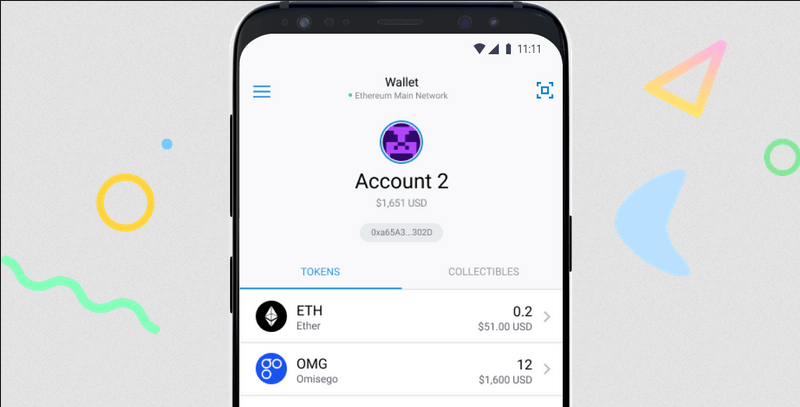
Your MetaMask wallet's main page.
After the agreement, you will be routed to the main screen of your Web3 MetaMask wallet. This is where you can check what cryptocurrencies you have and their value.
Pressing on one of it will let you get more information like transaction history, and allow you to Send or Receive that certain cryptocurrency.
Pressing on the burger icon on the top-right corner of the app's screen will bring you to the main menu of your wallet where you can do different things.

Contents of burger menu on the upper-left corner.
- Switch accounts/addresses
- Send or add funds
- Go to the browser
- Go to your wallet
- See you transaction history
- Share your address button
- Quicklink to your address info on Etherscan
- Settings
- Help
- Sending feedbacks
- Logging Out

Scan function for QR scans - connecting to dapps.
The 'scan' button on the upper-right corner, on the other hand, allows you to scan QR codes - this is used specifically for connecting your MetaMask wallet to a certain dapp.
When you have scanned a QR code for connecting to a certain dapp (like, for example, UniSwap) - you will be asked to confirm or sign that transaction on your MetaMask wallet to continue with that action. You can also reject it if needed.
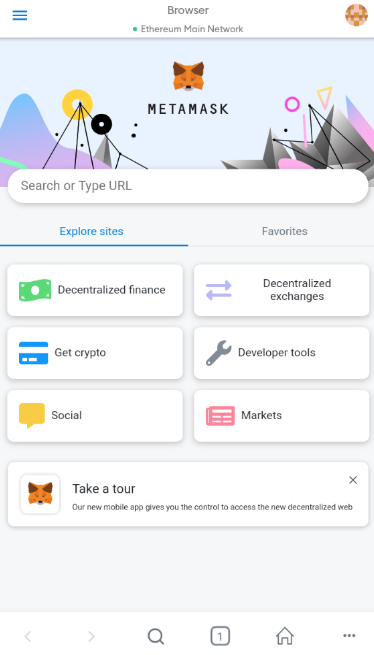
Browser feature inside Metamask.
When you click on the Browser feature from the burger icon, this is what you'll get. It's the built-in dapp browser of MetaMask.

Inside the DeFi button.
You can check all the DeFi-related protocols in the ethereum blockchain when you press the Decentralized finance button.

Inside the DEx button.
You can also access the decentralized exchanges on ethereum using the other button for Decentralized exchanges.
Other buttons are pretty self-explanatory.

Alternative way of connecting to a dApp.
A cool feature inside this browser is how easy it is to connect to a dApp, you don't even need to scan a QR code anymore. Simply find the dapp on the list or search for the name. Once you see it and select it, you will be asked to connect to the site with your wallet (we used UniSwap for this example).

The UniSwap dapp inside the built-in browser.
When you have chosen to connect your MetaMask wallet to that certain dapp, you'll be able to use it from then on.
I've been using MetaMask since way before they launched the mobile app-based MetaMask wallets (which only happened September of 2020 btw), and I think it's very helpful in letting users transact through the Ethereum blockchain effectively. Especially with the new wave of projects inside the cryptospace and Ethereum (like dExes and DeFi).
Hi @deveerei
Thanks for attending the 5th-Crypto course and for your effort in doing the given homework task.
Feedback
This is excellent work. Well done! You explained and displayed almost all the vital features in Meta Mask wallet that every user must know and have an experience while using them.
Particularly, I was interested in seeing that Decentralized finance feature that provides you with a list of the various DeFi protocols that DeFi enthusiasts can make good use of in their interactions with the DeFi ecosystem forexample through borrowing and lending of crypto assets.
Homework task
10
Homework task
Thanks a lot for the good remarks Prof. @yohan2on! Really appreciate it! Stay awesome!
The article has been reposted here: https://steemit.com/hive-108451/@deveerei/3wsg6o-crypto-academy-week-5-homework-post-for-yohan2on-metamask-a-defi-web3-wallet
Thanks for the chance! Have a wonderful day!