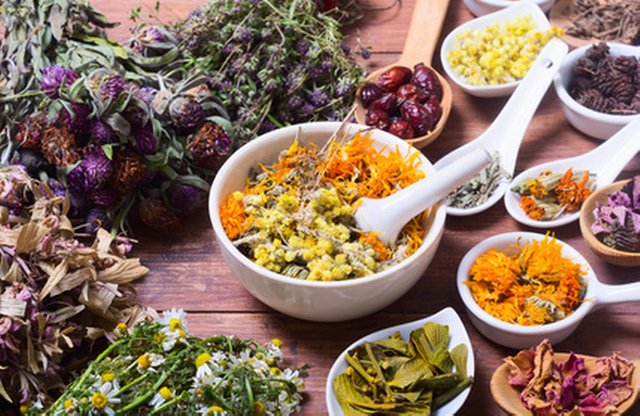
DIY Herbal Remedies: How to Make an Herb Infused Oil

Herb infused oils are a kind of herbal infusion where an herb or combination of herbs are soaked in oil long enough for some of the flavor and medicinal properties to extract into the oil. These oils can then be used for food, medicine, or both, depending on why you made it. A lot of the articles that I write (like this one on herbal remedies for earaches) and protocols that I give to clients require making an infused herbal oil. I'm often asked HOW one goes about making an herbal oil. There are several methods. All of them seem to be effective. All of them are easy. Let's review.
Herb Infused Oils: Simples or Blends?
Herbal oils can be made as simples (single herb ingredient) or as a blend of several herbs. It really depends on how much versatility you need, not to mention how much storage space you have. Herbalists will often make simple infusions with just one herbal ingredient at a time. Believe it or not, simples are the more versatile choice. This allows us to blend them as we see fit at a later date. Herbs are famous for their multi-purposed ability to help with numerous complaints. As such, different combinations of herbs can function in very different ways. Having an array of single ingredient oils at your disposal can make whipping up these varied herbal remedies easier. Simples are also the better choice for teaching purposes. If you're new to learning about herbs, then working with one herb at a time fosters better knowledge of that herb.
Herbalists are also known, however, for having cabinets upon cabinets full of oils, tinctures, teas, vinegars, dried herb jars, and more. I have yet to meet an herbalist who doesn't take great joy in having their stock of remedies look like a scene from the herbarium in a Brother Cadfael book. Just the word "herbarium" tickles us. You may not have that much shelf space available for such a hoarder's paradise. In such a case, blends might be more practical for you. Herbal oils made with a blend of herbs also come in handy when you already have a specific recipe.
Some experienced herbalists argue that using blends makes it hard to know which herb has been the most help. I'll sidestep arguing that one. I can hardly refute the logic of it. I can only say that I've worked with herbs singly and in combination. Though I tend to prefer synergistic combinations, I reach for single ingredient remedies nearly as often. Regardless of which you decide to go with, both are fine choices.
The Ingredients: Dried or Fresh Herbs in Oil?
Both! You can use dried and fresh herbs in your infused herbal oils. Most prefer fresh when they can get them, but this isn't always feasible. I often use dried herbs in my oils, and have yet to note any reduction in their efficacy. When I do harvest them fresh, I often use a gentle heat source like the oven method of infusion detailed below. This helps to ensure that any water content in the plant has vaporized off, reducing the risk of my oil going rancid. When choosing your herbs for an infused oil, keep the following tips in mind.
For fresh herbs:
- Fresh herbs take up more space than dried. Fill your jar up to the top before adding oil.
- Fresh herbs MUST be dry before immersing in oil. If you've rinsed them, lay them out to completely dry before proceeding. Water is your enemy when it comes to preventing rot.
- Give your fresh herbs a shake to remove any bugs. It's not a bad idea to lay them out for an hour or so to let any stragglers find another home.
- You don't have to macerate most fresh herbs, but a rough chop will increase the surface area of herb that's exposed to the oil, improving your infusion.
- Roots are one class of herbs that are best infused fresh in my opinion, especially with regard to infused oils. This includes plants like ginger or garlic. Use what you've got, but if you can obtain fresh for your infusions, do so.
For dried herbs:
- If your dried herbs are cut and sifted (check the package), use them within a year to ensure full potency.
- Less herb is required when using dried herb rather than fresh. The ratio is usually 1:2 of dried herb compared to its fresh version.
For ALL herbs:
- Organic herbs are ALWAYS preferred over those sprayed with pesticides. Many pesticides are fat soluble. There's potential that some could extract into your medicinal oil.
- Once you clip your herbs, they should never see the direct sunlight again. Sun is not your friend when it comes to drying and storing herbs. It can have a leeching effect. Look to dry and store your herbs in a cool, shady place.
- Water is not your friend either when it comes to herbal oils. Never immerse wet herbs in oil, and never use anything but clean, DRY fingers and utensils to handle your oils.
How to Make Herbal Oil Infusions
Now that we know how to treat our herbs, let's dive into how to make an infused oil. There are several ways that you can accomplish this. I'll take you through the three most popular. In all cases you'll need nonreactive containers (I use glass), lids, and utensils. Wood or bamboo chopsticks are excellent as stirrers. Remember that everything should be dry. Don't introduce any water into your oils, or you'll be kissing them goodbye once they spoil. I recommend using sterilized containers, especially if your oil will be used as food or otherwise taken internally.
The Oven Method: Herbal Earache Oil Recipe
The oven method of infusing herbal oils is the method that I teach the most. It's easy to do and works quickly. It's the gentle heat that speeds up the process. You can use this for all oil infusions. I especially recommend it for fresh herbs, roots, and bulbs, which often contain a lot of water. To demonstrate this method, we'll use one of my herbal remedies for earaches and ear infections. I focused on this topic extensively in my article on treating ear infections, but we'll pull just that recipe out for teaching purposes now.
Herbal Earache Oil Remedy
Ingredients:
- mullein leaf or flower (fresh or dried), leaves chopped
- 2 large, fresh garlic cloves, roughly chopped
- organic extra virgin olive oil
- oven-safe glass bowl, 1 cup size
- 1 tsp dried lavender flower (optional)
- 2 tsp dried chamomile flower (optional)
Set your oven to its lowest temperature, usually 170°F (250°F maximum). Add enough fresh mullein herb to fill your oven-safe, glass bowl. If using dried herb, just fill to a quarter of the way up. Add garlic cloves to the bowl. Sprinkle in any additional herbs that you intend to use, like lavender or chamomile. Cover this mixture with enough olive oil to submerge the herbs. Poke any herb that's sticking out back under the oil level. Once the oven has come to temperature, place the bowl into it. Don't cover the bowl. Now turn your oven off. Yup, you heard me. We don't want the oil to burn, so shut the oven off, but don't open the door! Leave the oil to infuse in the oven for 2-24 hours. Again, don't open the oven door at all during this period. Once you've steeped the oil for as long as you intend to, remove the bowl from the oven, strain off the herbs, and there's your earache oil! Store it in the fridge in a nonreactive, sealed container.
Quick note: The garlic in this recipe is why I recommend that you store it in the fridge. I usually store my infused oils on a cool, dark shelf unless they are made with short shelf life oils like hemp seed oil or contain perishable ingredients that I fear may go rancid if I don't use the infusion quickly. Use your judgment and always discard any remedy if you suspect that it has bacterial growth.
The Slow-Brew Method: Herbal Massage Oil
Many herbalists favor the slow-brew method of oil infusion as producing the most potent oils. This method gives the herbs lots of time to give up their medicinal components into the oil. We'll use a simple calendula oil to demonstrate the slow-brew method. Calendula is a great herb for the skin. Add a little lavender flower to the mix if you want a more fragrant oil.
Simple Herbal Massage Oil
Ingredients
- 1 cup dried calendula flower
- 1/2 cup dried lavender flower (optional)
- 2 cups (estimated) sweet almond oil or apricot kernel oil
Add your herbs and enough oil to cover them into a nonreactive container with a lid. Glass is my personal favorite. Cover tightly. You'll be letting it steep for 6 weeks. Put the container in a shady location where you'll see it everyday. This is because you'll need to take the lid off and check it weekly for signs of rancidity. If any herb is sticking up out of the oil, poke it back down. Alternatively, you can put the lid back on, and just shake the snot out of it. Add more oil if necessary to ensure that all herb material is engaged in the oil. This is the best way to prevent bacterial growth. It doesn't happen often, but if you see mold, toss it and start over. After 6 weeks, strain out the herb material, and enjoy your massage oil. This particular oil is shelf stable, and should keep for about a year.
I have also heard this method referred to as the solar method. This variation comes with the additional instruction to put your infusing oil in a sunny windowsill. I personally do not do this unless I'm using a dark glass container. Remember that I'm not a fan of putting cut herbs in direct sunlight. It's up to you.
The Stove-top Method
I highly recommend that you use a double boiler setup if you wish to make an infused oil on your stovetop. If you don't have a fancy double boiler, then simply make one by using 2 pots, one small enough to fit inside the other. Put a little water in the larger pot, and then plunk the smaller pot inside. A double boiler will keep your precious oil away from the direct heat of the stove, minimizing your risk of burning it. Let's make a fresh rosemary oil to demonstrate this method.
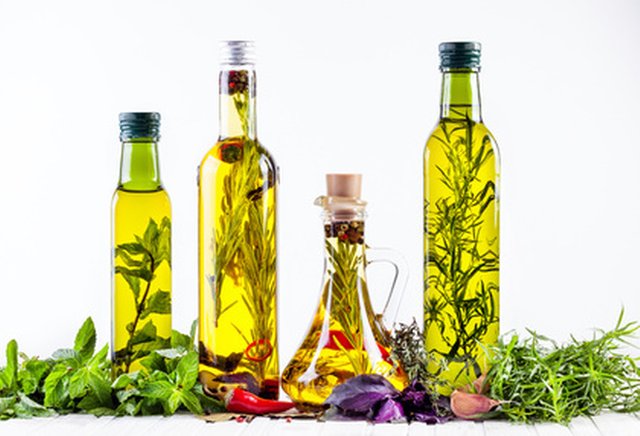
Fresh Rosemary Oil
Ingredients
- 2 cups olive oil
- 2 cups estimated fresh rosemary sprigs
- 1 chili pepper, fresh or dried, roughly chopped (optional)
- 1 fresh garlic clove, halved (optional)
Add your herbs and enough olive oil to cover them into the smaller pot. Make sure that the water level in the larger pot isn't so high that it risks boiling into the oil. Set the heat to low or simmer and let it infuse for 2-6 hours. With this particular oil, 2 hours is usually enough. Rosemary is very fragrant and readily gives up its properties. You'll have to babysit stovetop infusions. Watch that the water doesn't fully evaporate. Add more if needed. Also take care that your oil doesn't start to bubble. This is an indication that it is burning. If you see this starting to happen, lower the heat immediately.
Let's try something fun with this oil. Once it's done infusing, strain the herbs out of the oil and compost them. Into a clean, tall, glass bottle with a stopper add a few sprigs of freshly cut rosemary, a garlic clove or two (uncut) and a dried chili pepper (also uncut). Poke a few holes into the pepper with a needle or toothpick to discourage it floating at the top. You do want to add new herbs into this bottle, because the ones that you used to actually infuse the oil are probably discolored now. Pour in your fragrant infused oil. Ensure that all the new herb material is completely covered. Stopper the bottle, stand back, and look at your gorgeous cooking oil! This oil is great in homemade salad dressings, as a bread dip, and in cooking. The pretty herbs that you added to the bottle for looks will actually add their flavor slowly into the oil. Just be sure to add more olive oil in as you use it up, or remove any herbs that stick up out of the oil as you go. Otherwise it will mold. This is a shelf stable oil, and will keep for a year. Makes a stunning herbal gift!
Now you know how to make an herb infused oil, and it wasn't hard at all, right? Have fun with creating infused oils, but do always remember to research any herb that you want to work with. Consult your friendly neighborhood herbalist if you have questions or to see if there are any hands-on workshops that you can attend get visual learning on how this is done.
Editor's Note: The information in this article is not intended to diagnose or treat illness. Always do your research before using an herbal remedy to ensure that there are no allergy risks or cross indications with any prescription medications that you are taking. See your doctor before starting any new treatments or programs. Anything that you learn from Prairie Hawk Botanica, its blog, or Jennifer Capestany must be considered informational only. You own yourself.
Article originally published at Prairie Hawk Botanica. All images are paid stock photos. By agreement, no annotation is required.

Author: Jennifer Capestany
Jennifer is a clinical herbalist and health coach, specializing in autoimmune diseases like rheumatoid arthritis. Her interest in plant medicine led Jennifer to spend years studying herbology, physiology, and nutrition. She works one-on-one with her clients via her herbalist and health coaching business, Prairie Hawk Botanica. Jennifer lives on a homestead in rural Texas with her husband, 2 children, and various animals. In her spare time she loves to be in her large herb and vegetable garden. Sharing herb knowledge and her love of natural healing with others is her calling. You can also connect with Jennifer on Facebook and Twitter.
Hey @jenncapestany, this post was an absolute delight! Very informative, awesome content. I am working on compiling a herbarium, here on steemit, that describes plants, their benefits and how we can process them. I would love to see posts like this one be posted on the "herbarium" tag, if you are interested in making this project a collective effort, please feel free to share your knowledge there as well. Have a wonderful day!
That's a great idea! I'll make a note to include the #herbarium tag whenever appropriate. Thanks for reaching out and sharing your project!
Are you able to add something about Steemit to your website, so we can verify it is actually you who owns this account? Or if you have an official Twitter / Facebook, a post there would suffice as well.
A verification will help you get votes because users like to know they are rewarding the original author.
Thanks, I'll see what I can do!
I've updated my blog page to include a Steemit reference in the sidebar. Thanks again!
Thank you for your verification! If anyone asks you for that from now on, just direct them to this post.
Keep posting your excellent work, and I'm confident it won't be too long before your blog starts to get noticed :)
You're welcome, and thanks for the tip! Appreciate it!
Great post, thanks. Do you ever use coconut oil for infusions? Could you just substitute it for the olive oil?
Sure, you can! I do as well. If your coconut oil is solid, you'll have to use gentle heat to get it to liquefy and infuse. Unless you're looking for your infusion to target a specific condition or have a specific flavor, then the oil that you use is largely up to you. Just remember to use food safe oils for anything that you intend to ingest.
Herbal supplements are often used to support general health and well-being, rather than just targeting specific ailments. I think this is one of the main reasons why they are so popular. Also, they really help to cope with various problems or simply improve your immunity.