Complete Guide to OverdriveNTool
We present the complete guide to overclocking GPUs with OverdriveNTool for your Ethereum Mining Rig!
In this special we will write a complete guide to OverdriveNTool, in our opinion the most efficient, fast and immediate software for overclocking GPUs dedicated to mining.
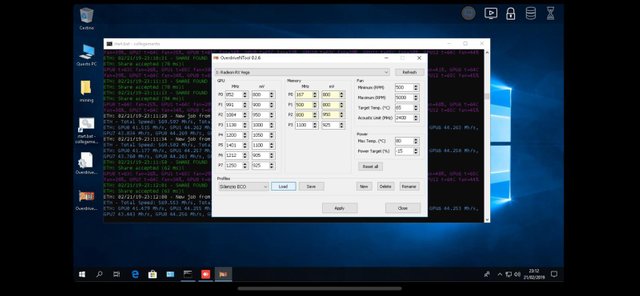
The interface is presented in a very simple and no-frills way, as if to suggest how much the program was created to go directly to the purpose.
We remind you that after installing the drivers (see our guide to build a 6 GPU Ethereum Mining Rig) you will need to go through the Radeon Settings (Radeon Settings), select Game, Global Settings and for each GPU in your mining rig (or mining rig) you will need to make sure that HBCC memory is disabled. Do the same with the Crossfire option, checking that it is also disabled. Reboot the system and verify that all video cards have indeed not enabled HBCC and Crossfire before proceeding.
At the following link the software download and technical specifications: https://forums.guru3d.com/threads/overdriventool-tool-for-amd-gpus.416116/
Recall that the GPUs in Atiflash will numerically correspond to the GPUs in ONT and Claymore, without misalignment.
First we open our BIOS previously modified with Bios Polaris or, possibly, a stable Bios Mod downloaded from specialized sites such as Anorak via ONT. However, we can also overclock the original Bios of the GPU. Follow the OverdriveNTool guide carefully when operating at these levels!
Click on New to create a new profile for the selected GPU. At first you will find yourself on the 0 which will correspond to the 0 in Atiflash and Claymore. I repeat once again: identical GPUs can behave differently; for this reason, the most stable final overclocking may vary from card to card. It will be sufficient to load the first profile on each subsequent tab, select New, make the necessary changes and save it with a different name (possibly recognizable, such as GPU1-OC Memory or GPU2-Temp, etc ...).
The stages of the GPU and Ram.
On the left we find the stages or clocks of the GPU with relative voltage for each sector. Some users disable the first 6 stages (from P1 to P6) to ensure that once the command for the minion is executed, the GPU immediately goes to the last stage. For those who, like us, restart the RIG once every 2 or 3 days, or even more, it is an unnecessary procedure.
We recommend, at least for the first tests, to leave them activated. Once you have reached the limit of the video card, you can check whether disabling them will bring some improvement in terms of hashing on the screen without the pool being affected. Because in effect our goal is to have a high hash-rate and with a minimum percentage of errors on the pool even at the expense of a lower hash-rate in our RIG.
In the central part we find the speed of the memory divided into 3 sectors. We will operate directly on the latter.
On the right you can see the speed of the fans, the temperature that the fans must maintain (in our bios-mode it is set at 75 ° to which we obviously never arrived), the acoustic limit (in a RIG it is a parameter to always keep consideration).
The last section at the bottom right, the Power, is divided into the maximum reachable temperature (with our Pulse set at 84 ° while with the XFX at 75 °) and the Power Target, strictly linked to the modified Bios that we are overclocking . You can try at the end of all tests, in the event of instability of one or more GPUs, to give less power starting from -25%.
In this guide we will refer to the XFX RX 580 8GB GDDR5, with GPU clock at 1200Mhz and Memory at 2150Mhz. 8 video cards theoretically identical in total.
Let's put into practice what has been written up to now ...
We immediately opted for blocking the stages by operating directly on the latter for both the GPU Clock and the RAM. From these levels it starts to drop with the voltage of both the GPU and the RAM, alternatively always checking hashing, consumption and the stability of the system (usually 5-10 minutes are enough). When the voltage is too low, the GPU will not start undermining.
The goal is to obtain the best performance / consumption ratio, always parameterizing the results obtained on the pool. A very high hashrate or very low consumption can often create numerous errors in the mining phase.
With 8 RX580 8GB video cards we reached a total consumption (thus including all the components of the RIG) of 770 Watts for an average of less than 100 Watts per GPU.
The result was achieved by bringing the GPU clock voltage to 1000 and the RAM to 900. Lower values are theoretically possible but could cause system instability. As mentioned previously, each video card is different from the others and on one of the eight GPUs we were forced to lower the power by 25%.
After these tweaks, we got results on the pool with a hashrate often higher than 240mhs.
We would like to emphasize that GPU overclocking is the absolute operation that will take you the longest time. It can take hours to reach the so-called "sweet spot" of each video card. Our OverdriveNTool guide will surely help you!
But this achievement will give you great satisfaction, we guarantee it.
Below the stable settings for the RX Vega 64 video cards of our 13 GPU Mining Rig of which you can see some videos on our YouTube channel: https://www.youtube.com/channel/UCdE9TTHAOtyKxy59rALSprA
Complete Guide to OverdriveNTool
See you soon for the next guide dedicated to mining!
If you liked this article and would like to contribute with a donation:
Bitcoin: 1Ld9b165ZYHZcY9eUQmL9UjwzcphRE5S8Z
Ethereum: 0x8D7E456A11f4D9bB9e6683A5ac52e7DB79DBbEE7
Litecoin: LamSRc1jmwgx5xwDgzZNoXYd6ENczUZViK
Stellar: GBLDIRIQWRZCN5IXPIKYFQOE46OG2SI7AFVWFSLAHK52MVYDGVJ6IXGI
Ripple: rUb8v4wbGWYrtXzUpj7TxCFfUWgfvym9xf
By: cryptoall.it
Telegram Channel: t.me/giulo75
Netbox Browser: https://netbox.global/r/PZn5A
