Namecheap 에서 GCP용 SSL 인증서 만들기
요즘 무료로 인증서를 만들어주는 Let's Encrypt 같은 서비스가 있긴 하지만,여러가지 이유로 유료 인증서를 써야 하는 경우가 있다.
그런 경우 상대적으로 저렴한 Namecheap 에서 인증서를 구입할 수 있는데, 과정이 만만치가 않다.
( 돈주고 하는건데도 편리하지 않다는 게... )
우선 구입 과정은 각자 알아서 하고 (...)
CSR을 만드는 과정부터 보자.
( https://www.namecheap.com/support/knowledgebase/article.aspx/9852/0/csrgoogle 참고 )
harrisonjung@cloudturing-2017-05-18:~/cert/dreamyoungs.com$ openssl req -new -newkey rsa:2048 -nodes -keyout server.key -out server.csr
Generating a 2048 bit RSA private key
.........................+++
.......................................................................................................................................................+++
writing new private key to 'server.key'
-----
You are about to be asked to enter information that will be incorporated
into your certificate request.
What you are about to enter is what is called a Distinguished Name or a DN.
There are quite a few fields but you can leave some blank
For some fields there will be a default value,
If you enter '.', the field will be left blank.
-----
Country Name (2 letter code) [AU]:KR
State or Province Name (full name) [Some-State]:SEOUL
Locality Name (eg, city) []:MAPOGU
Organization Name (eg, company) [Internet Widgits Pty Ltd]:Dreamyoungs,Inc.
Organizational Unit Name (eg, section) []:Web
Common Name (e.g. server FQDN or YOUR name) []:dreamyoungs.com
Email Address []:[email protected]

Please enter the following 'extra' attributes
to be sent with your certificate request
A challenge password []:
An optional company name []:Dreamyoungs,Inc.
위와 같이 하면 server.key 와 server.csr 의 두개의 파일이 생성된다.
( server.key는 당장 쓰지 않는데 굉장히 중요한 파일이다. 이거 몰라서 1시간 고생했다. )
우선 csr 파일을 가져다가 namecheap에 업로드를 한다.
이메일을 선택하고 나면 다음과 같은 화면을 볼 수 있다.
이메일함을 확인하면 이메일이 하나 와 있고, 컨펌을 하면 다음과 같은 화면을 볼 수 있다.
컨펌을 하고 나면 이메일이 오는데 그 이메일에 있는 첨부파일을 열어보자.
2개의 파일이 있다. 잘 보관한다.
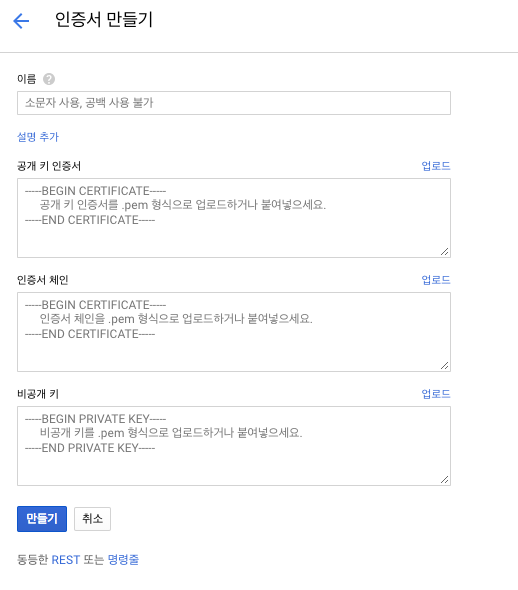
다음으로 구글의 Cloud Network 로 가서 인증서를 생성을 해야 한다.
위의 화면을 가면 순서대로 입력을 해야 하는데, 먼저 맨위의 공개 키 인증서에는 crt 파일을 업로드 한다.
다음으로 인증서 체인은 CA-bundle 에 있는 내용을 입력하고, 마지막으로 비공개키에는 앞에서 만든 server.key 의 내용을 업로드 하면 된다.
이렇게 해서 잘 적용되었나를 확인해 보면 되는데, 적용을 한뒤에 다음 사이트 ( https://decoder.link/sslchecker ) 를 통해서 확인을 해보면 된다.
- 이상하게 이메일이 아닌 사이트에 가서 다운로드를 받은걸로 하면 잘 안된다. 이유가 뭘까..

