How to Build a Wicking Bed (2.0 — full automation)
A comprehensive DIY guide for the construction of sub-irrigated raised-beds.
(Optional) Upgrade: fully autonomous watering.
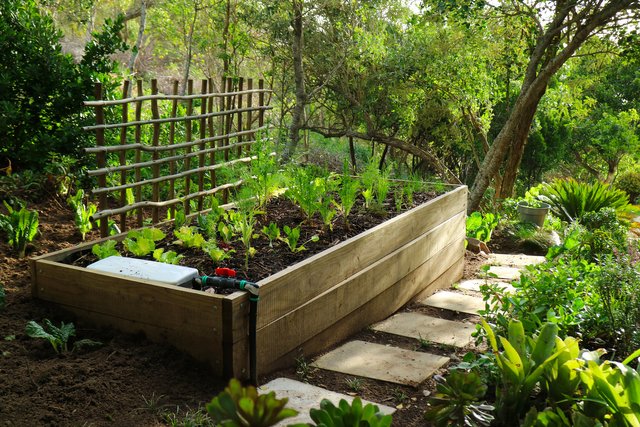
The combination of sub-irrigation and raised-beds offer a number of advantages for the regenerative urban farmer. The passive irrigation system, for example, enables consistent and efficient watering without the need for electrical pumps or complicated piping. This makes sub-irrigated planters a relatively affordable option for gardeners and urban farmers looking to increase water efficiency while reducing water management requirements.
In addition to improved water management, sub-irrigation ensures that your soil-substrate never dries out, creating an environment that is beneficial for both plants and their microbial symbionts. Microbial activity is key for creating regenerative grow systems — ultimately increasing plant health and productivity while reducing your inputs.
Irrigation mechanism: Water is drawn up from a reservoir below the planter into the soil through capillary action (hence the term ‘wicking’ bed).
The reservoir is typically topped-up manually through an inlet or, alternatively, one can automate this process by installing a simple valve (e.g. toilet-flush mechanism) and pipe leading from your water mains or rainwater tank.
Advantages of sub-irrigation:
- Improved water management (‘self-watering’).
- Increased watering efficiency (plants draw exactly what they need, minimal water evaporation).
- Optimum conditions for microorganisms (the substrate never dries out).
- Reduced salt build-up.
- Weed prevention (weeds have difficulty taking root due to the dry surface soil)
Step 1: Constructing the frame
Materials used: Treated-timber (8 x 2.7m, 8 x 0.7m), threaded-bolts (x64), right-angled bracing (4 x 0.7m)
Equipment used: Drill, saw, ratchet-spanner, clamps, sandpaper, spirit-level
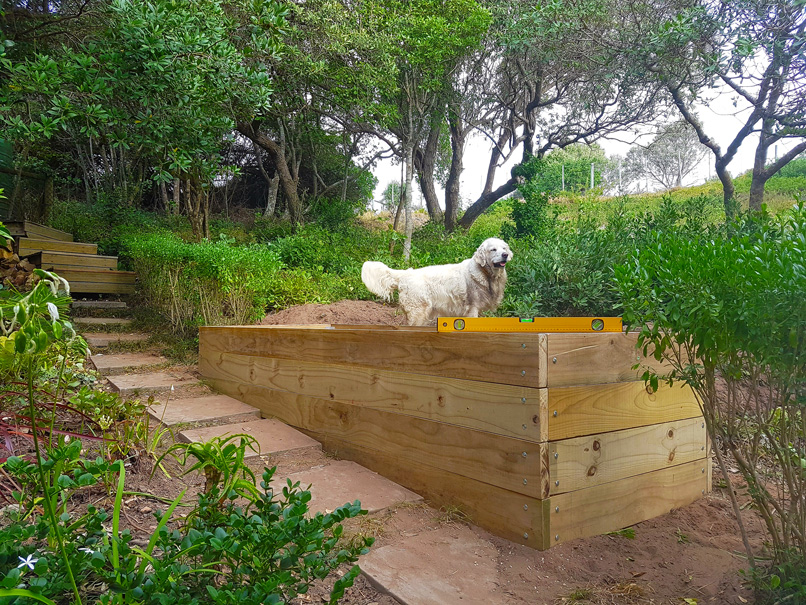
Dimensions: 90 x 270cm | height = 70cm
Design considerations:
Whatever materials you decide to make the frame from, ensure that the final component has enough strength and rigidity to hold the weight of the stones and soil (in Step 2).
If you’re looking to save money, consider digging a hole in the ground instead of constructing a raised-bed. Alternatively, you can use an existing wall to form one side of the wicking bed.
The maximum depth of your water reservoir should be around 30cm. It’s up to you to determine the optimum size based on you local rainfall, plant thirst, and how frequently you want to be topping up the reservoir. *If installing the automated top-up component, you can make the reservoir much shallower.
It’s necessary to have an upper limit of about 40cm for the depth of the soil-substrate due to the amount of wicking that is possible. We are fighting gravity, after all. Soils higher in organic matter will improve your bed’s wicking ability, so this number will vary according to the type of soil used.
Recommended depths: Reservoir height = 20–30cm (manual top-up) / 10cm (automated top-up) | Soil height = 25–35cm
In case you were wondering, it’s safe to use treated-timber with this grow system since an impermeable barrier is made between the soil and the wood by the pond-liner/plastic sheeting (see Step 2)
When cutting your planks, remember to take into account the overlap that will occur at the joins.
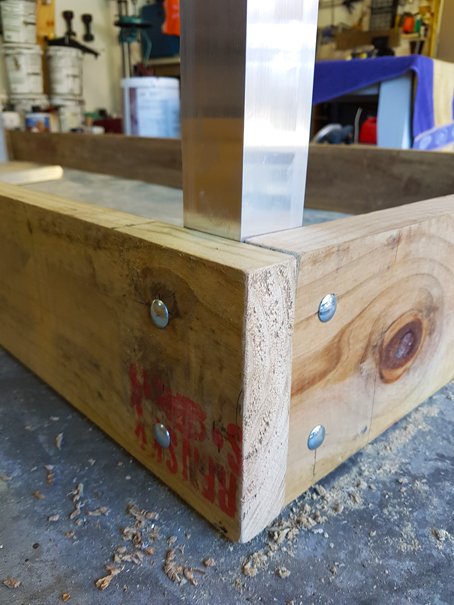
- Prepare your planks by cutting them to your desired lengths (remember to take the overlap into account — see image on the left).
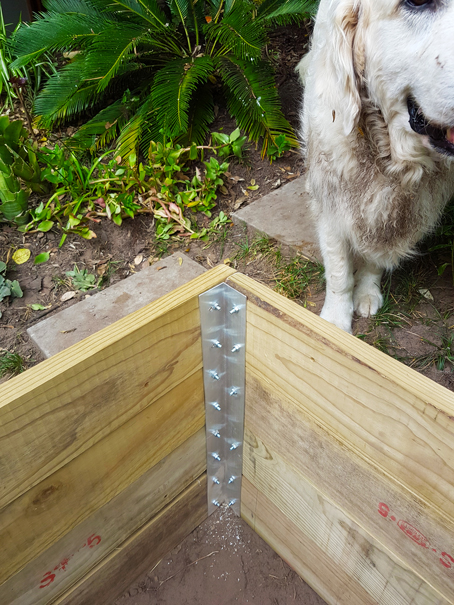
- Start with the base of the frame and use clamps to position the planks together and to the right-angled bracket (that vertical aluminum bracket in the left image).
- Line-up your drill and punch the holes for the bolts, inserting the bolts as you go (this will keep all the holes are all lined-up).
- Attach all the nuts and tighten everything fairly loosely (too much and we’ll warp the bracket).
At this point, you might want to move the base of the frame to the desired location due to weight considerations.
If your longer planks have a slight bow in them, position the crest/hill of the bow facing inwards. The weight of the soil should provide some corrective pressure.
Make sure the base is on a level plain (this is important for adequate wicking).
Finish punching the holes and attaching the rest of the planks one level at a time (remember to keep adjusting your level & alignment) until you reach the top.
If your bolts protrude too much (see left image) they could puncture the plastic, creating unwanted leaks. File them down or attach a protective covering.
Step 2: Constructing the reservoir
Materials used: builders plastic (cheaper option) / pond-liner (durable option), stones/gravel, ‘builders’ fabric, weeping tile, threaded pipe, (optional: Toilet cistern with flush-valve, PVC piping, irrigation pipes and the appropriate joins)
Equipment used: drill, clamps, scissors/blade, staple-gun
Design considerations:
- Ensure that the length and breadth of your plastic is sufficient to cover the bottom and sides (all the way to the top) without requiring any joins (we want to avoid leaks at all cost).
- Lay weeping tiles (AKA those black, ribbed drain pipes with slits in them) on the bottom of the bed before adding the stones to increase your reservoir capacity.
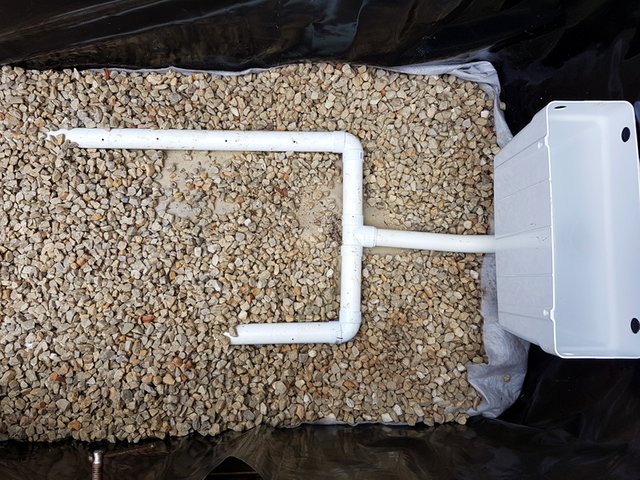
Above: the reservoir component (with the addition of a toilet cistern for automating top-up)
- Flatten and level the ground inside the frame. Remove all objects (twigs, roots, etc.) that could penetrate the plastic when the stones are put down.
- If you have doubts about the strength of your plastic, put down a layer of ‘builders’ fabric to buffer any stones that could pierce the plastic.
- Lay the plastic down inside and along the sides of the frame, smoothing out the wrinkles as much as you can manage. A good strategy for removing the slack is to make vertical folds along the corner vertices. Use a staple-gun and/or clamps along the top (we don’t want leaks, remember!) to keep the plastic in position.
- Lay down the weeping tiles (‘drain pipes’) and — if not using the automated top-up component — make a hole at the end of one of the weeping tiles (preferably in an accessible corner) and insert a PVC pipe vertically into it. This will serve as your inlet, allowing you to top-up the reservoir — so make sure it’s long enough to protrude above your soil.
- Once everything is in position, carefully add the stones until you reach the desired reservoir depth (Important: if you’re installing the automated top-up component, proceed with that before continuing with 5–8).
- Add another layer of ‘builders’ fabric over the stones, making sure there is some overlap on the sides. This is to prevent soil from falling into the reservoir.
- If you haven’t already done so, cut the excess plastic around the top of the bed to neaten it up a little.
- Last (but incredibly important), we’ll want to add an overflow pipe just above the maximum water level (approximately 1-2cm above the stones). Simply drill a hole right through your frame and plastic lining, and insert a short threaded pipe. It’s a good idea to seal the hole you made in the plastic by twisting a gasket onto the threaded pipe on the inside of the bed, ‘clamping’ the plastic to the frame.
Optional (automated top-up component):
Note: In the image above, you’ll notice that there are some PVC pipes connected to a toilet cistern. Originally this was intended to evenly distribute the water throughout the reservoir — but this is unnecessary due to the slow wicking action relative to the flow of water through the stones. For the purpose of this guide, imagine that they are the weeping tiles (drain pipes).
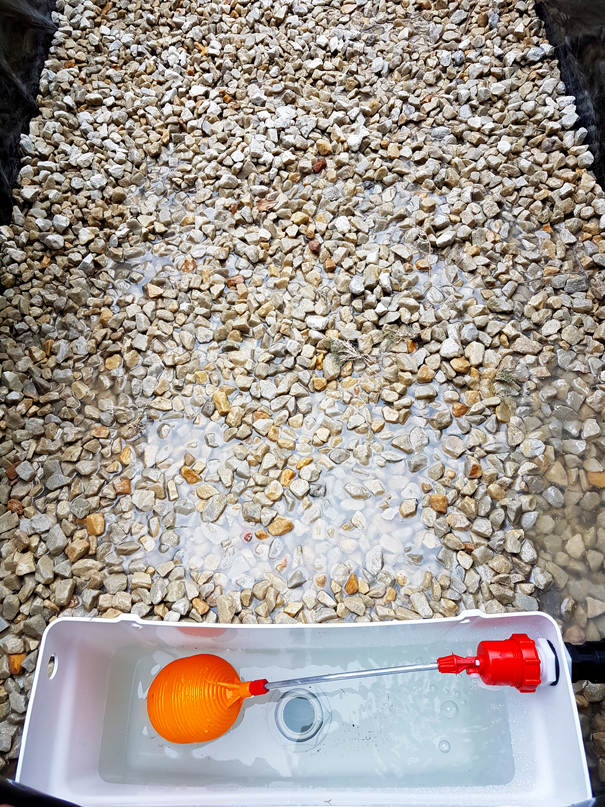
Above: A toilet flush-valve in the wicking bed — enabling automated top-up of the reservoir.
- Position the cistern in place, making sure that the maximum water level (i.e. the top of the stones) will be approximately halfway up the cistern.
- Before placing the stones, you may want to brace the cistern with something to prevent it from buckling.
- Connect your irrigation piping to the cistern (the other end will connect to your rainwater tank/water-mains), making sure that the end is accessible once we’ve filled the bed with soil. You will likely require two elbow-joins for this.
- Bend the float arm so that the valve shuts-off at the maximum water level (just enough to allow wicking — i.e. just above the top of the stones)
- Connect the inlet to your rainwater tank or water-mains (you may want to add an extra valve to this pipe in case you need to turn off the flow at some point)
Step 3: Adding the soil
Soil mix: Your choice of soil will depend on various factors such as the types of plants, budget, and your ability to source quality organic material.
Your main consideration should be to ensure that the substrate will wick effectively. Wicking can be improved by using high quality organic compost, loamy soils, peat, etc.
- Premix your soil, or mix and churn it as you lay down the different layers (beware of puncturing the plastic with your spade/rake).
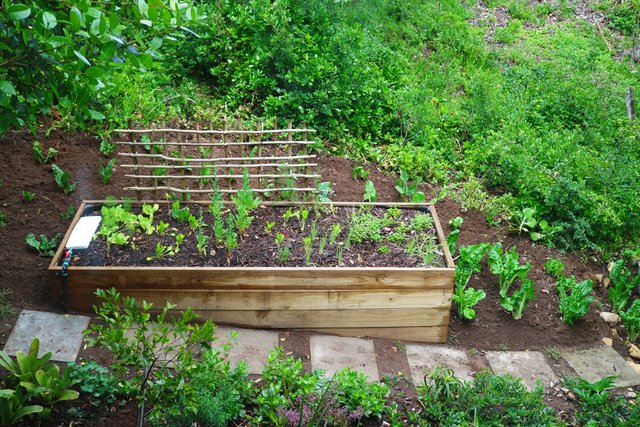
- Lay down an organic mulch layer over the surface of your soil. This will help prevent weeds, reduce water evaporation, protect the surface soil (and microbes) from direct sunlight, as well as providing nutrients to the soil below as it decomposes.
- Plant!
Strategies / Recommendations
No-till: It’s good idea to adopt a no-till policy with these raised-beds. By minimizing disturbance to the soil we allow the microorganisms and worms to determine the soil’s structure, resulting in increased microbial biomass and the beneficial emergent effects thereof. By actively tilling the soil, we oxidize existing humus and destroy one of the crucial aspects of the soil’s ‘energy transportation system’: the mycelium networks, leading to further dissociation of the soil-plant supraorganism.
Probiotic amendments:
These powerful inoculants provide a way to improve your soil’s microbial diversity and consequently your garden’s health and productivity. They can be added to your soil, composting systems, or, if you have a wicking bed, straight into the reservoir via the inlet (another advantage of sub-irrigation). Below are a few worth mentioning:
Lactic Acid Bacteria Serum (LABs): In probiotic and natural farming circles, these bacterium are often referred to as the ‘microbial workhorse’ of soil ecosystems, providing a number of important functions in the anaerobic decomposition process and in the production of beneficial enzymes and antibiotics. These are highly abundant organisms and can be cultivated at home with ease.
(LAB cultivation guide coming soon..)
Effective Microbes (EM): This powerful microbial inoculant typically contains a variety of lactic acid bacteria, yeasts and photosynthetic bacteria that form a particularly synergistic microbial consortium within the soil-plant ecosystem.
(You can order this in South Africa from Efficient Microbes).
Bokashi: This is an organic fertilizer produced by the fermentation of organic material by various microbes (typically EM or LAB). Bokashi bran (wheat bran inoculated with these microbes) can be used as a probiotic soil amendment (added to the mulch layer, for example) or to further ferment organic waste such as kitchen scraps. The end product of this fermentation process (Bokashi) is typically buried in the soil as an incredibly rich source of microorganisms (and their byproducts), nutrients and minerals.
I hope you’ve enjoyed/made use of this guide! If you have any suggestions, feel free to contact me at my email address below.
Email: [email protected]
♥ Be regenerative!
Congratulations @rosseyre, you have decided to take the next big step with your first post! The Steem Network Team wishes you a great time among this awesome community.
The proven road to boost your personal success in this amazing Steem Network
Do you already know that awesome content will get great profits by following these simple steps, that have been worked out by experts?
Congratulations @rosseyre! You received a personal award!
Click here to view your Board
Congratulations @rosseyre! You received a personal award!
You can view your badges on your Steem Board and compare to others on the Steem Ranking
Vote for @Steemitboard as a witness to get one more award and increased upvotes!