DIY Two Liter Bottle Garden (Great For Kids / Homeschooling)
I was fortunate enough to be invited on the first @pennsif Alternative Lifestyle show on MSP Waves yesterday, and we talked about how I've gotten the word out about Epic Gardening, my website. One of the things I mentioned after listening to @redrica talk about homeschooling as an experiment I published for kids - how to build a simple hydroponic garden with a two liter bottle.
Today, I'm reposting it from my site and YouTube for all of you who were interested in the full guide - thanks and I'm so grateful to have met a lot of you on the show yesterday!
Hydroponic Gardens: A Great Experiment For Kids
As a kid, I remember growing a bean plant in school. It was 3rd grade and I vaguely remember the lessons that the teacher was trying to convey...but if you asked me for details today, I wouldn't be able to tell you any. Looking back, this was for a few reasons:
- I didn't connect growing the plant to growing food
- I didn't see the final product (we didn't grow the plant to the point where it produced new beans)
- It just wasn't that cool -- it was a bean in a cup with some of that old green foam they use for floral arrangements (you know the kind)
For this tutorial, I wanted to put together a guide that solves all three of those problems for your child...something I would have loved back in third grade!
What Your Child Will Learn
The Growth Cycle of a Plant
From germination, to seedlings, to vegetative growth, all the way to harvest -- this guide shows kids the full lifecycle of a plant.
What Plants Need to Grow
By growing in a hydroponic environment, the "cloak" of using soil is removed -- kids will learn how proper nutrition, water, and light help a plant to thrive.
Where Food REALLY Comes From
No longer will food be something that just magically shows up on their plates. By growing edible leafy greens, your child will learn exactly what happens before the food they eat hits their mouths every meal.
P.S. If your child doesn't like eating veggies, this is an especially good project for them...kids seem to "magically" want to eat lettuce and spinach after they grow it themselves. Funny how that works...
The Materials You'll Need
This is a pretty simple project, so don't be scared off by the materials list. You can find most of it lying around the house. For the few specialty items, Amazon or a local garden store will work just fine!
| Item | Amount | Where to Buy | Price |
|---|---|---|---|
| 2 Liter Bottle | 1 | Grocery or Home | $0-$1 |
| Growing Media (Coconut Coir) | 2-3 cups | Amazon or Garden Store | $6 |
| Water | 3-4 cups | Home | $0 |
| Wick(s) | 1-2 wicks | Amazon or Home | $0-$6 |
| Aluminum Foil | 2 sheets | Grocery or Home | $0-$5 |
| Nutrients (GH Flora Grow) | Quart | Amazon or Garden Store | $22 |
| Seeds | 1 packet | Amazon or Garden Store | $3 |
| Sharpie | 1 | Home | $0 |
| Scissors | 1 | Home | $0 |
| Optional -- pH Kit | 1 | Amazon or Garden Store | $15 |
| Optional -- Seed Starters | 1 pack | Amazon or Garden Store | $17 |
| Total | | | $30-$43 |
| Total w/ Optional | | | $57-$75 |
Materials Breakdown
2 Liter Bottle
Price: $1 or Free
Location: Grocery Store
A container of some kind is needed to house the water and nutrient mixture. Grab any 2 liter bottle that's lying around, or pick up a cheap $1 bottle of club soda and either empty it out or drink it if you don't already have a 2 liter bottle around the house.
Personally, I have a weird addiction to club soda, so I had a couple bottles lying around the house for this project 
Growing Media

Price: $6 or Free
Location: Amazon or Gardening Store
You will need something for your plant's roots to sit in and hold on to if you want to grow a healthy plant.
I highly recommend using coconut coir, which you can buy on Amazon. It's a natural, sustainable hydroponic growing material that's really cheap.
If you want to try something else, use larger-sized growing media so it doesn't fall through the hole in the bottle. Gravel, expanded clay pellets, or lava rock are all good choices.
*Refer to the Epic Gardening Growing Media Guide for more details.
Wick Material

Price: $6.00 or Free
Location: Amazon, Home Depot, or Home
We'll be using the wick method to get water and nutrients up to the plant's roots, so you'll need some material for this. Felt or cotton towels are best for this. I typically cut up a washcloth into a strip and use that.
If you want to get fancy, you can use Tiki Torch Replacement Wicks -- but they're not necessary -- grabbing some cloth from around the house works just fine!
Water

Price: Free
Location: Home
Water straight out of the tap is ok, as long as you let it sit out overnight to evaporate the chlorine in the water. Distilled, filtered, or reverse osmosis water will also work!
Aluminum Foil

Price: $5 or Free
Location: Grocery or Home
If you don't cover the bottom of the 2 liter bottle with something opaque, light will get it and your garden will start growing algae in the water reservoir -- no good! Aluminum foil helps to block out the light.
Seeds

Price: $3 or Free
Location: Garden Store, Amazon, or Home
For this experiment, it's best to choose a fast-growing, leafy vegetable so your child can see progress really fast. Don't pick anything that needs to fruit to be edible (beans, tomatoes, etc). Any lettuce, spinach, or basil variety is a great choice.
Recommended Varieties: Black Seeded Simpson or Genovese Sweet Basil
Nutrients / Fertilizer

Price: $22
Location: Amazon or Garden Store
For your plant to grow successfully to a harvestable stage, you'll need some nutrients. Because you're only growing a plant in the vegetative phase, you can use something like General Hydroponics Flora Grow and get amazing results.
pH Kit (Optional)

Price: $15.00
Location: Hydroponics Store or Amazon (recommended)
Most plants need water to be a bit lower pH than typically comes out of your tap. While it's not 100% necessary for this experiment, your plant will grow better if you pick up a cheap pH Control Kit to adjust your water down to a ~6.5 pH.
Seed Starters (Optional)

Depending on the growing media you chose, you may need something to start your seed in so it takes root successfully. I personally like Rapid Rooters, though you can also use Rock Wool Cubesor even make your own DIY Seed Cubes if you want to save some money and have some more fun with your kid!
Step 1: Prepare 2 Liter Bottle
Draw a Line
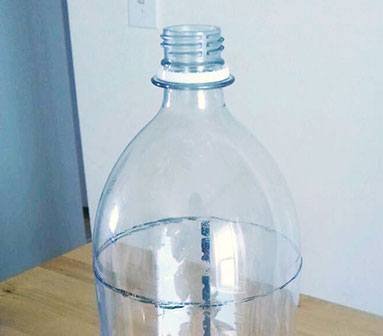
Rinse out the bottle to remove any residue of whatever drink was in there before it was empty.
Take your 2 liter bottle and draw a line around it right where the curve ends and the bottle transitions to a straight line. It's important to draw the line below the curved area, so you have enough space to grow your plant!
Cut The Bottle

Next, cut across the line, making sure to cut as straight as possible. Then flip the top over. Pretty simple, right? Now you've got the basic structure of the system built.
The top area is where your growing media and seed will go, and the bottom section houses the water and nutrient mixture. A wick will be fed through the hole...but before we get to that, we have to prepare the water...
Step 2: Prepare The Water
pH Your Tap Water
Note: pHing your water is optional, but it's highly recommended not only for helping your kid's plant grow better, but also for teaching him/her some really cool principles about chemistry and WHY a plant needs water with a lower pH than what we typically drink.

Now that we have built our simple 2 Liter Garden, we need to pH the water and add nutrients. Most tap water is in the 7.0-8.0 range. The plants you will be growing need water with a pH in the 6.0-6.5 range, so you will need to use some pH down. The picture to the left shows the forest green color of average tap water in the 7.0-8.0 range.
pH down is highly corrosive, so be sure not to get it on any part of your body. You don't need much to adjust the water -- try a drop to start. Mix it into the water thoroughly and then test again. When the color matches the 6.0-6.5 range like the picture below, you're ready to mix the nutrients.

It can take a while to get the color just right -- try not to get frustrated. This is one of the most important steps in making sure that your plants get all of the nutrients that they require for vigorous growth. If you don't correctly adjust pH, you will prevent your plants' roots from absorbing certain nutrients.
Learn More: How pH interacts with nutrient uptake
Add Nutrients

Now we need to remember how much water we added to the reservoir. Take a look at the nutrient mixing chart on the back of your bottle of General Hydroponics FloraNova Grow. This will give you the exact amount to mix into your system. If you're starting from seed or cuttings, use ¼ tsp/gallon and if you're starting from established plants you've bought from a garden store, use 1 tsp/gallon.
Learn More: Hydroponic Nutrients Guide -- What Plants NEED To Grow
After you prepare your water, pour it into your 2 liter bottle until it reaches the point where the cap would touch, then move on to the next step!
Step 3: Add Wick and Growing Media
Add The Wick

Take your wick and thread it through the cap hold in the 2 liter bottle. Pull it through to around 2/3 of the height of the smaller growing area.
You want it to be high enough so that when your seeds sprout, the roots won't have to travel far to get to the wick area (where your growing media is moist and filled with nutrients.
Prepare Your Growing Media

If you decided to use coconut coir, this step is simple: all you need to do is add some water to your coco coir brick, which will hydrate it and expand it to around 5 times its original size. Drop a few handfuls into your bottle, making sure the wick is in the center of the media.
If you are using another type of media, repeat the process, but don't add extra water!
The cube in the middle is a Rockwool Cube, used to start seeds outside of the system
Step 4: Plant Your Seeds!

Now comes the fun part -- planting your seeds. Grab your packet of seeds and pour a small amount out in your hand.
Pick three or four seeds and clump them together on the tip of your finger. Now, you might be thinking:
"Why am I planting 3-4 seeds if I'm only growing one plant?"
It's a good question! The reason we do this is because of germination rates. A seed does not have a 100% chance of sprouting...usually it's anywhere from 80-95% for fresh seeds for most common varieties.
We plant 3-4 seeds in one hole to increase the odds that we get at least one that sprouts -- it'd be a shame to wait 5-7 days only to have your seed not sprout -- so avoid that problem altogether by planting a few!
Follow the directions on the seed packet to figure out how deep to plant your seeds -- usually it's 1/4thto 1/8th inches below the growing media. Make sure to cover them up with a little coconut coir so they're in a dark environment.
Using a Different Growing Media?
If you're using a larger growing media (pebbles, lava rock, expanded clay pellets), then you'll need a seed starter like a Rapid Rooter or Rockwool Cube to get the seed started. See the materials section for more information.


Finished Product

Congratulations, you're now the proud owner of a really awesome 2 Liter Hydroponic Garden that will produce a head of lettuce, spinach, or some tasty basil within a few weeks! Read on for some important details on taking care of your garden.
Why Is There Aluminum Foil Around The Bottle?
If you want to be absolutely sure of the health of your garden, you'll want to encase the 2 Liter Bottle in something opaque -- aluminum foil works well.
Why? Plants aren't the only organisms that like water, nutrients, and light -- algae does too. If you let too much light hit the nutrient reservoir, you might find that you get some nasty visitors that will make your garden look gross and smell a little weird.
Maintenance
This garden is really easy to take care of. Just follow the guidelines below with your child and you'll have a healthy plant!
Plant Details
Here's a list of plants that I would recommend trying with your child for this garden:
| Plants | Germination | Seedling | Harvest |
|---|---|---|---|
| Basil | 5-10 days | 2 weeks | As leaves mature |
| Lettuce | 7-10 days | 2 weeks | As leaves mature |
| Spinach | 7-14 days | 2 weeks | As leaves mature |
In my example garden, I planted Black Seeded Simpson Lettuce. If I had to recommend a particular plant, I would go with lettuce -- it's easy to grow, fast growing, and most kids will eat it...and if they wont...they will after they've grown it themselves!
Germination
Once your seeds begin to sprout, you will need to thin your seeds. Because you planted 3-4 seeds, you will usually have at least 2-3 that sprout up.
This garden is designed for only one plant -- so you'll need to clip off the weakest looking seedlings with a pair of scissors...leaving only the healthiest seedling.
Every seed has a chance of not sprouting, so by planting 3-4 seeds at a time we lower the chances that we don't get any seeds to germinate.
Lighting
Place your garden in an area that gets as much natural sunlight as possible. Ideally, you want an area that's getting at least six hours a day.
If you can't find a spot in your home that fits these requirements, you may want to consider lighting it artificially. A compact fluorescent bulb (CFL) will work just fine for lettuce, basil, or spinach.
Make sure that your plants get no less than six hours of sun per day, supplementing with lights if you can't get this much light naturally.
Watering
Taking care of your 2 Liter Garden is simple. All you have to do is make sure that you keep the water at the correct level.
As your plant grows, it will suck up water and nutrients, so keep some properly prepared nutrient mixture ready to fill it back up to normal levels when the reservoir drops.
Harvesting
The best part about setting up a 2 Liter Garden is the fact that you can harvest all of the time!
Have your child cut off the outer spinach, lettuce, or basil leaves and leave the smaller, less developed leaves to grow. You can keep harvesting over and over for at least a month using this method!
Questions?
If you have any questions that I didn't answer in this guide, drop me a comment below!
Thanks For Reading!
If this is your first time reading my writing, thank you! Please leave a comment so I can get to know you better.
My name is Kevin and I run Epic Gardening, a website, podcast, and YouTube channel. My goal is to teach 10,000,000 people how to grow their own food.
I'm a big believer in Steemit and decentralized platforms, so I'm going all in on Steemit, dtube, and dsound. Be sure to check me out there too! You'll find me writing about gardening, travel, health, and philosophy - I can't seem to stick to one topic :P
Thanks and happy Steeming,

Kevin
Wow!!! I didn't know that this was possible. Whenever I have time, I am going to try and use this method to plant seeds.
A very indepth post!
Thanks for the kind words ! It's a wonderful way to grow hydroponically :)
Am definitely gonna try ds
Please let me know how it goes for you!
Very informative, thanks for sharing.
Thanks Marlon!
Perfect for that Urban Gardener or that person that doesn't have very much space. Great post @halcyondaze! Very informational
Thank you so much!
Never mind the kids, I am seriously gonna try this and I’m an old guy. Now how can I bookmark this?
It's a great system if you set ~12 up and do different types of leafy greens! You can even stagger so you have a never-ending supply of greens.
My daughters would love this, definitely going to give it a shot!
Post it on Steemit if you do!