Reading a Soil Test Part 1
This is Part 1 of a 3 part series on reading a soil test and making a custom amendment mix for your garden.
In 2010 I attended a workshop by Dan Kittredge on Balancing Your Soil. He had brought an apple from his mother’s orchard that he had sliced in half the day before. It had not browned at all. He said it was because the soil it had grown in had all the needed nutrients in the proper proportions and the tree was very healthy and so was the fruit.
I had been trying to raise the best food I could as treatment for Lyme disease for 2 years and I was smitten by this information. I got the soil test from Logan Labs that he recommended because they will do one that includes the micro-nutrients. But for 2 years I struggled to understand what the results meant and how to utilize them.
In 2012 Steve Solomon published a book titled The Intelligent Gardener and in it he included worksheets on making your own custom amendment for your garden from the Logan Labs test.
He has a Yahoo group called SoilandHealth and over the next year various changes were made to the worksheet. But some of the micro-nutrients weren’t addressed. I had been attending Soil Seminars and keeping notes on nutrient recommendations. I went through a Jerry Brunetti PowerPoint and collected his recommendations. I offered them to Steve to be added to the worksheets.
I read his book, kept lots of notes, and figured out the formulas for each amendment on the worksheet. I’ve been doing this custom amendment mixing for each of my 3 big gardens since 2012. It is making a huge difference in plant health and production, improving each year.
CRUCIAL NOTE: Be aware that not all labs use the same testing methods. It is VERY IMPORTANT to only use this worksheet on a Logan Labs test. You could toxify your soil using the results from another lab.
I normally do my soil tests in early November, when the plants have stopped growing and the soil is depleted. This is my soil test for November 2017, for use in 2018.
Outside of exchangeable cations, there are no recommendations for how to amend deficiencies on the test.
One way of reading this test is to think of all the nutrients sitting around a table with 100 seats. If you look at the Base Saturation % section, you will see that Calcium is 60 to 70%. That means Calcium takes up 60 – 70 of the 100 seats. Magnesium takes 10 – 20, Potassium 2 – 5 and on down into the Trace Elements and Other. How many seats does your test show them using?
You may also notice that some are recorded as p.p.m. (parts per million) or as lbs/acre.
At the top there are the results for pH, Organic Matter, and TEC.
So what to do with all this?
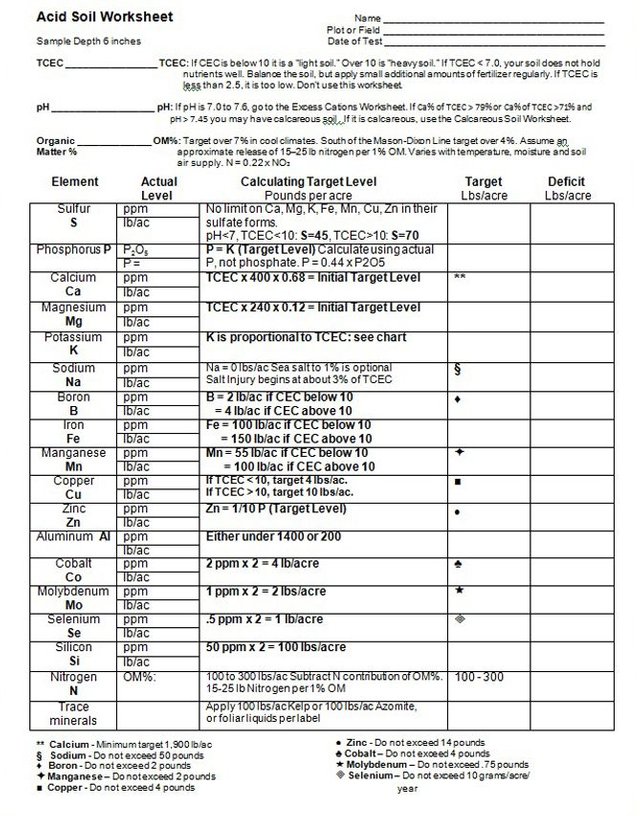
I use the Acid Soil Worksheet because I don’t have a pH over 7.0. There is another one for higher pH. I’ve never used it, so if you have a high pH you will want to use the other worksheet.
In this post I will cover filling out Page 1 of the Worksheet. It will give you targets, but they will all be for an acre. Page 2 converts them into what is needed for your space. That will be another post.
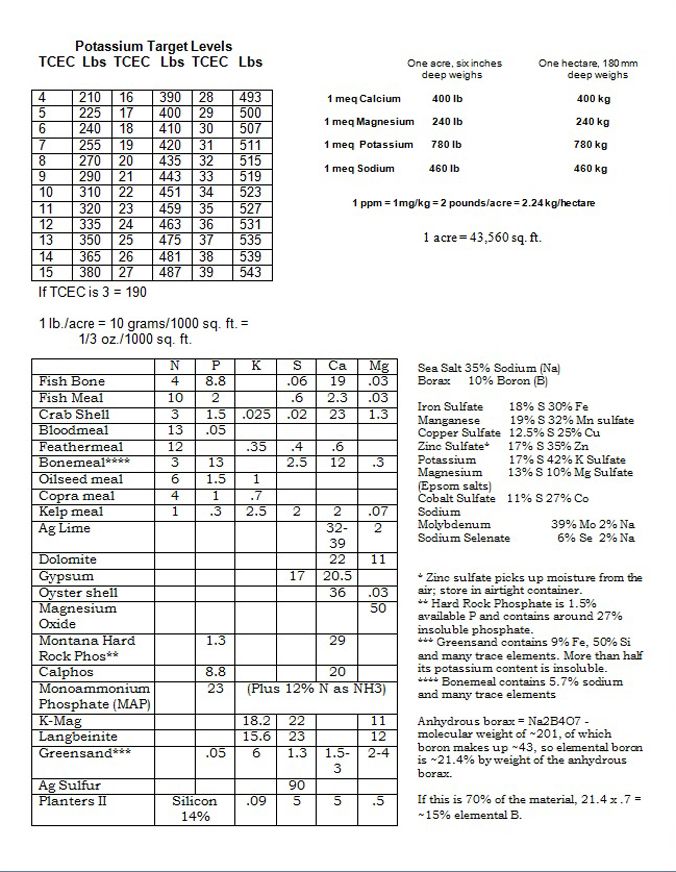
Some of the formulas require using the following Chart Page.
So let’s get started figuring this out.
Sulfur: pH<7, TCEC<10: S=45, TCEC>10: S=70 In my Big Garden the pH was 6.7, the TCEC 12.46 so my sulfur target is 70 lbs/acre. Looking at the test, it says I have 19 ppm. Now what?
To convert ppm to lbs/acre you multiply the Actual Level x 2. So my ppm becomes 38 lbs/acre. That’s a good deal less than my target of 70, so my deficient is 32 lbs/acre.
Let’s look at the next one, Phosphorus (P): P = K (Target Level) Calculate using actual P, not phosphate. P = 0.44 x P2O5 (phosphate) Hmmmmm… Now what?
Well, it must be actual P, so we do the math. 3138 (from Phosphorus under Anions) X .44 = 1380.72 So this is our actual P. But P = K (Target Level)…
So we must go to Potassium (K) to see what it is. 284, but K is proportional to TCEC: see chart. Hmmmmm… Ok, TCEC is 12.46, from the soil test.
Let’s see what the chart says in the top left corner of the Charts page. Lbs for TCEC 12 is 335 and for 13 is 350. 12.46 is half way between so I’d use 342. So Potassium’s target is 342, which makes Phosphorus’s target 342.
Calcium and Magnesium have a formula, just plug in the correct numbers.
When you get to traces, they are all ppm so you need to CAREFULLY convert them to lb/acre. A mistake in math could toxify your garden for years. Ask me how I know….
As you go about determining the targets for traces, be super aware of the symbols in each target box. DO NOT EXCEED! You may need 2 lbs of molybdenum but the year limit is .75 lb. This means it may be several years before you bring that number up to target.
Nitrogen: 100 to 300 lbs/ac Subtract N contribution of OM%. 15-25 lb Nitrogen per 1% OM Now what?
My organic matter is 6.35%. I use the middle ground of 20, between 15 – 25 for figuring. So this means 1% = 20 lbs. I have 6.35% x 20 = 127 lbs/acre. Target is 100 – 300, and again I take the middle ground, 200 as my target.
Trace minerals: I use kelp as Azomite has too many things I don’t need, so my target is 100 lbs of kelp.
DOUBLE Check your figures. MAKE SURE there are no decimal errors. Make sure your writing is clear and legible.
Your next job is to precisely measure up the area you tested and plan to amend. Too small and you could put too much down; too big and you won’t have enough.
We will use this figure on Page 2 of the worksheet.
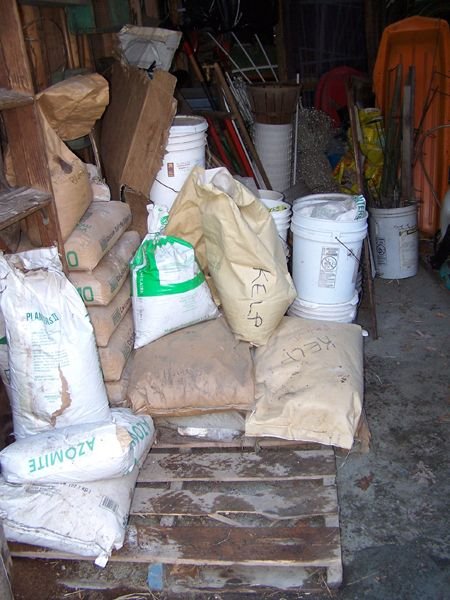
Doing amendment inventory…..
References:
http://soilanalyst.org/wp-content/uploads/2012/12/WorksheetRevision-03.pdf
Credit:
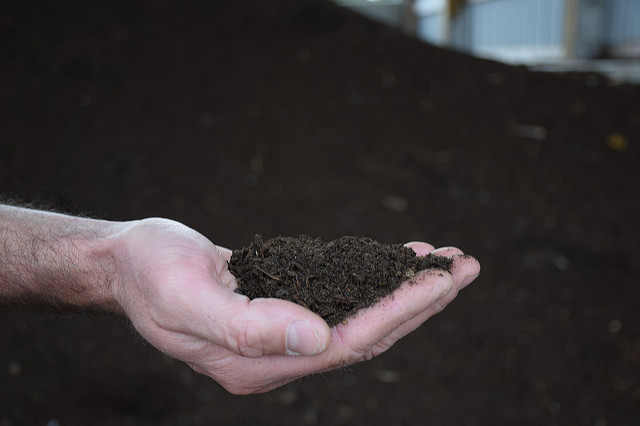
Soil @USDA NRCS photo by Analia Bertucci.

Resteeming to save so I can read this a million more times lol!!
My brain does not work this way.....this is so confusing to me but I am so facinated and want (need) to learn this so badly!! Thank you, amazing blog. I am really excited to be armed with this info!
It had EXACTLY the same effect on me when I did it the first 2 - 3 times. I had to constantly refer to my notes to figure it out each year. But I talk about it a LOT to others and have been teaching them to do it, and it gets easier, as time goes on. I do hope I was clear enough on each step. Don't be afraid to ask me about any bit you can't figure out.
Oh thank you! I will probably have a million questions!
Excellent, This will be my first year trying to do some heavy production. Which I am sure will be nowhere near yours! But... having said that, I am considering doing about 1/4 acre (I have one full cleared) All straw bale gardening for 5 years. I will be able to build up a decent sized soil bed within 5 years, including my rabbit poop and hay compost. Maybe I should test every year before I start planting, or wait? Great information!!!!! I copied your pics so I could print, if that is ok.
I would test now for a base line. If you aren't way off on things, then go to every 3 years.
I put up as clear copies as I could so that they could be saved and used, so it's perfectly fine. I know Steve Solomon will not mind, he's said so many times.
Thanks! As you can see the reason I am bale gardening is due to our terrible soil... Since we have so much limestone, rocks and clay our actual soil is really alkaline. So rotting straw and mulch can be mixed with the clay for a reduced acidity. Add the neutral rabbit poop for volume. Yea i could get a pretty good mix going. I will do a test this fall, I think out extension does those things The University of AR is fairly awesome with this stuff!
Be aware if you use Extension tests you can NOT use this form for a mix. They also do NOT test for the micro-nutrients. Different labs use different methods and the results you are given could toxify your soil if you used them on the worksheet.
This worksheet is for Logan Labs tests only!
I'll check and see what hey offer and refer back to your post. Thanks! Once you start to go larger than a small garden, everything changes...
It took a little to understand the first soil testing I had done on my worm castings to see how potent they were coming out of my bins. I actually have everything I see on your pallet that I use in my worm teas. I found it is easier for me to brew really good quality worm teas to spray on my plants then to improve all the soil the plants are planted in. A lot cheaper also. The microbes from the worm tea will start to live in your soil over time improving the soil also.
Super useful article to reference back to.
How do you get the logan test? Do you buy a kit online, or at a nursery or store?
You get the instructions from their website:
http://www.loganlabs.com/customer-tools.html
To get the micros done, use this form:
Don't use the form on the website as it doesn't specify the micros.