Building a Memory Game Using Decentraland’s SDK
Learn how to use Decentraland’s SDK and API to create your first, simple game!

So, you want to build your first interactive experience for the metaverse? You came to the right place!
My name is Daniel Belohlavek and I’m part of Decentraland’s world team (the team in charge of developing Decentraland’s client and developer experience). Specifically, I’m responsible for the CLI, so if you have some feedback, hit me up on Discord!
Creating an experience for Decentraland bears a lot of resemblance to modern web development. If you’ve ever created a website using only HTML or if you’ve played around with React, you will feel quite at home with our SDK. If you come from a game development background, hang in there, I’ll walk you through everything you need to know to build a basic memory game called Simon Says!
Prerequisites
To get started, make sure you visit our Developer Portal where you can find information on how and where to get our Command Line Interface (CLI), the point of entry to the metaverse for all developers. Make sure everything is set up properly before continuing by following our Quick Start Guide. Please bear in mind that this tutorial was written shortly after the release of the Alpha version of the SDK.
You can follow along by downloading the source code for this tutorial from GitHub!
Simon Says
Simon Says is a simple memory game where you have to remember the order of a sequence that is shown to you, and if you choose incorrectly you lose instantly. This game can take several different forms, but we will go for the classic “remember the color sequence” type of game using just four colors and a reset button.
The computer will show the player a sequence of colors, and then wait for the player to re-submit the same sequence. If the player re-submits the correct sequence, they win, and the game gets harder by presenting a longer sequence. If the player misses even one color in the sequence, they lose. Easy, right? Let’s get going!
Getting started
Begin by creating a new folder for your project, and use the dcl init command to create a new Single Player Scene. We will be using TypeScript to build our scene (the recommended scripting language for use with our SDK). While there’s no mandatory folder structure, I recommend that you put all of your scripts inside a /src folder, while leaving your scene.tsx outside as your entry point.
Defining the game state
As I mentioned before, there are several possible implementations of this game, but the one we’ll create today maintains a good balance between readability and length. If you roll your own solution or find any problems with mine, feel free to leave a GitHub issue within the game’s repo.
The scene.tsx file is not only the entry point but also the source of truth for the state of our game as well as the place where we will place all of our game logic. To begin let’s write a bare-bones scene:

If you are wondering what the IState interface is supposed to do, don’t worry, it’s part of TypeScript’s set of tools to help us strictly type our code. In this case, we are defining a contract for the state of our game that needs to be respected at transpilation time. The difficulty of our game is determined by the length of the sequence the player has to memorize. From here, we can build on top of this simple contract to store a more complex state.
The second part that might have caught your attention is **ScriptableScene<{}, IState>. ScriptableScene **is a generic class that allows us to specify a type for both the received properties (none in this case), and a type for the state that this scene will hold: the contract we defined above. The state will hold both the expected sequence and the sequence submitted by the player.
Each time the state is updated, the render() method will be called to update our scene. If you take a look at the definition of the state property, you can see how the contract is actually respected. If you are using an IDE like VSCode you can even hover over the text to verify that the type was correctly inferred.
Storing the color sequences
In order to store the color sequences, we need to add some more data to our state. First, the computer generated sequence should be represented by an array of possible colors (each color representing an individual choice). We’ll store the player’s submissions in a similar array to make it easier to compare their sequence against the generated sequence.
Finally, we need to include two more fields, one containing the current active color (this allows us to show the sequence of colors to the player one by one), and a flag to control when the player is allowed to submit choices.
Now, our state interface will look like this:

And our default state will look like:

But what exactly is a Panel? TypeScript allows us to define string enums (which can be thought of as a dictionary with specific string fields). To keep things coupled by domain, we will group our Panels component (the visual representation of all the panels) and the Panel enum (an individual panel identifier).
Input methods
The player will only be able to interact with two objects in this game: the choice panels and the reset button. To make this happen we will create two new files inside the src folder, let’s start with Panels.tsx:

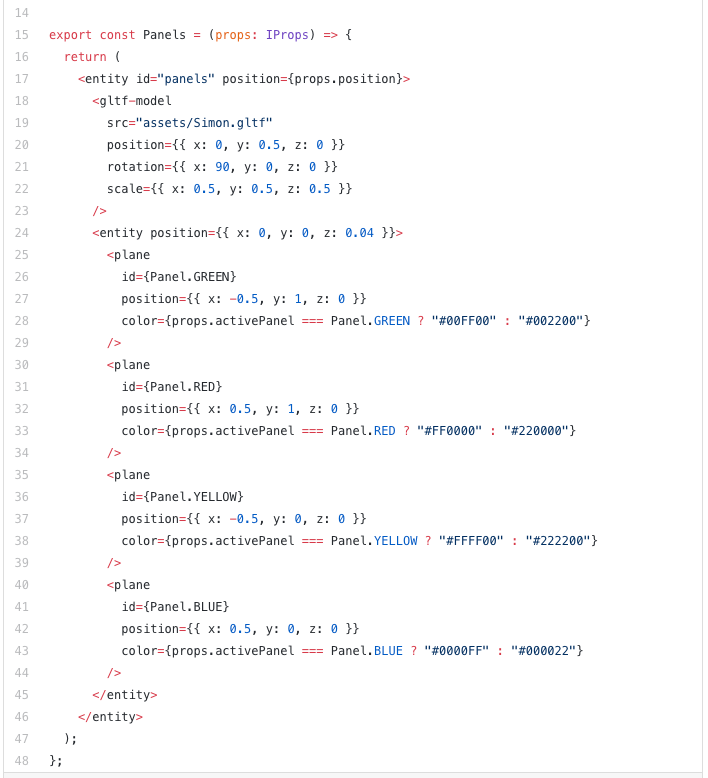
As you can see, we are using the members of the panel enum as the id for our plane entities. This is useful because we need to assign an id to our entities so we can interact with them.
A Panel is what we call a “pure component”, this means that we are relying on a simple function to decouple our entities into external stateless modules. To create your own component, you only need to define a new function that returns some JSX. These pure functions work the same way as the render() method of our scene, except they require us to return a single element, which is why we wrap all the boxes inside a generic entity
The logic driving our panels’ functionality is very simple. We only need to receive an activePanel in the properties, and then set the color for that panel. There’s also a position property used to control the whole panel component as a group.
Back in the scene.tsx file, we can now use our component as follows:
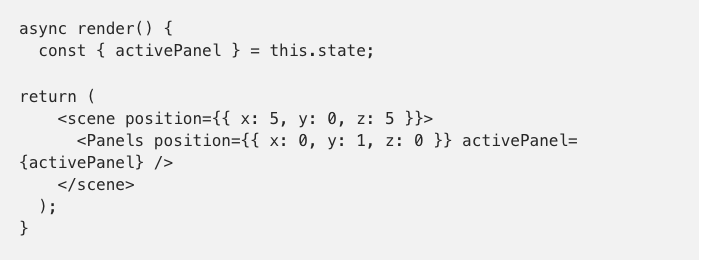
When our state is updated and the activePanel changes, our Panels component will change the panel colors as expected.
We still need a reset button that allows our player to play as long as they like. So, we’ll create another component called Button.tsx, which will be much simpler than our panel component:

All we’re doing is creating a box and giving it an ID I’ll leave an entity wrapper in our button component so we can add more entities in the future.
To handle click events we can now set a series of event listener using the sceneDidMount lifecycle method of the ScriptableScene class, which is called only once when the scene is spawned.

Now that we have all the required input methods we need to actually begin writing the logic for our game.

Here we are making use of the Panel enum to avoid hardcoding our entity IDs. All click events are sent with the _click suffix so we need to concatenate that as well. The activatePanel() and the newGame() methods are not yet defined. We will take a closer look at those in a bit.
To create an new instance for the Button component we just need to add it our scene’s render method:

And it will look like this:

Game logic
There are four things that we need to achieve with our game logic:
When the start button is clicked, a random sequence should be generated
When a panel is clicked, it should be highlighted for a period of time
When an incorrect choice is made, the player should lose
When the sequence is matched correctly, the player should win, and the difficulty should be increased
We can separate all of our logic into four core methods:
newGame(): starts a new game with a given difficulty
randomSequence(): generates a new random sequence for a game
playSequence(): reproduces the random sequence for the player to remember
activatePanel(): highlights a panel and validates the player’s choice
Starting the game
Let’s start with newGame():

Generating a color sequence
Here we generate a new sequence, set the base state for a new game, and proceed to play the new sequence to the user. Note that at this point user input is locked to avoid unexpected behaviour while the sequence is played. We can start any game with any arbitrary level of difficulty, , which allows us to reuse the same method when the player wins and advances to the next difficulty.

Generating a new sequence is pretty straightforward and relies on accessing the keys of our enum. We do this as many times as the difficulty indicates, so a difficulty of 4 will generate an array containing four colors.

The sleep() function is an utility function created to avoid using timeouts while taking advantage of the async/await syntax:

Showing the color sequence to the player
Playing a sequences relies on switching between two states, toggling the activePanel between a value of the sequence and null. We make use of a custom sleep utility function to leave enough time for the player to clearly see which panel gets highlighted.
Finally, if we are iterating over the last item in the sequence we unlock user inputs so choices are actually processed:


We check if the user’s input is locked by returning the value of lockedInput.
Then, if the player chose the correct panel, we log the result in the browser console. When a player loses, they must restart the game manually by pressing the start button.
If the player’s choice is correct, we proceed to update our game state by toggling the highlight of the chosen panel. When the player has submitted a complete sequence matching the game’s generated sequence, they win! All we have to do is log the result in the browser console.

You can test everything out by running dcl preview from your terminal. The CLI will render the game and open it automatically in a new browser window.
What’s next?
I’ll leave to you the finer details such as fleshing out the UI, adding score tracking, and building in any other features you would like. I hope this has been a mind-opening experience, and I hope to see you all for part two, where we will take this experience to the next level by making it multiplayer!
https://github.com/decentraland/sample-scene-memory-game
Stay in touch with us, and learn more about Decentraland, through:
Our Discord
our mailing list
Follow us on Twitter
our subreddit
This is an official Decentraland account. The original published article can be found here on our Medium blog
This is so freaking cool. I followed the tutorial and everything is up and running. Guess I have to learn TypeScript. Shouldn't be a problem at all.
Hopefully LAND becomes cheaper.
I am having a busy week so this makes my head hurt, however, I will endeavour to investigate more when I can!
Dear Decentraland Team,
I really enjoyed trying out your alpha SDK. What the team provided so far is impressive! Keep up the great work.
This is my first demo creation. Maybe there is more to come ;D
https://steemit.com/decentraland/@skorpsim/ttesk763
nice work! thanks for the feedback
Thanks! My next game creation will definitely be more fun and motivating than this demo game ;D. Where is the best place for specific SDK questions? Discord?