Making a 3D game for a while!!!!

So, want to learn making game?
Introduction to Unity
We start by looking
at the different Unity licenses, choosing one, and then installing it. Once that is installed, you learn
how to create new projects as well as open existing ones. You open the powerful Unity editor, and
we examine its various components. Finally, you learn to navigate a scene using mouse controls and
keyboard commands. This chapter is meant to be hands-on, so download Unity while reading and
follow along.
Installing Unity
To begin using Unity, you first need to download and install it. Software installation is a pretty simple
and straightforward process these days, and Unity is no exception. Before we can install anything,
though, we need to look at the two available Unity licenses: Unity Free and Unity Pro. Unity Free is
more than sufficient to complete all the examples and projects in this book. In fact, Unity Free
contains everything you need to make games commercially. If you feel like working with more power
(and spending money), Unity Pro provides a suite of extended tools that gives you a true “highpriced”
game engine experience. If you are curious about Unity Pro but don’twant to commit to
purchasing it, Unity Free comes with a 30-day trial of the Pro license.Feel free to play around with
the Pro features and determine whether it is right for you. While on the Unity website, you might
notice the Android and iOS plug-in licenses as well. As of the most recent release of Unity, the basic
mobile plug-ins are free and come with Unity.
Downloading and Installing Unity
For the purposes of this chapter, we will assume you are sticking with the Unity Free license. If you
went with the Pro version, the process will be very similar, only deviating when it comes time to
choose the license. When you are ready to begin downloading and installing Unity, follow these
steps:
- Download the Unity installer from the Unity3D download page at
http://unity3d.com/unity/download/. - Run the installer and follow the prompts as you would with any other piece of software.
- When prompted, be sure to leave the Example Project, Unity Development Web Player, and
MonoDevelop check boxes checked (see Figure 1.1).
FIGURE 1.1 Prompt to choose the installed components. - Choose an install location for Unity (see Figure 1.2). It is recommended that you leave the
default unless you know what you are doing.
FIGURE 1.2 The prompt to choose the install location. - At this point, the installation will finish.
- When you run Unity for the first time, you will be asked to activate your license (see Figure
1.3). At this point, you can select whether you want to use Unity Free or start a 30-daytrial of
Unity Pro. If you purchased Unity Pro, you can enter your serial number tounlock it. We will
operate under the assumption that you chose Unity Free for now.
FIGURE 1.3 The Unity license selection screen. - You will be prompted to log in to a Unity account (see Figure 1.4). If you have one, enter it
here. If you don’t have one, choose the Create Account option and fill out the required form.
FIGURE 1.4 The prompt to log in to a Unity account. - That’s it! Unity installation is now complete.
Note: Supported Operating Systems and Hardware
To use Unity, you must be using a Windows PC or a Macintosh computer. Although it
is possible to build your projects to run on a Linux machine, the Unity editor itselfwill
not. Your computer must also meet the minimum requirements outlined here (taken
from the Unity website at the time of writing):
Windows: XP SP2 or later. Mac OS X: Intel CPU and Snow Leopard 10.6 or later.
Note that Unity was not tested on server versions of Windows and OS X.
Graphics card with DirectX 9 (Shader Model 2.0) capabilities. Any card made since
2004 should work.
Using occlusion culling requires a GPU with occlusion query support (some Intel
GPUs do not support that).
Note that these are minimum requirements.
Caution: Internet Links
All Internet links are current as of the time of this writing. Web locations do change
sometimes, though. If the material you are looking for is no longer provided at the links
I give you, a good Internet search should turn up what you are looking for.
Getting to Know the Unity Editor
Now that you have Unity installed, you can begin exploring the Unity editor. The Unityeditor is the
visual component that enables you to build your games in a “what you see is what you get” fashion.
Because most interaction we have is actually with the editor, we often just refer to it as Unity. The
next portion of this chapter examines all the different elements of the Unity editor and how they fit
together to make games.
The Project Dialog
The first window you see when opening Unity for the first time is the Project dialog(see Figure 1.5).
This window is what we use to open recent projects, browse for projects that have already been
created, or start new projects.
FIGURE 1.5 The Project dialog.
If you have created a project in Unity already, whenever you open Unity, it will go directly into that
project. To get back to the Project dialog, you go (from inside Unity) to File > New Projectto get to
the Create New Project dialog, or you go to File > Open Project to get to the Open Project dialog.
Tip: Opening the Project Dialog
When you run Unity, the last project you were working on opens automatically. If you
want to open the Project dialog instead of the last project, you can do so by holding the
Alt key (Control on a Mac) while clicking the Unity icon. If you would like Unity to
behave this way all of the time, you can set it to do so by going to Edit > Preferences
and checking the box Always Show Project Wizard.
Try It Yourself: Creating Our First Project
Let’s go ahead and create a project now. You want to pay special attention to where
you save the project so that you can find it easily later if necessary. Figure 1.6 shows
you what the dialog window should look like before creating the project: - Open the Create New Project dialog.
- Select a location for your project. If you are unsure where to put your project, you
can leave the default location. If you decide to choose a custom location, select an
empty folder to put your project in. The empty folder will dictate the name of the
project. - Name your project Chapter1_Trial. The project name is the last bit of text in the
Project Location text box. - Leave unchecked all the packages under Import the Following Packages. We will
discuss packages later. - Click Create.
FIGURE 1.6 The settings used for our first project.
Caution: Projects and Packages
At first, you might be tempted to select a bunch of packages in the Create New Project
dialog. I want to caution you against frivolously adding packages to your project,
however, because unneeded items can add size and lag. Unused packages just take up
space and provide no real benefit. With that in mind, it is better to wait until you
actually need a package to import it. Even then, only import the parts of the package
that you intend to use.
The Unity Interface
So far, we have installed Unity and looked at the Project dialog. Now it is time todig in and start
playing around. When you open a new Unity project for the first time, you will see a collection of
gray windows (called views), and everything will be rather empty (see Figure 1.7). Never fear, we
will quickly get this place hopping. In the following sections, we look at each of the unique views one
by one. First, though, I want to talk about the layout as a whole.
FIGURE 1.7 The Unity interface.
For starters, Unity allows the user to determine exactly how they want to work. This means that any of
the views can be moved, docked, duplicated, or changed. For instance, if you click the word
Hierarchy (on the left) to select the Hierarchy view and drag it over to the Inspector (onthe right),
you can tab the two views together. You can also place your cursor on any line between views and
resize the windows. In fact, why don’t you take a moment to play around and move things so that they
are to your liking. If you end up with a layout that you don’t much care for, never fear. You can
quickly and easily switch back to the built-in default view by going to Window > Layouts > Default
Layout. While we are on the topic of built-in layouts, go ahead and try out a few of the other layouts
(I’m a fan of the Wide layout). If you create a custom layout you like, you can always save it by going
to Window > Layouts > Save Layout. Now if you accidentally change your layout, you can always
get it back.
Note: Finding the Right Layout
No two people are alike, and likewise, no two ideal layouts are alike. A good layout
will help you work on your projects and make things much easier for you. Be sure to
take the time to fiddle around with the layout to find the one that works best for you.
You will be working a lot with Unity. It pays to set your environment up in a way that
is comfortable.
If you would like to duplicate a view, it is a fairly straightforward process as well. You can simply
right-click any view tab (the tab is the part sticking up with the views name on it), hover the mouse
cursor over Add Tab, and a list of views will pop up for you to choose from (see Figure 1.8). You
may wonder why you would want to duplicate a view. It is possible that in your view-moving frenzy,
you accidentally closed the view. Re-adding the tab will give it back to you. Also, consider the
capability to create multiple Scene views. EachScene view could align with a specific element or
axis within your project. If you want to see this in action, check out the four Split built-in layout by
going to Window > Layouts > 4 Split. (If you created a layout that you like, be sure to save it first.)
FIGURE 1.8 Adding a new tab.
Now, without further ado, let’s look at the specific views themselves.
The Project View
Everything that has been created for a project (files, scripts, textures, models, and so on) can be found
in the Project view (see Figure 1.9). This is our window into all the assets and organization of our
entire project. When you create a new project, you will notice a single folder item called Assets. If
you go to the folder on your hard drive where you save the project, you will also find an Assets
folder. This is because Unity mirrors the Project view with the folders on the hard drive. If you create
a file or folder in Unity, the corresponding one appears in the explorer (and vice versa). You can
move items in the Project view simply by dragging and dropping. This enables you to place items
inside folders or reorganize your project on-the-fly.
FIGURE 1.9 The Project view.
Note: Assets
An asset is any item that exists as a file in your assets folder. All textures, meshes,
sound files, scripts, and so on are considered assets. In contrast, if you create a game
object, but it doesn’t create a corresponding file, it is not an asset.
Caution: Moving Assets
Unity maintains links between the various assets associated with projects. As a result,
moving or deleting items outside of Unity could cause potential problems. As a general
rule, it is a good idea to do all of your asset management inside Unity.
Whenever you click a folder in the Project view, the contents of the folder will be displayed under
the Assets section on the right. As you can see in Figure 1.9, the Assets folder is currently empty, and
therefore nothing is appearing on the right. If you would like to create assets, you can do so easily by
clicking the Create drop-down menu. This menu enables you to add all manner of assets and folders
to your project.
Tip: Project Organization
Organization is extremely important for project management. As your projects get
bigger, the number of assets will start to grow until finding anything can be a chore.
You can help prevent a lot of frustration by employing some simple organization rules:
Every asset type (scenes, scripts, textures, and so on) should get its own folder.
Every asset should be in a folder.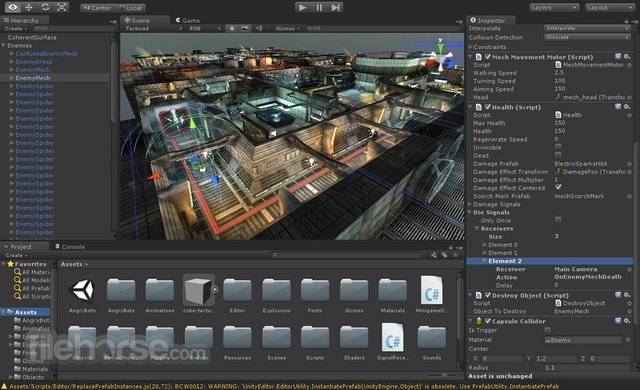
If you are going to use a folder inside another folder, make sure that the structure
makes sense. Folders should become more specific and not be vague or generalized.
Following these few, simple rules will really make a difference.
One of my favorite additions to the Project view in Unity 4 would be the additionof favorites and the
integration of the Unity Asset Store. The Favorites buttons enableyou to quickly select all assets of a
certain type. This makes it possible for you to get an “at a glance” view of your assets quickly. When
you click one of the Favorites buttons (All Models, for instance) or perform a search with the built-in
search bar, you will see that you can narrow down the results between Assets and Asset Store. If you
click Asset Store, you will be able to browse the assets that fit your search criteria from the Unity
Asset Store (see Figure 1.10). You can further narrow your results down by free and paid assets. To
me, this is a fantastic addition because it enables you to go and grab assets that you need for your
project without ever leaving the Unity interface.
FIGURE 1.10 Searching the Unity Asset Store.
The Hierarchy View
In many ways, the Hierarchy view (see Figure 1.11) is a lot like the Project view. The difference is
that the Hierarchy view shows all the items in the current scene instead of the entire project. When
you first create a project with Unity, you get the default scene, which is empty except for a single
item: the Main Camera. As you add items to your scene, they will appear in the Hierarchyview. Just
like with the Project view, you can use the Create menu to quickly add items to your scene, search
using the built-in search bar, and click and drag items to organize and “nest” them.
FIGURE 1.11 The Hierarchy view.
Tip: Nesting
Nesting is the term for establishing a relationship between two or more items. In the
Hierarchy view, clicking and dragging an item onto another item will nest the dragged
item under the other. This is commonly known as a parent/child relationship. In this
case, the object on top is the parent, and any objects below it are children. You will
know when an object is nested because it will become indented. As you will see later,
nesting objects in the Hierarchy view can affect how they behave.
Tip: Scenes
A scene is the term Unity uses to describe what you might already know as a level. As
you develop a Unity project, each collection of objects and behaviors should be its
own scene. Therefore, if you were building a game with a snow level and a jungle
level, those would be separate scenes.
Tip: Scene Organization
The first thing you should do when working with a new Unity project is create a
Scenes folder under Assets in the Project view. This way, all your scenes (or levels)
will be stored in the same place. Be sure to give your scenes a descriptive name.
Scene1 may sound like a great name now, but when you have 30 scenes, it can get
confusing.
The Inspector View
The Inspector view enables you to see all of the properties of a currently selected item. Simply click
any asset or object from the Project or Hierarchy view, and the Inspector view automatically
propagates with information.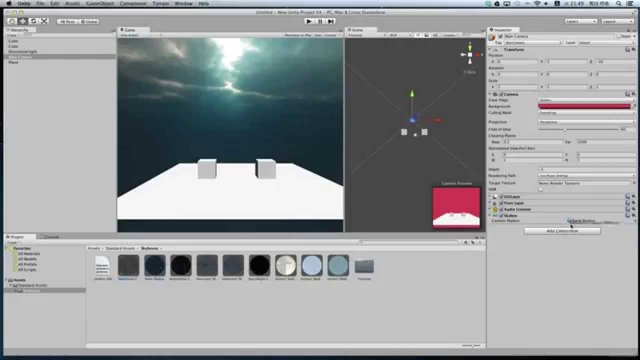
In Figure 1.12, we can see the Inspector view after the Main Camera object was selected from the
Hierarchy view.
FIGURE 1.12 The Inspector view.
Let’s break down some of this functionality:
If you click the check box next to the object’s name, it will become disabled and not appear in
the project.
Drop-down lists (such as the Layer or Tag lists; more on those later) are used to select from a
set of predefined options.
Text boxes, drop-downs, and sliders can have their values changed, and the changes will be
automatically and immediately reflected in the scene—even if the game is running!
Each game object acts like a container for different components (such as Transform, Camera,
and GUILayer inFigure 1.12). You can disable these components by unchecking them or
remove them by right-clicking and selecting Remove Component.
Components can be added by clicking the Add Component button.
Caution: Changing Properties While Running a Scene
The capability to change the properties of an object and seeing those changes reflected
immediately in a running scene is very powerful. It enables you to tweak things like
movement speed, jumping height, collision power, and so on all on-the-fly without
stopping and starting the game. Be wary, though. Any changes you make to the
properties of an object while the scene is running will be changed back when the scene
finishes. If you make a change and like the result, be sure to remember what it was so
that you can set it again when the scene is stopped.
The Scene View
The Scene view is the most important view you work with because it enables you to see your game
visually as it is being built (see Figure 1.13). Using the mouse controls and a few hotkeys, you can
move around inside your scene and place objects where you want them. This gives you an immense
level of control.
FIGURE 1.13 The Scene view.
In a little bit, we will talk about moving around within a scene, but first, let’s focus on the controls
that are a part of the Scene view:
Draw mode: This controls how the scene is depicted. By default it is set to Textured, which
means objects will be drawn with their textures.
Render mode: This controls how the objects in the scene are drawn. By default, the Render
mode is RGB, which means that objects will be drawn in their full color.
Scene lighting: This control determines whether objects in the Scene view will be lit by
default ambient lighting or by lights that actually exist within the scene. The default is to use the
built-in ambient lighting, but that gets changed once the first light is added to the scene.
Game overlay: This determines whether items like skyboxes and graphical user interface
(GUI) components appear in the Scene view. This also controls whether the placement grid is
visible.
Audition mode: This control sets whether an audio source in the Scene view functions or not.
Gizmo selector: This control enables you to choose which “gizmos” appear in the Scene view.
A gizmo is an indicator that gives visual debugging or aids in setup.
Scene gizmo: This control serves to show you which direction you are currently facing and to
align the Scene view with an axis.
Note: The Scene Gizmo
The scene gizmo gives you a lot of power over the Scene view. As you can see, the
control has an X, Y, and Z indicator that aligns with the three axes. This makes it easy
to tell exactly which way you are looking in the scene. We discuss axes and 3D space
more in a later chapter. The gizmo also gives you active control over the scene
alignment. If you click one of the gizmo’s axes, you will notice that the Scene view
immediately snaps to that axis and gets set to a direction like top or left. Clicking the
box in the center of the gizmo toggles you between Iso and Persp modes. Iso standsfor
Isometric and is the 3D view with no perspective applied. Inversely, Persp standsfor
Perspective and is the 3D view with perspective applied. Try it out for yourself and
see how it affects the Scene view.
Note: Different Versions, Different Buttons
If you are using Unity 4.2 or earlier, your scene view menus will look as listed in
Figure 1.13. If you are using Unity 4.3 or later, however, things will look a little
different. Don’t worry, the options are all still there. They will now just be under an
Effects drop-down menu. You may also notice a new 2D button not illustrated in the
previous images. This enables Unity’s new 2D capabilities. Because this book focuses
on 3D games, however, don’t worry about those options for now.
The Game View
The last view to go over is the Game view. Essentially, the Game view allows you to “play” the
game inside the editor by giving you a full simulation of the current scene. All elements of a game
will function in the Game view just as they would if the project were fully built. Figure 1.14 shows
you what a Game view looks like. Note that although the Play, Pause, and Stepbuttons are not
technically a part of the Game view, they control the Game view and therefore are included in the
image.
FIGURE 1.14 The Game view.
Tip: Missing Game View
If you find that the Game view is hidden behind the Scene view, or that the Game view
tab is missing entirely, don’t worry. As soon as you click the Play button, a Game
view tab will appear in the editor and begin displaying the game.
The Game view comes with some controls that assist us with testing our games:
Play: The Play button enables you to play your current scene. All controls, animations,sounds,
and effects will be present and working. Once a game is running, it will behave just like the
game would if it were being run in a standalone player (such as on your PC or mobile device).
To stop the game from running, click the Play button again.
Pause: The Pause button pauses the execution of the currently running Game view. The game
will maintain its state and continue exactly where it was when paused. Clicking the Pause
button again will continue running the game.
Step: The Step button works while the Game view is paused and causes the game to executea
single frame of the game. This effectively allows you to “step” through the game slowly and
debug any issues you might have. Pressing the Step button while the game is running will cause
the game to pause.
Aspect drop-down: From this drop-down menu, you can choose the aspect ratio you want the
Game view window to display in while running. The default is Free Aspect, but you can change
this to match the aspect ratio of the target platform you are developing for.
Maximize on Play: This button determines whether the Game view takes up the entirety of the
editor when run. By default, this is off, and a running game will only take up the size of the
Game view tab.
Stats: This button determines whether rendering statistics are displayed on the screen while the
game is running. These statistics can be useful for measuring the efficiency of your scene. This
button is set to off by default.
Gizmos: This is both a button and a drop-down menu. The button determines whether gizmos
are displayed while the game is running. The button is set to off by default. The drop-down
menu (the small arrow) on this button determines which gizmos appear if gizmos are turned on.
Note: Running, Paused, and Off
If you want to learn more i will give link to download PDF.
Sams Teach Yourself Unity Game Development in 24 Hours
https://www.scribd.com/document/286070481/Unity-Game-Development-in-24-Hours-Sams-Teach-Yourselfby-Mike-Geig-EhipShare-pdf
This post is just very sad... It's obviously copied and pasted without any editing (you put the link below but if you don't add value to something already in the internet then what's the point?).... Maybe with editing I'd like this post... but now, it's painful to read.
If someone from steemcleaners found this you'll be flagged without mercy.
That's sad.....
And the worst part is that you have posted the same post TWICE with minimal (or no) editing!!!!