Crispy Roast Pork Belly
Crispy Roast Pork Belly
First of all, I'd like to give a big shout out to my sister-in-law, Leli. Many years ago, she shared with me a recipe for Norwegian Roast Pork Belly. The recipe below is heavily based on her recipe. I've made it numerous times and have shared it with family, friends and my blog readers. I hope you get a chance to make and enjoy it.
Roasting in the Oven, Pressure Cooking or Cooking Sous Vide?
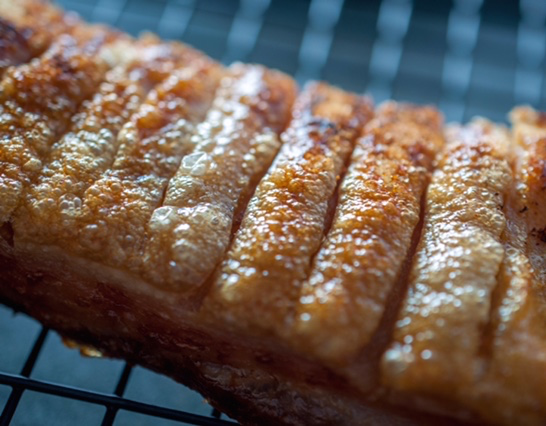
I honestly think the simplest and easiest method for getting nice, crispy skin without sacrificing the texture of the meat is by roasting the pork belly in the oven.
To elaborate, I tried different ways of making this dish. I tried pre-cooking the meat using a pressure cooker as well as cooking it sous vide. Although the cooking time is cut dramatically with the pressure cooker, it took a long time in the broiler to get the skin crispy. It was tricky too and the skin did not turn out as nice as the oven-roasted one as in the photo above.

Pork belly cooked in a pressure cooker. Although the meat was moist and tender, it took a long broiling time to get crispy, crackly skin. Due to the longer broiling time, it needed lots of attention to ensure that the skin cooked evenly and to also to ensure it did not burn.
The same is true with the sous vide method. The cooking time is longer, 24 hours, as expected. The meat was moist and tender, however, just like the pressure cooker method, it took longer to get a nice, crispy outer layer. I would say it was do-able but tricky. Also like the pressure cooker method, the long broiling time required more attention.
Pork belly cooked sous vide. Getting the skin crispy took a long time, similar to the pressure-cooked version.
And then there's frying ...
Yes, crispy skin. Yes, tender and moist inside. However, the oil splatters and angrily pops everywhere. Extra care should be taken as the oil can land on your face, arms, etc.
The Oven Wins
So for me, cooking pork belly by roasting and broiling in the oven is the sure winner. It's the simplest, easiest and most straightforward way.
Happy cooking and eating!
Anna
Crispy Roast Pork Belly
Ingredients
2 - 3 pounds pork belly with skin
Salt and pepper to taste
3/4 cup water
For Porchetta style, add:
3 garlic cloves
2 green onion leaves
Directions
Score the skin and fat of the pork belly in a horizontal or diagonal criss-cross pattern. Using a really sharp knife or blade should make this part easier and safer.
Season generously with salt, bending the slab of meat to reach between the cracks of the skin. Rub the salt in to get a nice crackly skin when cooked. Sprinkle pepper all around. Let stand in the fridge for a day or two with the skin side down.
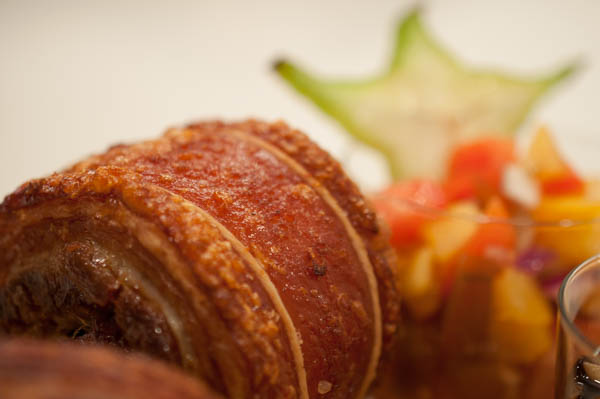
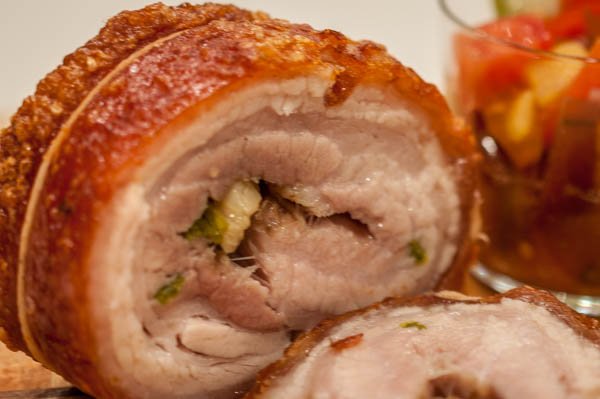
For Porchetta style, make two slits sideways (end-to-end on the short side) on the meat side to create two 'pockets'. Tuck the garlic cloves in one pocket and the green onion leaves in the other. Roll tight and secure one end with twine. Repeat with another piece of twine on the other end.
Preheat the oven to 450oF. Pour water in a roasting pan and put the meat in with the skin side down. Cover with foil. Bake for about 20 min.
Adjust the temperature to 350oF. Turn the meat over so the skin side is up. Bake uncovered for another 1.5 hours or so. If you have a thermometer, a reading of about 160oF means that the meat is thoroughly cooked. Cooking time will vary but estimate 2 - 2 1/2 hours total cooking time.
Broil meat to crisp up the skin, watching closely to prevent it from burning. Do not broil too close to the heating element, otherwise, the skin will cook too fast in some areas and slow in others. If some areas are crispy while others are not, cover the sections that are crispy with strips or pieces of foil then continue cooking to get the other sections crispy.
For porchetta style, rotate meat throughout the broiling process to expose skin to the oven heating element. Cover sections as above to prevent burned spots.
Let the meat stand for about 15 minutes before carving.
Looks fantastic! The crispy outsides, mmm yum!
It's worth every calorie 🤗. Thanks for stopping by.
Congratulations @offoodandart! You have completed some achievement on Steemit and have been rewarded with new badge(s) :
Click on any badge to view your own Board of Honnor on SteemitBoard.
For more information about SteemitBoard, click here
If you no longer want to receive notifications, reply to this comment with the word
STOPBy upvoting this notification, you can help all Steemit users. Learn how here!
Upvoted!
I miss this dish...
Let's make it!
Wow... I love cooking....
I do too. And eating :)! Thanks for stopping by.
I like that you have tried different ways of making crispy pork belly. Saves us the trouble of experimenting on how to achieve that crispy goodness. The pics are so enticing!
Thanks so much for stopping by @ritaritz!
Lovely post! I really like pork belly, and nice garnish with the start fruit!
Pork belly is so yummy! Thanks for stopping by!