New Fermentation Room Trial Run: Sauerkraut
Alright Steemians,
Since my lovely fiancee @daniphotography and I bought a double shotgun (duplex) in the Lower Ninth Ward of New Orleans this January we've been planning on converting one of the laundry rooms to a pickling room so we could finish our plans of opening up a pickle business which we started back in Portland.
Before I go any further, here's a link to our website which we haven't updated in a long time, as well as our Facebook page. We are locked out of our Instagram account but there are some nice looking pictures there taken by the future Mrs. Benton.
OK, thanks for your patience and for following us on our various social media outlets! Here is a picture of the room:
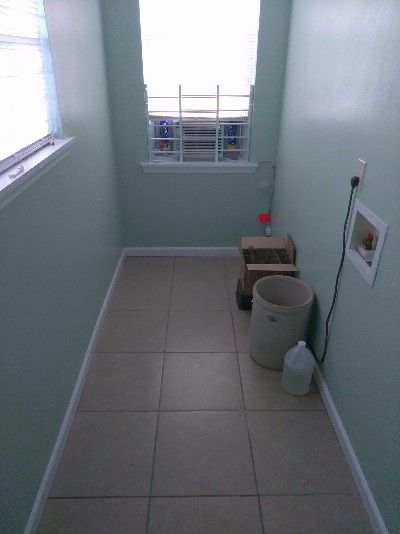
As you can see, it's just a small window unit set on full blast. I'm planning on wiring in some kind of thermostat but for now I wanted to see what it would put out unmodified. I'd love to have a basement for this kind of stuff but it turns out you can't have basements in a swamp. Also you'll see the type of crock we're planning on doing most of our pickling in. That's an 8-gallon, way too much sauerkraut for a first batch! Anyways, what are the temps looking like?
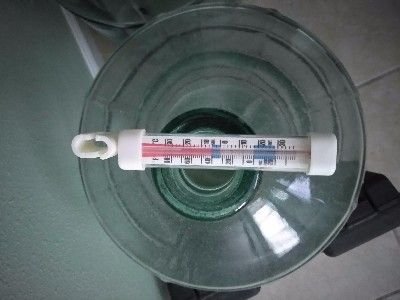
This thermometer is sitting on one of our 6-gallon carboys by the door. (in that black case is a sweet Acorn pH meter I'll use to ensure that the sauerkraut has reached a final pH of 3.5 or less). 68° F (20° C) is a little warm. Considering the fermentation process itself generates heat I'd like the room to be a little cooler.
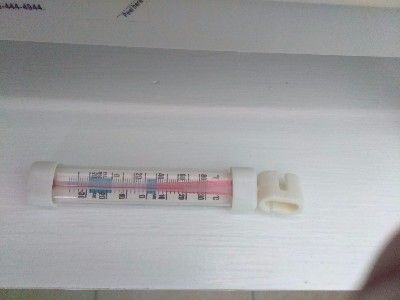
Right by the A/C it's reading 64° F (17.8° C). Right on the money! We could even do ales in this room... Still, I'll look into insulating the door and getting the thermostat set up for a little more consistency. But for now it's time to give it a test run!
Now, this isn't going to be a step-by-step sauerkraut tutorial, but I am going to make a few points which a lot of online writers miss. The big one is: MEASURE YOUR INGREDIENTS BY WEIGHT! A cup of coarse-grained salt is gonna weigh a lot less than a cup of fine-grained pickling salt. If you're measuring by volume, you really have no way to know how much you're using. Granted, lacto-fermentation is a pretty forgiving process, but if want to repeat it, you'll want to know why certain batches turn out better than others. Of course, you're using non-iodized salt since you know iodine has anti-microbial qualities. And of course, if you're using water (cabbage supplies its own) you're making sure that water has been filtered to remove chlorine. We use a filter with deionizing resin pellets which also removes fluoride. I don't know what effect fluoride would have on lactobacilli and their friends, but it's hardly indicated seeing as they lack hard tissue. Better to leave it out in my opinion.
So, the recipe is:
Vegetables
Water to cover by at least an inch
3.5% total weight in salt
(that means an amount of salt equal to 3.5% of the weight of the vegetables, AND 3.5% of the weight of the water. You can make a 3.5% brine solution and measure out the salt for the vegetables, or you can take the combined weight of the water and vegetables and get 3.5% of that. Either way, most vegetables are gonna be 3.5%, except cucumbers, which are 5.4%. A lot of studies have been done on this, and they've determined that for ideal flavor and texture 3.5% is the number. I'm not sure why that is, but 3.5% is the average salinity of seawater so it would make sense that organisms have evolved to thrive in that salinity. For reference, the human body is about 0.9% salt. You can do your own research or use those numbers.)
Alright, now I'll get into the meat and potatoes of the process.
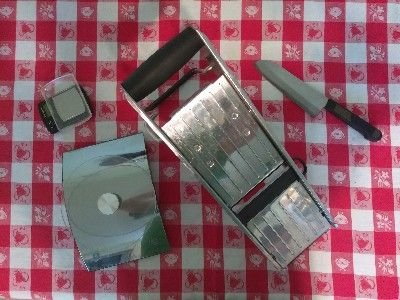
These are the tools you're absolutely going to need for making sauerkraut: a sharp knife to quarter and core the heads of cabbage, a very sharp mandoline, and A SCALE. I actually use two: the big one is for cabbage and the more precise little weed scale is for salt and other smaller quantities of things like spices. In addition to these you'll need some non-reactive bowls to keep stuff in and something to cut on.
A few notes about mandolines: the exact one I use is a French-made Miu. I like that the cutting thickness is adjustable so that I can get my sauerkraut super fine, but I do have to occasionally adjust it while shredding because pushing down on the mandoline body causes the aperture to open up as you go. We've done as much as 10 gallons of sauerkraut using this one and my brother's mandoline but it takes a LONG time. Before we look into commercial production we're going to have to drop some money on something like this. A lot of people will use the grater attachment on a food processor. This, to me, is totally unacceptable as the resulting product is way too coarse and nothing like the stuff I grew up eating on hot dogs, but people make money that way... As for those wooden ones you see, I've never tried one but I'm leery about the cutting width being non-adjustable. If someone wants to chime in with their opinion I'd welcome it.
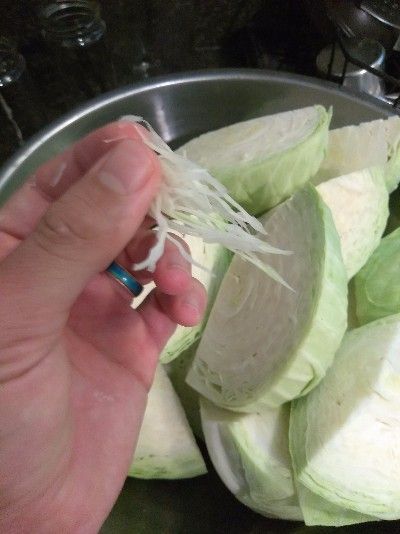
Jumping ahead in the process, here's an example of the kind of consistency I go for. I would even take it a little finer but that's what machines are for.
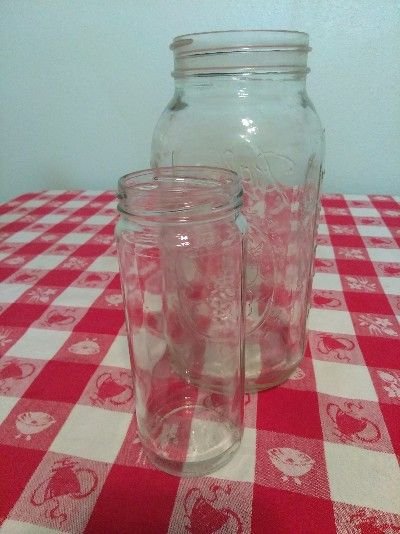
Anyways here's the other part of the toolkit. The big one in back is a half-gallon (2 liter) Mason jar. The little one fits inside the big one and you fill it with water to act as a weight. There are a lot of misconceptions about sanitation when lacto-fermenting so I'll try to clear them up here. Lacto-fermentation is an anaerobic process, which means the microorganisms do not require oxygen to metabolize. It is NOT, however, an ANOXIC process. This means you don't need to exclude oxygen from your pickles. YOU DO NOT NEED AN AIRLOCK! YOU DO NOT NEED A FANCY HARSCH JAR! The seal is formed by the water-air interface itself, and so you just need to make sure that nothing floats up to break the surface of the water. If it does, you will have crud grow on the surface. Hence the weight. You will also need to go in periodically (daily) and skim off any stuff that has floated up. Luckily, none of this crud tends to be dangerous since your pickles would taste too gross to eat long before they accumulated enough of anything really bad for you, but proper sanitation will lead to the best, cleanest taste without any off or yeasty flavors. Now, despite your best attempts you can expect something called kahm yeast to grow on the top. This will be a white film that you can just scrape off when you're ready to eat. I'll be experimenting with a UV LED to try and prevent the growth of this yeast. Again, it's just a taste issue. I'll be reporting back when I see how it goes. If you've got a crock, use a plate with a rock on it to keep the veggies below the water. You can use a plastic bucket too, but make sure it's out of direct sunlight since sunlight can get through the plastic and cause discoloration. Also, plastic is slightly porous which can lead to problems with contamination. For sanitization, I usually just use boiling water, although something like Star San is good too. If you use an alkaline sanitizer like Five Star PBW just make sure the surface is totally clean before you put your pickles in. Also, note that for the little jars it's the outer surface that's going to be in contact with the food. They'll be filled with tap water or maybe some fishing weights if necessary. Sauerkraut really needs some weight to keep it under the water.
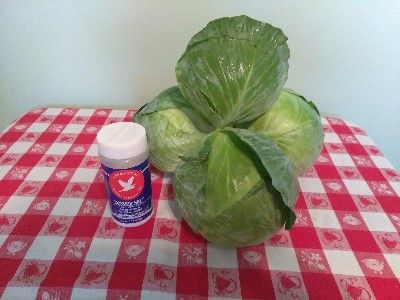
Alright, these beauties are our entertainment for the evening. Cabbage: the White man's coconut. I got these at Wal-Mart and they were actually super fresh but it's a crap-shoot going to a store. The secret to a really crunchy pickle, no matter what you're doing, is to start with super fresh produce. Find a local farmer and get them within a few hours of being picked. Sometimes at a store you can find out what days they get produce delivered but even then they will have sat in a warehouse for at least a day before getting to that store. Our salt for this batch comes directly from the salt dome beneath Avery Island, home of Louisiana's own Tabasco Pepper Sauce.
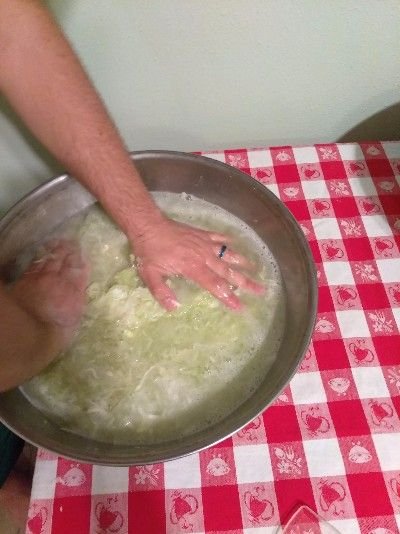
Okey Dokey! Peel 'em, quarter 'em, core 'em, shred 'em, pound 'em, and stuff 'em. You know the drill! Here's a photo for inspiration:
(maybe I shoulda taken my mood ring off)
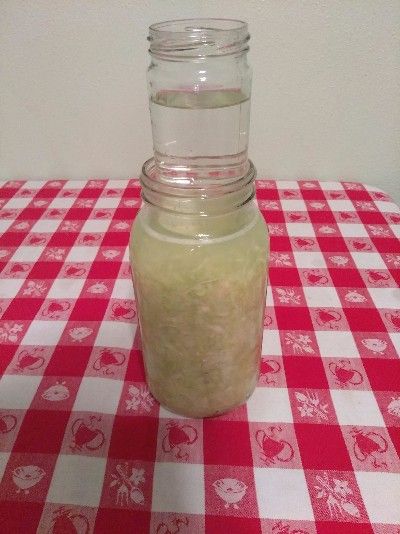
Here we have the jar-in-jar system.
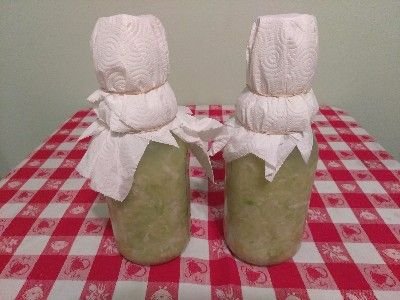
And here they are covered in paper towels just to keep any bugs out. It is the South after all.
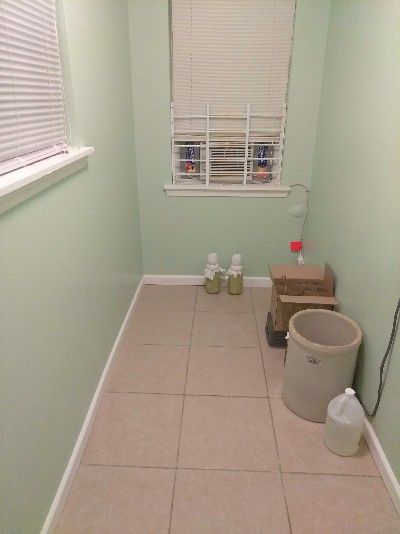
Finally, here they are in their new home. See you in six weeks, buddies. (don't worry, the super farty smell only lasts for a couple of days)
Hey this is awesome! I just set up my first batch about 2 weeks ago in mason jars with these new airlock attachments for the lids. You should check them out - they work similar to beer fermenters and attach to any widemouth mason jar. Love it and hopefully all will be will in a few weeks!
I'm familiar with those. As I mentioned in the post - airlocks are completely unnecessary. What are you using to weight down your veg? What's your salinity?
Hello, just checked out your pages and followed you on instagram. I'd love to see more content as you develop your pickling operations. I just started my second pickling batch last Tuesday. I'm doing cucumbers and green beans.
Thank you! Steemit provides excellent motivation. I haven't actually done cukes or green beans since I tend to focus on one thing until I get it absolutely perfect. The next update will show some extra insulation added to the room. I also started some turnips, garlic, and kombucha (which is new for me.) How are your temps?
I like cabbage, this is nice.
wow... what a lecture ... learning... thanks @evdoggformayor for sharing this
At your service! If you have any questions please let me know.
Sure will have that in mind and do find time to check my blog posts
Congratulations @evdoggformayor! You have completed some achievement on Steemit and have been rewarded with new badge(s) :
Click on any badge to view your own Board of Honor on SteemitBoard.
For more information about SteemitBoard, click here
If you no longer want to receive notifications, reply to this comment with the word
STOPThank you for the educational and entertaining blog post! And thanks for the shout out, Salty Dogg. Keep 'em coming.
@daniphotography nice comment for a worthy post... whats your area of blogging
Thank you. I'm new to blogging myself, but I would consider my area photography. I like to do technical write-ups about my lighting setups, camera settings, behind-the-scenes, concept creation, that sort of thing. What's your area?
Ok dear...good one... @daniphotography i blog on general stuffs but for now more on healthy living... alternative remedies and organic farming... Check them out in my blog posts