Spectacular cake without oven // Tartas espectaculares sin horno - Tarta de galletas con chocolate
Today I come with cakes for celebrations. This recipe is very easy and, in view of it, that your presentation is spectacular.
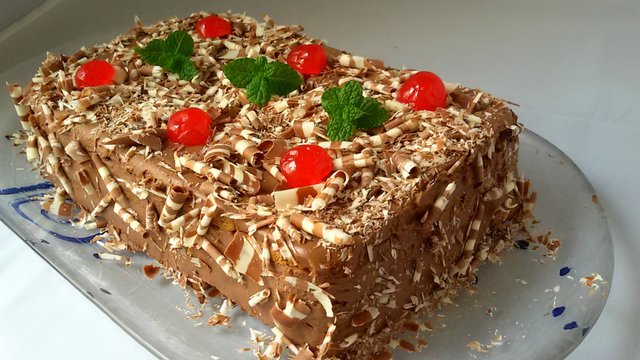
The chocolate chip cookie cake is a classic for birthdays. The little ones love it and as it is a cake that does not need oven, the result always comes out well. You can make it inside a removable mold, or in a rectangular container like the lunch box I have used. The decor, as always, is to your liking.
Ingredients
For 9 to 12 servings
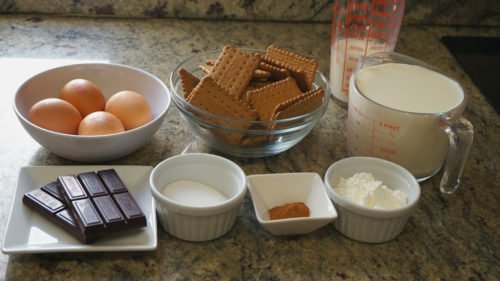
200 g square crackers
700 ml milk
4 egg yolks
50 g of sugar
150 g of chocolate coating for desserts
1 teaspoon ground cinnamon
50 g cornstarch
Milk to moisten cookies
Chocolate chips
cherries
Mint leaves
Recipe Preparation
1.- Pour in half the milk (about 350 ml) in a saucepan and bring to the fire. Share the ounces of chocolate and leave them in a bowl large enough to fit the milk. When the milk is hot without boiling, pour it over the chocolate. Remove until chocolate melts and reserves.
2.- In a saucepan (you can use the same one that you used before to heat the milk) place the rest of the milk, the four egg yolks, the cornstarch, the sugar and a teaspoon of cinnamon powder to taste. Beat well with the hand rods until all the ingredients are well mixed and notice that there are no lumps.
3.- Bring the mixture to the fire to prepare the chocolate cream, which will fill our chocolate cake with cookies. Heat over low heat so that it does not stick and stir continuously with the rods. When it begins to warm, pour the mixture of milk and chocolate that you had reserved. Heat it while stirring until the cream thickens. This can take 10 minutes or more. When thick, remove from the heat without boiling.
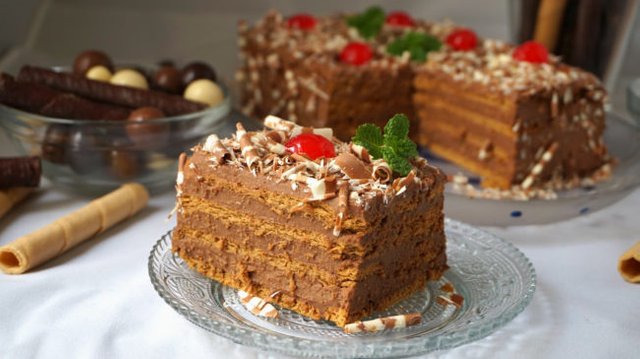
4.- Now is the time to assemble the chocolate chip cake. Although I used a lunch box, you can use a removable mold. If you want, you can cover it with kitchen film to unmold it better because it costs a little. Pour in a few tablespoons of chocolate cream covering the base completely. Dip the cookies one at a time or two in two into the milk and cover the chocolate cream with the cookies. Where a whole cookie does not fit, place a broken cookie, then you will not notice anything.

5.- Alternate layers of chocolate cream and cookies dipped in the milk (soaked, do not soak them because they melt, dip and remove). Make sure that the cream layer reaches the edges of the mold well and prepare them so that each layer has the same thickness. Finish with a layer of cookies without dipping because they will be the base of our cake.
- Cover the mold with a lid or with a kitchen film and leave it in the refrigerator for at least six hours (I leave it all night).
7.- Once the cake is cold, you can unmold it. Roll a knife around the edge to remove it from the mold. If your mold is removable, also pass the knife so that when opening it retains its shape. Turn the cake into a tray as if it were a pudding. Locate it well because then you can not move it, unless you put a baking paper on it to serve as a base. Smooth edges with knife.
- Cover with chocolate shavings the whole surface and sides of the cake and decorate with cherry halves and mint leaves. Your chocolate chip cookie will be ready for you to enjoy.
Versión en Español
Hoy vengo con tartas para celebraciones. Esta receta es muy fácil y, a la vista está, que su presentación se espectacular.
La tarta de galletas con chocolate es un clásico de los cumpleaños. A los pequeños les encanta y como es una tarta que no necesita horno, el resultado siempre sale bien. Puedes elaborarla dentro de un molde desmontable, o bien en un recipiente rectanguar como la fiambrera que he usado yo. La decoración, como siempre, es a tu gusto.
Ingredientes
Para 9 a 12 raciones
200 g de galletas cuadradas
700 ml de leche
4 yemas de huevo
50 g de azúcar
150 g de chocolate de cobertura para postres
1 cucharadita de canela en polvo
50 g de maizena
leche para mojar las galletas
virutas de chocolate
guindas
hojas de menta
Preparación de la receta
1.- Vierte en un cazo la mitad de la leche (350 ml aproximadamente) y llévala al fuego. Parte las onzas de chocolate y déjalas en un bol lo bastante grande para que quepa la leche. Cuando la leche esté caliente sin llegar a hervir, viértela sobre el chocolate. Remueve hasta que el chocolate se derrita y reserva.
2.- En un cazo (puedes usar el mismo que has usado antes para calentar la leche) coloca el resto de la leche, las cuatro yemas de los huevos, la maicena, el azúcar y una cucharadita de canela en polvo al gusto. Bate bien con las varillas manuales hasta que todos los ingredientes estén bien mezclados y notes que no hay grumos.
3.- Lleva la mezcla al fuego para preparar la crema de chocolate, que rellenará nuestra tarta de chocolate con galletas. Calienta a fuego medio bajo para que no se te pegue y remueve continuamente con las varillas. Cuando empiece a calentarse, vierte la mezcla de leche y chocolate que tenías reservada. Calienta sin dejar de remover hasta que la crema espese. Esto puede tardar de 10 minutos o más. Cuando espese retírala del fuego sin necesidad de que hierva.
4.- Ahora es el momento de montar la tarta de galletas con chocolate. Aunque he usado una fiambrera, puedes usar un molde desmontable. Si quieres, puedes forrarla con film de cocina para desmoldarla mejor porque cuesta un poquito. Vierte unas cucharadas de crema de chocolate cubriendo la base por completo. Moja las galletas de una en una o de dos en dos en la leche y cubre la crema de chocolate con las galletas. Donde no quepa una galleta entera, coloca una galleta partida, luego no se va a notar nada.
5.- Alterna capas de crema de chocolate y galletas mojadas en la leche (mojadas, no las pongas a remojo porque se deshacen, sumergir y sacar). Cuida de que la capa de crema llegue bien a los bordes del molde y alísalas para que cada capa tenga el mismo grosor. Termina con una capa de galletas sin mojar porque serán la base de nuestra tarta.
6.- Cubre el molde con una tapa o con un film de cocina y déjalo en la nevera por lo menos seis horas (yo lo dejo toda la noche).
7.- Una vez fría la tarta, la puedes desmoldar. Pasa un cuchillo por todo el borde para despegarlo del molde. Si tu molde es desmontable, pasa también el cuchillo para que al abrirlo conserve su forma. Voltea la tarta en una bandeja como si de un flan se tratara. Céntrala bien porque luego no la podrás mover, a no ser que coloques encima un papel de horno para que sirva de base. Alisa los bordes con el cuchillo.
8.- Cubre con virutas de chocolate toda la superficie y los laterales de la tarta y decora con mitades de guinda y unas hojitas de menta. Tu tarta de galletas con chocolate estará lista para disfrutarla.
Looks easy and delicious!