How to delete/hide all of your timeline posts on Facebook! [Mass unliker included]
How are you wonderful Steemians doing today?
I'm here again with something pretty simple and this may be one of my shortest posts yet, however I’ll still try to be as ‘straight to the point’ but also as thorough as I can possibly be with this topic. So we’ve all been on Facebook for years, we sign up at young ages due to the social hype surrounding our educational institutions or simply just because it makes interacting with other people locally ten times easier; the reasons are endless, but we can all admit when we signed up to Facebook we posted one or two things (or maybe hundreds, heh) that wasn’t very acceptable or simply put, ‘cringey’.
These views, whether they be political or just an unorthodox sense of humour, can come back to bite you in the future and impact you socially and professionally, should the human resources department of your employer/potential employer explore your previous tenure on Facebook (it’s honestly very easy to jump back to a specific year now).
How can we solve this? Well with the use of a very popular browser and a trusty add-on, we can get the issue of scrubbing our past posts on Facebook within a few minutes, or even a few hours, the process does depend on HOW MANY posts you have on your Facebook, e.g for me – this took roughly 4 hours due to the fact I had quite a lot of posts from 2009 ranging onward to 2018, so buckle up to keep your computer on for a generous amount of time when attempting this but you can always stop the process and come back to it later.
What you’ll need:
- The latest version of the Google Chrome web browser: https://www.google.com/chrome/
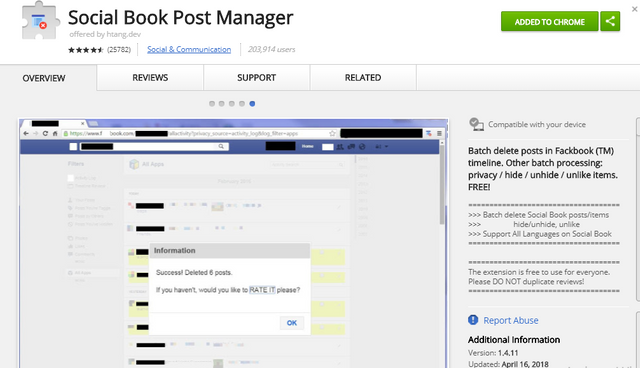
- The ‘Social Book Post Manager’ add-on for Google Chrome: https://chrome.google.com/webstore/detail/social-book-post-manager/ljfidlkcmdmmibngdfikhffffdmphjae
So there we have it, not a long list of software needed, I won’t be instructing you how to install Google Chrome as I’ll assume you already have it, if not the installation process is very simple and I’m sure the instructions will guide you through the installation with ease.
The nitty-gritty:
- Ensure you have downloaded and installed the Google Chrome web browser here: https://www.google.co.uk/chrome/
- Head to the installation link for ‘Social Book Post Manager’ – ensure you’re on your Google Chrome web browser before doing this. (https://chrome.google.com/webstore/detail/social-book-post-manager/ljfidlkcmdmmibngdfikhffffdmphjae)
- On the top right corner, select the button ‘Add to Chrome’ – close and open (restart) your Google Chrome web browser after doing so.
You should now have a blue icon that represents a Facebook timeline on the top right corner of your Google Chrome web browser.

Navigate to your Facebook timeline – then click ‘View Activity Log’ on the right side of your cover photo space.

Click the add-on icon as pictured above on the right side of your Chrome and you should be presented with the following menu – I’ll break it down below.
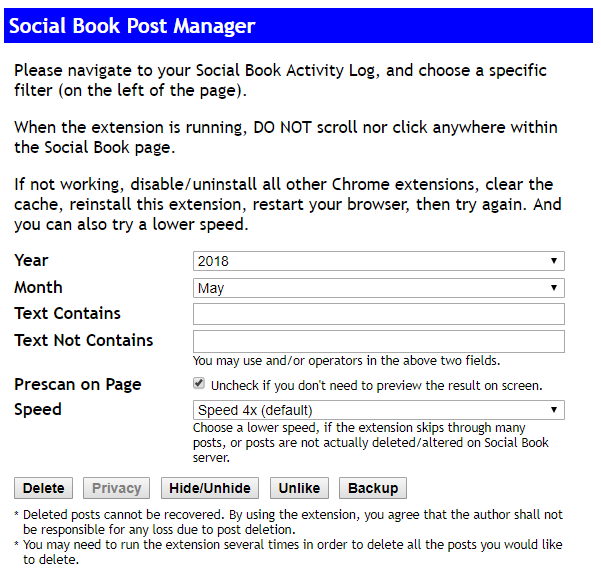
Breakdown
- Year – Select a specific year of posts you’d like to delete, click ‘Select All’ to delete posts ranging from ALL years.
Month - Click ‘Select All’ to delete all posts within a specific year, if you’d like to delete posts in a specific year and month, select a month along with a year. E.G – 2014:March
- Text Contains – Use this field to delete posts that SPECIFICALLY contain the keywords you’ll enter. E.G if you’d like to delete posts you made of your ex-girlfriend/boyfriend named ‘Crystal’ or ‘Steve’ you’d input either name into this field.
- Text Not Contains – Use this field to skip posts (not delete) that contain specific keywords. E.G – You had a post that blew up with hundreds of likes with the hashtag ‘#DonaldTrump’ input that in this field to avoid the post being deleted.
Prescan on Page – You can uncheck this box to speed up the process, however I feel this will give you poorer accuracy when it comes to deleting. I recommend you allow the add-on to pre-scan your page so you can review the results and proceed to delete them after.
- Speed – Speed 4x is the default and this can sometimes skip posts. The higher the speed, the quicker the process, the more posts that are likely to be skipped/not deleted. The lower the speed, the longer the process is, more accuracy and guarantee posts will be deleted without fail. I recommend higher speeds when you’re doing just one month (x4 – x8), lower speeds if doings full years or all your posts (2x).
Buttons
- Delete - Select this to DELETE posts by others on your timeline or posts you have made. THIS CANNOT BE UNDONE.
- Hide/Unhide – Select this to HIDE or UNHIDE posts that have been posted on your timeline by other people or posts you have manually hidden from your timeline in the past that you’d like back.
- Unlike – Use this to mass unlike content you have liked in the past by other people on your timeline or content you posted on your own timeline.
So now you understand how the add-on works, I’ll be working you through the process of just deleting posts on this tutorial. Now you’ll need to take a minute and think of a period of when you want your posts to be deleted or maybe posts you want to save that contain certain text that clash with the said period (e.g ‘Select All’). It’s important to do this as posts cannot be recovered, I can’t stress this enough to you, so please tread carefully as I would not like any of my readers to lose nostalgic memories (‘cringey’ or not)! You’ll also be asked to confirm deleting any posts before proceeding by the add-on itself.
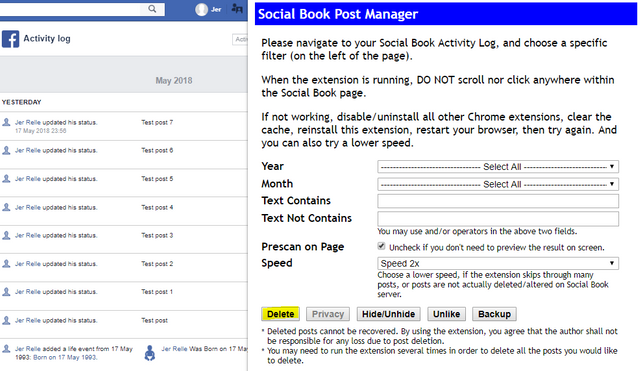
Your setting should be similar to above if you want to delete everything with maximum accuracy, if you wish to only delete posts from a certain period of time, go ahead and tweak them properly as noted above.
- You can now select the ‘delete’ option, a yellow bar should now appear at the top of your Facebook page with the text ‘Scanning’. This may take a while depending on how many posts you have, it can take anywhere from seconds to hours.

- After the scan is complete, you should now have another yellow bar appear and replace the ‘Scanning’ yellow bar with the text ‘Confirm to delete’ - go ahead and click that and proceed to click the ‘Confirm’ button, remember, once it’s done, it’s done forever.


- You’ll then get one final yellow bar which states ‘Processing’ while this is happening, you’ll want to not try and edit the add-ons settings, in fact, I recommend not touching the browser at all while it’s executing the macro, instead open up a new, separate browser window and use that instead to avoid issues.

- Once the whole process is done, you’ll be presented with a dialog giving you the statistic of the whole process along with marking it as a ‘success’. I do recommend you write a review if the software worked with ease for you, as this motivates developers, if you appreciate it enough, you can even buy the developer(s) a coffee!

There you have it, a very simple way to get rid of all the posts on your timeline and completely erase the years of unnecessary, potentially embarassing posts on your timeline. Hope you’ve enjoyed my piece, if you need any help or have any questions, drop a comment below and I’ll be sure to respond, thanks!
Social media:
- Twitter: https://twitter.com/LordJerrelle
- Youtube: https://www.youtube.com/user/xJerrelle
- Website: https://www.jerrellemckenzie.co.uk
I plan on releasing another cryptocurrency related article explaining the dangers of ICOs, how to participate in ICOs and how to research and analyse an ICO (initial-coin offering) for those who are new to cryptocurrency or just ICOs itself sometime this week. See you soon!
Nice guide
Thanks! Appreciated.
Just something simple to help out people when they need it. :)
You got a 2.75% upvote from @upmewhale courtesy of @jerrellemckenzie!
Earn 100% earning payout by delegating SP to @upmewhale. Visit http://www.upmewhale.com for details!
Do one for deleting all messages from the inbox.
Will look into that, thanks for the idea!