Exercises Tips At-Home
Life can get busy, and oftentimes we find ourselves traveling or otherwise unable to get to our preferred health and fitness facility for a workout. ACE Certified Professional Ted Vickey offers these 25 moves to help you stay on track, no matter where you find yourself. Using only your own body weight, these versatile moves can help you create a total-body workout that fits your needs and abilities.
Back Exercises
Supermans
BODY PART:
Back, Butt/Hips, Shoulders
Step 1
Starting Position: Lie prone (on your stomach) on a mat with your legs extended, ankles slightly plantarflexed (toes pointing away from your shins), arms extended overhead with palms facing each other. Relax your head to align it with your spine.
Step 2
Upward Phase: Exhale, contract your abdominal and core muscles to stabilize your spine and slowly extend both hips (raise both legs) a few inches off the floor while simultaneously raising both arms a few inches off the floor. Keep both legs and arms extended and avoiding any rotation in each. Maintain your head and torso position, avoiding any arching in your back or raising of your head. Hold this position briefly.
Step 3
Downward Phase: Gently inhale and lower your legs and arms back towards your starting position without any movement in your low back or hips.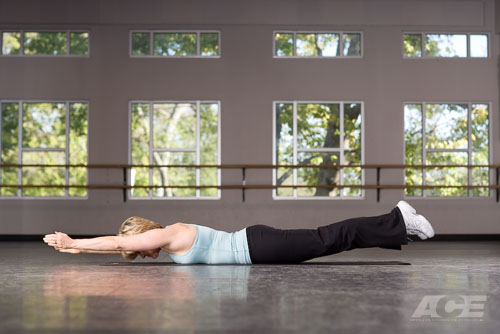
Arm Exercises
Push-up
BODY PART:
Arms, Chest, Shoulders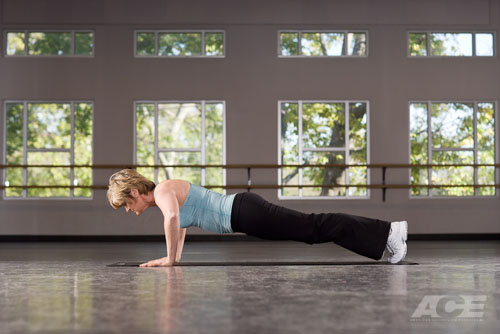
Step 1
Starting Position: Kneel on an exercise mat or floor and bring your feet together behind you.
Step 2
Slowly bend forward to place your palms flat on the mat, positioning your hands shoulder-width apart with your fingers facing forward or turned slightly inward. Slowly shift your weight forward until your shoulders are positioned directly over your hands. Reposition your hands as needed to allow full extension of your body without any bend at the hips or knees. Stiffen your torso by contracting your core/abdominal muscles ("bracing"), your glute and quadriceps muscles and align your head with your spine. Place your feet together with your ankles dorsiflexed (toes pointed towards your shins).
Step 3
Downward Phase: Slowly lower your body towards the floor while maintaining a rigid torso and head aligned with your spine. Do not allow your low back to sag or your hips to hike upwards during this downward phase. Continue to lower yourself until your chest or chin touch the mat/floor. Allow your elbows to flare outwards during the lowering phase.
Step 4
Upward Phase: Press upwards through your arms while maintaining a rigid torso and head aligned with your spine. For extra strength think about pushing the floor away from you. Do not allow your low back to sag or your hips to hike upwards. Continue pressing until the arms are fully extended at the elbows.
Step 5
An alternative position is to turn your hands to face forwards and keep your your elbows close to your sides during the downward phase. This shifts the emphasis from the chest muscles onto the triceps and may reduce stresses in the shoulder joint.
Pushing through the heel and outside surface of your palm provides greater force in your press and stability to your shoulders.
https://d5kh2btv85w9n.cloudfront.net/0/00/Do%20a%20Push%20Up%20Step%202%20Version%205.360p.mp4
next coming soon