PART 2: Run YOUR OWN Ethereum node | "Create your own Ethereum Blockchain" series
Hey there!

In this tutorial we will learn how to create your first Ethereum node from scratch, run it and interact with it.
In order to create a node you need ONE thing: a genesis file. A genesis file is a file specifying informations about how to create the first block of your blockchain.
Since a blockchain is nothing more than a long chain of blocks and that each block is built upon information contained in the previous block, the first block is truly important. It can allocate pre-ICO (Initial Coin Offering) coins and even specify the type of consensus that will be used in the blockchain.
A genesis file needs to be in a JSON format and is highly customisable. I will provide you a standard format compatible up to and included the version 1.6 of Ethereum. So when the 1.7th will be released it is wise to check if the genesis file does not require more specifications.
Here is your genesis file:
{
  "nonce": "0x0000000000000042",
  "difficulty": "0x40",
  "mixhash": "0x0000000000000000000000000000000000000000000000000000000000000000",
  "coinbase": "0x0000000000000000000000000000000000000000",
  "timestamp": "0x00",
  "parentHash": "0x0000000000000000000000000000000000000000000000000000000000000000",
  "gasLimit": "0xffffffffffffff",
  "alloc": {},
  "config": {}
}
I recommend using a text editor like Atom
Create a genesis.json file and paste the contents above in that file. (don't forget to save the file)
Now create a folder where you will want your blockchain to live and drag & drop your genesis.json file in there.
Then open your terminal and navigate to the content of the folder like shown in the video.
Creating your genesis block
If you have geth installed (you can check it with "geth help" or "which geth") you can type:
geth --datadir node init genesis.json
- --datadir: specifies where your blockchain will live, where you blockchain will physicially exist.
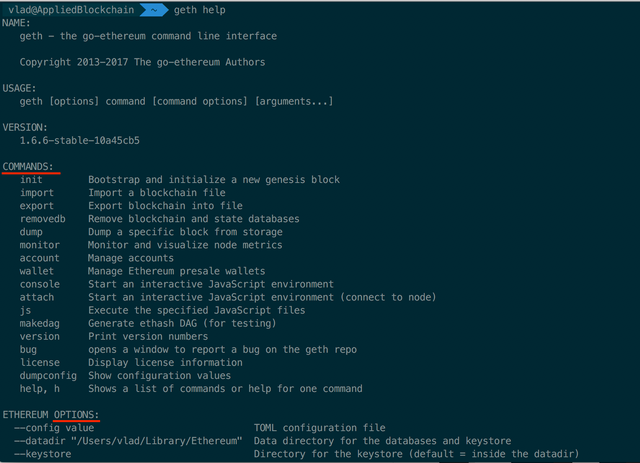
- init: don't use the -- before init init is a command while datadir is an option. An option requires the --. You can see the difference by typing "geth help" in the terminal:

Running your node
In order to run the node you need to enter:
geth --datadir node --networkid 300 console
- networkid: The networkid option will specify the networkid that your node will use. This is important because if you want to connect two nodes together they need to have the same genesis file (if not they will have a different chain) and the sit on the same network. By default, if you omit the networkid option, your networkid will be 1 and since it is the main network used by Ethereum we want to avoid that.
- console: Console logs you in the interactive javascript console. When you will write something you will write it inside your blockchain and directly communicate with your Ethereum node. You are not in a normal terminal there!
NB: Using the same networkid but with a different genesis.json file will not collide with the official Ethereum network but it is a bad practice anyway.
Play with your blockchain
If you type web3:

You will see a lot of stuff popping. If you know javascript this should be very familiar. Basically everything lives inside the web3 object.
It contains variables, functions and other objects [which contain variables and functions] (eth, miner, admin...).
Now try to create 3 accounts with the personal object and check them with the eth object.
You can either type eth/personal to access them or type web3.eth/web3.personal
If you are blocked check the video.
Good luck!
Really enjoying these tutorials! Keep it up :). The Ethereum space needs more developers spreading knowledge like this.
Thanks for providing the info! Following and upvoted! @sergej.stein
Great series of tutorials, I have bookmarked them. Easy to follow along! Cheers!
Extremly useful and an easy to follow guide, can't wait for more where this came from!
When I started learning Redux I found this article https://code-cartoons.com/a-cartoon-intro-to-redux-3afb775501a6 where all was explained with drawings, since picture is 1000 words :) I belive you have all this quite clear in your head and would like to ask you if you can create something like that with pictures for us to understand all clear connections between nodes, networks, blockchains etc. Thank you for great job ;)